If you intend to use the various Qlik script snippets included in the GithHub repository, you first need to initialize things.
Initializing Butler in an app’s load script is easy, just call the ButlerInit function.
Note: It’s usually a good idea to create a shared data connection for scripts that are available to all Sense apps.
In the example below this shared data connection is simply called “Butler scripts”:
1 - Swagger UI: Try out the Butler API using the API docs
Assuming Butler is properly configured and running, it’s easy to try out Butler’s API.
This page shows some examples of interactions with the Butler API.
Below are some examples of how Butler’s built-in Swagger docs can be used to test-drive the Butler API.
Note: Some of the videos below were created with older Butler versions.
Details may have changed (for example what API parameters are available), the general concepts remain the same though.
OpenAPI documentation built into Butler
The complete documentation for Butler’s REST API is built into Butler itself.
This means that its very easy to try out and get familiar with the various API endpoints, without having to create Sense apps for everything you want to try out.
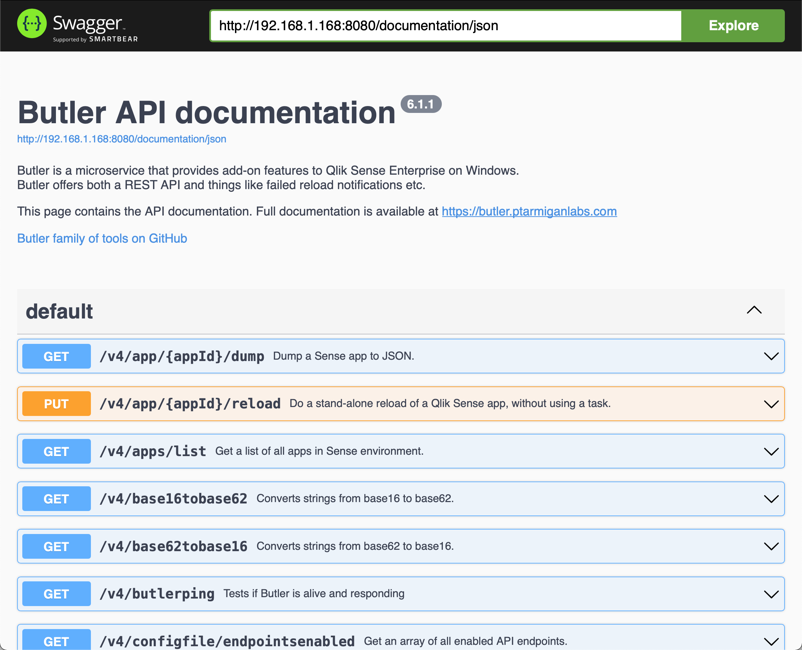
If Butler’s config file contains the settings below, the API will be available at http://192.168.1.168:8080.
In addition to the API endpoints, the API documentation will be available at http://192.168.1.168:8080/documentation.
The beauty of the Swagger docs is that you can also test drive the API itself. If you have Butler running it’s thus super easy to test the various REST API endpoints.
The API doc page looks like this:
Other tools for exploring APIs
If the OpenAPI interface to Butler’s API feels limited, there are lots of tools dedicated to this task.
Two good ones are:
Paw is Mac only, costs a bit of money, but is very, very good. Highly recommended.
Create, query, edit and delete task reload schedules using Butler’s scheduling API.
When wathcing the video below, you will notice there are two pre-defined schedules.
One of them fires every 30 seconds and this is also visible in the Butler logs:
List available Sense apps and extract them as JSON
List existing apps on Sense server, then export one of them to JSON.
2 - Flexible scheduling of Sense reload tasks
Examples showing how to use the Butler scheduler using direct API calls.
There are many ways to call REST APIs. In this page curl is used, but the same tests can be done using Paw, Postman and by using the REST connector from within Qlik Sense load scripts.
All the examples assume Butler is exposing it’s API on 192.168.1.168:8080.
List all defined schedules
Looks like there is currently one schedule:
➜ ~ curl "http://192.168.1.168:8080/v4/schedules"| json_pp
% Total % Received % Xferd Average Speed Time Time Time Current
Dload Upload Total Spent Left Speed
10030610030600164980 --:--:-- --:--:-- --:--:-- 20400[{"created" : "2021-10-08T07:24:38.373Z",
"cronSchedule" : "* */2 * * *",
"id" : "3702cec1-b6c8-463e-bda3-58d6a94dd9ac",
"lastKnownState" : "started",
"name" : "Every 2 hours",
"qlikSenseTaskId" : "0fe447a9-ba1f-44a9-ac23-68c3a1d88d8b",
"startupState" : "started",
"tags" : ["tag 3",
"abc 123 åäö"],
"timezone" : "Europe/London"}]➜ ~
Get a specific schedule
Let’s try to get a schedule that doesn’t exist:
➜ ~ curl "http://192.168.1.168:8080/v4/schedules?id=Manually-added-schedule-1"| json_pp
% Total % Received % Xferd Average Speed Time Time Time Current
Dload Upload Total Spent Left Speed
10011710011700145630 --:--:-- --:--:-- --:--:-- 29250{"error" : "Bad Request",
"message" : "REST SCHEDULER: Schedule ID Manually-added-schedule-1 not found.",
"statusCode" : 400}➜ ~
Here’s a schedule that does exist (as per the API call above):
➜ ~ curl "http://192.168.1.168:8080/v4/schedules?id=3702cec1-b6c8-463e-bda3-58d6a94dd9ac"| json_pp
% Total % Received % Xferd Average Speed Time Time Time Current
Dload Upload Total Spent Left Speed
10035410035400504990 --:--:-- --:--:-- --:--:-- 115k
{"created" : "2021-10-08T07:24:38.373Z",
"cronSchedule" : "* */2 * * *",
"id" : "3702cec1-b6c8-463e-bda3-58d6a94dd9ac",
"lastKnownState" : "started",
"name" : "Every 2 hours",
"qlikSenseTaskId" : "0fe447a9-ba1f-44a9-ac23-68c3a1d88d8b",
"startupState" : "started",
"tags" : ["tag 3",
"abc 123 åäö"],
"timezone" : "Europe/London"}➜ ~
Add new schedule
Note how we get back information about the newly created schedule. It’s the same data that was sent to the API method, with the addition of schedule id, created timestamp and last known state.
Looking in the Butler logs we see that the every-5-seconds schedule with an ID ending in …a300 indeed fires every 5 seconds:
Starting and stopping a schedule
Let’s stop the schedule we just created:
➜ ~ curl -X "PUT""http://192.168.1.168:8080/v4/schedules/b028d0a2-7116-41bf-b15a-4f01bd126464/stop"| json_pp
% Total % Received % Xferd Average Speed Time Time Time Current
Dload Upload Total Spent Left Speed
10021002002460 --:--:-- --:--:-- --:--:-- 500{}➜ ~
If we get info about this schedule, it should have lastKnownState=stopped… Let’s verify.
➜ ~ curl "http://192.168.1.168:8080/v4/schedules?id=fb9b16f1-e2cf-4291-8036-24ef90efa300"| json_pp
% Total % Received % Xferd Average Speed Time Time Time Current
Dload Upload Total Spent Left Speed
10030710030700 99k 0 --:--:-- --:--:-- --:--:-- 99k
{"created" : "2020-10-16T15:23:36.957Z",
"cronSchedule" : "*/5 * * * * *",
"id" : "fb9b16f1-e2cf-4291-8036-24ef90efa300",
"lastKnownState" : "stopped",
"name" : "Every 5 sec",
"qlikSenseTaskId" : "0fe447a9-ba1f-44a9-ac23-68c3a1d88d8b",
"startupState" : "started",
"tags" : ["tag 1",
"abc 123 åäö"],
"timezone" : "Europe/Stockholm"}➜ ~
Great!
As a final step, let’s start the schedule again, as well as verifying it was successfully started:
➜ ~ curl -X "PUT""http://192.168.1.168:8080/v4/schedules/fb9b16f1-e2cf-4291-8036-24ef90efa300/start"| json_pp
% Total % Received % Xferd Average Speed Time Time Time Current
Dload Upload Total Spent Left Speed
10030910030900772500 --:--:-- --:--:-- --:--:-- 77250[{"created" : "2020-10-16T15:23:36.957Z",
"cronSchedule" : "*/5 * * * * *",
"id" : "fb9b16f1-e2cf-4291-8036-24ef90efa300",
"lastKnownState" : "started",
"name" : "Every 5 sec",
"qlikSenseTaskId" : "0fe447a9-ba1f-44a9-ac23-68c3a1d88d8b",
"startupState" : "started",
"tags" : ["tag 1",
"abc 123 åäö"],
"timezone" : "Europe/Stockholm"}]➜ ~ curl "http://192.168.1.168:8080/v4/schedules?id=fb9b16f1-e2cf-4291-8036-24ef90efa300"| json_pp
% Total % Received % Xferd Average Speed Time Time Time Current
Dload Upload Total Spent Left Speed
10030710030700 149k 0 --:--:-- --:--:-- --:--:-- 149k
{"created" : "2020-10-16T15:23:36.957Z",
"cronSchedule" : "*/5 * * * * *",
"id" : "fb9b16f1-e2cf-4291-8036-24ef90efa300",
"lastKnownState" : "started",
"name" : "Every 5 sec",
"qlikSenseTaskId" : "0fe447a9-ba1f-44a9-ac23-68c3a1d88d8b",
"startupState" : "started",
"tags" : ["tag 1",
"abc 123 åäö"],
"timezone" : "Europe/Stockholm"}➜ ~
All good!
3 - Reload task chaining with parameters
Examples showing how to use Butler’s key-value store to pass parameters between apps in a reload chain, using calls to Butler’s API.
Reload chaining with parameters à la Butler
First: Some people argue that apps in an ETL chain should be atomic and not pass parameters to each other.
There is certainly some merit to this view, but there are also cases where you just have to tell the following app(s) what happened in a previous step in the reload chain. Some kind of parameter passing is thus needed.
Passing parameters between apps in a QMC reload chain can be done in various ways.
The most common option is to use what’s available in Sense out of the box:
Store the parameters in a disk file (CSV, QVD etc) in the first app, then load the parameters back into the second app when it is reloading.
Butler offers a different approach: Store and manipulate named key-value pairs within Butler, using its REST API.
It works like this:
Pretty easy, right?
One more thing. There is an optional but useful property for each KV pair: TTL, or time-to-live.
If a ttl is set (in milliseconds) for a KV pair, it will be automatically deleted when the ttl clock expire. This is an easy way to keep the Butler key-value store nice and tidy.
Data connections not included
In order to call Butler’s REST API you need a couple of REST data connections defined in Qlik Sense. The apps described in this example assumes Butler_Get and Butler_POST exists. They look like this:
Butler_GET
This data connection is trivial. When creating it any REST API that responds to GET requests can be used. Later on (before the calls to the Butler API) the URL will be replaced with the correct one = host:port where Butler is running.
Butler_POST
This data connection is a bit more complex.
First, in order to create the connection you need a REST endpoint that takes a POST with data passed in the body of the message. The data connection used by the apps in this example are found below. Note the http method, the request body and the Content-Type Query header. Any other settings can be ignored.
Secondly, Qlik Sense’s REST connector only supports GET and POST methods over http. That’s fine in this particular case, because we’ll use a POST to create a new key-value pair. On a generel levels it’s however really quite bad that Qlik’s REST connector only supports GET and POST: PUT, DELETE and other http methods are certainly also used out there on the Internet, and should be supported too.
Some of the Butler API endpoints use PUT or DELETE methods, which is nothing strange at all - rather the opposite. Butler tries to follow best practices when it comes to using GET, POST, PUT and DELETE at the appropriate times.
We still need a way to invoke PUT and DELETE endpoints from Sense load script.
This is done in the script, by adding an extra http header in the call to Butler’s API: X-HTTP-Method-Override
If X-HTTP-Method-Override is set to PUT in the call to Butler’s API, the Butler will convert the call to a PUT call before it reaches the message dispatching within Butler. Same thing for DELETEs.
Parameter passing in action
The scenario is as follows:
App 1 needs to pass a parameter called “Paramater 1” to App 2
App 2 is scheduled to reload either directly or in some later stage after App 1.
App 1 stores the parameter in Butler’s key-value store during reload of App 1.
When App 2 reloads it pulls the parameter from the KV store.
When App 1 reloads the reload window looks like this. Note how the app has created a key-value pair within Butler.
App 2 is scheduled to reload when App 1 has finished reloading. Note that we get back the same value that was set by App 1. Mission accomplished.
Qlik script for passing parameters between apps
Let’s take a closer look at the two apps. The apps are available in the sense_apps directory of the Butler repository on GitHub.
The apps are called Butler 4.0 - Reload chain parameters, app 1.qvf and Butler 4.0 - Reload chain parameters, app 2.qvf.
App 1
The app has three script sections, each is shown below.
Script section 1: Init
The interesting parts here are the two variables towards the end. These tell the rest of the script where Butler is running.
SET ThousandSep=',';
SET DecimalSep='.';
SET MoneyThousandSep=',';
SET MoneyDecimalSep='.';
SET MoneyFormat='$#,##0.00;-$#,##0.00';
SET TimeFormat='h:mm:ss TT';
SET DateFormat='M/D/YYYY';
SET TimestampFormat='M/D/YYYY h:mm:ss[.fff] TT';
SET FirstWeekDay=6;
SET BrokenWeeks=1;
SET ReferenceDay=0;
SET FirstMonthOfYear=1;
SET CollationLocale='en-US';
SET CreateSearchIndexOnReload=1;
SET MonthNames='Jan;Feb;Mar;Apr;May;Jun;Jul;Aug;Sep;Oct;Nov;Dec';
SET LongMonthNames='January;February;March;April;May;June;July;August;September;October;November;December';
SET DayNames='Mon;Tue;Wed;Thu;Fri;Sat;Sun';
SET LongDayNames='Monday;Tuesday;Wednesday;Thursday;Friday;Saturday;Sunday';
SET NumericalAbbreviation='3:k;6:M;9:G;12:T;15:P;18:E;21:Z;24:Y;-3:m;-6:μ;-9:n;-12:p;-15:f;-18:a;-21:z;-24:y';


// The Butler instance is running at this IP/port:
let vButlerHost = '192.168.1.168';
let vButlerPort = '8080';
Script section 2: Sub definitions
Here we define two subs: One to get a bit more friendly looking trace messages, and one that encapsulates the code needed to store key-value pairs in Butler.
// ------------------------------------------------------------
// ** Time stamped trace messages **
//
// Get nice trace lines in the reload log by calling the line with
// CALL NiceTrace('My trace message. Variable value=$(vVariableName)');
//
// Paramaters:
// vMsg                  : Message sent to reload log
// ------------------------------------------------------------
sub NiceTrace(vMsg)
    let vNow = Now(1);
    TRACE >>> $(vNow): $(vMsg);

    // Clear timestamp variable
    set vNow=;
end sub


// ------------------------------------------------------------
// ** Add key-value pair to a namespace **
//
// Paramaters:
// vNamespace            : Namespace in which the KV pair will be stored
// vKey                  : Key name
// vValue                : Value to store together with key
// vTimeToLive           : How long should the KV pair exist before being automatically deleted?
//                         Set to 0 to disable TTL feature (=no auto-delete of KV pair)
// ------------------------------------------------------------
sub AddKeyValue(vNamespace, vKey, vValue, vTimeToLive)
    LIB CONNECT TO 'Butler_POST';

    if (vTimeToLive>0) then
        let vRequestBody = '{"key": "$(vKey)", "value": "$(vValue)", "ttl": "$(vTimeToLive)"}';
    else
        let vRequestBody = '{"key": "$(vKey)", "value": "$(vValue)"}';
    end if

    // Escape " in request body
    let vRequestBody = replace(vRequestBody,'"', chr(34)&chr(34));

    RestConnectorMasterTable:
    SQL SELECT
        "namespace",
        "key",
        "value",
        "ttl"
    FROM JSON (wrap on) "root"
    WITH CONNECTION (
    Url "http://$(vButlerHost):$(vButlerPort)/v4/keyvalues/$(vNamespace)",
    BODY "$(vRequestBody)",
    HTTPHEADER "Content-Type" "application/json"
    );

    DROP TABLE RestConnectorMasterTable;
end sub
Script section 3: Write parameters to KV store
Finally, the code needed to actually store the parameter in Butler is just a few lines:
Set host and port where Butler is running. Exactly the same script as in App 1.
SET ThousandSep=',';
SET DecimalSep='.';
SET MoneyThousandSep=',';
SET MoneyDecimalSep='.';
SET MoneyFormat='$#,##0.00;-$#,##0.00';
SET TimeFormat='h:mm:ss TT';
SET DateFormat='M/D/YYYY';
SET TimestampFormat='M/D/YYYY h:mm:ss[.fff] TT';
SET FirstWeekDay=6;
SET BrokenWeeks=1;
SET ReferenceDay=0;
SET FirstMonthOfYear=1;
SET CollationLocale='en-US';
SET CreateSearchIndexOnReload=1;
SET MonthNames='Jan;Feb;Mar;Apr;May;Jun;Jul;Aug;Sep;Oct;Nov;Dec';
SET LongMonthNames='January;February;March;April;May;June;July;August;September;October;November;December';
SET DayNames='Mon;Tue;Wed;Thu;Fri;Sat;Sun';
SET LongDayNames='Monday;Tuesday;Wednesday;Thursday;Friday;Saturday;Sunday';
SET NumericalAbbreviation='3:k;6:M;9:G;12:T;15:P;18:E;21:Z;24:Y;-3:m;-6:μ;-9:n;-12:p;-15:f;-18:a;-21:z;-24:y';


// The Butler instance is running at this IP/port:
let vButlerHost = '192.168.1.168';
let vButlerPort = '8080';
Script section 2: Sub definitions
Here we define a NiceTrace sub, and a sub for retrieving key-value pairs from Butler.
// ------------------------------------------------------------
// ** Time stamped trace messages **
//
// Get nice trace lines in the reload log by calling the line with
// CALL NiceTrace('My trace message. Variable value=$(vVariableName)');
//
// Paramaters:
// vMsg                  : Message sent to reload log
// ------------------------------------------------------------
sub NiceTrace(vMsg)
    let vNow = Now(1);
    TRACE >>> $(vNow): $(vMsg);

    // Clear timestamp variable
    set vNow=;
end sub


// ------------------------------------------------------------
// ** Get key-value pair from a namespace **
//
// Paramaters:
// vNamespace            : Namespace in which the KV pair will be stored
// vKey                  : Key name
// vResultVarName        : Name of variable in wich value will be placed
// ------------------------------------------------------------
sub GetKeyValue(vNamespace, vKey, vResultVarName)
    LIB CONNECT TO 'Butler_GET';

    RestConnectorMasterTable:
    SQL SELECT
        "key",
        "value"
    FROM JSON (wrap on) "root"
    WITH CONNECTION (
    Url "http://$(vButlerHost):$(vButlerPort)/v4/keyvalues/$(vNamespace)?key=$(vKey)"
    );

    let $(vResultVarName) = Peek('value', 0, 'RestConnectorMasterTable');
    set vResultVarName=;

    DROP TABLE RestConnectorMasterTable;
end sub
Script section 3: Read parameter from KV store
Again, the code needed to interact with the key-value API is pretty compact:
// Define variable to store the retrieved parameter in
let vParam1='';

Call NiceTrace('---------------------------')
Call NiceTrace('Loading parameter from Butler key-value store.')
Call GetKeyValue('Reload chain parameter demo', 'Parameter 1', 'vParam1')

Call NiceTrace('Retrieved parameter value:')
Call NiceTrace('Namespace="Reload chain parameter demo", Key="Parameter 1", Value="$(vParam1)"')
set vParam1=;
4 - Monitoring Butler's memory usage using Grafana
Butler can be configured to store its own memory usage in InfluxDB.
Here we look at how this works and how Grafana real-time charts can be created.
Butler can optionally store uptime information (Butler version number and memory usage) in InfluxDB or New Relic.
InfluxDB is a database for time-series data such as measurements, while New Relic is an enterprise grade, SaaS observability solution.
Once in InfluxDB it’s easy to create nice monitoring charts in Grafana or similar tools.
New Relic has their own built-in dashboard tool (but Grafana can actually load data from New Relic too!).
But hey - why spend CPU cycles and disk space on this?
Well, if you are serious about your Qlik Sense Enterprise environment, you should also be serious about your supporting tools and microservices, Butler included.
Even though Butler over the years has proven to be a very stable piece of software, there is always the risk of new features misbehaving or new bugs appearing.
It’s thus a good idea to monitor for example how much memory (RAM) tools like Butler use over time and alert if things go wrong.
Enable Butler’s uptime monitor
Both he uptime monitor and the logging to desired destination (InfluxDB or New Relic) must be enabled. Note that there are two settings for this. If your InfluxDB uses authentication you’ll need to enable this too in Butler’s config file.
If you use New Relic to monitor your uptime metrics you must first define the New Relic API credentials in the Butler config file’s Butler.thirdPartyToolsCredentials.newRelic settings, then configure the uptime monitoring specifics in Butler.uptimeMonitor.storeNewRelic.
The uptime monitoring part of the config file could looks like this:
# Uptime monitoruptimeMonitor:enable:false# Should uptime messages be written to the console and log files?frequency:every 15 minutes # https://bunkat.github.io/later/parsers.htmllogLevel:verbose # Starting at what log level should uptime messages be shown?storeInInfluxdb:enable:false# Should Butler memory usage be logged to InfluxDB?storeNewRelic:enable:falsedestinationAccount:- First NR account- Second NR account# There are different URLs depending on whther you have an EU or US region New Relic account.# The available URLs are listed here: https://docs.newrelic.com/docs/accounts/accounts-billing/account-setup/choose-your-data-center/# As of this writing the options for the New Relic metrics API are# https://insights-collector.eu01.nr-data.net/metric/v1# https://metric-api.newrelic.com/metric/v1 url:https://insights-collector.eu01.nr-data.net/metric/v1 # Where should uptime data be sent?header:# Custom http headers- name:X-My-Headervalue:Header valuemetric:dynamic:butlerMemoryUsage:enable:true# Should Butler's memory/RAM usage be sent to New Relic?butlerUptime:enable:true# Should Butler's uptime (how long since it was started) be sent to New Relic?attribute:static:# Static attributes/dimensions to attach to the data sent to New Relic.- name:metricTypevalue:butler-uptime- name:servicevalue:butler- name:environmentvalue:proddynamic:butlerVersion:enable:true# Should the Butler version be included in the data sent to New Relic?
Creating a InfluxDB database
When starting Butler for the first time and InfluxDB is enabled, it will connect to InfluxDB and if needed create a new database with a name controlled by the Butler.influxDb.dbName setting in the Butler config file.
A retention policy with its name controlled by the Butler.influxDb.retentionPolicy.name setting in the Butler config file will also be created:
Note that the only thing needed is a running InfluxDB instance. Butler creates the database in InfluxDB if needed, together with a retention policy that is defined in the Butler config file.
Hey data, are you there?
So far so good. Let’s wait a few minutes and then verify that New Relic and/or InfluxDB has received a few dataspoints.
The interval between the uptime messages is controlled by the Butler.uptimeMonitor.frequency setting in the Butler config file.
Using the InfluxDB command line client to connect to InfluxDB we can do a manual query:
Indeed, there are a few data points in InfluxDB. Butler’s uptime monitor seems to be working.
Butler + InfluxDB + Grafana = 🎉📈
Grafana has excellent support for InfluxDB, it’s therefore a good way to visualise Butler memory use over time.
To use the Grafana dashboard included in the Butler GitHub repository you first need to create a Grafana data source named Butler ops metrics, and point it to the InfluxDB database in which Butler stores its data.
Once the Grafana data source is in place and working you can import the Grafana dashboard file Butler operational metrics.json (available in the docs/grafana folder in the GitHub repo).
If everything works you’ll see something like this:
Looks like Butler is using ca 70 MByte here. This is pretty normal, memory usage is usually around 100 MByte, even when Butler has been running for days, weeks and months. Exact memory usage will vary depending on which features are enabled.
Butler’s version number is also included in the data sent to InfluxDB.
This means that you can easily create a Grafana dashboard showing which Butler version is running on which server.
If you have multiple Butler instances running in your environment, this can be very useful.
Butler + New Relic = 😎🌟
While InfluxDB combined with Grafana is hard to beat when it comes to flexibility and look’n’feel of the dashboards, New Relic is outstanding when it comes to ease of setup.
New Relic is a SaaS product which means you don’t have to host neither databaes nor dashboard tool yourself.
It’s all there within New Relic.
What about cost? Is New Relic expensive?
Well, if you have lots of metrics, log files etc New Relic can become quite expensive as they charge you based on how much data you send to New Relic.
But given that Butler will send very little data you are unlikely to ever reach the limit of New Relic’s free tier.
There is thus a good chance you won’t even have to pay for New Relic if you only use it to monitor Butler.
A New Relic chart showing Butler memory usage can look like this:
Similarly to the Grafana dashboard, Butler’s version number is also included in the data sent to New Relic, and can be used to create a chart showing which Butler version is running on which server:
5 - Start Sense tasks using Butler APIs
5.1 - Start Sense tasks using REST API
Use Butler’s REST API to start Sense tasks
If the Butler config file is properly set up it’s possible to start Sense tasks by doing a PUT or POST call to /v4/reloadtask/{taskId}/start endpoint.
A great use case is to have upstream systems that feed Qlik Sense with data trigger a Sense task when new data is available.
That way Sense doesn’t have to poll for new data, with less system resources used in both upstream system and in Sense.
AND users get the new data as quickly as possible!
General principles
The API docs contain the best info for how the API works, a few things to keep in mind though:
Butler will verify that all specified task IDs exist before trying to start them. Invalid task IDs will be reported in the http response.
If the allTaskIdsMustExist URL parameter is set to true it means that all specified task IDs must be valid for any of them to be started.
Tasks associated with tags and custom properties are not affected by the allTaskIdsMustExist flag.
Requirements
These config file settings must be set up before Butler can use the REST API to start tasks:
Configure Butler’s REST server:
Butler.restServerConfig.enable: true
Butler.restServerConfig.serverHost: <IP or hostname where Butler’s REST server is running>
Two tasks, specified in the request body, were started.
Start multiple tasks using task IDs, all task IDs must exist, task filtering ON
Here two task IDs are valid and on the list of approved task IDs. One task ID is invalid (too short).
As allTaskIdsMustExist=true we expect that no task is started (all task IDs must exist for any task to be started based on task ID!).
Task filtering is turned on in the config file’s Butler.startTaskFilter.enable entry.
One invalid (too short!) task is returned in the response.
As there was one or more invalid task IDs, the two valid and approved task IDs were not started.
Their task IDs are returned in the denied array in the response.
Start multiple tasks using task IDs, all task IDs must exist, task filtering OFF
Here two task IDs are valid and on the list of approved task IDs. One task ID is invalid (too short).
As allTaskIdsMustExist=true we expect that no task is started (all task IDs must exist for any task to be started based on task ID!).
Task filtering is turned off in the config file’s Butler.startTaskFilter.enable entry.
The response and its message is the same as in the previous example:
No tasks were started based on task IDs.
One invalid (too short!) task is returned in the response.
As there was one or more invalid task IDs, the two valid and approved task IDs were not started.
Their task IDs are returned in the denied array in the response.
Start multiple tasks using task IDs, task filtering ON
Two task IDs are valid and on the list of approved task IDs.
One task ID is valid but not on list of approved task IDs.
One task ID is invalid (too short).
Task filtering is turned on in the config file’s Butler.startTaskFilter.enable entry.
As the task “Reload task of App2” had both values set for the custom property, this task was started twice.
Sending parameters to apps
Sometimes there is a need to send parameters from outside of Sense to an app that should be reloaded.
This is supported by Butler as follows:
Start a task and pass in one or more key-value pairs (=the parameters that should be sent to the app(s)) in the body of the call.
Have the app being reloaded read the key-value pairs from within the load script, using the Butler APIs.
Optional: Clear up (delete KV pairs or the namespace used) the key-value store when done.
Here a single task, identified by its ID in the URL, is started.
Two key-value pairs are passed along as parameters to the app. One has a TimeToLive of 10 seconds, the other has no TTL (=it will not be automatically deleted).
Task filtering is off, i.e. any task can be started using this API.
5.2 - Start Sense tasks from load script of Sense apps
Helper functions included
It is very much possible to call Butler’s REST API from the load script of Sense apps.
Create a REST connector in the Sense editor, configure it for the endpoint you want to call and use it from the load script.
This works but is tedious and quickly leads to lots of script code - especially if you need to make many calls to the Butler API.
To make things a bit easier the Butler GitHub repository includes a set of helper .qvs files.
These contain functions/subs that encapsulate various Butler APIs (include starting tasks) and make them easier to use.
Just include the butler_subs.qvs file from the GitHub release package and you get (among many other things) a helper function that’s called StartTask.
Requirements for starting tasks via REST API
These config file settings must be set up before Butler can use the REST API to start tasks:
Connection to Qlik Sense:
Butler.configQRS.*
Configure Butler’s REST server:
Butler.restServerConfig.enable: true
Butler.restServerConfig.serverHost: <IP or hostname where Butler’s REST server is running>
Sense data connections as described in the Getting started section.
Helper functions
There are two helper functions/sub for starting tasks:
StartTask(...) is a generic function that can be called with a single task ID, or with complex combinations of task IDs, tags, custom properties and key-value pairs.
StartTask_KeyValue(...) makes it easy to start a single task and pass along one key-value pair as parameter. This function is essentially a specialized version of the more generic StartTask sub.
Start a single task
The function(=sub in Sense lingo) StartTask takes a single taskId parameter, which means that starting a reload task from an app’s load script is as simple as
Call StartTask(<TaskId>)
The demo app Butler 8.4 demo app.qvf (link) contains such a demo (and many others).
Need to pass along parameters to a task? There’s a Sub for that!
Sometimes you need to send parameters to a reload task (or rather to the load script of the app associated with the task).
This can be done by using the StartTask_KeyValue helper function/Sub.
That Sub takes a taskId as parameter (similarly to its StartTask sibling), but it also takes parameters for a full key-value pair:
Call StartTask_KeyValue('fbf645f0-0c92-40a4-af9a-6e3eb1d3c35c', 'MyNamespace', 'An important key', 'The value', 3000)
The parameters are
The namespace to store the key-value pair in (required).
The key (required).
The value (required).
An time-to-live valud in milliseconds (optional). When the ttl times out the key-value pair is automatically deleted.
Documentation about Butler’s key-value store is available here.
An example showing how task chaining with parameters can be done using key-values is found here.
Start several tasks using task IDs
If several tasks should be started using task IDs, those IDs need to be passed into the StartTask sub.
This is done by storing the task IDs in a separate table whose name is passed as a parameter into StartTask:
These tables can be called anything as long as
They are qualified (i.e. keep the “Qualify *;” statement!).
The table names are passed as parameters to the StartTask function.
The table MUST have a field called TaskId that contains the IDs of reload tasks to be started.
Regarding parameters to StartTask:
Trailing, unused parameters can be omitted.
Unused parameters that are followed by used parameters should be set to Null().
Example 1
The script below will start tasks fbf645f0-0c92-40a4-af9a-6e3eb1d3c35c (via the first parameter), 7552d9fc-d1bb-4975-9a38-18357de531ea (via second parameter, i.e. a table) and fb0f317d-da91-4b86-aafa-0174ae1e8c8f (via second parameter too).
Similar to how multiple tasks can be started using a table of task IDs (see above), tasks can also be started using a table containing custom property names and values.
Example 1
The script below will start all reload tasks that have the taskGroup custom property set to a value of tasks1.
Butler can be configured to listen to a specific MQTT topic (specified in config file property Butler.mqttConfig.taskStartTopic) and use any message received in that topic as a Sense task ID, which is then started.
For example:
A Sense app, used by end users, relies on data in a source system that talks MQTT (there are lots of MQTT libraries available, covering most operating systems).
The data in the source system can be updated at any time.
In order to update the Sense app with data the most common approach is to schedule reloads of the Qlik Sense app at certain intervals, i.e. polling the source system.
But if the source system instead posts a MQTT message on a well defined topic when new data is available, theat message will trigger the Sense app’s reload.
This way the Sense app will be updated as quickly as possible after new data is availabe in the source system.
I.e. the end user will have access to more up-to-date data, compared to the polling based solution.
Requirements for starting tasks via MQTT
These config file settings must be set up before Butler will use MQTT messages to start tasks:
Connection to MQTT broker (=server):
Butler.mqttConfig.enable: true
Butler.mqttConfig.brokerHost:
Butler.mqttConfig.brokerPort:
MQTT topics that Butler should subscribe to
Butler.mqttConfig.subscriptionRootTopic: <Root topic that Butler should subscribe to. Something like qliksense/#>
Butler.mqttConfig.taskStartTopic: <Topic used to start Sense tasks. MUST be a suptopic to the root topic above!>
For security reasons Qlik Sense does not offer direct access to the file system from load scripts. Using lib:// constructs files can be read and written, but not copied, moved or deleted.
Butler has APIs that enabled file copy/move/delete in a secure, controlled way.
Goal: Copy, move and delete files from Sense load scripts
These steps are needed to achieve the goal:
Install and configure Butler’s general settings.
Add the directories in which file operations should be allowed to Butler’s config file.
Make sure the account Butler runs under has the appropriate access to those directories.
Call the Butler APIs directly or use the subs included in the GitHub repo to do the desired file operations.
Warning: UNC paths only on Windows
UNC paths (i.e. “\\host\fileshare\folder1\folder2”) is a Windows-only feature and as such only supported when Butler is running on Windows.
If Butler is running on a non-Windows operating system and directories on network file shares should be accessible via Butler’s RESR API, those directories must be mounted on the server using the standard OS mechanisms, then accessed via the server’s local file system.
Butler will warn in the console and file logs if UNC paths are specified in the config file, and Butler is NOT running on Windows.
The general idea is:
For each file system operation (copy, move and delete) you can specify in which (or between which) directories that operation should be allowed.
This is straight forward, but because Butler can run on different operating systems AND access file shares hosted by various OSs, things can get a bit complicated.
In most cases the paths to use are the expected ones, but when it comes to UNC paths they can for example either use forward slash “/” or back ditto “\”.
Both work as all paths are normalized into an internal, uniform format when loaded into Butler.
Note that all subdirectories of the directories listed in the config file are also considered to be approved directories by Butler.
A few examples show how to deal with some common scenarios:
fileCopyApprovedDirectories:- fromDirectory:/data1/qvd # Butler running on Linux, with either a local directory in /data1, or a remote fileshare mounted into /data1toDirectory:/data2/qvd_archive- fromDirectory:e:\data3\qvd # Butler running on Windows Server, accessing files/directories in the local file systemtoDirectory:e:\data4\qvd_archive- fromDirectory://server1.my.domain/fileshare1/data1 # Butler running on Windows server, accessing a SMB file share (which can be on a Windows or Linux server)toDirectory://server1.my.domain/fileshare1/data2- fromDirectory:\\server1.my.domain\fileshare1\data1toDirectory:\\server1.my.domain\fileshare1\data2fileMoveApprovedDirectories:- fromDirectory:/data7/qvdtoDirectory:/data8/qvd_archive- fromDirectory:e:\data9\qvdtoDirectory:e:\data10\qvd_archive- fromDirectory://server2.my.domain/data1/qvdtoDirectory://server2.my.domain/data1/qvd_archivefileDeleteApprovedDirectories:- /data1/qvd_archive- e:\data1\qvd_archive- //server3.my.domain/data1/qvd_archive- \\server3.my.domain\data1\qvd_archive
This configuration (for example) means:
Copying can be done from e:\data3\qvd to e:\data4\qvd_archive, but not from e:\data3\qvd to e:\data6\qvd_archive
Moving files can be done from /data7/qvd to /data8/qvd_archive, but not from /data7/qvd to e:\data9\qvd
Files can be deleted in the directories /data1/qvd_archive, e:\data1\qvd_archive and (using UNC notation) \\server3.my.domain\data1\qvd_archive.
3. Create Sense data connections used to call Butler’s REST API
Once you know what file path format to use (see above), using the helper subs is pretty easy:
// Where is Butler running?
let vButlerHost = 'http://10.11.12.13';
let vButlerPort = 8080;

// Delete files
Call DeleteFile('/data1/qvd_archive/a.txt')
Call DeleteFile('e:\data1\qvd_archive\a.txt')
Call DeleteFile('//server3.my.domain/data1/qvd_archive\a.txt')

// Copy files with options overwrite-if-exists=true and keep-source-timestamp=true
Call CopyFile('/data1/qvd/a.txt', '/data2/qvd_archive/a.txt', 'true', 'true')
Call CopyFile('e:\data5\qvd\a.txt', 'e:\data6\qvd_archive\a.txt', 'true', 'true')

// Move files with option overwrite-if-exists=true
Call MoveFile('/data7/qvd/a.txt', '/data8/qvd_archive/a.txt', 'true')
Call MoveFile('e:\data9\qvd\a.txt', 'e:\data10\qvd_archive\a.txt', 'true')
If you prefer to call the REST API directly, the DeleteFile sub might provide some inspiration:
// ------------------------------------------------------------
// ** Delete file **
//
// Files can only be deleted in folders (and subfolders of) directories that
// have been approved in the Butler config file.
//
// Paramaters:
// vFile                : File to be deleted.
// ------------------------------------------------------------
sub DeleteFile(vFile)
    let vFile = Replace('$(vFile)', '\', '/');
    let vFile = Replace('$(vFile)', '#', '%23');

    let vRequestBody = '{""deleteFile"":""$(vFile)""}';

    LIB CONNECT TO 'Butler_POST';

    RestConnectorMasterTable:
    SQL SELECT
        "vFile"
    FROM JSON (wrap on) "root"
    WITH CONNECTION (
    Url "$(vButlerHost):$(vButlerPort)/v4/filedelete",
    BODY "$(vRequestBody)",
    HTTPHEADER "X-HTTP-Method-Override" "DELETE"
    );

    set vFile=;
    set vRequestBody=;
    DROP TABLE RestConnectorMasterTable;
end sub
Note how the HTTP operation is set using the X-HTTP-Method-Override HTTP header.
This is a way to work around a limitation of Qlik’s REST connector, as it only supports GET and POST operations. The extra HTTP header tells Butler what kind of HTTP operation should really be carried out.
Examples using UNC paths
When specifying UNC paths in the Butler config file and running Butler on a non-Windows operating system, you will get warnings like the ones below.
The approved directories sections of the config file look like this:
Butler:....# List of directories between which file copying via the REST API can be done.fileCopyApprovedDirectories:- fromDirectory:/from/some/directory2toDirectory:/to/some/directory2- fromDirectory://1.2.3.4/qlik/testdata/deletefile1toDirectory://1.2.3.4/qlik/testdata/deletefil2# List of directories between which file moves via the REST API can be done.fileMoveApprovedDirectories:- fromDirectory:/from/some/directory3toDirectory:/to/some/directory3- fromDirectory://1.2.3.4/qlik/testdata/deletefile1toDirectory://1.2.3.4/qlik/testdata/deletefil2fileDeleteApprovedDirectories:- /from/some/directory2- \\1.2.3.4\qlik\testdata\deletefile3
In this case Butler is running on macOS (with IP 192.168.1.168 on port 8081) and we get warnings in the logs when starting Butler:
Startup warnings about non-compatible UNC paths when running Butler on macOS.
When trying to do a file operation (in this case a delete) using an UNC path (Butler is still running on macOS!) we get a warning in the logs and a http error returned to the Sense script:
http error returned when trying to delete a file via a UNC path, and Butler is running on macOS.
Warnings in log for the previous scenario.
7 - Sense apps that explain and highlight various Butler features
Butler comes with several demo apps.
Feel free to review them to get a better understanding of how Butler can be used.
7.1 - Using Butler APIs from Sense load script
This app uses the helper subs call some of Butler’s APIs. It’s not diving too deep into any particular feature, but rather just calls most APIs to show how it’s done.
If unsure what the parameters of the helper subs should look like, this page might be useful.
Calling the Butler API from Sense app’s load script
The demo app Butler 5.0 - demo app.qvf is available in the GitHub repository.
The app includes examples on how to use many of Butler’s REST APIs endpoints.
It doesn’t have much of a user interface (it just shows what API endpoints are enabled) so you should look at the load script to get examples of how to use the Butler APIs.
The app includes a copy of the helper functions that are also available in the GitHub repository.
7.2 - Partial loads in Qlik Sense
It’s surprisingly difficult to do partial loads in Qlik Sense Enterprise on Windows.
In QlikView that feature was easily available, but in QSEoW it’s currently not possible to create reload tasks that do partial app reloads.
Butler has an API for doing partial reloads of apps. A couple of demo apps are also includedin the GitHub repository.
Partial reload API
The full API documentation is available in the Reference section, here we’re interested in the PUT /v4/app/{appId}/reload endpoint.
Demo app showing how to post message to Slack from Qlik Sense load script.
Load script
Assuming the .qvs helper subs are used, only one line of script is needed to send a Slack message:
// -------------------------------------------
// Post messsage to Slack
// -------------------------------------------
// Post a basic message to Slack
Call PostToSlack('#general', 'Butler the Bot', '👽 Greetings, we come in peace.' , ':ghost:')
Note how emojis can be used in the message and a message specific icon can be used (":ghost:" above).
Demo app showing how to publish message to MQTT from Qlik Sense load script.
Load script
Assuming the .qvs helper subs are used, only one line of script is needed to publish a MQTT message.
The demo app does a bit more. First it posts a startup message to MQTT, then it loads some data and finally an all-done message is sent:
// -------------------------------------------
// Publish a MQTT message, load some data and publish another message
Call PostToMQTT('butler/5.0/demo-reloading/status', 'reload started')

// Load some data
Characters:
Load Chr(RecNo()+Ord('A')-1) as Alpha, RecNo() as Num autogenerate 26;

// Publish final message
Call PostToMQTT('butler/5.0/demo-reloading/status', 'reload done')
The MQTT messages look like this in the MQTT Explorer app on mac OS:
If running Butler on a Windows computer it is possible to install Butler as a Windows service.
This means that Butler will start automatically when the computer starts, and will run in the background without any user interaction.
A blog post on ptarmiganlabs.com goes through the steps required to install Butler SOS as a Windows service, the steps needed for Butler are virtually identical.
Butler is a complex piece of software, and it is not uncommon to run into issues when setting up and configuring Butler.
In the vast majority of cases, the issues are caused by misconfiguration, and not by bugs in the tool itself.
This page contains some tips and tricks that can be useful when troubleshooting a Butler instance.
General things to check
Is Butler running?
The first thing to check is if Butler is running at all.
If Butler is running as a Windows service, check the Windows Services applet to see if the service is running.
If Butler is running as a Docker container, check the Docker container status with the docker ps command.
Logs
Make sure logging to file is enabled in the Butler configuration file.
Take note of the log file location.
Then check the log files for errors and warnings.
In theory errors and warnings can occur as part of normal operation, but that should be rate.
If there are errors or warnings during startup, or if there are a lot of errors and warnings, then there is most likely a problem.
You can also try increasing the log level to verbose or even debug to get more information about what’s happening, and where in Butler the problem is occurring.
Logging level is configured in the Butler configuration file or via the --loglevel command line parameter (which takes precedence over the configuration file).
Feature specific issues
Failed reload alerts not working
Butler offers quite comprehensive support for dealing with failed or aborted reloads tasks.
As such there are a number of things that can go wrong and settings that can be misconfigured.
When configured correctly, Butler’s logs can look like below.
In this example Butler has received a reload task failure event from Qlik Sense, and is now sending out notifications to the following channels:
Script log archive (all failed reload logs are archived to a folder on disk)
InfluxDB (from where the reload failure can be visualized in a Grafana dashboard)
Slack
Teams
Outgoing webhook
Email
2024-01-10T05:47:52.992Z info: SCRIPTLOG STORE: Writing failed task script log: C:\tools\butler\config\scriptlog\2024-01-10\2024-01-10_06-47-52_appId=8f1d1ecf-97a6-4eb5-8f47-f9156300b854_taskId=22b106a8-e7ed-4466-b700-014f060bef16.log
2024-01-10T05:47:52.994Z info: INFLUXDB RELOAD TASK FAILED: Sending reload task notification to InfluxDB
2024-01-10T05:47:53.008Z info: SLACK RELOAD TASK FAILED: Rate limiting check passed for failed task notification. Task name: "Reload of Test failing reloads 1 (emojis supported! 🤪)"
2024-01-10T05:47:53.017Z info: TEAMS RELOAD TASK FAILED: Rate limiting check passed for failed task notification. Task name: "Reload of Test failing reloads 1 (emojis supported! 🤪)"
2024-01-10T05:47:53.021Z info: WEBHOOK OUT RELOAD TASK FAILED: Rate limiting check passed for failed task notification. Task name: "Reload of Test failing reloads 1 (emojis supported! 🤪)"
2024-01-10T05:47:53.300Z info: EMAIL RELOAD TASK FAILED ALERT: Rate limiting check passed for failed task notification. Task name: "Reload of Test failing reloads 1 (emojis supported! 🤪)", Recipient: "joe@company.com"
Tip
Rate limiting is defined in the Butler configuration file.
If the rate limiting condition is met, this will be shown as “Rate limiting check passed for failed task notification” in the logs.
Things to check:
Is Butler receiving the reload task events from Qlik Sense?
Is the failed/aborted reload UDP server in Butler enabled and working?
The UDP server is enabled via the Butler.udpServerConfig.enabled setting in the Butler configuration file.
The IP address/host and port where Butler is listening for UDP events is configured via the Butler.udpServerConfig.serverHost and Butler.udpServerConfig.portTaskFailure settings in the Butler configuration file.
If working correctly, the log will show a message like this: TASKFAILURE: UDP server listening on 10.11.12.13:9998
If there is a problem with the UDP server, the log might show a message like this (in this case the IP address is not valid for the Butler host): TASKFAILURE: Error in UDP error handler: Error: getsockname EINVAL
Check the Butler log files.
When Butler receives a reload task event from Qlik Sense, it will check if rate limiting conditions are met, and also log a message about that.
If there are no such messages:
Butler has not received the event from Qlik Sense.
Check the XML appender files deployed to the Qlik Sense servers. Make sure they send UDP events to the host and port where Butler is listening.
Try pinging the host where Butler is running, from the Qlik Sense server (ping <butler host>). If the ping fails, there is probably a network issue.
Try doing a telnet to the UDP port where Butler is listening from the Qlik Sense server (telnet <butler host> <butler port>). If the telnet fails, there is for sure a network issue.
Make sure reload failure events are enabled in the Butler configuration file.
Are reload failure events received from some Sense nodes, but not others?
Check the XML appenders on the nodes where the events are not received.
Check the network connectivity between the nodes and the Butler host.
The XML appender files can be identical on all nodes.
Are some reload failure events forwarded to destinations, but not others?
Check the Butler log files.
Is rate limiting enabled? If so, check the rate limiting settings in the Butler configuration file.
If events arrive more frequently than the rate limiting settings allow, Butler will not forward all events.
A failed rate limiting check will result in a log warning: Rate limiting failed. Not sending reload notification email for task ...
Are alerts forwarded to some destination, but not others?
Each destination can be enabled/disabled individually in the Butler configuration file.
Make sure the destination you are interested in is enabled.