This is the multi-page printable view of this section. Click here to print.
Getting started
- 1: Overview
- 2: Install
- 2.1: Decide how to run Butler
- 2.2: Running Butler as a native, pre-built application
- 2.3: Running Butler in Docker
- 2.4: Running Butler as a Node.js application
- 3: Setup
- 3.1: Which config file to use
- 3.2: Minimal configuration to start Butler
- 3.3: Connecting to a Qlik Sense server
- 3.4: Connecting to Qlik Cloud
- 3.5: Configuring Butler's REST API
- 3.6: Reload alerts
- 3.6.1: Reload alerts for client-managed Qlik Sense
- 3.6.1.1: Reload alerts sent as emails
- 3.6.1.2: Reload alerts in InfluxDB
- 3.6.1.3: Reload alerts via New Relic
- 3.6.1.4: Reload alerts via Slack
- 3.6.1.5: Reload alerts via Microsoft Teams
- 3.6.1.6: Reload alerts via MQTT
- 3.6.1.7: Reload alerts via outgoing webhooks
- 3.6.2: Reload alerts for Qlik Sense Cloud
- 3.6.2.1: Qlik Cloud reload alerts sent as emails
- 3.6.2.2: Reload alerts via Slack
- 3.6.2.3: Reload alerts via Microsoft Teams
- 3.7: Reload script logs
- 3.8: Monitoring Windows services
- 3.8.1: Sending Windows service alerts as email
- 3.8.2: Sending Windows service alerts to New Relic
- 3.8.3: Storing Windows service alerts in InfluxDB
- 3.8.4: Sending Windows service alerts to Slack
- 3.8.5: Sending Windows service alerts to Microsoft Teams
- 3.8.6: Sending Windows service alerts as MQTT messages
- 3.8.7: Sending Windows service alerts as outgoing webhooks (=http messages)
- 3.9: Qlik Sense server version
- 3.10: Qlik Sense server license
- 3.11: Qlik Sense access licenses
- 3.12: Configuring the Butler scheduler
- 3.13: Configuring the key-value store
- 3.14: Configuring file system access via REST API
- 3.15: Incident management tools
- 3.16: Setting up MQTT messaging
- 3.17: Configuring Butler heartbeats
- 3.18: Configuring Butler metrics & monitoring
- 3.19: Docker healthcheck
- 3.20: Creating Sense data connections
- 3.21: Control which tasks can be started via Butler's API
- 3.22: Configuring telemetry
- 3.23: Visualise Butler's config file
- 3.24: Forwarding user activity events to Butler
- 4: Day 2 operations
- 4.1: Standalone app
- 4.2: Docker
- 4.3: Node.js app
- 5: Upgrade
1 - Overview
Butler makes it both easier to develop Qlik Sense apps and run client-managed Qlik Sense clusters.
This page gives you the general steps to get started with Butler.
It also explains how Butler relates to and uses other tools and services.
Getting started: 1-2-3

The main components of Butler are outlined in the system diagram above.
Remember!
Individual parts of Butler can be enabled/disabled in the main config file.
If you’re unsure what each REST API endpoint does, the API docs is the place to check.
1. Installation
Follow the installation instructions - they will guide through the setup process, including requirements and customization.
2. Setup
Once everything is installed you need to edit the configuration file to suit your specific needs.
3. Try it out!
Feel free to browse through the concepts and examples to get an understanding of how to use Butler.
2 - Install
Warning
Butler was developed with InfluxDB version 1.x in mind.
If you intend to use Butler together with InfluxDB you need to be aware of the following:
InfluxDB is currently available in version 2.x and while this version brings lots of new goodies, it’s not out-of-the-box compatible with Butler.
For that reason you should use the latest 1.x version of InfluxDB, which at the time of this writing is 1.8.4.
If you do not intend to use any InfluxDB related features of Butler you can simply disregard this warning.
In due time Butler will be updated to support InfluxDB 2.x too.
Given the cross platform nature of Node.js (which is the language Butler is written in), Butler can run on lots of different hardware platforms and operating systems.
It is therefore difficult to give detailed installation instructions for each possible installation scenario. This site thus tries explain how to get started with Butler in some of the most common scenarios.
Pre-built binaries are available for Windows, macOS and Linux. When using these there is no need to install Node.js, as the Node.js runtime is bundled into the binaries.
Using these binaries is the easiest - and thus recommended - way of using Butler.
…unless you want to use Docker, which is also a great option.
Getting started
Sorry - there is no installer for Butler.
The pre-built binaries for Windows, macOS, Linux and Docker simply work as-is when combined with a properly set up configuration file.
If you still want to run Butler as Node.js app you will first need to install Node.js.
The instructions on the pages below should provide good guidance, if you still run into troubles you can always reach out via the GitHub discussion forums.
What’s required to use Butler
- A Butler executable for your operating system
- A Butler config file adapted to your specific Qlik Sense environment
- A way to authenticate with Qlik Sense APIs
- Certificates for Qlik Sense Enterprise on Windows
- JSON Web Token (JWT) for Qlik Sense Cloud
| What | Comment |
|---|---|
| Qlik Sense Enterprise on Windows | Most Butler features target client-managed Qlik Sense Enterprise on Windows (QSEoW). |
| Qlik Sense Cloud | Some features are available for Qlik Sense Cloud, for example the ability to send app reload failed alerts to email, Slack, Teams or script log on local disk. |
| Butler executable | Mandatory. A Butler executable of some kind. This would be a) a stand-alone binary for the operating system you plan to use, b) a Docker image from which a Butler container can be created or c) the Butler source code plus Node.js installed. |
| MQTT broker | Optional. MQTT is used for both in- and out-bound pub-sub messaging. Butler assumes a working MQTT broker is available, the IP of which is defined in the Butler config file. Mosquitto is a great open source broker. It requires very little hardware to run, even the smallest (usually free) Amazon/Google/Microsoft/… instance is enough, if you want a dedicated MQTT server. If you don’t care about the pubsub features of Butler, you don’t need a MQTT broker. In this case you can disable the MQTT features in the config YAML file. |
| InfluxDB | Optional. A database for realtime information, used to store metrics around Butler’s own memory usage over time (if this feature is enabled). |
| New Relic | Optional. A commercial online service offering a vast set of observability features of which Butler uses just a few. Reload failure alerts are for example very nicely handled in New Relic as you get access to the script logs (similar to what can be done with InfluxDB + Grafana) right in the New Relic UI. New Relic’s free tier usually goes a long way towards the need of SenseOps and Butler use cases, so it’s easy to try out New Relic. |
| Signl4 | Optional. A smaller but very nice, mobile-first incident management service. Using Signl4 it’s easy to get failed reload alerts to your phone. The service also makes it easy to set up on-call schedules, escalate incidents if needed etc. |
2.1 - Decide how to run Butler
The short answer is: Almost anywhere.
The pre-built binaries for Windows, macOS, Linux and Docker should cater for most use cases.
If you have some other, more exotic platform or operating system you want to run Butler on that’s probably possible too.
Butler is built on Node.js and as long as Node.js is available on the platform/operating system of your choice there is a good chance Butler will run there.
Butler has been successfully used on Windows Server, Windows 10, various Linux distributions, in Docker, Kubernetes, on Mac OS and even on Raspberry Pis. And a Raspberry Pi based Kubernetes cluster.
Your platform options thus typically fall into three categories:
Butler as a stand-alone executable
Here you will be using the pre-built Butler binaries (Windows, Linux, Mac OS) that are available for Butler 7.2 and later.
When using third party tools these binaries can be started as services.
For example, on Windows the free NSSM tool is a great way to run Butler as a Windows service.
Another good tool is PM2 which works well on Linux-ish platforms.
The Butler stand-alone executables are available on the GitHub releases page.
Butler in a container: Docker and Kubernetes
If you have access to or can set up a container runtime environment, this is a great way to running Butler.
Installation is less error prone compared to installing Butler as a native Node.js app, you get all the benefits from the Docker ecosystem (monitoring of running containers etc), and upgrades to future Butler versions become trivial.
If you have access to a Kubernetes cluster, that is usually an even better option than Docker. Kubernetes can be daunting when first approached, but will give you superb reliability, failover and restarts if a server goes down or becomes unresponsive etc. All major cloud providers (Microsoft Azure, Google, Amazon etc) offer Kubernetes services.
Rancher’s K3s is a very good way to get started with self hosted Kubnernetes. Fully featured, well supported and a vibrant developer community.
Butler as a Node.js application
This option means you will first install Node.js on your server of choice, then Butler and it’s dependencies.
It works perfectly well but is the most demanding when it comes to amount of work needed to get started.
2.2 - Running Butler as a native, pre-built application
Downloading the app
Download Butler for your preferred operating system.
Latest version is available on GitHub.
Installation steps
Installing Butler is quite simple.
The steps below outline the process.
Additional information is found on the Day 2 operations page.
-
Decide where to install Butler
It is usually a good starting point to run Butler on the Sense server. If there are more than one server in the Sense cluster, Butler can be placed on the reload server (as the /createDir endpoint then can be used to create folders in which QVD and other files can be stored).On the other hand, you might want to keep the Sense servers as clean as possible (with respect to software running on them). If that is a priority you should install Butler on some other server.
The bottom line is that Butler can run on any server, as long as there is network connectivity to the Sense server(s).
It’s usually a good idea to keep 3rd party tools installed in the same directory tree, to maintenance as easy as possible.
A good place for Butler could bec:\tools\butlerord:\tools\butleron Windows, for example. -
Download Butler
Download the latest version from the releases page.
Make sure to get the binary file for your preferred operating system.Unzip the downloaded file, then copy or move the butler binary to the desired directory (e.g.
c:\tools\butler) and that’s it.
Tip
On Windows you must “unblock” the ZIP file before extracting the Butler binary from it.
This is basically a way to tell Windows that the ZIP is safe even though it was downloaded from Internet.
Right click on the ZIP file, then select Properties.
If there is an “Unblock” check box in the lower right part of the properties window you should click that box and hit OK.
Then unpack the ZIP file.
The macOS version of Butler is signed using Apple’s official app signing process.
This means you may see a warning the first time you start Butler, but after that there should be no more warnings.
2.3 - Running Butler in Docker
Installation steps
The following steps give some guidance on how to get Butler running on Docker.
Here Mac OS was used, things will look different on Linux and Windows.
Note: While the console logs below refer to an older version of Butler’s Docker image, the steps involved are the same also for current/most recent version of Butler.
proton:~ goran$ mkdir /Users/goran/butler
proton:~ goran$ cd /Users/goran/butler
proton:butler goran$ mkdir -p config/certificate
proton:butler goran$
proton:butler goran$ wget https://raw.githubusercontent.com/ptarmiganlabs/butler/master/src/docker-compose.yaml
--2021-10-25 17:07:23--  https://raw.githubusercontent.com/ptarmiganlabs/butler/master/src/docker-compose.yaml
Resolving raw.githubusercontent.com (raw.githubusercontent.com)... 185.199.108.133, 185.199.109.133, 185.199.110.133, ...
Connecting to raw.githubusercontent.com (raw.githubusercontent.com)|185.199.108.133|:443... connected.
HTTP request sent, awaiting response... 200 OK
Length: 660 [text/plain]
Saving to: ‘docker-compose.yaml’

docker-compose.yaml 100%[=====================================================================================================================================>]     660  --.-KB/s    in 0s

2021-10-25 17:07:23 (42.0 MB/s) - ‘docker-compose.yaml’ saved [660/660]


proton:butler goran$ cat docker-compose.yaml
# docker-compose.yml
version: '3.3'
services:
  butler:
    image: ptarmiganlabs/butler:6.1.0
    container_name: butler
    restart: always
    ports:
      - "8080:8080"       # REST API available on port 8180 to services outside the container
      - "9998:9998/udp"   # UDP port for task failure events
    volumes:
      # Make config file accessible outside of container
      - "./config:/nodeapp/config"
      - "./log:/nodeapp/log"
    environment:
      - "NODE_ENV=production"
    logging:
      driver: json-file
      options:
        max-file: "5"
        max-size: "5m"
proton:butler goran$
At this point you should
- Export certificates from the Qlik Sense QMC. Export a full set of certificates in PEM format, no password on the certificates.
- Copy the certificates to the
./config/certificatedirectory. - Copy the template config file from the GitHub repository to the ./config directory, modify it as needed based on your system(s) and which Butler features you want enabled, and rename it to for example
production.yaml.
You can name the config file anything, but its name has to match the NODE_ENV environment variable, as set it thedocker-compose.yamlfile. - Optional. Copy the template schedule file to the location specified in Butler’s config file. This is only needed if you manually want to add schedules. If using the API to create schedules, there is no need to first manually create a schedules file (the schedule file will be created by Butler in this case).
When done, you should see something like this:
proton:butler goran$ pwd
/Users/goran/butler
proton:butler goran$ ls -la
total 8
drwxr-xr-x   4 goran  staff   128 Sep 26 16:36 .
drwxr-xr-x+ 59 goran  staff  1888 Sep 26 16:24 ..
drwxr-xr-x   4 goran  staff   128 Sep 26 16:36 config
-rw-r--r--   1 goran  staff   565 Sep 26 16:25 docker-compose.yml
proton:butler goran$
proton:butler goran$ ls -la config/
total 8
drwxr-xr-x  4 goran  staff   128 Sep 26 16:36 .
drwxr-xr-x  4 goran  staff   128 Sep 26 16:36 ..
drwxr-xr-x  6 goran  staff   192 Sep 26 16:36 certificate
-rw-r--r--  1 goran  staff  1861 Sep 26 16:36 production.yaml
proton:butler goran$
proton:butler goran$ ls -la config/certificate/
total 32
drwxr-xr-x  6 goran  staff   192 Sep 26 16:36 .
drwxr-xr-x  4 goran  staff   128 Sep 26 16:36 ..
-rw-r--r--@ 1 goran  staff  1166 Sep 26 16:36 client.pem
-rw-r--r--@ 1 goran  staff  1702 Sep 26 16:36 client_key.pem
-rw-r--r--@ 1 goran  staff  1192 Sep 26 16:36 root.pem
proton:butler goran$
At this point everything is ready and you can start the Butler container using docker-compose:
proton:butler goran$ docker-compose up
Creating network "butler_default" with the default driver
Pulling butler (ptarmiganlabs/butler:6.1.0)...
6.1.0: Pulling from ptarmiganlabs/butler
7d63c13d9b9b: Already exists
bb262aff53d8: Already exists
24467fa1084c: Already exists
d318401bbcfd: Already exists
fef5c41ac380: Already exists
da4caec0e1fa: Pull complete
d69466c67eaa: Pull complete
ad6e84e85ade: Pull complete
56b17f947d30: Pull complete
9aa9ea345c5a: Pull complete
Digest: sha256:046989e7d440b1fde2db6abfb2cc5eab740b82559ef392c32287ba188bae6235
Status: Downloaded newer image for ptarmiganlabs/butler:6.1.0
Creating butler ... done
Attaching to butler
butler    | 2021-10-25T16:35:31.739Z info: Adding normalized fileCopy directories {
butler    |   "fromDir": "/Users/goran/butler-test-dir1",
butler    |   "toDir": "/Users/goran/butler-test-dir2"
butler    | }
butler    | 2021-10-25T16:35:31.739Z info: Adding normalized fileCopy directories {
butler    |   "fromDir": "/Users/goran/butler-test-dir2",
butler    |   "toDir": "/Users/goran/butler-test-dir1"
butler    | }
butler    | 2021-10-25T16:35:31.740Z info: Adding normalized fileCopy directories {
butler    |   "fromDir": "/Users/goran/butler-test-dir1/abc",
butler    |   "toDir": "/Users/goran/butler-test-dir1"
butler    | }
butler    | 2021-10-25T16:35:31.741Z info: Adding normalized fileCopy directories {
butler    |   "fromDir": "/from/some/directory2",
butler    |   "toDir": "/to/some/directory2"
butler    | }
butler    | 2021-10-25T16:35:31.742Z info: Adding normalized fileMove directories {
butler    |   "fromDir": "/Users/goran/butler-test-dir1",
butler    |   "toDir": "/Users/goran/butler-test-dir2"
butler    | }
butler    | 2021-10-25T16:35:31.743Z info: Adding normalized fileMove directories {
butler    |   "fromDir": "/Users/goran/butler-test-dir2",
butler    |   "toDir": "/Users/goran/butler-test-dir1"
butler    | }
butler    | 2021-10-25T16:35:31.744Z info: Adding normalized fileMove directories {
butler    |   "fromDir": "/Users/goran/butler-test-dir1/abc",
butler    |   "toDir": "/Users/goran/butler-test-dir1"
butler    | }
butler    | 2021-10-25T16:35:31.745Z info: Adding normalized fileMove directories {
butler    |   "fromDir": "/Users/goran/butler-test-dir2/abc-dest",
butler    |   "toDir": "/Users/goran/butler-test-dir1"
butler    | }
butler    | 2021-10-25T16:35:31.745Z info: Adding normalized fileDelete directory /Users/goran/butler-test-dir1
butler    | 2021-10-25T16:35:31.746Z info: Adding normalized fileDelete directory /Users/goran/butler-test-dir1
butler    | 2021-10-25T16:35:31.747Z info: Adding normalized fileDelete directory /Users/goran/butler-test-dir2/abc-dest
butler    | 2021-10-25T16:35:31.747Z info: Enabled API endpoints: [
butler    |   "activeUserCount",
butler    |   "activeUsers",
butler    |   "apiListEnbledEndpoints",
butler    |   "base62ToBase16",
butler    |   "base16ToBase62",
butler    |   "butlerping",
butler    |   "createDir",
butler    |   "createDirQVD",
butler    |   "fileDelete",
butler    |   "fileMove",
butler    |   "fileCopy",
butler    |   "keyValueStore",
butler    |   "mqttPublishMessage",
butler    |   "createNewSchedule",
butler    |   "getSchedule",
butler    |   "getScheduleStatusAll",
butler    |   "updateSchedule",
butler    |   "deleteSchedule",
butler    |   "startSchedule",
butler    |   "stopSchedule",
butler    |   "senseAppReload",
butler    |   "senseAppDump",
butler    |   "senseListApps",
butler    |   "senseStartTask",
butler    |   "slackPostMessage",
butler    |   "getBookmarkList",
butler    |   "applyBookmark",
butler    |   "getSessions",
butler    |   "deleteSession"
butler    | ]
butler    | 2021-10-25T19:06:41.265Z info: CONFIG: Influxdb enabled: false
butler    | 2021-10-25T19:06:41.265Z info: CONFIG: Influxdb host IP: 192.168.100.20
butler    | 2021-10-25T19:06:41.265Z info: CONFIG: Influxdb host port: 8086
butler    | 2021-10-25T19:06:41.265Z info: CONFIG: Influxdb db name: butler
butler    | 2021-10-25T19:06:41.567Z info: --------------------------------------
butler    | 2021-10-25T19:06:41.567Z info: Starting Butler
butler    | 2021-10-25T19:06:41.568Z info: Log level      : verbose
butler    | 2021-10-25T19:06:41.568Z info: App version    : 6.1.0
butler    | 2021-10-25T19:06:41.568Z info: Instance ID    : b6292735c80987393c5cf1a5c685e8548b46e6385b940789e2599936e20d5080
butler    | 2021-10-25T19:06:41.568Z info:
butler    | 2021-10-25T19:06:41.569Z info: Node version   : v16.11.1
butler    | 2021-10-25T19:06:41.569Z info: Architecture   : x64
butler    | 2021-10-25T19:06:41.569Z info: Platform       : linux
butler    | 2021-10-25T19:06:41.569Z info: Release        : 11
butler    | 2021-10-25T19:06:41.570Z info: Distro         : Debian GNU/Linux
butler    | 2021-10-25T19:06:41.570Z info: Codename       : bullseye
butler    | 2021-10-25T19:06:41.570Z info: Virtual        : false
butler    | 2021-10-25T19:06:41.570Z info: Processors     : 4
butler    | 2021-10-25T19:06:41.570Z info: Physical cores : 4
butler    | 2021-10-25T19:06:41.571Z info: Cores          : 4
butler    | 2021-10-25T19:06:41.571Z info: Docker arch.   : undefined
butler    | 2021-10-25T19:06:41.571Z info: Total memory   : 6233116672
butler    | 2021-10-25T19:06:41.571Z info: --------------------------------------
butler    | 2021-10-25T19:06:41.571Z info: Client cert: /nodeapp/config/certificate/client.pem
butler    | 2021-10-25T19:06:41.571Z info: Client cert key: /nodeapp/config/certificate/client_key.pem
butler    | 2021-10-25T19:06:41.572Z info: CA cert: /nodeapp/config/certificate/root.pem
butler    | 2021-10-25T19:06:41.584Z info: MAIN: Didn't load schedules from file
butler    | 2021-10-25T19:06:41.627Z info: MAIN: REST server listening on http://0.0.0.0:8080
butler    | 2021-10-25T19:06:41.633Z info: MAIN: Started Docker healthcheck server on port 12398.
butler    | 2021-10-25T19:06:46.029Z info: /v4/senselistapps called from 192.168.176.1
What you see on your screen will depend on which Butler version you are using and what features are enabled.
Let’s make sure things are working by opening a new terminal window and from there requesting a list of all apps on the server:
proton:~ goran$
proton:~ goran$ curl "http://localhost:8080/v4/senselistapps"
[{"id":"492a1bca-1c41-4a01-9104-543a2334c465","name":"2018 sales targets"},
{"id":"5b243cb2-8d00-44c9-b865-08b00a0af18b","name":"App 1"},
...
...
{"id":"181d101f-986c-49c5-a457-d351058c05b4","name":"Template app 1 DEV"}]
proton:~ goran$
Nice, looking good.
In the terminal where you ran docker-compose, you will see a new line saying that a app list was retrieved:
butler | 2021-10-25T19:20:50.356Z info: /v4/senselistapps called from 192.168.176.1
2.4 - Running Butler as a Node.js application
Selecting an OS
While Qlik Sense Enterprise is a Windows only system, Butler should be able to run on any OS where Node.js is available.
Butler has been successfully used - during development and production - on Windows, Linux (Debian and Ubuntu tested) and mac OS.
Installation steps
The steps below outline the steps needed to install Butler as a native Node.js application on for example Windows Server.
Additional information is found on the Day 2 operations page.
-
Install node.js
Butler has been developed and tested using the 64 bit version of Node.js. The most recent LTS (Long Term Support) version is usually a good choice. -
Decide where to install Butler
It is usually a good starting point to run Butler on the Sense server. If there are more than one server in the Sense cluster, Butler can be placed on the reload server (as the /createDir endpoint then can be used to create folders in which QVD and other files can be stored).On the other hand, you might want to keep the Sense servers as clean as possible (with respect to software running on them). If that is a priority you should install Butler on some other server.
The bottom line is that Butler can run on any server, as long as there is network connectivity to the Sense server(s).
-
Download Butler
Download the repository zip from the releases page.Do not just clone the Butler repository as that will give you the latest development version, which may not yet be fully tested and packaged.
The exception is of course if you want to contribute to Butler development - then forking and cloning the repository is the right thing to do. -
Install node dependencies
From a Windows command prompt (assuming the Butler ZIP file/repository was saved to d:\node\butler):d: cd \node\butler\src npm installThis will download and install all Node.js modules used by Butler.
On some OSs you’ll get some warnings during the installation - they are usually harmless. Try to run Butler even if you got some warnings, chances are good that things will work just fine. This is common on especially Windows Server and is a result of some Butler dependencies being primarily developed on Linux rather than Windows.
3 - Setup
Things not working?
Check out the troubleshooting page.
3.1 - Which config file to use
A description of the config file format is available here.
Select which config file to use
Butler uses configuration files in YAML format.
A default config file called production_template.yaml is included in the release Zip files on the download page. It is also available in the GitHub repository.
Make a copy of it, then rename the copy default.yaml, production.yaml, staging.yaml or something else suitable to your specific use case.
Update it as needed (see the config file reference page for details).
Trying to run Butler with the default config file (the one on GitHub) will not work - you must adapt it to your server environment. For example, you need to enter the IP or host name of you Sense server(s), the IP or host name where Butler is running etc.
All config entries are mandatory
As of Butler 9.0 the config file’s structure will be validated when Butler starts. If there are any errors (missing entries etc) in the config file, Butler will not start.
This means that all config file entries are mandatory. If some feature is not use the corresponding entry can be left empty.
Finally, Butler must somehow be given instructions about where to look for the config file.
This can be done in several ways depending on how Butler is used, see below.
Config file for stand-alone Butler
Let’s run Butler on a Windows Server using PowerShell, without any options or parameters:
PS C:\tools\butler> .\butler.exe
Usage: butler [options]

Butler gives superpowers to client-managed Qlik Sense Enterprise on Windows!
Advanced reload failure alerts, task scheduler, key-value store, file system access and much more.

Options:
  -V, --version                        output the version number
  -c, --configfile <file>              path to config file
  -l, --loglevel <level>               log level (choices: "error", "warn", "info", "verbose", "debug", "silly")
  --new-relic-account-name  <name...>  New Relic account name. Used within Butler to differentiate between different target New Relic accounts
  --new-relic-api-key <key...>         insert API key to use with New Relic
  --new-relic-account-id <id...>       New Relic account ID
  --test-email-address <address>       send test email to this address. Used to verify email settings in the config file.
  --test-email-from-address <address>  send test email from this address. Only relevant when SMTP server allows from address to be set.
  --no-qs-connection                   don't connect to Qlik Sense server at all. Run in isolated mode
  --api-rate-limit                     set the API rate limit, per minute. Default is 100 calls/minute. Set to 0 to disable rate limiting.
  -h, --help                           display help for command
PS C:\tools\butler>
There is an option --configfile (or its short version -c) that let us control which config file to use.
In this example the config file .\config\butler-config.yaml is used.
Let’s try again with the -c option:
PS C:\tools\butler> dir


    Directory: C:\tools\butler


Mode                 LastWriteTime         Length Name
----                 -------------         ------ ----
-a----        20/06/2022     16:27       68426646 butler.exe
-a----        20/06/2022     17:17          34762 butler-config.yaml


PS C:\tools\butler> .\butler.exe -c .\config\butler-config.yaml
2023-12-10T13:46:32.939Z info: Enabled API endpoints: [
  "apiListEnbledEndpoints",
  "base62ToBase16",
  "base16ToBase62",
  "butlerping",
  "createDir",
  "createDirQVD",
  "fileDelete",
  "fileMove",
  "fileCopy",
  "keyValueStore",
  "mqttPublishMessage",
  "postNewRelicMetric",
  "postNewRelicEvent",
...
...
Butler now starts nicely using the specified config file.
Tip
When using the standalone Butler executables you can use an absolute or a relative path when specifying the location of the config file.
For example, c:\tools\butler\config\butler-config.yaml is an absolute path, while .\config\butler-config.yaml would be a relative path.
Config file when running Butler as a Node.js app
When running Butler as a Node.js app, i.e. starting it with node butler.js, Butler will look for a config file in the ./config subdirectory.
The name of the config file matters.
Butler looks for an environment variable called “NODE_ENV” and then tries to load a config file named with the value found in NODE_ENV.
Example: NODE_ENV=production
Butler will look for a config file config/production.yaml.
Config file when running Butler in a Docker container
The template docker-compose.yaml file in the GitHub repository shows how to specify which config file that will be used:
# docker-compose.yml
services:
  butler:
    image: ptarmiganlabs/butler:latest
    container_name: butler
    restart: always
    ports:
      - "8080:8080" # REST API available on port 8180 to services outside the container
      - "9998:9998/udp" # UDP port for task failure events
    volumes:
      # Make config file accessible outside of container
      - "./config:/nodeapp/config"
      - "./log:/nodeapp/log"
    environment:
      - "NODE_ENV=production"
    logging:
      driver: json-file
      options:
        max-file: "5"
        max-size: "5m"
Here the environment variable NODE_ENV is set to “production”, and the host OS’ ./config directory is mapped to the container’s /nodeapp/config directory.
As there is no --configfile command line option present the default setting will be used, which is to look for the config file in the config directory right under the directory where the docker-compose.yaml file is located.
The file name is determined by Butler (running in the container) looking at the NODE_ENV env variable.
Bottom line is that the ./config/production.yaml (relative to the location of docker-compose.yaml) file will be used.
Running several Butler instances in parallel
If you have several Sense clusters (for example DEV, TEST and PROD environments) you may want to run several Butler instances.
The solution is to create several config files: butler_dev.yaml, butler_test.yaml and butler_prod.yaml.
In this scenario three instances of Butler should be started, each given a different config file via the --configfile command line option.
Note: If running several Butler instances in parallel, you must also ensure that each one uses unique port numbers for their respective REST APIs, UDP servers etc.
Setting environment variables
The method for setting environment variables varies between operating systems:
On Windows: set NODE_ENV=production
Mac OS or Linux: export NODE_ENV=production
If using Docker, the NODE_ENV environment variable is set in the docker-compose.yml file (as already done in the template docker-compose file.)
3.2 - Minimal configuration to start Butler
It contains the minimum settings needed to start Butler, but a few settings in it must be updated to match your environment.
Starting Butler with a minimal config file
Configuring Butler via its YAML format config file is probably the most difficult part of setting up Butler.
It’s however also the only way to configure Butler, so it needs to be done.
To make that process easier, a minimal config file called production_template.yaml is included in the release Zip files on the download page.
Note
The included sample config file contains the minimum settings needed to start Butler, but a few settings in it must be updated to match your environment. These are described in the comments at the beginning of the config file.
The settings are mostly related to the host names and ports of the Qlik Sense server(s) you want Butler to connect to, and the host name and port of the machine where Butler is running.
After working through the instructions in the config file, you should be able to start Butler with the following command (PowerShell in this case):
PS C:\tools\butler> .\butler.exe -c .\config\butler-config-file.yaml
Most Butler features are disabled in the minimal config file, but it’s a good starting point for your own config file.
To summarize, the recommended steps to get Butler up and running are:
- Download the latest Butler release from the download page. Precompiled binaries are available for Windows, Linux, macOS and Docker (on Docker Hub).
- Copy the
production_template.yamlconfig file (which is included in the Zip file) to a new file, e.g.butler-config.yaml. - Add the needed settings to
butler-config.yamlas described in the comments at the beginning of that that file. - Start Butler, passing in the path to the config file as the
--configfile(or-c) parameter. - Once Butler is running in this minimal configuration, you can start enabling more features in the config file, for example failed task monitoring, monitoring of Windows services, Sense licenses and much more.
Example: Things to change in the minimal config file
The following is an example of the comments at the beginning of the production_template.yaml config file, describing what needs to be changed in it to start Butler with a minimal configuration.
The example below is for Butler 12.4.0, but the same principle applies to later versions too.
---
Butler:
  # General notes:
  # - File and directory paths in this sample config file use Linux/Mac syntax, i.e. using forward slashes.
  #   Windows paths work just as well, just make sure to quote them with single or double quotes.
  # - All entries in the config file are mandatory in the sense that they must be present.
  #   However, if a feature is not used the corresponding config entries can contain
  #   any value (for example the provided default ones).
  # - Butler will start using the settings in this file if the follwing settings are set first:
  #   - Butler.cert.clientCert: Set to the path of the client certificate file. If relative paths cause issues, use an absolute path.
  #   - Butler.cert.clientCertKey: Set to the path of the client key file. If relative paths cause issues, use an absolute path.
  #   - Butler.cert.clientCertCA: Set to the path of the CA certificate file. If relative paths cause issues, use an absolute path.
  #   - Butler.configEngine.host: Set to the IP or FQDN of the host where the Sense engine service is running.
  #   - Butler.configEngine.port: Set to the port where the Sense engine service is listening.
  #   - Butler.configQRS.host: Set to the IP or FQDN of the host where the Qlik Repository Service (QRS) is running.
  #   - Butler.configQRS.port: Set to the port where the Qlik Repository Service (QRS) is listening.
  # - Having set the above settings, Butler will start and run, but it will not do anything useful until you configure
  #   the various monitoring and notification settings, as described at https://butler.ptarmiganlabs.com.
...
...
3.3 - Connecting to a Qlik Sense server
What’s this?
In order to interact with a Qlik Sense Enterprise on Windows (QSEoW) environment, Butler needs to know a few things about that environment. This is true no matter if the Sense cluster consists of a single Sense server or many.
Settings in config file
---
Butler:
  ...
  ...
  # Certificates to use when connecting to Sense. Get these from the Certificate Export in QMC.
  cert:
    clientCert: <path/to/cert/client.pem>
    clientCertKey: <path/to/cert/client_key.pem>
    clientCertCA: <path/to/cert/root.pem>
    # If running Butler in a Docker container, the cert paths MUST be the following
    # clientCert: /nodeapp/config/certificate/client.pem
    # clientCertKey: /nodeapp/config/certificate/client_key.pem
    # clientCertCA: /nodeapp/config/certificate/root.pem

  configEngine:
    # engineVersion: 12.170.2        # Qlik Associative Engine version to use with Enigma.js. Ver 12.170.2 works with Feb 2019
    engineVersion: 12.612.0         # Qlik Associative Engine version to use with Enigma.js. Works with Feb 2020 and others
    host: <FQDN or IP of Sense server where Sense Engine is running>
    port: <Port to connect to, usually 4747>
    useSSL: true
    headers:
      static:                                                   # http headers that are sent with every request to QRS. The "X-Qlik-User" is mandatory.
        - name: X-Qlik-User                                     # Header used to identify what user connection to QRS is made as
          value: UserDirectory=Internal;UserId=sa_repository    # What user connection to QRS is made as
    rejectUnauthorized: false

  configQRS:
    authentication: certificates
    host: <FQDN or IP of Sense server where QRS is running>
    useSSL: true
    port: 4242
    headers:
      static:                                                   # http headers that are sent with every request to QRS. The "X-Qlik-User" is mandatory.
        - name: X-Qlik-User                                     # Header used to identify what user connection to QRS is made as
          value: UserDirectory=Internal;UserId=sa_repository    # What user connection to QRS is made as
    rejectUnauthorized: false       # Set to false to ignore warnings/errors caused by Qlik Sense's self-signed certificates.
                                    # Set to true if the Qlik Sense root CA is available on the computer where Butler SOS is running.
  ...
  ...
3.4 - Connecting to Qlik Cloud
What’s this?
In order to interact with a Qlik Sense Cloud environment, Butler needs to know a few things about that environment.
How Butler gets events from Qlik Sense Cloud
A few things to note about how Butler gets events from Qlik Sense Cloud:
- When an app reload fails in Qlik Sense Cloud, an outgoing webhook is triggered.
- This webhook calls a https endpoint somewhere on the Internet, for example a serverless function in Azure or AWS (or on-prem).
- The function forwards the event as an MQTT message to a MQTT broker, on a well-defined topic.
- Butler listens to this topic and reacts to the event.
This model may seem a bit complex, but it has a few advantages:
- It is scalable. The serverless function can be scaled up and down as needed. MQTT brokers also scale well.
- It is flexible. The serverless function can be written in any language, and can be hosted anywhere.
- It is secure. The serverless function can be locked down to only accept incoming webhooks from Qlik Sense Cloud. The option would be to expose Butler directly to the Internet, which is not recommended.
The effect is an asynchronous, scalable and secure way of getting events from Qlik Sense Cloud to Butler.
Settings in config file
Butler:
  ...
  ...
  qlikSenseCloud:                   # Settings for Qlik Sense Cloud integration
    enable: false
    event:
      mqtt:                         # Which QS Cloud tenant should Butler receive events from, in the form of MQTT messages?
        tenant:
          id: tenant.region.qlikcloud.com
          tenantUrl: https://tenant.region.qlikcloud.com
          authType: jwt             # Authentication type used to connect to the tenant. Valid options are "jwt"
          auth:
            jwt:
              token: <JWT token>    # JWT token used to authenticate Butler when connecting to the tenant
          # Qlik Sense Cloud related links used in notification messages
          qlikSenseUrls:
            qmc: <URL to QMC in Qlik Sense Cloud>
            hub: <URL to Hub in Qlik Sense Cloud>
          comment: This is a comment describing the tenant and its settings # Informational only
  ...
  ...
3.5 - Configuring Butler's REST API
What’s this?
Butler offers a set of REST API endpoints. While these endpoints are tested for stability and correct functionality as part of each release, it’s always good practice to only enable the endpoints really needed.
Thus, individual endpoints of Butler’s API can be turned on or off in the main config file.
Configuring the REST API
Butler:
  ...
  ...
  restServerConfig:
    enable: false                                     # Should Butler's REST API be started? Must be true if *any* API endpoints are to be used.
    serverHost: <FQDN or IP (or localhost) of server where Butler is running>   # Use 0.0.0.0 to listen on all network interfaces (e.g. when running in Docker!).
    serverPort: 8080                                  # Port where Butler's REST is available. Any free port on the server where Butler is running can bse used.
    backgroundServerPort: 8081
Ports used by Butler
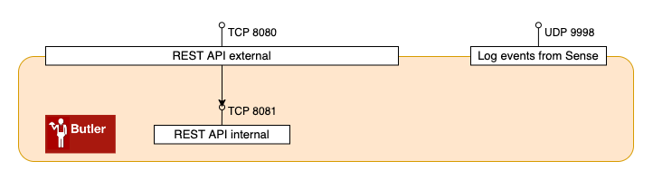
Butler exposes its REST API on a TCP port defined in the Butler.restServerConfig.serverPort setting in the config file.
Similarly, the host name Butler listens at is defined by the Butler.restServerConfig.serverHost setting. This would typically be the IP number, host name or fully qualified domain name of the computer where Butler is running.
Note that Butler uses two ports for its REST API: One external facing port and one used internally. Both must be dedicated to Butler on the computer where Butler is running.
Using two ports (one external facing and one internal) is not ideal, but it was an easy yet stable way of solving some technical challenges around Butler’s use of the X-HTTP-Method-Override HTTP header.
Just make sure that the two settings Butler.restServerConfig.serverPort and Butler.restServerConfig.backgroundServerPort aren’t the same and aren’t already in use, and all should be fine.
Ports used by Butler
Rate limiting the REST API
Butler’s REST API can be rate limited to prevent abuse.
Rate limiting is configured by the --api-rate-limit command line parameter when starting Butler.
The parameter takes a single integer value, which is the number of API calls allowed per minute.
Set to 0 to disable rate limiting.
Enabling individual API endpoints
Each enabled endpoint will result in Butler using more memory and CPU. Thus only enable the endpoints that are needed.
Endpoint specific settings
In some cases some extra configuration is needed to make an API endpoint function properly.
This information is configured in the Butler.restServerEndpointsConfig section in the config file.
Settings in config file
---
Butler:
  ...
  ...
  # Enable/disable individual REST API endpoints. Set config item below to true to enable that endpoint.
  restServerEndpointsEnable:
    apiListEnbledEndpoints: false
    base62ToBase16: false
    base16ToBase62: false
    butlerping: false
    createDir: false
    createDirQVD: false
    fileDelete: false
    fileMove: false
    fileCopy: false
    keyValueStore: false
    mqttPublishMessage: false
    newRelic:
      postNewRelicMetric: false
      postNewRelicEvent: false
    scheduler:
      createNewSchedule: false
      getSchedule: false
      getScheduleStatusAll: false
      updateSchedule: false
      deleteSchedule: false
      startSchedule: false
      stopSchedule: false
    senseAppReload: false
    senseAppDump: false
    senseListApps: false
    senseStartTask: false
    slackPostMessage: false

  restServerEndpointsConfig:
    newRelic:
      postNewRelicMetric:          # Setings used by post metric to New Relic API endpoint
        destinationAccount:
          - First NR account
          - Second NR account
        # As of this writing the valid options are
        # https://insights-collector.eu01.nr-data.net/metric/v1
        # https://insights-collector.newrelic.com/metric/v1
        url: https://insights-collector.eu01.nr-data.net/metric/v1
        header:                   # Custom http headers
          - name: X-My-Header
            value: Header value
        attribute:
          static:                   # Static attributes/dimensions to attach to the metrics data sent to New Relic.
            - name: env
              value: prod
      postNewRelicEvent:            # Setings used by post event to New Relic API endpoint
        destinationAccount:
          - First NR account
          - Second NR account
        # Note that the URL path should *not* be included in the url setting below!
        # As of this writing the valid options are
        # https://insights-collector.eu01.nr-data.net
        # https://insights-collector.newrelic.com
        url: https://insights-collector.eu01.nr-data.net/
        header:                   # Custom http headers
          - name: X-My-Header
            value: Header value
        attribute:
          static:                   # Static attributes/dimensions to attach to the metrics data sent to New Relic.
            - name: env
              value: prod
  ...
  ...
3.6 - Reload alerts
Butler handles reload alerts from both client-managed Qlik Sense and Qlik Sense Cloud.
The same kind of message templates are used, meaning that the look and feel of the alerts are the same regardless of where the alert originated.
This can be of particular interest for companies with a hybrid setup or that are in the process of migrating from client-managed to cloud-based Qlik Sense.
Getting the same kind of alerts from both environments can make it easier to understand what’s going on.
3.6.1 - Reload alerts for client-managed Qlik Sense
Butler offers a lot of flexibility when it comes to alerts when reloads fail, are aborted or succeed in Qlik Sense Enterprise on Windows (QSEoW).
Learn how to set up the desired features, the alert layout, formatting and more.
Alert types
These alert types are available:
- Reload task failure. Send alerts when reload tasks fail, no matter if they were started on schedule or manually from the QMC.
- Reload task aborted. Send alerts when reload tasks are manually aborted in the QMC.
- Reload task success. Send alerts when reload tasks complete successfully.
Alert destinations and options
Alerts can be sent to these destinations, with different options available for each destination.
Each destination can be individually enabled/disabled in the config file.
| Destination | Reload task failure | Reload task aborted | Reload task success | Enable/disable alert per reload task | Per reload task alert recipients | Flexible formatting | Basic formatting | Comment |
|---|---|---|---|---|---|---|---|---|
| ✅ | ✅ | ✅ | ✅ | ✅ | ✅ | ✅ | Basic emails can be sent using a log appender. | |
| InfluxDB | ✅ | ✅ | ✅ | ✅ | ✅ | The failed reload’s script log is available in InfluxDb. | ||
| New Relic | ✅ | ✅ | ✅ | ✅ | The failed reload’s script log is available in New Relic. | |||
| Signl4 | ✅ | ✅ | ✅ | ✅ | Alerts are presented in Signl4’s own format in their mobile app. | |||
| Slack | ✅ | ✅ | ✅ | ✅ | ||||
| MS Teams | ✅ | ✅ | ✅ | ✅ | ||||
| Outgoing webhook | ✅ | ✅ | Formatting is not relevant for webhooks | |||||
| MQTT | ✅ | ✅ | Formatting is not relevant for MQTT messages |
How it works
In order for Butler initiated alerts to become a reality, Butler must somehow be notified that the event of interest (for example a failed reload task) has occurred.
This is achieved by adding a log appender to Qlik Sense Enterprise on Windows.
Log appenders offer a way to hook into Qlik Sense’s logging subsystem, which is called log4net.
By adding a carefully crafted .xml file in the right location on the Sense server(s), you can make Sense notify Butler by means of UDP messages when the events of interest occur. Conceptually it looks like this:

So what happens when a scheduled reload task fails?
Let’s look at the steps:
-
A reload task is started by the Sense scheduler, either on a time schedule, as a result of some other task(s) finishing or manually by a user in the QMC or from the Hub.
-
When the task’s state changes, entries are written to the Sense scheduler’s log files using log4net (which is built into Qlik Sense). If the filter defined in the log appender (= the .xml file on the Sense server) matches the log entry at hand, the associated action in the log appender will be carried out.
-
Log appenders can do all kinds of things, everything from writing custom log files, sending basic emails, writing to databases and much more.
Here we’re interested in the log appender sending a UDP message from Qlik Sense to Butler. -
The log appender provided as part of Butler will make log4net send a UDP message to Butler, including various info (reload task ID, timestamp, host name etc) about the reload task that just failed or was stopped/aborted.
-
Butler will look at the incoming event and determine what it is about.
For example: Is the event about a reload task failure, a reload that has been aborted/stopped, or something else?
Butler thus first works as a dispatcher. In a second step, after the initial dispatch, the event is sent to the relevant handler function within Butler.
Response times are usually very good - Butler will typically get the UDP message within a few seconds after (for example) the reload failing, with alerts going out shortly thereafter.
Warning
The log appenders that catch failed and aborted reloads in the Qlik Sense engine and scheduler must be set up on all Qlik Sense servers where reloads are happening for this feature to work.
Failing to do so will result in Butler not being notified about some reload failures/aborted reloads.
Tip
The concept above is the same also for aborted and successful reload tasks.
Adding a log appender
This is possibly the trickiest part to get right when it comes to setting up log4net based alerts.
Still, if you start from the sample .xml file provided in the Butler repository on GitHub it’s not too hard.
Those sample .xml files are also included in the release Zip files available on the Butler releases page.
The steps are:
-
In this case you want to be notified when certain events occur in the scheduler log files.
This is important: Qlik Sense Enterprise on Windows consists of many different subsystems (engine, proxy, scheduler, printing etc) - here we’re interested in log events from the scheduler subsystem.
Add a file
LocalLogConfig.xmlin theC:\ProgramData\Qlik\Sense\Schedulerfolder on the Sense server whose scheduler you want to get events from. If you have multiple Sense servers with schedulers running on them, the .xml file should be deployed on each server (assuming you want events from all the servers). -
The contents of
LocalLogConfig.xmlwill determine what events are forwarded to Butler, or what other actions will be taken by log4net. See below for examples. -
Sense will eventually detect and load the new xml file, but it might take a while (minutes). Restarting the Qlik Sense Scheduler Windows service will make the changes take effect immediately.

Forwarding reload task events to Butler
Here’s the XML that should go into C:\ProgramData\Qlik\Sense\Scheduler\LocalLogConfig.xml to enable the various kinds of Butler task reload alerts.
-
The
remoteAddressproperty should be set to the host name or IP where Butler is running. -
The
remotePortproperty should match the port number specified in Butler’s config file. Note that Butler uses different ports for task related and user activity related events. -
The first appender looks for the text “Max retries reached” in the
System.Scheduler.Scheduler.Master.Task.TaskSessionlog stream. That log entry will be created when a reload task has failed and also carried out all its retries. Once the search string is found a UDP message will be sent to port 9998 on IP 10.11.12.13. -
The second appender looks for “Execution State Change to Aborting” in the
System.Scheduler.Scheduler.Master.Task.TaskSessionlog stream. That log entry occurs when a user stops a running reload from the QMC’s task view, or using the Sense APIs. When the search string is found a UDP message is once again sent to 10.11.12.13:9998, but with a different message (as specified in theconversionpatternproperty of the appender). -
The third appender looks for “Reload complete” in the
System.Scheduler.Scheduler.Slave.Tasks.ReloadTasklog stream.
That log entry occurs when a reload task has completed successfully.
Here is an XML file that would forward log events as UDP messages to Butler:
<?xml version="1.0" encoding="UTF-8"?>

<configuration>
    <!-- Appender for detecting reload task failures. Only the last of potentially several retries is reported -->
    <appender name="TaskFailureLogger" type="log4net.Appender.UdpAppender">
        <filter type="log4net.Filter.StringMatchFilter">
            <param name="stringToMatch" value="Max retries reached" />
        </filter>
        <filter type="log4net.Filter.DenyAllFilter" />
        <param name="remoteAddress" value="<IP of server where Butler is running>" />
        <param name="remotePort" value="9998" />
        <param name="encoding" value="utf-8" />
        <layout type="log4net.Layout.PatternLayout">
            <converter>
                <param name="name" value="hostname" />
                <param name="type" value="Qlik.Sense.Logging.log4net.Layout.Pattern.HostNamePatternConverter" />
            </converter>
            <param name="conversionpattern" value="/scheduler-reload-failed/;%hostname;%property{TaskName};%property{AppName};%property{User};%property{TaskId};%property{AppId};%date;%level;%property{ExecutionId};%message" />
        </layout>
    </appender>

    <!-- Appender for detecting aborted reloads -->
    <appender name="AbortedReloadTaskLogger" type="log4net.Appender.UdpAppender">
        <filter type="log4net.Filter.StringMatchFilter">
            <param name="stringToMatch" value="Execution State Change to Aborting" />
        </filter>
        <filter type="log4net.Filter.DenyAllFilter" />
        <param name="remoteAddress" value="<IP of server where Butler is running>" />
        <param name="remotePort" value="9998" />
        <param name="encoding" value="utf-8" />
        <layout type="log4net.Layout.PatternLayout">
            <converter>
                <param name="name" value="hostname" />
                <param name="type" value="Qlik.Sense.Logging.log4net.Layout.Pattern.HostNamePatternConverter" />
            </converter>
            <param name="conversionpattern" value="/scheduler-reload-aborted/;%hostname;%property{TaskName};%property{AppName};%property{User};%property{TaskId};%property{AppId};%date;%level;%property{ExecutionId};%message" />
        </layout>
    </appender>

    <!-- Appender for detecting successful reload tasks -->
    <appender name="ReloadTaskSuccessLogger" type="log4net.Appender.UdpAppender">
        <filter type="log4net.Filter.StringMatchFilter">
            <param name="stringToMatch" value="Execution State Change to FinishedSuccess" />
        </filter>
        <filter type="log4net.Filter.DenyAllFilter" />
        <param name="remoteAddress" value="<IP of server where Butler is running>" />
        <param name="remotePort" value="9998" />
        <param name="encoding" value="utf-8" />
        <layout type="log4net.Layout.PatternLayout">
            <converter>
                <param name="name" value="hostname" />
                <param name="type" value="Qlik.Sense.Logging.log4net.Layout.Pattern.HostNamePatternConverter" />
            </converter>
            <param name="conversionpattern" value="/scheduler-reloadtask-success/;%hostname;%property{TaskName};%property{AppName};%property{User};%property{TaskId};%property{AppId};%date;%level;%property{ExecutionId};%message" />
        </layout>
    </appender>

    <!-- Send message to Butler on task failure -->
    <!-- Send message to Butler on task abort -->
    <!-- Send message to Butler on reload task success -->
    <logger name="System.Scheduler.Scheduler.Master.Task.TaskSession">
        <appender-ref ref="TaskFailureLogger" />
        <appender-ref ref="AbortedReloadTaskLogger" />
        <appender-ref ref="ReloadTaskSuccessLogger" />
    </logger>

</configuration>
The above configuration is enough to support all task reload alerts currently supported by Butler.
Sending basic alert emails from Qlik Sense/log4net
If you are happy with the more basic/limited reload-failed alert emails provided by log4net, you can add a SMTP appender like this (the example below is for sending emails using Google GMail, customize as needed).
Note
If sending alert emails from Log4Net you will not get any of the nice formatting, script logs or other features that Butler provides in its alerts.
The email will instead just tell you that a task failed, and include some basic information about the task (task name, specifically).
<?xml version="1.0"?>
<configuration>
    <!-- Mail appender-->
    <appender name="MailAppender" type="log4net.Appender.SmtpAppender">
        <filter type="log4net.Filter.StringMatchFilter">
            <param name="stringToMatch" value="Message from ReloadProvider" />
        </filter>
        <filter type="log4net.Filter.DenyAllFilter" />
        <evaluator type="log4net.Core.LevelEvaluator">
            <param name="threshold" value="ERROR"/>
        </evaluator>
        <param name="to" value="<email address to send failed task notification emails to>" />
        <param name="from" value="<sender email address used in notification emails>" />
        <param name="subject" value="Qlik Sense failed task (server <servername>)" />
        <param name="smtpHost" value="smtp.gmail.com" />
        <param name="port" value="587" />
        <param name="EnableSsl" value="true" />
        <param name="Authentication" value="Basic" />
        <param name="username" value="<Gmail username>" />
        <param name="password" value="<Gmail password>" />
        <param name="bufferSize" value="0" /> <!-- Set this to 0 to make sure an email is sent on every error -->
        <param name="lossy" value="true" />
        <layout type="log4net.Layout.PatternLayout">
            <param name="conversionPattern" value="%newline%date %-5level %newline%property{TaskName}%newline%property{AppName}%newline%message%newline%newline%newline" />
        </layout>
    </appender>

    <!--Send mail on task failure-->
    <logger name="System.Scheduler.Scheduler.Slave.Tasks.ReloadTask">
        <appender-ref ref="MailAppender" />
    </logger>
</configuration>
References
-
Qlik’s documentation around log appenders and how to hook into the Sense logs is somewhat brief, but does provide a starting point if you want to dive deeper into this topic.
-
The main log4net documentation (log4net is the logging framework used by Qlik Sense Enterprise) can also be useful.
These links describe how emails can be sent from the log4net logging framework itself, directly to the recipient. Butler includes sample XML files for this use case too, but Butler takes things further by using the data in the Sense logs to pull in more data around the failed or stopped reload.
In other words - Butler’s alert emails are significantly more flexible and contain information (such as script logs) that are not available using purely log4net.
3.6.1.1 - Reload alerts sent as emails
What’s this?
Butler can send two kinds of alert emails:
- When a reload task fails during execution.
- When a running reload task is somehow stopped/aborted.
- When a reload task completes successfully.
See the Concepts section for additional details and sample alert emails.
Basic vs formatted email alerts
If you want Butler to send email alerts you must provide an email template file.
For some other alert destinations (Slack and Teams) Butler offers a “basic” option. A fixed format alert is then sent by Butler.
The closest thing available for emails is to use the mail log appender described here, but if you set up a log appender AND have Butler running, you might as well use the formatted email option as it provides much more flexibility than log4net’s email appender.
Rate limiting and de-duplication
Butler has rate limiting feature to ensure alert recipients are not spammed with too many alert emails.
The rate limit is configured (in seconds) in the main config file and can be set independently for reload-failed and reload-aborted emails.
The corresponding config settings are Butler.emailNotification.reloadTaskFailure.rateLimit, Butler.emailNotification.reloadTaskAborted.rateLimit and Butler.emailNotification.reloadTaskSuccess.rateLimit.
Rate limiting is done based on task ID + email address.
Butler also has a de-duplication feature that ensure each email address that has qualified for an alert email only gets ONE email per alert.
Sending test emails to verify correct settings
It can be tricky to find the correct settings to use Butler with email servers.
Butler itself uses a very generic email components to send emails, but corporate email servers may impose restrictions on from where/what servers emails will be accepted, encryption may be used together with non-standard network ports etc.
Butler offers a command line option that when used will send a simple test email to the specified email address.
This makes is very easy to test if the email settings in Butler’s config file are working or not.
When this command line option is used Butler will start normally, but also send a test email during startup.
The command line option is --test-email-address <address>.
The sender of the test email can be specified with --test-email-from-address <address>.
PS C:\tools\butler> .\butler.exe
Usage: butler [options]

Butler gives superpowers to client-managed Qlik Sense Enterprise on Windows!
Advanced reload failure alerts, task scheduler, key-value store, file system access and much more.

Options:
  -V, --version                        output the version number
  -c, --configfile <file>              path to config file
  -l, --loglevel <level>               log level (choices: "error", "warn", "info", "verbose", "debug", "silly")
  --new-relic-account-name  <name...>  New Relic account name. Used within Butler to differentiate between different target New Relic accounts
  --new-relic-api-key <key...>         insert API key to use with New Relic
  --new-relic-account-id <id...>       New Relic account ID
  --test-email-address <address>       send test email to this address. Used to verify email settings in the config file.
  --test-email-from-address <address>  send test email from this address. Only relevant when SMTP server allows from address to be set.
  --no-qs-connection                   don't connect to Qlik Sense server at all. Run in isolated mode
  --api-rate-limit                     set the API rate limit, per minute. Default is 100 calls/minute. Set to 0 to disable rate limiting.
  -h, --help                           display help for command
PS C:\tools\butler>
If the settings in the config file’s Butler.emailNotification.smtp section are valid and correct a command like this can be used:
butler.exe -c ./config/production.yaml --test-email-address myname@somedomain.com. Adapt config file location and email address as needed.
The resulting email looks like this:

Sending alert emails to app owners
Butler can optionally send alert emails to the owner of apps that fail reloading/were aborted.
Note
App owner notification email can only be sent to app owners that have an email stored in their Qlik Sense user profile.
This is typically the case if the Qlik Sense user directory has been synced from a Microsoft Active Directory - but there is no guarantee this is the case.
If there is no email available for an app owner, he/she will simply not receive any alert emails.
This feature is controlled by the config file properties Butler.emailNotification.reloadTaskAborted.appOwnerAlert.enable and Butler.emailNotification.reloadTaskFailure.appOwnerAlert.enable.
If set to true the app owner will be added to the send list of alert emails, in addition to the recipients specified in Butler.emailNotification.reloadTaskAborted.recipients and Butler.emailNotification.reloadTaskFailure.recipients.
The sections of the config file dealing with app owner notification emails looks like this:
appOwnerAlert:
  enable: true # Should app owner get notification email (assuming email address is available in Sense user directory)
  includeOwner:
    includeAll:
      true # true = Send notification to all app owners except those in exclude list
      # false = Send notification to all app owners in the include list
    user:
      - directory: <Sense user directory>
        userId: <userId>
      - directory: <Sense user directory>
        userId: <userId>
  excludeOwner:
    user:
      - directory: <Sense user directory>
        userId: <userId>
      - directory: <Sense user directory>
        userId: <userId>
It works like this:
- If
appOwnerAlert.enableis set tofalseno app owner emails will be sent. If it’s set totruethe rules below apply. - If
appOwnerAlert.includeOwner.includeAllis set totrueall app owners will get notification emails when apps the own fail/are aborted…- … except those app owners listed in the
appOwnerAlert.excludeOwner.userarray. - That array thus provides a way to exclude some app owners (e.g. system accounts) to receive notification emails.
- … except those app owners listed in the
- If
appOwnerAlert.includeOwner.includeAllis set tofalseit’s still possible to add individual app owners to theappOwnerAlert.includeOwner.userarray.
Those users will then receive notification emails for apps they own.
Send alerts only for some reload tasks
Some reload tasks may be more important than others.
I.e. some tasks should generate alert emails when they fail/abort/succeed, but others not.
Butler controls which tasks to send alerts for by looking at a specific Qlik Sense custom property.
Note
The concept described below is the same for failed, aborted and successful reload tasks.
Each of these three types of tasks have their own settings in the config file.
- If the config file setting
Butler.emailNotification.reloadTaskFailure.alertEnableByCustomProperty.enableis set tofalse, all failed reload tasks will cause alert emails. - If that setting is
trueonly some tasks will cause alert emails:- If a task has the value specified in
Butler.emailNotification.reloadTaskFailure.alertEnableByCustomProperty.enabledValueset for the custom property named as specified inButler.emailNotification.reloadTaskFailure.alertEnableByCustomProperty.customPropertyName, the alert will be sent. - If a task does not have that custom property set, no alert will be sent for that task.
- A task can still cause an alert to be sent if a specific email address is specified for the task, see below for details.
- If a task has the value specified in
Some configuration is needed to make this work:
- Make changes to the config file. Specifically the three settings mentioned above needs to be reviewed and updated as needed.
- Create a custom property in Sense.
- The name and value of the custom property must match the one in the config file,
Butler.emailNotification.reloadTaskFailure.alertEnableByCustomProperty.customPropertyNameandButler.emailNotification.reloadTaskFailure.alertEnableByCustomProperty.enabledValue. - The custom property should be available on reload tasks.
- The name and value of the custom property must match the one in the config file,
- Set the custom property for reload tasks for which alert emails should be sent.
Aborted reload tasks (as compared to the failed reload tasks described above) are handled the same way, with their own settings in the config file.
In the QMC the custom property can look like this:

Send alerts to specific people, for some tasks
It’s possible to send alert emails to specific email addresses and control this on a per-task basis.
This is achieved by using a Sense custom property that contains the email addresses alerts should be sent to, for the task in question.
Note
The concept described below is the same for failed, aborted and successful reload tasks.
Each of these three types of tasks have their own settings in the config file.
These config setting Butler.emailNotification.reloadTaskFailure.alertEnableByEmailAddress.customPropertyName controls which custom property is used to store email addresses for failed reload tasks.
Email specific alert recipients is independent from the feature where alerts can be switched on/off for individual tasks (see above).
In other words: If an email address has been designated as recipient of alert emails, that address will always receive alert emails for all failed reload tasks.
Having set two different (blurred out) recipients of alert emails for a reload task:

Settings in config file
Warning
Don’t forget to create the log appender .xml files on the Sense server(s).
This page describes how.
Those xml files are the foundation on top of which all Butler reload task alerts are built - without them the alerts described on this page won’t work.
---
Butler:
  ...
  ...
  # Qlik Sense related links used in notification messages
  qlikSenseUrls:
    qmc: <Link to Qlik Sense QMC>
    hub: <Link to Qlik Sense Hub>
  ...
  ...
  # Settings needed to send email notifications when for example reload tasks fail.
  # Reload failure notifications assume a log appender is configured in Sense AND that the UDP server in Butler is running.
  emailNotification:
    enable: false
    reloadTaskSuccess:
      enable: false
      # Custom property used to control which task successes will cause alert emails to be sent
      # If this setting is true, alerts will not be sent for all tasks, but *only* for tasks with the CP set to the enabledValue.
      # If this setting is false, alerts will be sent for all failed reload tasks.
      alertEnableByCustomProperty:
        enable: false
        customPropertyName: 'Butler_SuccessAlertEnableEmail'
        enabledValue: 'Yes'
      # Custom property used to say that alerts for a certain task should be sent to zero or more recipients
      # These alerts will be sent irrespective of the alertEnableByCustomProperty.enable setting.
      alertEnabledByEmailAddress:
        customPropertyName: 'Butler_SuccessAlertSendToEmail'
      rateLimit: 60              # Min seconds between emails for a given taskID. Defaults to 5 minutes.
      headScriptLogLines: 15
      tailScriptLogLines: 25
      priority: high              # high/normal/low
      subject: '✅ Qlik Sense reload success: "{{taskName}}"'
      bodyFileDirectory: path/to/email_templates
      htmlTemplateFile: success-reload-qseow
      fromAddress: Qlik Sense (no-reply) <qliksense-noreply@ptarmiganlabs.com>
      recipients:
        - <Email address 1>
        - <Email address 2>

    reloadTaskAborted:
      enable: false
      appOwnerAlert:
        enable: true              # Should app owner get notification email (assuming email address is available in Sense user directory)
        includeOwner:
          includeAll: true                            # true = Send notification to all app owners except those in exclude list
                                                      # false = Send notification to app owners in the include list
          user:
            - directory: <Sense user directory>
              userId: <userId>
            - directory: <Sense user directory>
              userId: <userId>
        excludeOwner:
          user:
            - directory: <Sense user directory>
              userId: <userId>
            - directory: <Sense user directory>
              userId: <userId>
      # Custom property used to control which aborted tasks will cause alert emails to be sent
      # If this setting is true, alerts will not be sent for all tasks, but *only* for tasks with the CP set to the enabledValue.
      # If this setting is false, alerts will be sent for all aborted reload tasks.
      alertEnableByCustomProperty:
        enable: true
        customPropertyName: 'Butler_AbortedAlertEnableEmail'
        enabledValue: 'Yes'
      # Custom property used to say that alerts for a certain task should be sent to zero or more recipients
      # These alerts will be sent irrespective of the alertEnableByCustomProperty.enable setting.
      alertEnabledByEmailAddress:
        customPropertyName: 'Butler_AbortedAlertSendToEmail'
      rateLimit: 600                                  # Min seconds between emails for a given taskID. Defaults to 5 minutes.
      headScriptLogLines: 15                          # Number of lines from start of script to include in email
      tailScriptLogLines: 15                          # Number of lines from end of script to include in email
      priority: high                                  # high/normal/low
      subject: 'Qlik Sense reload aborted: "{{taskName}}"'  # Email subject. Can use template fields
      bodyFileDirectory: path/to/email_templates      # Directory where email body template files are stored
      htmlTemplateFile: aborted-reload                # Name of email body template file to use
      fromAddress: Qlik Sense (no-reply) <qliksense-noreply@mydomain.com>
      recipients:                                     # Array of email addresses to which the notification email will be sent
        - <Email address 1>
        - <Email address 2>
    reloadTaskFailure:
      enable: false
      appOwnerAlert:
        enable: true              # Should app owner get notification email (assuming email address is available in Sense user directory)
        includeOwner:
          includeAll: true                            # true = Send notification to all app owners except those in exclude list
                                                      # false = Send notification to app owners in the include list
          user:
            - directory: <Sense user directory>
              userId: <userId>
            - directory: <Sense user directory>
              userId: <userId>
        excludeOwner:
          user:
            - directory: <Sense user directory>
              userId: <userId>
            - directory: <Sense user directory>
              userId: <userId>
      # Custom property used to control which task failures will cause alert emails to be sent
      # If this setting is true, alerts will not be sent for all tasks, but *only* for tasks with the CP set to the enabledValue.
      # If this setting is false, alerts will be sent for all failed reload tasks.
      alertEnableByCustomProperty:
        enable: false
        customPropertyName: 'Butler_FailedAlertEnableEmail'
        enabledValue: 'Yes'
      # Custom property used to say that alerts for a certain task should be sent to zero or more recipients
      # These alerts will be sent irrespective of the alertEnableByCustomProperty.enable setting.
      alertEnabledByEmailAddress:
        customPropertyName: 'Butler_FailedAlertSendToEmail'
      rateLimit: 600                                  # Min seconds between emails for a given taskID. Defaults to 5 minutes.
      headScriptLogLines: 15                          # Number of lines from start of script to include in email
      tailScriptLogLines: 15                          # Number of lines from end of script to include in email
      priority: high                                  # high/normal/low
      subject: 'Qlik Sense reload failed: "{{taskName}}"'   # Email subject. Can use template fields
      bodyFileDirectory: path/to/email_templates      # Directory where email body template files are stored
      htmlTemplateFile: failed-reload                 # Name of email body template file to use
      fromAddress: Qlik Sense (no-reply) <qliksense-noreply@mydomain.com>
      recipients:                                       # Array of email addresses to which the notification email will be sent
        - <Email address 1>
        - <Email address 2>
    ...
    ...
    smtp:                                             # Email server settings. See https://nodemailer.com/smtp/ for details on the meaning of these fields.
      host: <FQDN or IP or email server, e.g. smtp.gmail.com>
      port: <port on which SMTP server is listening>
      secure: true                                    # true/false
      tls:
        serverName:                                   # If specified the serverName field will be used for TLS verification instead of the host field.
        ignoreTLS: false
        requireTLS: true
        rejectUnauthorized: false
      auth:
        enable: true
        user: <Username, email address etc>
        password: <your-secret-password>
  ...
  ...
  udpServerConfig:
    enable: false                                     # Should the UDP server responsible for receving task failure and session events be started? true/false
    serverHost: <FQDN or IP (or localhost) of server where Butler is running>
    portTaskFailure: 9998
  ...
  ...
Templates: Configuring email appearance
Alert emails use standard HTML formatting. Inline CSS can be used (if so desired) for fine tuning the visual look of the alert email.
Butler’s process for sending alert emails is
- Figure out which email body template file should be used. This is determine by two set of fields in the main config file:
- For reload failure emails these config file properties are used:
Butler.emailNotification.reladTaskFailure.bodyFileDirectoryandButler.emailNotification.reladTaskFailure.htmlTemplateFile. A.handlebarsextension is assumed. - For aborted reload emails these config file properties are used:
Butler.emailNotification.reloadTaskAborted.bodyFileDirectoryandButler.emailNotification.reloadTaskAborted.htmlTemplateFile. A.handlebarsextension is assumed. - For successful reload emails these config file properties are used:
Butler.emailNotification.reloadTaskSuccess.bodyFileDirectoryandButler.emailNotification.reloadTaskSuccess.htmlTemplateFile. A.handlebarsextension is assumed.
- For reload failure emails these config file properties are used:
- For email subjects, these config properties are used:
Butler.emailNotification.reladTaskFailure.subject,Butler.emailNotification.reloadTaskAborted.subjectandButler.emailNotification.reloadTaskSuccess.subject. - Process the body template, replacing template fields with actual values.
- Process the email subject template, replacing template fields with actual values.
- Send the email.
A couple of sample template files are found in the src/config/email_templates directory of the GitHub repository.
Tip
You can use template fields in email subjects too!
Using custom links in templates
Links to Qlik Sense QMC and Hub (for both client-managed and Qlik Sense Cloud) can be included in email templates.
It is also possible to define custom links in the config file, and use them in email templates.
This is described here: Custom links in alerts.
Template fields reference
A complete list of template fields - including descriptions - is available in the Reference section.
3.6.1.2 - Reload alerts in InfluxDB
What’s this?
Butler can store information about both successful and failed reload tasks in InfluxDB.
- If enabled, Butler will store information about all failed reload tasks to InfluxDB.
- For successful reload tasks, there are two options:
- Store information about all successful reload tasks to InfluxDB.
- Store information about some successful reload tasks to InfluxDB.
Which tasks to store information about is controlled using a custom property on the reload task.
Once the information about the reload task is in InfluxDB it can be used in Grafana dashboards.
This way it is possible to get a good, continuous overview of the reload activity in your Qlik Sense environment.
You can also use the information to create alerts in Grafana using it’s comprehensive alerting capabilities, including alerting to Slack, Teams, email, etc.
Please note that InfluxDB must be enabled and correctly configured in the Butler config file for the below features to work.
Monitor failed reload tasks
If enabled using the Butler.influxDb.reloadTaskFailure.enable setting, Butler will store information about all failed reload tasks in InfluxDB.
The information stored includes (among other things):
- The name and ID of the app that the failed reload task was reloading.
- The name and ID of the reload task.
- The name of the Qlik Sense node/server that the task was running on.
- User who started the reload task. This will be the service account when the task was started by a schedule or via a task chain/trigger.
- Execution ID of the reload. This is a unique ID that is generated by Qlik Sense for each reload task execution, it can be used to cross-reference the reload task with related entries in the Qlik Sense log files.
- Last
Butler.influxDb.reloadTaskFailure.tailScriptLogLineslines of the Sense log file for the reload task. - Static tags defined in the config file’s
Butler.influxDb.reloadTaskFailure.tag.staticsection. - Dynamic app tags, i.e. Sense tags for the app being reloaded, if enabled in the config file
Butler.influxDb.reloadTaskFailure.tag.dynamic.useAppTagssection. - Dynamic reload task tags, i.e. Sense tags for the reload task being executed, if enabled in the config file
Butler.influxDb.reloadTaskFailure.tag.dynamic.useTaskTagssection.
A complete definition of all information sent to InfluxDB is available in the reference section.
Monitor successful reload tasks
Butler can monitor all reload tasks for successful completion, or only some of them.
Monitor all successful reload tasks
If enabled using the Butler.influxDb.reloadTaskSuccess.allReloadTasks.enable setting, Butler will store information about all successful reload tasks in InfluxDB.
The information stored is almost the same as for failed reload tasks, except that the Sense script log file is not included.
Monitor only some successful reload tasks
If enabled using the Butler.influxDb.reloadTaskSuccess.byCustomProperty.enable setting, Butler will store information about only some successful reload tasks in InfluxDB.
Which tasks to store information about is controlled using a custom property on the reload task.
The name of the custom property is defined in the Butler.influxDb.reloadTaskSuccess.byCustomProperty.customPropertyName setting.
The value of the custom property that will be used to indicate that the reload task should be monitored is defined in the Butler.influxDb.reloadTaskSuccess.byCustomProperty.enabledValue setting.
Static vs dynamic tags
Butler offers two kinds of tags: Static and dynamic.
Static tags are defined in the config file and are the same for all messages stored in InfluxDB.
An example of a static tag could be the name of the Qlik Sense server that Butler is running on, or whether the message related to a production or test Qlik Sense environment.
Dynamic attributes are determined at run-time when the message is stored in InfluxDB.
Settings in config file
---
Butler:
  ...
  ...
  influxDb:
    ...
    ...
    reloadTaskFailure:
      enable: true
      tailScriptLogLines: 20
      tag:
        static:                 # Static tags to attach to data stored in InfluxDB
          - name: butler_instance
            value: prod-1
        dynamic:
          useAppTags: true      # Should app tags be stored in InfluxDB as tags?
          useTaskTags: true     # Should task tags be stored in InfluxDB as tags?
    reloadTaskSuccess:
      enable: true
      allReloadTasks:
        enable: false
      byCustomProperty:
        enable: true
        customPropertyName: 'Butler_SuccessReloadTask_InfluxDB'
        enabledValue: 'Yes'
      tag:
        static:                 # Static attributes/dimensions to attach to events sent to InfluxDb
          # - name: event-specific-tag 1
          #   value: abc 123
        dynamic:
          useAppTags: true      # Should app tags be sent to InfluxDb as tags?
          useTaskTags: true     # Should task tags be sent to InfluxDb as tags?
  ...
  ...
3.6.1.3 - Reload alerts via New Relic
What’s this?
Butler can send two kinds of messages to New Relic:
- When a scheduled or started from the QMC reload task fails.
- When a scheduled or started from the QMC reload task is somehow stopped/aborted.
See the Concepts section for examples on what a New Relic alert can look like.
This page has additional info on how to set up Butler to work with New Relic.
A complete reference to the config file format is found here.
Different kinds of New Relic messages
Two kinds of messages can be sent to New Relic: Events and log messages.
The difference between them is that New Relic events are meant to be used for alerting, while New Relic log messages are meant to be used for troubleshooting.
Events are more flexible in terms of what data can be included in them, whereas log messages are just that - parts of Sense log files sent to New Relic.
Together they provide a powerful combination of alerting and troubleshooting capabilities, but they can also be enabled independently of each other.
Destination accounts
New Relic does not have very good access control capabilities for their dashboards, so if you want certain people to see only some reload alerts, and other people to see other alerts, you need to create multiple New Relic accounts.
Butler supports this scenario and can send messages to one or more New Relic accounts.
It is possible to specify per reload task which New Relic account(s) to send alerts to.
Three pieces of information is needed for each New Relic account that Butler should send messages to:
- The name of the New Relic account. This is just a name that you choose, it is not used for anything other than to identify the account in Butler’s config file and in the custom properties of Qlik Sense reload tasks.
- The New Relic account ID.
- The New Relic insert/API key. This is basically a secret key that is used to authenticate Butler with New Relic.
Account numbers and insert keys are available in the New Relic UI, under “Account settings” > “Data sharing”.
Authentication and credentials
Butler looks for New Relic account names, account ID and API keys in two places:
- The command line, using the
--new-relic-account-name,--new-relic-account-idand--new-relic-api-keyoptions.- If you have multiple New Relic accounts they should be listed in sequence, separated by space.
- Account names can include spaces, but should then be enclosed in double quotes.
- Example:
--new-relic-account-name "First New Relic account" "Second New Relic account" --new-relic-api-key 1234567890abcdef 0987654321fedcba --new-relic-account-id 1234567 7654321
- The config file, in the
Butler.thirdPartyToolsCredentials.newRelicsection.
Standard attributes
When sending messages to New Relic you can include “attributes”.
Attributes are key/value pairs that can be used to provide additional information about the message.
They can be added to both events and log messages.
Attributes can be used in New Relic dashboards to filter and group messages in various ways.
Static vs dynamic attributes
Butler offers two kinds of attributes: Static and dynamic.
Static attributes are defined in the config file and are the same for all messages sent to New Relic.
An example of a static attribute could be the name of the Qlik Sense server that Butler is running on, or whether the message related to a production or test Qlik Sense environment.
Dynamic attributes are determined at run-time when the message is sent to New Relic.
Examples include:
- Sense tags that are assigned to the reload task that failed. Their names are
qs_appTag_<tag name> - App tags of the app that failed to reload. Their names are
qs_taskTag_<tag name>
Shared settings
Some settings are shared between events and log messages, these are found in the sharedSettings sections of the config file.
Values there will be used for both events and log messages, unless they are overridden in the respective events or logMessages sections of the config file.
Settings in config file
---
Butler:
  ...
  ...
  thirdPartyToolsCredentials:
    newRelic:         # Array of New Relic accounts/insert keys. Any data sent to New Relic will be sent to both accounts.
      - accountName: First NR account
        insertApiKey: <API key 1 (with insert permissions) from New Relic>
        accountId: <New Relic account ID 1>
      - accountName: Second NR account
        insertApiKey: <API key 2 (with insert permissions) from New Relic>
        accountId: <New Relic account ID 2>
  ...
  ...
  incidentTool:
    newRelic:
      enable: false
      destinationAccount:
        event:                    # Failed/aborted reload tasks are sent as events to these New Relic accounts
          - First NR account
          - Second NR account
        log:                      # Failed/aborted reload tasks are sent as log entries to these New Relic accounts
          - First NR account
          - Second NR account
      # New Relic uses different API URLs for different kinds of data (metrics, events, logs, ...)
      # There are different URLs depending on whther you have an EU or US region New Relic account.
      # The available URLs are listed here: https://docs.newrelic.com/docs/accounts/accounts-billing/account-setup/choose-your-data-center/
      url:
        # As of this writing the valid options are
        # https://insights-collector.eu01.nr-data.net
        # https://insights-collector.newrelic.com
        event: https://insights-collector.eu01.nr-data.net

        # Valid options are (1) EU/rest of world and 2) US)
        # https://log-api.eu.newrelic.com/log/v1
        # https://log-api.newrelic.com/log/v1
        log: https://log-api.eu.newrelic.com/log/v1
      reloadTaskFailure:
        destination:
          event:
            enable: false
            sendToAccount:              # Which reload task failures are sent to New Relic as events
              byCustomProperty:
                enable: false            # Control using a task custom property which reload task failures are sent as events
                customPropertyName: 'Butler_FailedTask_Event_NewRelicAccount'
              always:
                enable: false            # Controls which New Relic accounts ALL failed reload tasks are sent to (as events)
                account:
                  - First NR account
                  - Second NR account
            attribute:
              static:                 # Static attributes/dimensions to attach to events sent to New Relic.
                - name: event-specific-attribute 1  # Example
                  value: abc 123                    # Example
              dynamic:
                useAppTags: true      # Should app tags be sent to New Relic as attributes?
                useTaskTags: true     # Should task tags be sent to New Relic as attributes?
          log:
            enable: false
            tailScriptLogLines: 20
            sendToAccount:              # Which reload task failures are sent to New Relic as log entries
              byCustomProperty:
                enable: false            # Control using a task custom property which reload task failures are sent as log entries
                customPropertyName: 'Butler_FailedTask_Log_NewRelicAccount'
              always:
                enable: false            # Controls which New Relic accounts ALL failed reload tasks are sent to (as logs)
                account:
                  - First NR account
                  - Second NR account
            attribute:
              static:                 # Static attributes/dimensions to attach to events sent to New Relic.
                - name: log-specific-attribute 1    # Example
                  value: def 123                    # Example
              dynamic:
                useAppTags: true      # Should app tags be sent to New Relic as attributes?
                useTaskTags: true     # Should task tags be sent to New Relic as attributes?
        sharedSettings:
          rateLimit: 15             # Min seconds between events sent to New Relic for a given taskID. Defaults to 5 minutes.
          header:                   # Custom http headers
            - name: X-My-Header     # Example
              value: Header value 1 # Example
          attribute:
            static:                 # Static attributes/dimensions to attach to events sent to New Relic.
              - name: service       # Example
                value: butler       # Example
              - name: environment   # Example
                value: prod         # Example
      reloadTaskAborted:
        destination:
          event:
            enable: false
            sendToAccount:              # Which reload task aborts are sent to New Relic as events
              byCustomProperty:
                enable: false            # Control using a task custom property which reload task aborts are sent as events
                customPropertyName: 'Butler_AbortedTask_Event_NewRelicAccount'
              always:
                enable: false            # Controls which New Relic accounts ALL aborted reload tasks are sent to (as events)
                account:
                  - First NR account
                  - Second NR account
            attribute:
              static:                 # Static attributes/dimensions to attach to events sent to New Relic.
                - name: event-specific-attribute 2  # Example
                  value: abc 123                    # Example
              dynamic:
                useAppTags: true      # Should app tags be sent to New Relic as attributes?
                useTaskTags: true     # Should task tags be sent to New Relic as attributes?
          log:
            enable: false
            tailScriptLogLines: 20
            sendToAccount:              # Which reload task aborts are sent to New Relic as log entries
              byCustomProperty:
                enable: true            # Control using a task custom property which reload task aborts are sent as log entries
                customPropertyName: 'Butler_AbortedTask_Log_NewRelicAccount'
              always:
                enable: false          # Controls which New Relic accounts ALL aborted reload tasks are sent to (as logs)
                account:
                  - First NR account
                  - Second NR account
            attribute:
              static:                 # Static attributes/dimensions to attach to events sent to New Relic.
                - name: log-specific-attribute 2    # Example
                  value: def 123                    # Example
              dynamic:
                useAppTags: true      # Should app tags be sent to New Relic as attributes?
                useTaskTags: true     # Should task tags be sent to New Relic as attributes?
        sharedSettings:
          rateLimit: 15             # Min seconds between events sent to New Relic for a given taskID. Defaults to 5 minutes.
          header:                   # Custom http headers
            - name: X-My-Header     # Example
              value: Header value 2 # Example
          attribute:
            static:                 # Static attributes/dimensions to attach to events sent to New Relic.
              - name: service       # Example
                value: butler       # Example
              - name: environment   # Example
                value: prod         # Example
      serviceMonitor:
        destination:
          event:
            enable: false
            sendToAccount:                # Windows service events are sent to these New Relic accounts
              - First NR account
              - Second NR account
            attribute:
              static:                     # Static attributes/dimensions to attach to events sent to New Relic.
                - name: event-specific-attribute
                  value: abc 123
              dynamic:
                serviceHost: true         # Should host where service is running be sent to New Relic as attribute?
                serviceName: true         # Should service name be sent to New Relic as attribute?
                serviceDisplayName: true  # Should service display name be sent to New Relic as attribute?
                serviceState: true        # Should service state be sent to New Relic as attribute?
          log:
            enable: false
            sendToAccount:                # Windows service log entries are sent to these New Relic accounts
              - First NR account
              - Second NR account
            attribute:
              static:                     # Static attributes/dimensions to attach to events sent to New Relic.
                - name: log-specific-attribute
                  value: def 456
              dynamic:
                serviceHost: true         # Should host where service is running be sent to New Relic as attribute?
                serviceName: true         # Should service name be sent to New Relic as attribute?
                serviceDisplayName: true  # Should service display name be sent to New Relic as attribute?
                serviceState: true        # Should service state be sent to New Relic as attribute?
        monitorServiceState:              # Control whih service states are sent to New Relic
          running:
            enable: true
          stopped:
            enable: true
        sharedSettings:
          rateLimit: 5                    # Min seconds between events/logs sent to New Relic for a given host+service. Defaults to 5 minutes.
          header:                         # Custom http headers
            - name: X-My-Header           # Example
              value: Header value 2       # Example
          attribute:
            static:                       # Static attributes/dimensions to attach to events sent to New Relic.
              - name: service             # Example
                value: butler             # Example
              - name: environment         # Example
                value: prod               # Example

  ...
  ...
3.6.1.4 - Reload alerts via Slack
What’s this?
Butler can send two kinds of alert messages via Slack:
- When a reload task fails.
- When a reload task is stopped/aborted.
See the Concepts section for additional details.
A complete reference to the config file format is found here.
Basic vs formatted Slack alerts
Slack alerts come in two forms:
- Customizable formatting using a template concept. A standard template that will fit most use cases is included with Butler. Using this option the first and last parts of the script log can be included in the message, allowing you to tell from the Slack message what caused the reload to fail.
You can also add buttons to the message that can be used to open any URL you want, or open the app that failed reloading. - A fixed, more basic format that is built into Butler. No template file needed, but also less detailed.
Which option to go for depends on whether you want just a notification that something went wrong, or if you want as much detail as possible in the Slack message. In most cases the customizable formatting is the best option.
Sample message with custom formatting
Note
The concept described below is the same for failed and aborted reload tasks.
Each of these have their own settings in the config file.
A “reload task failed” Slack message using the custom formatting option could look like this:

Here’s how to set this up:
-
Create an incoming webhook in Slack, take note of its URL (you will need it in step 2 below).
-
Edit the Slack section of the config file, i.e. the settings in
Butler.slackNotification.reloadTaskFailure.The
messageTypeproperty should be set toformatted.
ThebasicMsgTemplateproperty is not used with formatted messages and can thus be left empty, -
Edit the template file if/as needed, the file is specified in
Butler.slackNotification.reloadTaskFailure.templateFile. It uses the Handlebars templating engine, to which Butler provides template fields with actual values.The available template fields are described here.
Sample template files are included in the release Zip file, and are also available in the GitHub repository’s src/config/slack_templates directory.
-
Restart Butler if it’s already running.
Sample message with basic formatting
Note
The concept described below is the same for failed and aborted reload tasks.
Each of these have their own settings in the config file.
A “reload task failed” Slack message with basic formatting could look like this:

To set it up:
-
Create an incoming webhook in Slack if you don’t already have one, take note of its URL (you will need it in step 2 below).
-
Edit the Slack section of the config file, i.e. in
Butler.slackNotification.reloadTaskFailure.The
messageTypeproperty should be set tobasic.
ThebasicMsgTemplateproperty is the message that will be sent via Slack. Template fields can be used. -
Restart Butler if it’s already running.
Customizing Slack messages
When using the formatted Slack alerts you have full freedom to create the alert you need.
Behind the scenes Slack messages are constructed from blocks defined in a JSON object. Each block can then contain either plain text, Markdown, images, buttons etc.
The Slack documentation is the best place for learning how to customize messages.
When it comes to Butler, it uses the Handlebars templating engine to render the template files into Slack JSON objects that are then sent to Slack via their APIs.
A few things to keep in mind when creating custom Slack messages:
- The handlebars syntax itself must be correct. If incorrect no Slack JSON object will be created. And no Slack messages sent.
- The handlebars template must result in a JSON object that adheres to Slack’s API specifications.
If the JSON syntax is somehow invalid the Slack API will return errors and no messages sent. JSON can be pretty sensitive to details, there should for example not be any trailing commas in properly formatted JSON objects.
Some useful links to Slacks’s documentation:
- Creating rich message layouts: General info on how messages are structured and created..
- Formatting text for app surfaces: How to use markdown, formatting of links, escaping text etc..
- Reference: Layout blocks: The official docs for creating Slack messages.
- Block Kit Builder: Great sandbox with readily available examples of different message layouts, syntax and more. Note: You must be logged into your Slack account to use this tool.
Using custom links in templates
It is also possible to define custom links in the config file, and use them in Slack templates.
This is described here: Custom links in alerts.
How it works
Warning
Don’t forget to create the log appender .xml files on the Sense server(s).
This page describes how.
Those xml files are the foundation on top of which all Butler alerts are built - without them the alerts described on this page won’t work.
The concept is the same for all alert types, see the email alerts for details.
Settings in config file
---
Butler:
  ...
  ...
  # Settings for notifications and messages sent to Slack
  slackNotification:
    enable: false
    restMessage:
      webhookURL: <web hook URL from Slack>   # Webhook to use when sending basic Slack messages via Butler's REST API
    reloadTaskFailure:                # Reload task failed in QSEoW
      enable: false
      webhookURL: <web hook URL from Slack>
      channel: sense-task-failure     # Slack channel to which task failure notifications are sent
      messageType: formatted          # formatted / basic. Formatted means that template file below will be used to create the message.
      basicMsgTemplate: 'Qlik Sense reload failed: "{{taskName}}"'      # Only needed if message type = basic
      rateLimit: 300                  # Min seconds between emails for a given taskID. Defaults to 5 minutes.
      headScriptLogLines: 10
      tailScriptLogLines: 10
      templateFile: /path/to/slack/template/directory/failed-reload-qseow.handlebars
      fromUser: Qlik Sense
      iconEmoji: ':ghost:'
    reloadTaskAborted:                # Reload task aborted in QSEoW
      enable: false
      webhookURL: <web hook URL from Slack>
      channel: sense-task-aborted     # Slack channel to which task stopped notifications are sent
      messageType: formatted          # formatted / basic. Formatted means that template file below will be used to create the message.
      basicMsgTemplate: 'Qlik Sense reload aborted: "{{taskName}}"'       # Only needed if message type = basic
      rateLimit: 300                  # Min seconds between emails for a given taskID. Defaults to 5 minutes.
      headScriptLogLines: 10
      tailScriptLogLines: 10
      templateFile: /path/to/slack/template/directory/aborted-reload-qseow.handlebars
      fromUser: Qlik Sense
      iconEmoji: ':ghost:'

  ...
  ...
  udpServerConfig:
    enable: false                                     # Should the UDP server responsible for receving task failure and session events be started? true/false
    serverHost: <FQDN or IP (or localhost) of server where Butler is running>
    portTaskFailure: 9998
  ...
  ...
3.6.1.5 - Reload alerts via Microsoft Teams
What’s this?
Butler can send two kinds of alert messages via Teams:
- When a reload task fails.
- When a reload task is somehow stopped/aborted.
See the Concepts section for additional details.
A complete reference to the config file format is found here.
Basic vs formatted Teams alerts
Teams alerts come in two forms:
- Customizable formatting using a template concept. A standard template that will fit most use cases is included with Butler. With this option the first and last parts of the script log can be included in the message, allowing you to tell from the Teams message what caused the reload to fail.
You can also add buttons to the message that can be used to open any URL you want, or open the app that failed reloading. - A fixed, more basic format that is built into Butler. No template file needed.
Which option to go for depends on whether you want just a notification that something went wrong, or if you want as much detail as possible in the Teams message.
Sample message with custom formatting
Note
The concept described below is the same for failed and aborted reload tasks.
Each of these have their own settings in the config file.
A “reload task failed” Teams message using the custom formatting option could look like this:

Here’s how to set it up:
-
Create a workflow in Teams, take note of its URL (you will need it in step 2 below). More information on how to create a Teams workflow in the Concepts section.
-
Edit the Teams section of the config file, i.e. the settings in
Butler.teamsNotification.reloadTaskFailure.The
messageTypeproperty should be set toformatted.
ThebasicMsgTemplateproperty is not used with formatted messages and can thus be left empty, -
Edit the template file if/as needed, the file is specified in
Butler.teamsNotification.reloadTaskFailure.templateFile.It uses the Handlebars templating engine, to which Butler provides template fields with actual values.The available template fields are described here.
Sample template files are included in the release Zip file, and are also available in the GitHub repository’s src/config/teams_templates directory.
-
Restart Butler if it’s already running.
Sample message with basic formatting
Note
The concept described below is the same for failed and aborted reload tasks.
Each of these have their own settings in the config file.
A “reload task failed” Teams message with basic formatting could look like this:

To set it up:
-
Create an incoming webhook in Teams if you don’t already have one, take note of its URL (you will need it in step 2 below).
-
Edit the Teams section of the config file i.e. the settings in
Butler.teamsNotification.reloadTaskFailureand/orButler.teamsNotification.reloadTaskAbortedsections of the config file.The
messageTypeproperty should be set tobasic.
ThebasicMsgTemplateproperty is the message that will be sent via Teams. Template fields can be used. -
Restart Butler if it’s already running.
Customizing Teams messages
When using the formatted Teams alerts you have full freedom to create the alert you need.
Behind the scenes Teams messages are constructed as “Adaptive Cards”, which is standardized JSON format that Teams understands.
More information on Adaptive Cards can be found here, here and here.
When it comes to Butler, it uses the Handlebars templating engine to render a template file into an adaptive card JSON object that is then sent to the workflow webhook.
A few things to keep in mind when creating custom Teams messages:
- The handlebars syntax itself must be correct. If incorrect no Teams JSON object will be created. And no Teams message sent.
- The handlebars template must result in a JSON object that adheres to Teams’s specifications for JSON payloads.
If the JSON syntax is somehow invalid the Teams API will return errors and no messages sent. JSON can be pretty sensitive to details, there should for example not be any trailing commas in properly formatted JSON objects.
Using custom links in templates
It is also possible to define custom links in the config file, and use them in Teams templates.
This is described here: Custom links in alerts.
How it works
Warning
Don’t forget to create the log appender .xml files on the Sense server(s).
This page describes how.
Those xml files are the foundation on top of which all Butler alerts are built - without them the alerts described on this page won’t work.
The concept is the same as for all alert types.
Settings in config file
---
Butler:
  ...
  ...
  # Settings for notifications and messages sent to MS Teams
  teamsNotification:
    enable: false
    reloadTaskFailure:
      enable: false
      webhookURL: <web hook URL from MS Teams>
      messageType: formatted     # formatted / basic. Formatted means that template file below will be used to create the message.
      basicMsgTemplate: 'Qlik Sense reload failed: "{{taskName}}"'      # Only needed if message type = basic
      rateLimit: 300             # Min seconds between emails for a given taskID. Defaults to 5 minutes.
      headScriptLogLines: 10
      tailScriptLogLines: 10
      templateFile: /path/to/teams/template/directory/failed-reload-qseow.handlebars
    reloadTaskAborted:
      enable: false
      webhookURL: <web hook URL from MS Teams>
      messageType: formatted     # formatted / basic. Formatted means that template file below will be used to create the message.
      basicMsgTemplate: 'Qlik Sense reload aborted: "{{taskName}}"'       # Only needed if message type = basic
      rateLimit: 300             # Min seconds between emails for a given taskID. Defaults to 5 minutes.
      headScriptLogLines: 10
      tailScriptLogLines: 10
      templateFile: /path/to/teams/template/directory/aborted-reload-qseow.handlebars
  ...
  ...
  udpServerConfig:
    enable: false                                     # Should the UDP server responsible for receving task failure and session events be started? true/false
    serverHost: <FQDN or IP (or localhost) of server where Butler is running>
    portTaskFailure: 9998
  ...
  ...
3.6.1.6 - Reload alerts via MQTT
What’s this?
Butler can send two kinds of alert messages as MQTT messages:
- When a scheduled, running reload task fails.
- When a scheduled, running reload task is somehow stopped.
How it works
Basic message
The MQTT message will be sent on the MQTT topic defined in the config file property Butler.mqttConfig.taskAbortedTopic or Butler.mqttConfig.taskFailureTopic, depending on the event type.
The task name will be sent in the message body.
The basic message looks like this when viewed in the MQTTLens app:

Complete message
Optionally a larger, more complete message is also sent if Butler.mqttConfig.taskFailureSendFull or Butler.mqttConfig.taskFailureSendFull are set to true.
This message contains a stringified JSON of all available information about the failed/aborted task.
The message is sent on the Butler.mqttConfig.taskFailureFullTopic or Butler.mqttConfig.taskAbortedFullTopic topics.
That message can look like this:

Remember
Don’t forget to create the log appender .xml files on the Sense server(s).
This page describes how.
Those xml files are the foundation on top of which all Butler alerts are built - without them the alerts described on this page won’t work.
The concept is more or less the same as for alert emails.
Settings in config file
---
Butler:
  ...
  ...
  mqttConfig:
    enable: false                                     # Should Qlik Sense events be forwarded as MQTT messages?
    brokerHost: <FQDN or IP of MQTT server>
    brokerPort: 1883
    azureEventGrid:
      enable: false              # If set to true, Butler will connect to an Azure Event Grid MQTT Broker, using brokerHost and brokerPort above
      clientId: <client ID>
      clientCertFile: <path to client certificate file>
      clientKeyFile: <path to client key file>
    taskFailureSendFull: true
    taskAbortedSendFull: true
    subscriptionRootTopic: qliksense/#                                  # Topic that Butler will subscribe to
    taskStartTopic: qliksense/start_task                                # Topic for incoming messages used to start Sense tasks. Should be subtopic to subscriptionRootTopic
    taskFailureTopic: qliksense/task_failure
    taskFailureFullTopic: qliksense/task_failure_full
    taskFailureServerStatusTopic: qliksense/butler/task_failure_server
    taskAbortedTopic: qliksense/task_aborted
    taskAbortedFullTopic: qliksense/task_aborted_full
  ...
  ...
  udpServerConfig:
    enable: false                                     # Should the UDP server responsible for receving task failure and session events be started? true/false
    serverHost: <FQDN or IP (or localhost) of server where Butler is running>
    portTaskFailure: 9998
  ...
  ...
3.6.1.7 - Reload alerts via outgoing webhooks
What’s this?
Butler can send two kinds of alert messages as outgoing webhooks:
- When a scheduled, running reload task fails.
- When a scheduled, running reload task is somehow stopped/aborted.
How it works
Outgoing webhooks is a concept where Butler will do a GET, POST or PUT HTTP call to a specific URL when a task fails or is aborted/stopped.
The use case is to interface with currently unknown third party systems in a generic way.
Both http and https calls are supported, including the use of self-signed certificates and untrusted certificates.
As the call will include information about the failed/aborted task, the typical (and arguably most correct) way of doing this would be via a PUT call.
But some systems only handle GET calls - and Butler should still be able to notify them using webhooks.
The chosen solution is to offer full flexibility for outgoing webhooks and support both GET, PUT and POST calls.
Webhook notifications can be turned off all together with the Butler.webhookNotification.enable property in the config file.
If that property is true both task fail and abort webhooks are enabled.
If you don’t need any outgoing webhooks you should keep the Butler.webhookNotification.reloadTaskFailure.webhooks and Butler.webhookNotification.reloadTaskAborted.webhooks arrays empty.
There are also rate limiting properties that are used to ensure that webhooks are not sent too often.
Certificates and https
Outgoing webhooks can use http or https.
If https is used and the server being called uses a publicly trusted certificate, no additional configuration is needed.
If the server uses a self-signed certificate, the corresponding root CA certificate must be provided to Butler in order to avoid certificate validation errors.
Each webhook has its own certificate configuration, so Butler can be integrated with many systems, each using their own publicly verified or self-signed certificates - or just plain http without any certificates at all.
The certificate configuration is done in the Butler config file and looks like this for each webhook:
---
cert:
  enable: true # Set to true to use a custom CA certificate when calling the webhookURL
  rejectUnauthorized: true # Set to false to ignore warnings/errors caused by self-signed certificates used on the webhooks server.
  certCA: /path/to/ca-certificate.pem # Path to the CA certificate file
If ...cert.enable is set to true Butler will use the certificate specified in ...cert.certCA when calling the webhook.
If ...cert.rejectUnauthorized is set to false Butler will ignore warnings/errors caused by self-signed certificates being used on the webhook server.
Data included in outgoing webhooks
This information is included in all outgoing webhook calls:
| Field | Description |
|---|---|
| event | Type of event, for example Qlik Sense reload failed. |
| hostName | Name of server where the event took place. |
| user | User directory/userId of user causing the event. For task failures this will be the user account used to do the reload. For aborts it will be the user stopping/aborting the task. |
| taskName | Task name |
| taskId | Task ID |
| appName | App name |
| appId | App ID |
| logTimeStamp | Timestamp entry in the Qlik Sense log files when the event took place. |
| logLevel | Log level used in the Qlik Sense log file in which the event was detected by the log appender. |
| executionId | Execution ID of the failed/aborted task. |
| logMessage | Message in Qlik Sense log file that triggered the event. |
GET call
When doing GET calls all the data fields will be passed as search parameters in the URL.
For example, a failed task GET call to a remote URL could look like this:
http://someremote.system.com/butler_get?event=Qlik+Sense+reload+failed&hostName=pro2-win1&user=LAB%5Cgoran&taskName=Manually+triggered+reload+of+Test+failing+reloads+2&taskId=dec2a02a-1680-44ef-8dc2-e2bfb180af87&appName=Test+failing+reloads+2&appId=e7af59a0-c243-480d-9571-08727551a66f&logTimeStamp=2021-02-16+09%3A24%3A59%2C099&logLevel=INFO&executionId=14a81bf5-f81c-4047-b1a1-193b0920de28&logMessage=Max+retries+reached
The received/remote system can then unpack the URL parameters and use them as needed.
PUT and POST calls
PUT and POST calls work the same when it comes to Butler’s outgoing webhooks:
- A stringified JSON is created based on the event’s data fields.
- The string is sent in the POST/PUT call’s body.
The same event as above looks like this:
{
  "event": "Qlik Sense reload failed",
  "hostName": "pro2-win1",
  "user": "LAB\\goran",
  "taskName": "Manually triggered reload of Test failing reloads 2",
  "taskId": "dec2a02a-1680-44ef-8dc2-e2bfb180af87",
  "appName": "Test failing reloads 2",
  "appId": "e7af59a0-c243-480d-9571-08727551a66f",
  "logTimeStamp": "2021-02-16 09:24:59,099",
  "logLevel": "INFO",
  "executionId": "14a81bf5-f81c-4047-b1a1-193b0920de28",
  "logMessage": "Max retries reached"
}
Settings in config file
---
Butler:
  ...
  ...
  # Settings for notifications and messages sent using outgoing webhooks
  webhookNotification:
    enable: false
    reloadTaskFailure:
      rateLimit: 300              # Min seconds between outgoing webhook calls for a given taskID. Defaults to 5 minutes.
      webhooks:
        - description: 'This outgoing webhook is used to...'  # Informational only
          webhookURL: http://host.my.domain:port/some/path    # Outgoing webhook that Butler will call
          httpMethod: POST                                    # GET/POST/PUT
          cert:
            enable: false                                     # Set to true to use a custom CA certificate when calling the webhookURL
            rejectUnauthorized: true                          # Set to false to ignore warnings/errors caused by self-signed certificates used on the webhooks server.
            certCA: /path/to/ca-certificate.pem               # Path to the CA certificate file
        - description: 'This outgoing webhook is used to...'  # Informational only
          webhookURL: http://host.my.domain:port/some/path    # Outgoing webhook that Butler will call
          httpMethod: PUT                                     # GET/POST/PUT
          cert:
            enable: false                                     # Set to true to use a custom CA certificate when calling the webhookURL
            rejectUnauthorized: true                          # Set to false to ignore warnings/errors caused by self-signed certificates used on the webhooks server.
            certCA: /path/to/ca-certificate.pem               # Path to the CA certificate file
        - description: 'This outgoing webhook is used to...'  # Informational only
          webhookURL: http://host.my.domain:port/some/path    # Outgoing webhook that Butler will call
          httpMethod: GET                                     # GET/POST/PUT
          cert:
            enable: false                                     # Set to true to use a custom CA certificate when calling the webhookURL
            rejectUnauthorized: true                          # Set to false to ignore warnings/errors caused by self-signed certificates used on the webhooks server.
            certCA: /path/to/ca-certificate.pem               # Path to the CA certificate file
    reloadTaskAborted:
      rateLimit: 300              # Min seconds between outgoing webhook calls for a given taskID. Defaults to 5 minutes.
      webhooks:
        - description: 'This outgoing webhook is used to...'  # Informational only
          webhookURL: http://host.my.domain:port/some/path    # Outgoing webhook that Butler will call
          httpMethod: PUT                                     # GET/POST/PUT
          cert:
            enable: false                                     # Set to true to use a custom CA certificate when calling the webhookURL
            rejectUnauthorized: true                          # Set to false to ignore warnings/errors caused by self-signed certificates used on the webhooks server.
            certCA: /path/to/ca-certificate.pem               # Path to the CA certificate file
        - description: 'This outgoing webhook is used to...'  # Informational only
          webhookURL: http://host.my.domain:port/some/path    # Outgoing webhook that Butler will call
          httpMethod: POST                                    # GET/POST/PUT
          cert:
            enable: false                                     # Set to true to use a custom CA certificate when calling the webhookURL
            rejectUnauthorized: true                          # Set to false to ignore warnings/errors caused by self-signed certificates used on the webhooks server.
            certCA: /path/to/ca-certificate.pem               # Path to the CA certificate file
        - description: 'This outgoing webhook is used to...'  # Informational only
          webhookURL: http://host.my.domain:port/some/path    # Outgoing webhook that Butler will call
          httpMethod: GET                                     # GET/POST/PUT
          cert:
            enable: false                                     # Set to true to use a custom CA certificate when calling the webhookURL
            rejectUnauthorized: true                          # Set to false to ignore warnings/errors caused by self-signed certificates used on the webhooks server.
            certCA: /path/to/ca-certificate.pem               # Path to the CA certificate file
  ...
  ...
3.6.2 - Reload alerts for Qlik Sense Cloud
Butler offers a lot of flexibility when it comes to alerts when reloads fail in Qlik Sense Cloud.
Learn how to set up the desired features, the alert layout, formatting and more.
Warning
In general the information related to an app that failed reloading will not be very sensitive.
It’s app name, owner id, tenant id etc.
If this information is considered sensitive in your organization, you should consider the security implications of sending this information to service like Butler via the public Internet. The traffic will be https encrypted, but even so, the information will be sent over the public Internet.
As always, make sure to follow your organization’s security guidelines. Think before you act.
Alert types
These alert types are available:
- Reload task failure. Send alerts when app reloads fail.
Alert destinations and options
Alerts can be sent to these destinations, with different options available for each destination.
Each destination can be individually enabled/disabled in the config file.
| Destination | App reload failure | Enable/disable alert per app | Alerts to app owners | Flexible formatting | Basic formatting | Comment |
|---|---|---|---|---|---|---|
| ✅ | ✅ | ✅ | ✅ | |||
| Slack | ✅ | ✅ | ✅ | ✅ | ||
| MS Teams | ✅ | ✅ | ✅ | ✅ |
How it works
Somehow Butler needs to be notified when a reload task in Qlik Sense Cloud fails.
The only way to do this is currently (2024 October) to use Qlik Cloud’s outgoing webhooks, and have them triggered when the app reload fails.
So, the outbound webhook should call some URL it can reach.
In practice this means a URL on the public Internet.
This could be a Butler provided endpoint, but exposing Butler to the public Internet is not a good idea from a security perspective.
There are various ways to solve this, each described below.
More options for bringing Qlik Cloud events to Butler may be added in the future.
Option 1: Azure function forwarding event to MQTT
While this solution may be seen as a bit complex, it does offer some advantages:
- No need to expose Butler to the public Internet.
- The http-to-MQTT gateway is a minimal service that can be run as a serverless function in your cloud provider of choice, or on-premise in a de-militarized zone (DMZ). The point is that it’s a very small and simple service that both is easier to deploy and to secure, compared to a full Butler instance.
- Not having complex services like Butler exposed to the public Internet is a good security practice.
- The http-to-MQTT gateway can be used for other purposes too, such as sending MQTT messages to Butler when other events occur in your Qlik Cloud environment.
- The http-to-MQTT gateway can be used to send MQTT messages to other systems too, not just Butler.
- By exposing several https endpoints, The http-to-MQTT gateway can be used to send MQTT messages to Butler when events occur in other systems, not just Qlik Cloud.
- By using a serverless function in a cloud provider, the solution scales well and can benefit from the cloud provider’s security features.
- Low cost. The solution can even be run on a free tier in most cloud providers, and MQTT services are usually very cheap for the message volume in this scenario (one message per failed app reload).
- Fast. Events typically reach Butler within a few seconds after they occur in Qlik Cloud.
Downsides include:
- The solution is a bit complex to set up.
- The solution requires the http-to-MQTT gateway to be up and running at all times.
- A Internet connected MQTT broker is needed. There are several cloud based MQTT brokers available though.
The solution looks like this:

The webhook in Qlik Cloud is set up to call an Azure function when an app reload completes. The Azure function then sends an MQTT message to Butler.
The webhook is defined like this:

The webhook secret can be used in the gateway to verify that the webhook call is coming from an approved Qlik Cloud tenant.
Future options
Various solutions are possible, including:
- Qlik Cloud supporting other notification mechanisms, such as sending MQTT messages when app reloads fail.
- Qlik Cloud Application Automations supporting MQTT. The failed app reload could then be captured via an automation, and there forwarded to Butler via MQTT.
- Using a 3rd party service that runs a webhook-to-MQTT gateway in the cloud.
If the basic assumption is that you want to expose as little attack surface on the Internet as possible, the solution will most likely involve some kind of intermediate service that can be reached by Qlik Cloud, and that can in turn asynchronously forward the event to Butler.
Setting up the http-to-MQTT gateway
An Azure Function App is used in this example, but the same concept can be used with other cloud providers, or on-premise.
In the example below the Azure function is written in Node.js.
Note that the code below is a basic example that should be extended before being used in a production environment:
- Add proper error handling and logging
- Add better security, using the Qlik Cloud webhook secret to verify that the incoming request is coming from an approved Qlik Cloud tenant.
- The function does verify that the incoming request has a http header named
x-myheader-foo1, but it does not check the value of that header. Room for improvement there.
All in all the function does work, it has been in test use for some months and should serve well as a starting point for your own implementation.
import {
  app,
  HttpRequest,
  HttpResponseInit,
  InvocationContext,
} from "@azure/functions";
import { connectAsync } from "mqtt";

export async function qscloudreload(
  request: HttpRequest,
  context: InvocationContext
): Promise<HttpResponseInit> {
  context.log(`Http function processed request for url "${request.url}"`);
  context.log(`Request method: ${request.method}`);

  // Get query string parameters
  const query = Object.fromEntries(request.query.entries());
  context.log(`Request query:\n${JSON.stringify(query, null, 2)}`);

  // Ensure there are no query string parameters
  if (Object.keys(query).length > 0) {
    context.log("Too many query string parameters. Expected none.");
    return {
      status: 400,
      body: "Invalid query string parameters",
    };
  }

  // -----------------------------------------------------
  // Get headers
  const headers = Object.fromEntries(request.headers.entries());
  context.log(`Request headers:\n${JSON.stringify(headers, null, 2)}`);

  // Ensure the correct headers are present
  // The following headers are required:
  // - accept-encoding: gzip
  // - client-ip: <The IP address of the client making the request>
  // - content-length: <The length of the request body>
  // - content-type: application/json
  // - host: <The host name of the function app>
  // -  qlik-signature: <The Qlik Sense Cloud signature of the request>
  // - user-agent: Qlik Webhook
  // - x-forwarded-proto: https
  // - x-forwarded-tlsversion: 1.3
  //
  // Custom https headers (must also be present):
  // - x-myheader-foo1: bar1

  const requiredHeaders = [
    "accept-encoding",
    "client-ip",
    "content-length",
    "content-type",
    "host",
    "qlik-signature",
    "user-agent",
    "x-forwarded-proto",
    "x-forwarded-tlsversion",
    "x-myheader-foo1",
  ];

  for (const header of requiredHeaders) {
    if (!headers[header]) {
      context.log(`Missing required header: ${header}`);
      return {
        status: 400,
        body: `Missing required header`,
      };
    }
  }

  // Make sure select headers contain correct values
  // - accept-encoding: gzip
  // - content-type: application/json
  // - user-agent: Qlik Webhook
  // - x-forwarded-proto: https
  // - x-forwarded-tlsversion: 1.2 | 1.3
  if (headers["accept-encoding"] !== "gzip") {
    context.log(
      `Invalid header value for accept-encoding: ${headers["accept-encoding"]}`
    );
    return {
      status: 400,
      body: `Invalid header value for accept-encoding`,
    };
  }

  if (headers["content-type"] !== "application/json") {
    context.log(
      `Invalid header value for content-type: ${headers["content-type"]}`
    );
    return {
      status: 400,
      body: `Invalid header value for content-type`,
    };
  }

  if (headers["user-agent"] !== "Qlik Webhook") {
    context.log(
      `Invalid header value for user-agent: ${headers["user-agent"]}`
    );
    return {
      status: 400,
      body: `Invalid header value for user-agent`,
    };
  }

  if (headers["x-forwarded-proto"] !== "https") {
    context.log(
      `Invalid header value for x-forwarded-proto: ${headers["x-forwarded-proto"]}`
    );
    return {
      status: 400,
      body: `Invalid header value for x-forwarded-proto`,
    };
  }

  if (
    headers["x-forwarded-tlsversion"] !== "1.2" &&
    headers["x-forwarded-tlsversion"] !== "1.3"
  ) {
    context.log(
      `Invalid header value for x-forwarded-tlsversion: ${headers["x-forwarded-tlsversion"]}`
    );
    return {
      status: 400,
      body: `Invalid header value for x-forwarded-tlsversion`,
    };
  }

  // -----------------------------------------------------
  // Get request body
  let body: any = JSON.parse(await request.text());
  let bodyString = JSON.stringify(body, null, 2);
  context.log(`Request body:\n${bodyString}`);

  // Make sure the request body contains the expected properties
  // The following properties are required:
  // - cloudEventsVersion: 0.1
  // - source: com.qlik/engine,
  // - contentType: application/json,
  // - eventId: b0f5c473-5dea-4d7e-a188-5e0b904cde33,
  // - eventTime: 2024-07-27T13:57:27Z,
  // - eventTypeVersion: 1.0.0,
  // - eventType: com.qlik.v1.app.reload.finished,
  // - extensions: <object with the following properties>
  // -   ownerId: <userID of the owner of the Qlik Sense resource that triggered the event>
  // -   tenantId: <tenantID of the Qlik Sense tenant that contains the Qlik Sense resource that triggered the event>
  // -   userId: <userID of the user that triggered the event>
  // data: <object>
  const requiredProperties = [
    "cloudEventsVersion",
    "source",
    "contentType",
    "eventId",
    "eventTime",
    "eventTypeVersion",
    "eventType",
    "extensions",
    "data",
  ];

  for (const property of requiredProperties) {
    if (!body[property]) {
      context.log(`Missing required body property: ${property}`);
      return {
        status: 400,
        body: `Missing required body property`,
      };
    }
  }

  // Make sure the extensions object contains the expected properties
  // The following properties are required:
  // - ownerId: <userID of the owner of the Qlik Sense resource that triggered the event>
  // - tenantId: <tenantID of the Qlik Sense tenant that contains the Qlik Sense resource that triggered the event>
  // - userId: <userID of the user that triggered the event>
  const extensions = body.extensions;
  const extensionsProperties = ["ownerId", "tenantId", "userId"];

  for (const property of extensionsProperties) {
    if (!extensions[property]) {
      context.log(
        `Missing required extensions property in request body: ${property}`
      );
      return {
        status: 400,
        body: `Missing required extensions property`,
      };
    }
  }

  // Make sure select properties contain correct values
  // - cloudEventsVersion: 0.1
  // - contentType: application/json
  if (body.cloudEventsVersion !== "0.1") {
    context.log(
      `Invalid body value for cloudEventsVersion: ${body.cloudEventsVersion}`
    );
    return {
      status: 400,
      body: `Invalid body value for cloudEventsVersion`,
    };
  }

  if (body.contentType !== "application/json") {
    context.log(`Invalid body value for contentType: ${body.contentType}`);
    return {
      status: 400,
      body: `Invalid body value for contentType`,
    };
  }

  // -----------------------------------------------------
  // Forward message to MQTT broker
  const brokerHost = "hostname.of.mqtt.broker";
  const brokerPort = 8765;
  const mqttClient = await connectAsync(`mqtts://${brokerHost}:${brokerPort}`, {
    username: "my-username",
    password: "my-password",
  });
  const topic = `qscloud/app/reload/${body?.extensions?.tenantId}`;
  context.log(`Using MQTT topic: ${topic}`);

  context.log("MQTT client connected");
  mqttClient.publish(topic, bodyString, (err) => {
    if (err) {
      context.log(`Error publishing message: ${err}`);
    }
  });

  context.log("Message published");
  await mqttClient.endAsync();
  context.log("MQTT client disconnected");

  // Return a 200 response
  return {
    status: 200,
    // body: `Body received:\n${bodyString}`
    body: `OK. Message received.`,
  };
}

app.http("qscloudreload", {
  methods: ["POST"],
  authLevel: "anonymous",
  handler: qscloudreload,
});
Customizing the alerts
The alerts can be customized in the same ways as for Qlik Sense client-managed. More info at links below.
References
- Creating webhooks in Qlik Cloud: Qlik Cloud documentation
3.6.2.1 - Qlik Cloud reload alerts sent as emails
What’s this?
Butler can send these alert emails:
- When an app reload fails during execution.
See the Concepts section for additional details and sample alert emails.
Basic vs formatted email alerts
If you want Butler to send email alerts you must provide an email template file.
For some other alert destinations (Slack and Teams) Butler offers a “basic” option. A fixed format alert is then sent by Butler.
This is not the case for email alerts - there you must provide Butler with a template file.
Rate limiting and de-duplication
Butler has rate limiting feature to ensure alert recipients are not spammed with too many alert emails.
The rate limit is configured (in seconds) in the main config file in the Butler.qlikSenseCloud.event.mqtt.tenant.alert.emailNotification.reloadAppFailure.rateLimit setting in the config file.
Rate limiting is done based on app reload ID + email address.
Butler also has a de-duplication feature that ensure each email address that has qualified for an alert email only gets ONE email per alert, even if the email address (for example) appears as both an app owner and is specified via an app tag.
Sending test emails to verify correct settings
See the same section for client-managed Qlik Sense.
The commands are identical.
Sending alert emails to app owners
Butler can optionally send alert emails to the owner of apps that fail reloading.
Note
App owner notification email can only be sent to app owners that have an email stored in their Qlik Cloud user profile.
If there is no email available for an app owner, he/she will simply not receive any alert emails.
This feature is controlled by the config file properties Butler.qlikSenseCloud.event.mqtt.tenant.alert.emailNotification.reloadAppFailure.appOwnerAlert.enable.
If set to true the app owner will be added to the send list of alert emails, in addition to the recipients specified in Butler.qlikSenseCloud.event.mqtt.tenant.alert.emailNotification.reloadAppFailure.recipients.
The sections of the config file dealing with app owner notification emails looks like this:
appOwnerAlert:
  enable: false # Should app owner get notification email (assuming email address is available in Sense)?
  includeOwner:
    includeAll:
      true # true = Send notification to all app owners except those in exclude list
      # false = Send notification to app owners in the include list
    user:# Array of app owner email addresses that should get notifications
      # - email: anna@somecompany.com
      # - email: joe@somecompany.com
  excludeOwner:
    user:
      # - email: daniel@somecompany.com
It works like this:
- If
appOwnerAlert.enableis set tofalseno app owner emails will be sent. If it’s set totruethe rules below apply. - If
appOwnerAlert.includeOwner.includeAllis set totrueall app owners will get notification emails when apps the own fail/are aborted…- … except those app owners listed in the
appOwnerAlert.excludeOwner.userarray. - That array thus provides a way to exclude some app owners (e.g. system accounts) to receive notification emails.
- … except those app owners listed in the
- If
appOwnerAlert.includeOwner.includeAllis set tofalseit’s still possible to add individual app owners to theappOwnerAlert.includeOwner.userarray.
Those users will then receive notification emails for apps they own.
Send alerts only for some apps
Some apps may be more important than others.
I.e. some apps should result in alert emails when they fail reloading, but others not.
Butler controls which app reload failures cause email alerts by looking at a specific app tag.
- If the config file setting
Butler.qlikSenseCloud.event.mqtt.tenant.alert.emailNotification.reloadAppFailure.alertEnableByTag.enableis set tofalse, all failed app reloads will result in alert emails. - If that setting is
trueonly some apps will cause alert emails when their reload fails:- If an app has the tag specified in
Butler.qlikSenseCloud.event.mqtt.tenant.alert.emailNotification.reloadAppFailure.alertEnableByTag.tag, an email alert will be sent for that app if it fails reloading. - If an app does not have that tag set, no alert will be sent for that app.
- If an app has the tag specified in
Some configuration in Sense is needed to make this work:
- Make changes to the config file. Specifically the settings mentioned above needs to be reviewed and (probably) updated.
- In Qlik Cloud, tag the apps that should cause alert emails when they fail reloading.
- Use the same tag as specified in the config file.
Looks like this in Qlik Sense Cloud:

How it works
The concept is the same for all alert types, see the this page for details.
Settings in config file
---
Butler:
  ...
  ...
  mqttConfig:
    enable: false                                     # Should Qlik Sense events be forwarded as MQTT messages?
    ...
    ...
    qlikSenseCloud:                                                   # MQTT settings for Qlik Sense Cloud integration
      event:
        mqttForward:                                                  # QS Cloud events forwarded to MQTT topics, which Butler will subscribe to
          enable: false
          broker:                                                     # Settings for MQTT broker to which QS Cloud events are forwarded
            host: mqttbroker.company.com
            port: <port>
            username: <username>
            password: <password>
          topic:
            subscriptionRoot: qscloud/#                     # Topic that Butler will subscribe to
            appReload: qscloud/app/reload
  ...
  ...
  qlikSenseCloud:                   # Settings for Qlik Sense Cloud integration
    enable: false
    event:
      mqtt:                         # Which QS Cloud tenant should Butler receive events from, in the form of MQTT messages?
        tenant:
          id: tenant.region.qlikcloud.com
          tenantUrl: https://tenant.region.qlikcloud.com
          authType: jwt             # Authentication type used to connect to the tenant. Valid options are "jwt"
          auth:
            jwt:
              token: <JWT token>    # JWT token used to authenticate Butler when connecting to the tenant
          # Qlik Sense Cloud related links used in notification messages
          qlikSenseUrls:
            qmc: <URL to QMC in Qlik Sense Cloud>
            hub: <URL to Hub in Qlik Sense Cloud>
          comment: This is a comment describing the tenant and its settings # Informational only
          alert:
            ...
            ...
            # Settings needed to send email notifications when for example reload tasks fail.
            # Reload failure notifications assume a log appender is configured in Sense AND that the UDP server in Butler is running.
            emailNotification:
              reloadAppFailure:
                enable: false                # Enable/disable app reload failed notifications via email
                alertEnableByTag:
                  enable: false
                  tag: Butler - Send email if app reload fails
                appOwnerAlert:
                  enable: false              # Should app owner get notification email (assuming email address is available in Sense)?
                  includeOwner:
                    includeAll: true                            # true = Send notification to all app owners except those in exclude list
                                                                # false = Send notification to app owners in the include list
                    user:                    # Array of app owner email addresses that should get notifications
                      # - email: anna@somecompany.com
                      # - email: joe@somecompany.com
                  excludeOwner:
                    user:
                      # - email: daniel@somecompany.com
                rateLimit: 60              # Min seconds between emails for a given taskID. Defaults to 5 minutes.
                headScriptLogLines: 15
                tailScriptLogLines: 25
                priority: high              # high/normal/low
                subject: '❌ Qlik Sense reload failed: "{{taskName}}"'
                bodyFileDirectory: /path/to//email_templates
                htmlTemplateFile: failed-reload-qscloud
                fromAddress: Qlik Sense (no-reply) <qliksense-noreply@ptarmiganlabs.com>
                recipients:
                  # - emma@somecompany.com
                  # - patrick@somecompany.com
  ...
  ...
Templates: Configuring email appearance
Alert emails use standard HTML formatting. Inline CSS can be used (if so desired) for fine tuning the visual look of the alert email.
Butler’s process for sending alert emails is
- Figure out which email body template file should be used. This is determine by two set of fields in the main config file:
- For reload failure emails these config file properties are used:
Butler.qlikSenseCloud.event.mqtt.tenant.alert.emailNotification.reloadAppFailure.bodyFileDirectoryandButler.qlikSenseCloud.event.mqtt.tenant.alert.emailNotification.reloadAppFailure.htmlTemplateFile. A.handlebarsextension is assumed.
- For reload failure emails these config file properties are used:
- Email subjects are specified in the config property
Butler.qlikSenseCloud.event.mqtt.tenant.alert.emailNotification.reloadAppFailure.subject. - Process the body template, replacing template fields with actual values.
- Process the email subject template, replacing template fields with actual values.
- Send the email.
A couple of sample template files are found in the src/config/email_templates directory of the GitHub repository.
Tip
You can use template fields in email subjects too!
Using custom links in templates
It is also possible to define custom links in the config file, and use them in email templates.
This is described here: Custom links in alerts.
Template fields reference
A complete list of template fields - including descriptions - is available in the Reference section.
3.6.2.2 - Reload alerts via Slack
What’s this?
Butler can send two kinds of alert messages via Slack:
- When an app fails during reload.
See the Concepts section for additional details.
A complete reference to the config file format is found here.
Basic vs formatted Slack alerts
Slack alerts come in two forms:
- Customizable formatting using a template concept. A standard template that will fit most use cases is included with Butler. Using this option the first and last parts of the script log can be included in the message, making it possible to tell from the Slack message what caused the reload to fail.
You can also add buttons to the message that can be used to open any URL you want, or open the app that failed reloading. - A fixed, more basic format that is built into Butler. No template file needed, but also less detailed.
Which option to go for depends on whether you want just a notification that something went wrong, or if you want as much detail as possible in the Slack message. In most cases the customizable formatting is the best option.
Sample message with custom formatting
An “app reload failed” Slack message using the custom formatting option could look like this:

Here’s how to set this up:
-
Create an incoming webhook in Slack, take note of its URL (you will need it in step 2 below).
-
Edit the Slack section of the config file, i.e. the settings in
Butler.qlikSenseCloud.event.mqtt.tenant.alert.slackNotification.reloadAppFailure.The
messageTypeproperty should be set toformatted.
ThebasicMsgTemplateproperty is not used with formatted messages and can thus be left empty, -
Edit the template file if/as needed, the file is specified in
Butler.qlikSenseCloud.event.mqtt.tenant.alert.slackNotification.reloadAppFailure.templateFile. It uses the Handlebars templating engine, to which Butler provides template fields with actual values.The available template fields are described here.
Sample template files are included in the release Zip file, and are also available in the GitHub repository’s src/config/slack_templates directory.
-
Restart Butler if it’s already running.
Sample message with basic formatting
A “reload task failed” Slack message with basic formatting could look like this:
To set it up:
-
Create an incoming webhook in Slack if you don’t already have one, take note of its URL (you will need it in step 2 below).
-
Edit the Slack section of the config file, i.e. in
Butler.qlikSenseCloud.event.mqtt.tenant.alert.slackNotification.reloadAppFailure.The
messageTypeproperty should be set tobasic.
ThebasicMsgTemplateproperty is the message that will be sent via Slack. Template fields can be used. -
Restart Butler if it’s already running.
Customizing Slack messages
When using the formatted Slack alerts you have full freedom to create the alert you need.
Behind the scenes Slack messages are constructed from blocks defined in a JSON object. Each block can then contain either plain text, Markdown, images, buttons etc.
The Slack documentation is the best place for learning how to customize messages.
When it comes to Butler, it uses the Handlebars templating engine to render the template files into Slack JSON objects that are then sent to Slack via their APIs.
A few things to keep in mind when creating custom Slack messages:
- The handlebars syntax itself must be correct. If incorrect no Slack JSON object will be created. And no Slack messages sent.
- The handlebars template must result in a JSON object that adheres to Slack’s API specifications.
If the JSON syntax is somehow invalid the Slack API will return errors and no messages sent. JSON can be pretty sensitive to details, there should for example not be any trailing commas in properly formatted JSON objects.
Some useful links to Slacks’s documentation:
- Creating rich message layouts: General info on how messages are structured and created..
- Formatting text for app surfaces: How to use markdown, formatting of links, escaping text etc..
- Reference: Layout blocks: The official docs for creating Slack messages.
- Block Kit Builder: Great sandbox with readily available examples of different message layouts, syntax and more. Note: You must be logged into your Slack account to use this tool.
Using custom links in templates
It is also possible to define custom links in the config file, and use them in Slack templates.
This is described here: Custom links in alerts.
How it works
The concept is the same for all alert types, see the this page for details.
Settings in config file
---
Butler:
  ...
  ...
  mqttConfig:
    enable: false                                     # Should Qlik Sense events be forwarded as MQTT messages?
    ...
    ...
    qlikSenseCloud:                                                   # MQTT settings for Qlik Sense Cloud integration
      event:
        mqttForward:                                                  # QS Cloud events forwarded to MQTT topics, which Butler will subscribe to
          enable: false
          broker:                                                     # Settings for MQTT broker to which QS Cloud events are forwarded
            host: mqttbroker.company.com
            port: <port>
            username: <username>
            password: <password>
          topic:
            subscriptionRoot: qscloud/#                     # Topic that Butler will subscribe to
            appReload: qscloud/app/reload
  ...
  ...
  qlikSenseCloud:                   # Settings for Qlik Sense Cloud integration
    enable: false
    event:
      mqtt:                         # Which QS Cloud tenant should Butler receive events from, in the form of MQTT messages?
        tenant:
          id: tenant.region.qlikcloud.com
          tenantUrl: https://tenant.region.qlikcloud.com
          authType: jwt             # Authentication type used to connect to the tenant. Valid options are "jwt"
          auth:
            jwt:
              token: <JWT token>    # JWT token used to authenticate Butler when connecting to the tenant
          # Qlik Sense Cloud related links used in notification messages
          qlikSenseUrls:
            qmc: <URL to QMC in Qlik Sense Cloud>
            hub: <URL to Hub in Qlik Sense Cloud>
          comment: This is a comment describing the tenant and its settings # Informational only
          alert:
            ...
            ...
            # Settings for notifications and messages sent to Slack
            slackNotification:
              reloadAppFailure:
                enable: false
                alertEnableByTag:
                  enable: false
                  tag: Butler - Send Slack alert if app reload fails
                basicContentOnly: false
                webhookURL: <URL to Slack webhook>
                channel: sense-task-failure     # Slack channel to which app reload failure notifications are sent
                messageType: formatted          # formatted / basic. Formatted means that template file below will be used to create the message.
                basicMsgTemplate: 'Qlik Sense Cloud app reload failed: "{{appName}}"'      # Only needed if message type = basic
                rateLimit: 60                   # Min seconds between emails for a given appId/recipient combo. Defaults to 5 minutes.
                headScriptLogLines: 10
                tailScriptLogLines: 20
                templateFile: /path/to/slack_templates/failed-reload-qscloud.handlebars
                fromUser: Qlik Sense
                iconEmoji: ':ghost:'
  ...
  ...
3.6.2.3 - Reload alerts via Microsoft Teams
What’s this?
Butler can send two kinds of alert messages via Teams:
- When an app fails during reload.
See the Concepts section for additional details.
A complete reference to the config file format is found here.
Basic vs formatted Teams alerts
Teams alerts come in two forms:
- Customizable formatting using a template concept. A standard template that will fit most use cases is included with Butler. With this option the first and last parts of the script log can be included in the message, allowing you to tell from the Teams message what caused the reload to fail.
You can also add buttons to the message that can be used to open any URL you want, or open the app that failed reloading. - A fixed, more basic format that is built into Butler. No template file needed, but also less detailed.
Which option to go for depends on whether you want just a notification that something went wrong, or if you want as much detail as possible in the Teams message. In most cases the customizable formatting is the best option.
Sample message with custom formatting
An “app reload failed” Teams message using the custom formatting option could look like this:

Here’s how to set it up:
-
Create a workflow in Teams, take note of its URL (you will need it in step 2 below). More information on how to create a Teams workflow in the Concepts section.
-
Edit the Teams section of the config file, i.e. the settings in
Butler.qlikSenseCloud.event.mqtt.tenant.alert.teamsNotification.reloadAppFailure.The
messageTypeproperty should be set toformatted.
ThebasicMsgTemplateproperty is not used with formatted messages and can thus be left empty, -
Edit the template file if/as needed, the file is specified in
Butler.qlikSenseCloud.event.mqtt.tenant.alert.teamsNotification.reloadAppFailure.templateFile.It uses the Handlebars templating engine, to which Butler provides template fields with actual values.The available template fields are described here.
Sample template files are included in the release Zip file, and are also available in the GitHub repository’s src/config/teams_templates directory.
-
Restart Butler if it’s already running.
Sample message with basic formatting
A “reload task failed” Teams message with basic formatting could look like this:
To set it up:
-
Create a workflow in Teams if you don’t already have one, take note of its URL (you will need it in step 2 below).
-
Edit the Teams section of the config file i.e.
Butler.qlikSenseCloud.event.mqtt.tenant.alert.teamsNotification.reloadAppFailure.The
messageTypeproperty should be set tobasic.
ThebasicMsgTemplateproperty is the message that will be sent via Teams. Template fields can be used. -
Restart Butler if it’s already running.
Customizing Teams messages
When using the formatted Teams alerts you have full freedom to create the alert you need.
Behind the scenes Teams messages are constructed as “Adaptive Cards”, which is standardized JSON format that Teams understands.
More information on Adaptive Cards can be found here, here and here.
When it comes to Butler, it uses the Handlebars templating engine to render a template file into an adaptive card JSON object that is then sent to the workflow webhook.
A few things to keep in mind when creating custom Teams messages:
- The handlebars syntax itself must be correct. If incorrect no Teams JSON object will be created. And no Teams message sent.
- The handlebars template must result in a JSON object that adheres to Teams’s specifications for JSON payloads.
If the JSON syntax is somehow invalid the Teams API will return errors and no messages sent. JSON can be pretty sensitive to details, there should for example not be any trailing commas in properly formatted JSON objects.
Using custom links in templates
It is also possible to define custom links in the config file, and use them in Teams templates.
This is described here: Custom links in alerts.
How it works
The concept is the same for all alert types, see the this page for details.
Settings in config file
---
Butler:
  ...
  ...
  mqttConfig:
    enable: false                                     # Should Qlik Sense events be forwarded as MQTT messages?
    ...
    ...
    qlikSenseCloud:                                                   # MQTT settings for Qlik Sense Cloud integration
      event:
        mqttForward:                                                  # QS Cloud events forwarded to MQTT topics, which Butler will subscribe to
          enable: false
          broker:                                                     # Settings for MQTT broker to which QS Cloud events are forwarded
            host: mqttbroker.company.com
            port: <port>
            username: <username>
            password: <password>
          topic:
            subscriptionRoot: qscloud/#                     # Topic that Butler will subscribe to
            appReload: qscloud/app/reload
  ...
  ...
  qlikSenseCloud:                   # Settings for Qlik Sense Cloud integration
    enable: false
    event:
      mqtt:                         # Which QS Cloud tenant should Butler receive events from, in the form of MQTT messages?
        tenant:
          id: tenant.region.qlikcloud.com
          tenantUrl: https://tenant.region.qlikcloud.com
          authType: jwt             # Authentication type used to connect to the tenant. Valid options are "jwt"
          auth:
            jwt:
              token: <JWT token>    # JWT token used to authenticate Butler when connecting to the tenant
          # Qlik Sense Cloud related links used in notification messages
          qlikSenseUrls:
            qmc: <URL to QMC in Qlik Sense Cloud>
            hub: <URL to Hub in Qlik Sense Cloud>
          comment: This is a comment describing the tenant and its settings # Informational only
          alert:
            # Settings for notifications and messages sent to MS Teams
            teamsNotification:
              reloadAppFailure:
                enable: false
                alertEnableByTag:
                  enable: false
                  tag: Butler - Send Teams alert if app reload fails
                basicContentOnly: false
                webhookURL: <URL to MS Teams webhook>
                messageType: formatted     # formatted / basic
                basicMsgTemplate: 'Qlik Sense Cloud app reload failed: "{{appName}}"'      # Only needed if message type = basic
                rateLimit: 15              # Min seconds between emails for a given appId. Defaults to 5 minutes.
                headScriptLogLines: 15
                tailScriptLogLines: 15
                templateFile: /path/to/teams_templates/failed-reload-qscloud-workflow.handlebars
  ...
  ...
3.7 - Reload script logs
Butler can detect, capture and store all script logs of reload tasks that failed.
This makes it much easier to find and analyze the script logs of failed reloads.
Works with both client-managed Qlik Sense and Qlik Sense Cloud.
What’s this?
The idea is to save the full script logs of failed reloads.
Having access to the full logs can sometimes be what’s needed to understand what caused the failure.
- Log files from client-managed Qlik Sense are stored in one directory hierarchy, while logs from Qlik Sense Cloud are stored in another.
- The files are store in separate directories for each date.
- The file name of the script log consists of
- Client-managed:
<timestamp of the reload failure>_<app ID>_<task ID>.log - Qlik Sense Cloud:
<timestamp of the reload failure>_<app ID>_<reload ID>
- Client-managed:
Could look like this:
.
└── scriptlog
    ├── qscloud
    │   └── 2024-10-14
    │       └── 2024-10-14T11-41-31_appId=86ee4ae7-7ae7-4dd4-98a1-ebea989f78fb_reloadId=670d0369dededd0781e18ade.log
    └── qseow
        └── 2024-10-10
            └── 2024-10-10_15-35-25_appId=8f1d1ecf-97a6-4eb5-8f47-f9156300b854_taskId=22b106a8-e7ed-4466-b700-014f060bef16.log

5 directories, 2 files
How it works
Client-managed Qlik Sense
This feature relies on the same Qlik Sense log appenders that the reload alerts uses. Please see that page for an in-depth discussion on how log appenders work and how to set them up.

Warning
The log appenders that catch failed reloads in the Qlik Sense scheduler must be set up on all Qlik Sense servers where reloads are happening for this feature to reliably capture all failed reloads.
Qlik Sense Cloud
Storing script logs on disk is closely associated with sending alerts about failed reloads.
Those alerts (email, Slack, Teams) can include the first and last few lines of the script log, whereas the full log is stored on disk using the feature described on this page.
Butler listens to the Qlik Sense Cloud event stream and captures the script logs of failed reloads.
Settings in config file
---
Butler:
  ...
  ...
  # Store script logs of failed reloads on disk.
  # The script logs will be stored in daily directories under the specified main directory below
  # NOTE: Use an absolute path when running Butler as a standalone executable!
  scriptLog:
    storeOnDisk:
      clientManaged:
        reloadTaskFailure:
          enable: false
          logDirectory: /path/to/scriptlogs/qseow
      qsCloud:
        appReloadFailure:
          enable: false
          logDirectory: /path/to/scriptlogs/qscloud
  ...
  ...
3.8 - Monitoring Windows services
Butler can monitor Windows services and alert if they are not running.
This is useful for monitoring services that are critical for Qlik Sense to function - or any other important service.
Messages can be sent when services stop or start, with message destinations such as Slack, Teams, email, New Relic, InfluxDB, webhooks and MQTT.
What’s this?
Qlik Sense uses Windows Services to run the Qlik Sense Engine, Qlik Sense Repository Service, Qlik Sense Scheduler Service and more.
If any of these services stop, Qlik Sense will not work.
Butler can monitor these services and alert if they are not running and when they start again.
This feature is only available when Butler is running on Windows, on other OSs a warning will be logged when Butler is starting and the feature will be disabled.
How it works
Butler will poll the Windows Service Control Manager (SCM) for the status of the services that are configured to be monitored.
The polling interval is configurable via the Butler.serviceMonitor.frequency setting, but defaults to 30 seconds.
The services to be monitored are listed in Butler.serviceMonitor.monitor section of the config file.
If firewalls etc allow it it is possible to monitor services on remote Windows machines as well.
Three pieces of information are needed for each service to be monitored:
- The host name of the machine where the service is running (
Butler.serviceMonitor.monitor.<host>).
This config entry is shared for all services monitored on the same host. - The name of the service (
Butler.serviceMonitor.monitor.<services>.name).
This is the name of the service as it appears in the Windows Service Control Manager (SCM). Right click on a service in the Windows Services app and select Properties, then find the “Service name” on the General tab. - A “friendly name” that can be anything (
Butler.serviceMonitor.monitor.<services>.friendlyName). This is useful as the Windows service name are not always very descriptive.
The friendly name is used in the alert messages sent to the various alert destinations, including InfluxDB and New Relic.
Each alert destination can be enabled or disabled via the Butler.serviceMonitor.alertDestination.<destination>.enable setting.
Settings in config file
The configuration of each alert destination is done in the destinations’ own section of the config file, for example Butler.teamsNotification.serviceStopped, Butler.emailNotification.serviceStopped, Butler.emailNotification.serviceStarted etc.
Those settings are described in sub-pages of this page.
---
Butler:
  ...
  ...
  # Monitor Windows services.
  # This feature only works when Butler is running on Windows Server or desktop.
  # On other OSs service monitoring will be automatically disabled.
  serviceMonitor:
    enable: false                    # Main on/off switch for service monitoring
    frequency: every 30 seconds     # https://bunkat.github.io/later/parsers.html
    monitor:
      - host: <hostname or IP>      # Host name of Windows computer where services are running
        services:                   # List of services to monitor
          - name: postgresql-x64-12       # Posgress/repository db
            friendlyName: Repository DB
          - name: QlikSenseEngineService
            friendlyName: Engine
          - name: QlikSensePrintingService
            friendlyName: Printing
          - name: QlikSenseProxyService
            friendlyName: Proxy
          - name: QlikSenseRepositoryService
            friendlyName: Repository
          - name: QlikSenseSchedulerService
            friendlyName: Scheduler
          - name: QlikSenseServiceDispatcher
            friendlyName: Service Dispatcher
    alertDestination:               # Control to thich destinations service related alerts are sent
      influxDb:                     # Send service alerts to InfluxDB
        enable: true
      newRelic:                     # Send service alerts to New Relic
        enable: true
      email:                        # Send service alerts as emails
        enable: true
      mqtt:                         # Send service alerts as MQTT messages
        enable: true
      teams:                        # Send service alerts as MS Teams messages
        enable: true
      slack:                        # Send service alerts as Slack messages
        enable: true
      webhook:                      # Send service alerts as outbound webhooks/http calls
        enable: true
  ...
  ...
3.8.1 - Sending Windows service alerts as email
What’s this?
These config settings are specific to the email alert destination.
They are used in addition to the general Windows Service monitoring settings in Butler.serviceMonitor.
How it works
The sent emails are created from template files using the Handlebars templating engine.
The template files are located in the Butler.emailNotification.<alertType>.bodyFileDirectory directory, with the actual file name specified in Butler.emailNotification.<alertType>.htmlTemplateFile.
The template files can contain Handlebars expressions to insert values from the alert data.
The available values are:
| Value | Description |
|---|---|
{{host}} |
The hostname of the server where the service is running |
{{serviceStatus}} |
The status of the service, e.g. RUNNING or STOPPED |
{{servicePrevStatus}} |
The previous status of the service, e.g. RUNNING or STOPPED |
{{serviceName}} |
The name of the service as defined in Windows |
{{serviceDisplayName}} |
The display name of the service as defined in Windows. Can sometimes be a bit more human readable than the serviceName. |
{{serviceFriendlyName}} |
The display name of the service as defined in the Butler config file. Used to give the service a good name when both serviceName and serviceDisplayName are unsuitable for use in for example Grafana dashboards. |
{{serviceStartType}} |
The startup mode of the service, e.g. Automatic or Manual |
{{serviceExePath}} |
The path to the executable of the service |
Settings in config file
---
Butler:
  ...
  ...
  emailNotification:
    serviceStopped:
      rateLimit: 30                   # Min seconds between emails for a given service. Defaults to 5 minutes.
      priority: high                  # high/normal/low
      subject: '❌ Windows service stopped on host {{host}}: "{{serviceDisplayName}}"'
      bodyFileDirectory: path/to/email_templates/email_templates
      htmlTemplateFile: service-stopped
      fromAdress: Qlik Sense (no-reply) <qliksense-noreply@mydomain.com>
      recipients:
        - <Email address 1>
        - <Email address 2>
    serviceStarted:
      rateLimit: 30                   # Min seconds between emails for a given service. Defaults to 5 minutes.
      priority: high                  # high/normal/low
      subject: '✅ Windows service started on host {{host}}: "{{serviceDisplayName}}"'
      bodyFileDirectory: path/to/email_templates/email_templates
      htmlTemplateFile: service-started
      fromAdress: Qlik Sense (no-reply) <qliksense-noreply@mydomain.com>
      recipients:
        - <Email address 1>
        - <Email address 2>
    smtp:                                             # Email server settings. See https://nodemailer.com/smtp/ for details on the meaning of these fields.
      host: <FQDN or IP or email server, e.g. smtp.gmail.com>
      port: <port on which SMTP server is listening>
      secure: true                                    # true/false
      tls:
        serverName:                                   # If specified the serverName field will be used for TLS verification instead of the host field.
        ignoreTLS: false
        requireTLS: true
        rejectUnauthorized: false
      auth:
        enable: true
        user: <Username, email address etc>
        password: <your-secret-password>
  ...
  ...
3.8.2 - Sending Windows service alerts to New Relic
What’s this?
These config settings are specific to the New Relic alert destination.
They are used in addition to the general Windows Service monitoring settings in Butler.serviceMonitor.
How it works
All settings are found in the Butler.incidetTool.newRelic.serviceMonitor section of the config file.
Butler can send two kinds of messages to New Relic: events and logs entries.
New Relic events and log entries are good at different things, and you can choose to send either or both.
In general, events are good for monitoring and alerting while log entries are good for logging and troubleshooting.
If in doubt, send both - that will give you the freedom to choose later which to use in the New Relic dashboards, alerts and incidents.
New Relic events
Windows service events will be sent to New Relic with the name of qs_serviceStateEvent.
The static attributes attached to events sent to New Relic events are the ones defined in the config file.
These can be used to identify which of potentially several Butler instances the message originated from, and to filter and group messages in New Relic.
The values of dynamic attributes are determined at runtime and can be enabled or disabled in the config file:
| Dynamic attribute name in New Relic | Description |
|---|---|
| butler_serviceHost | The hostname of the server where the service is running |
| butler_serviceName | The name of the service as defined in Windows |
| butler_serviceDisplayName | The display name of the service as defined in Windows. Can sometimes be a bit more human readable than the serviceName. |
| butler_serviceStatus | The status of the service, e.g. RUNNING or STOPPED |

New Relic log entries
Windows service log entries will be sent to New Relic with a log type of qs_serviceStateLog.
Static and dynamic attributes are handled in the same way as for events.
The raw data of a New Relic lg entry will look something like this:

Settings in config file
---
Butler:
  ...
  ...
  incidentTool:
    newRelic:
      serviceMonitor:
        destination:
          event:
            enable: false
            sendToAccount:                # Windows service events are sent to these New Relic accounts
              - First NR account
              - Second NR account
            attribute:
              static:                     # Static attributes/dimensions to attach to events sent to New Relic.
                - name: event-specific-attribute
                  value: abc 123
              dynamic:
                serviceHost: true         # Should host where service is running be sent to New Relic as attribute?
                serviceName: true         # Should service name be sent to New Relic as attribute?
                serviceDisplayName: true  # Should service display name be sent to New Relic as attribute?
                serviceState: true        # Should service state be sent to New Relic as attribute?
          log:
            enable: false
            sendToAccount:                # Windows service log entries are sent to these New Relic accounts
              - First NR account
              - Second NR account
            attribute:
              static:                     # Static attributes/dimensions to attach to events sent to New Relic.
                - name: log-specific-attribute
                  value: def 456
              dynamic:
                serviceHost: true         # Should host where service is running be sent to New Relic as attribute?
                serviceName: true         # Should service name be sent to New Relic as attribute?
                serviceDisplayName: true  # Should service display name be sent to New Relic as attribute?
                serviceState: true        # Should service state be sent to New Relic as attribute?
        monitorServiceState:              # Control whih service states are sent to New Relic
          running:
            enable: true
          stopped:
            enable: true
        sharedSettings:
          rateLimit: 5                    # Min seconds between events/logs sent to New Relic for a given host+service. Defaults to 5 minutes.
          header:                         # Custom http headers
            - name: X-My-Header           # Example
              value: Header value 2       # Example
          attribute:
            static:                       # Static attributes/dimensions to attach to events sent to New Relic.
              - name: service             # Example
                value: butler             # Example
              - name: environment         # Example
                value: prod               # Example
  ...
  ...
3.8.3 - Storing Windows service alerts in InfluxDB
What’s this?
These config settings are specific to the InfluxDB alert destination.
They are used in addition to the general Windows Service monitoring settings in Butler.serviceMonitor.
How it works
There is no specific InfluxDB configuration for Windows Service monitoring, so the general InfluxDB in Butler.influxDb settings are used.
This means that information about Windows service alerts are stored in the same InfluxDB database as other data points sent to InfluxDB from Butler (e.g. uptime metrics).
Settings in config file
---
Butler:
  ...
  ...
  # InfluxDB settings
  influxDb:
    enable: false                  # Master switch for InfluxDB integration. If false, no data will be sent to InfluxDB.
    hostIP: <IP or host name>     # Where is InfluxDB server located?
    hostPort: 8086                # InfluxDB port
    auth:
      enable: false               # Does InfluxDB require login?
      username: user_joe
      password: joesecret
    dbName: butler                # Name of database in InfluxDB to which Butler's data is written
    instanceTag: DEV              # Tag that can be used to differentiate data from multiple Butler instances
    # Default retention policy that should be created in InfluxDB when Butler creates a new database there.
    # Any data older than retention policy threshold will be purged from InfluxDB.
    retentionPolicy:
      name: 10d
      duration: 10d
  ...
  ...
3.8.4 - Sending Windows service alerts to Slack
What’s this?
These config settings are specific to the Slack alert destination.
They are used in addition to the general Windows Service monitoring settings in Butler.serviceMonitor.
How it works
All settings are found in the Butler.slackNotification.serviceStopped and Butler.slackNotification.serviceStarted sections of the config file.
Butler will send a Slack message to the channel specified in the config file when a Windows service stops or starts.
Similarly to how reload-failed Slack alerts work, Butler can send two types of Slack messages:
- A simple message with just the name of the service that stopped or started. This will be the case if
Butler.slackNotification.serviceStopped.messageTypeorButler.slackNotification.serviceStarted.messageTypeis set tobasic. - A more detailed and better formatted message with information about the service, the server it’s running on etc. This will be the case if
Butler.slackNotification.serviceStopped.messageTypeorButler.slackNotification.serviceStarted.messageTypeis set toformatted.
Rate limiting is controlled by the Butler.slackNotification.serviceStopped.rateLimit and Butler.slackNotification.serviceStarted.rateLimit settings.
Tip
The template used to create formatted Slack messages can be customized.
Check out the handlebars documentation for more information on how to do this.
A formatted Slack message can look something like this:

Information available in formatted Slack messages
Similar to how failed-reload email notifications work, the templating engine Handlebars is used to format the Slack messages.
The following information is available in formatted Slack messages:
| Handlebars variable | Description |
|---|---|
{{host}} |
The hostname of the server where the service is running |
{{serviceStatus}} |
The status of the service, e.g. RUNNING or STOPPED |
{{servicePrevStatus}} |
The previous status of the service, e.g. RUNNING or STOPPED |
{{serviceName}} |
The name of the service as defined in Windows |
{{serviceDisplayName}} |
The display name of the service as defined in Windows. Can sometimes be a bit more human readable than the serviceName. |
{{serviceFriendlyName}} |
The friendly name of the service as defined in the config file. |
{{serviceStartType}} |
The start type of the service, e.g. AUTO_START or DEMAND_START |
{{serviceExePath}} |
The path to the service executable |
Settings in config file
---
Butler:
  ...
  ...
  # Settings for notifications and messages sent to Slack
  slackNotification:
    serviceStopped:
      webhookURL: <web hook URL from Slack>
      channel: qliksense-service-alert  # Slack channel to which Windows service stopped notifications are sent
      messageType: formatted          # formatted / basic. Formatted means that template file below will be used to create the message.
      basicMsgTemplate: 'Windows service stopped: "{{serviceName}}" on host "{{host}}"'       # Only needed if message type = basic
      rateLimit: 30                   # Min seconds between messages for a given Windows service. Defaults to 5 minutes.
      templateFile: /path/to/slack/template/directory/service-stopped.handlebars
      fromUser: Qlik Sense
      iconEmoji: ':ghost:'
    serviceStarted:
      webhookURL: <web hook URL from Slack>
      channel: qliksense-service-alert  # Slack channel to which Windows service stopped notifications are sent
      messageType: formatted          # formatted / basic. Formatted means that template file below will be used to create the message.
      basicMsgTemplate: 'Windows service started: "{{serviceName}}" on host "{{host}}"'       # Only needed if message type = basic
      rateLimit: 30                   # Min seconds between messages for a given Windows service. Defaults to 5 minutes.
      templateFile: /path/to/slack/template/directory/service-started.handlebars
      fromUser: Qlik Sense
      iconEmoji: ':ghost:'
  ...
  ...
3.8.5 - Sending Windows service alerts to Microsoft Teams
What’s this?
These config settings are specific to the Microsoft Teams alert destination.
They are used in addition to the general Windows Service monitoring settings in Butler.serviceMonitor.
How it works
All settings are found in the Butler.teamsNotification.serviceStopped and Butler.teamsNotification.serviceStarted sections of the config file.
Butler will send a Teams message to the channel associated with Butler.teamsNotification.<serviceStopped|servierStarted>.webhookRL in the config file when a Windows service stops or starts.
Similarly to how reload-failed Teams alerts work, Butler can send two types of Teams messages:
- A simple message with just the name of the service that stopped or started. This will be the case if
Butler.teamsNotification.serviceStopped.messageTypeorButler.teamsNotification.serviceStarted.messageTypeis set tobasic. - A more detailed and better formatted message with information about the service, the server it’s running on etc. This will be the case if
Butler.teamsNotification.serviceStopped.messageTypeorButler.teamsNotification.serviceStarted.messageTypeis set toformatted.
Rate limiting is controlled by the Butler.teamsNotification.serviceStopped.rateLimit and Butler.teamsNotification.serviceStarted.rateLimit settings.
Tip
The template used to create formatted Teams messages can be customized.
Check out the handlebars documentation for more information on how to do this.
A formatted Teams message can look something like this:

Information available in formatted Teams messages
Similar to how failed-reload email notifications work, the templating engine Handlebars is used to format the Teams messages.
The following information is available in formatted Teams messages:
| Handlebars variable | Description |
|---|---|
{{host}} |
The hostname of the server where the service is running. |
{{serviceStatus}} |
The status of the service, e.g. RUNNING or STOPPED. |
{{servicePrevStatus}} |
The previous status of the service, e.g. RUNNING or STOPPED. |
{{serviceName}} |
The name of the service as defined in Windows. |
{{serviceDisplayName}} |
The display name of the service as defined in Windows. Can sometimes be a bit more human readable than the serviceName. |
{{serviceFriendlyName}} |
The friendly name of the service as defined in the config file. |
{{serviceStartType}} |
The start type of the service, e.g. AUTO_START or DEMAND_START. |
{{serviceExePath}} |
The path to the service executable. |
Creating a MS Teams webhook
To create a webhook in MS Teams, follow the steps in the Concepts section.
Settings in config file
---
Butler:
  ...
  ...
  # Settings for notifications and messages sent to MS Teams
  teamsNotification:
    serviceStopped:
      webhookURL: <web hook URL from MS Teams>
      messageType: formatted          # formatted / basic. Formatted means that template file below will be used to create the message.
      basicMsgTemplate: 'Windows service stopped: "{{serviceName}}" on host "{{host}}"'       # Only needed if message type = basic
      rateLimit: 30                   # Min seconds between messages for a given Windows service. Defaults to 5 minutes.
      templateFile: /path/to/teams/template/directory/service-stopped.handlebars
    serviceStarted:
      webhookURL: <web hook URL from MS Teams>
      messageType: formatted          # formatted / basic. Formatted means that template file below will be used to create the message.
      basicMsgTemplate: 'Windows service started: "{{serviceName}}" on host "{{host}}"'       # Only needed if message type = basic
      rateLimit: 30                   # Min seconds between messages for a given Windows service. Defaults to 5 minutes.
      templateFile: /path/to/teams/template/directory/service-started.handlebars
  ...
  ...
3.8.6 - Sending Windows service alerts as MQTT messages
What’s this?
These config settings are specific to the MQTT alert destination.
They are used in addition to the general Windows Service monitoring settings in Butler.serviceMonitor.
How it works
All settings are found in the Butler.mqttConfig section of the config file.
Butler will send two kinds of MQTT messages:
- A state message indicating that a service has changed its state, for example from
RUNNINGtoSTOPPED.- When a service stops or starts, Butler will send a message to the topic defined in
Butler.mqttConfig.serviceStoppedTopic, with/<hostname>/<serviceName>appended to the topic. The payload will be a JSON with information about the service (name, display name, current state, previous state, dependencies, EXE path etc.).) - When a service starts the same thing happens, but the base topic used is defined in
Butler.mqttConfig.serviceStartedTopic.
- When a service stops or starts, Butler will send a message to the topic defined in
- A message containing the current state of a service. These messages are sent when Butler starts up and when the state of a service changes.
- The base MQTT topic for these messages are defined in the
Butler.mqttConfig.serviceStateTopicsetting. To this topic, Butler will append/<hostname>/<serviceName>before sending the message. - These messages are sent every time Butler checks the status of the Windows services, i.e. every
Butler.serviceMonitor.frequencyseconds. - The MQTT message will be sent as a JSON with information about the service (name, display name, current state, dependencies, EXE path etc.).
- The base MQTT topic for these messages are defined in the
A few MQTT message can look like this when viewed in MQTT Explorer:

Settings in config file
---
Butler:
  ...
  ...
  mqttConfig:
    enable: false                                     # Should Qlik Sense events be forwarded as MQTT messages?
    brokerHost: <FQDN or IP of MQTT server>
    brokerPort: 1883
    serviceRunningTopic: qliksense/service_running
    serviceStoppedTopic: qliksense/service_stopped
    serviceStatusTopic: qliksense/service_status
  ...
  ...
3.8.7 - Sending Windows service alerts as outgoing webhooks (=http messages)
What’s this?
These config settings are specific to the outbound webhook alert destination.
They are used in addition to the general Windows Service monitoring settings in Butler.serviceMonitor.
How it works
All settings are found in the Butler.webhookNotification section of the config file.
Butler can send three kinds of http messages: POST, PUT and GET.
Some services only support one/some of these, so you need to check the documentation for the service you want to send the message to.
It is possible to define any number of webhook, and each destination can have its own settings such as http method and URL.
It is for example possible to send POST messages to different URLs if needed.
The rate limit defined in Butler.webhookNotification.rateLimit is calculated against each state change of the monitored Windows service.
There is no check with respect to rate limits how many URLs are defined (and thus outbound http messages are sent).
Payload of outbound http calls
The same webhooks/URLs are used for both Windows service start and stop events.
The details of the Windows service events are sent in the payload of the http message - exactly how depends on the http method used.
POST
The payload is sent as JSON in the body of the http message.
Here Node-RED is used to receive the http message and display it in a debug window:

PUT
The message payload is sent in the body, exactly as for POST messages.
The same fields are used as for POST messages:

GET
The message payload is sent as URL query parameters rather than in the body.
The fields are the same as for POST and PUT messages, except that the field names are in lower case.

Settings in config file
---
Butler:
  ...
  ...
  # Settings for notifications and messages sent using outgoing webhooks
  webhookNotification:
    enable: false
    serviceMonitor:
      rateLimit: 15               # Min seconds between outgoing webhook calls, per Windows service that is monitored. Defaults to 5 minutes.
      webhooks:
        - description: 'This outgoing webhook is used to...'
          webhookURL: http://host.my.domain:port/some/path    # outgoing webhook that Butler will call
          httpMethod: POST                                    # GET/POST/PUT. Note that the body and URL query parameters differs depending on which method is used
        - description: 'This outgoing webhook is used to...'
          webhookURL: http://host.my.domain:port/some/path    # outgoing webhook that Butler will call
          httpMethod: PUT                                     # GET/POST/PUT. Note that the body and URL query parameters differs depending on which method is used
        - description: 'This outgoing webhook is used to...'
          webhookURL: http://host.my.domain:port/some/path    # outgoing webhook that Butler will call
          httpMethod: GET                                     # GET/POST/PUT. Note that the body and URL query parameters differs depending on which method is used
  ...
  ...
3.9 - Qlik Sense server version
Butler can monitor the server version of the client-managed Qlik Sense environment that Butler is configured to connect to.
- Check server version at regular intervals.
- Save version to InfluxDB.
- Makes it easy to keep track of versions running on different Qlik Sense environments, for example PROD, TEST and DEV.
What’s this?
As with most software, client-managed Qlik Sense is updated regularly.
Butler can monitor the server version of the Qlik Sense environment that Butler is connected to and store this information in InfluxDB.
Having this information in InfluxDB makes it easy to visualize it in a Grafana dashboard, or similar tool.
If you are running multiple Qlik Sense environments, for example PROD, TEST and DEV, you probably have one Butler instance running for each environment.
By storing the server version in InfluxDB, you can easily keep track of which Sense version is running on which environment.
How it works
Butler will periodically poll the Qlik Sense server for information about the server version. The retrieved information is logged to the log file and can also optionally be stored in InfluxDB.
It is possible to add additional tags to the data sent to InfluxDB, for example to differentiate between PROD, TEST and DEV environments, to make later visualizations easier and richer.
How often to check the server version
The frequency of the server version check is configurable in the Butler.qlikSenseVersion.versionMonitor.frequency setting.
It uses the later.js syntax, for example every 24 hours or every 14 days.
Which InfluxDB database is used?
The data sent to InfluxDB is stored in the database specified in the Butler.influxDb setting.
Settings in config file
---
Butler:
  ...
  ...
  # Settings for monitoring Qlik Sense version info
  # Version info is retrieved from the hostname:9032/v1/systeminfo endpoint in Qlik Sense
  qlikSenseVersion:
    versionMonitor:
      enable: false                   # Should Qlik Sense version info be retrieved?
      frequency: every 24 hours       # https://bunkat.github.io/later/parsers.html#text
      host: <FQDN or IP of Qlik Sense central node>
      rejectUnauthorized: false       # Set to false to ignore warnings/errors caused by Qlik Sense's self-signed certificates.
      destination:
        influxDb:                     # Store version data in InfluxDB.
                                      # If enabled, version info will be stored as measurements in InfluxDB.
          enable: false
          tag:
            static:                   # Static attributes/tags to attach to the data sent to InfluxDB
              - name: foo
                value: bar
  ...
  ...
3.10 - Qlik Sense server license
Butler can monitor the Qlik Sense server license that is used to run client-managed Qlik Sense (=Qlik Sense Enterprise on Windows).
- Check license expiration date and alert a configurable number of days before expiration.
- Send license status and expiration alerts to InfluxDB, webhooks and MQTT.
What’s this?
If the Qlik Sense server license expires, the Qlik Sense environment will go into a disabled state and users will not be able to access Sense.
Butler can monitor the Qlik Sense server license and alert if the license is about to expire.
How it works
Butler will periodically poll the Qlik Sense server for information about the Qlik Sense server license.
The retrieved information can be stored in/sent to zero or more of InfluxDB, webhooks and MQTT.
If the license is about to expire, Butler will send an alert to the configured alert destinations.
The alert will be sent a configurable number of days before the license expires, giving you time to renew the license.
The alert can also be stored in InfluxDB and/or sent to webhooks and MQTT.
How often to check the license
The frequency of the license check is configurable in the Butler.qlikSenseLicense.serverLicenseMonitor.frequency setting.
It uses the later.js syntax, for example every 24 hours or every 14 days.
What’s sendRecurring?
For each destination, you can configure if Butler should send the license status to the destination every time the license is checked.
This is useful if you want to keep track of the license status over time, for example in a Grafana dashboard.
What’s sendAlert?
For each destination, you can configure if Butler should send an alert if the license is about to expire, i.e. if the number of days left on the license is below the threshold specified in the Butler.qlikSenseLicense.serverLicenseMonitor.alert.thresholdDays setting.
This is useful if you want to be alerted (repeatedly) if the license is about to expire and possibly also store the alerts in InfluxDB.
Which InfluxDB database is used?
The data sent to InfluxDB is stored in the database specified in the Butler.influxDb setting.
Settings in config file
---
Butler:
  ...
  ...
  # Settings for monitoring Qlik Sense licenses
  qlikSenseLicense:
    serverLicenseMonitor:
      enable: false
      frequency: every 24 hours       # https://bunkat.github.io/later/parsers.html#text
      alert:                          # Alert if the number of days left on the license is below the threshold
                                      # License expiry alerts on a global level are enabled here, then configured on
                                      # a per-destination basis elsewhere in this config file.
        thresholdDays: 60
      destination:
        influxDb:                     # Store license data in InfluxDB
          enable: false
          tag:
            static:                   # Static attributes/tags to attach to the data sent to InfluxDB
              - name: foo
                value: bar
        mqtt:
          enable: false
          sendRecurring:              # Send license data to the MQTT broker at the frequency specified above
            enable: true
          sendAlert:                  # Send an MQTT alert if the number of days left on the license is below the threshold
            enable: true
        webhook:
          enable: false
          sendRecurring:              # Send license data to webhook(s) at the frequency specified above
            enable: true
          sendAlert:                  # Send alert to webhook(s) if the number of days left on the license is below
                                      # the threshold or the license has already expired
            enable: true
  ...
  ...
3.11 - Qlik Sense access licenses
Butler can monitor Qlik Sense user access licenses.
- High level metrics per user license type (professional, analyzer etc) are gathered and stored in your database of choice (at the time of writing, InfluxDB is supported).
- User licenses can be released automatically after a certain period of inactivity, allowing them to be used by other users.
What’s this?
It’s important to keep track of how Qlik Sense end user licenses are used.
If your Sense environment runs out of licenses, users without a license - but entitled to one - will not be able to access Sense.
By monitoring license usage you can make sure that you have enough licenses available, and get an early warning if you’re about to run out.
New licenses can then be ordered and installed before the current ones run out.
Additionally, some Sense users might only use Sense sporadically.
For example, a user might only use Sense during certain times of the year.
In such cases it’s a waste of resources to keep the license assigned to the user when it’s not being used.
Butler can be configured to periodically release Professional and Analyzer user licenses that have been inactive for a certain period of time.
How it works
Butler periodically polls the Qlik Sense Repository Service (QRS) for information about user licenses and store this information in the database specified in the Butler config file.
Similarly, Butler will periodically release Professional and/or Analyzer user licenses that have been inactive for a certain (configurable) period of time.
Monitoring Qlik Sense license usage
The config file settings below will (if enabled):
- Every 6 hours, poll Qlik Sense for information about user licenses.
- Store this information in InfluxDB and add a tag
foowith the valuebarto the data sent to InfluxDB.
Adapt as needed to your environment.
Releasing inactive user licenses
The config file settings below will (if enabled):
- Every 24 hours, release Professional and Analyzer access licenses that have been inactive for 30 days or more.
- Never release access licenses for…
- users
INTERNAL\sa_repository,INTERNAL\sa_apiandUSERDIR\qs_admin_account. - users tagged with
License do not releaseorsome other tag. - users with custom property
LicenseManageset todo-not-release. - users in user directories
INTERNALandADMIN.
- users
- Disregard users’ inactive, blocked and removed externally status when deciding whether to release their access licenses.
- Store information about released licenses in InfluxDB and add a tag
foowith the valuebarto the data sent to InfluxDB.
Which InfluxDB database is used?
The data sent to InfluxDB is stored in the database specified in the Butler.influxDb setting.
Settings in config file
---
Butler:
  ...
  ...
  # Settings for monitoring Qlik Sense licenses
  qlikSenseLicense:
    ...
    ...
    licenseMonitor:                   # Monitor Qlik Sense accesds license usage
      enable: false
      frequency: every 6 hours        # https://bunkat.github.io/later/parsers.html#text
      destination:
        influxDb:                     # Store license data in InfluxDB
          enable: false
          tag:
            static:                   # Static attributes/tags to attach to the data sent to InfluxDB
              - name: foo
                value: bar
    licenseRelease:                   # Release unused Qlik Sense access licenses
      enable: false                   # true/false. If true, Butler will release unused licenses according to settings below
      dryRun: true                    # true/false. If true, Butler will not actually release any licenses, just log what it would have done.
      frequency: every 24 hours        # https://bunkat.github.io/later/parsers.html#text
      neverRelease:                   # Various ways of defining which users should never have their licenses released
        user:                         # Users who should never have their licenses released
          - userDir: 'INTERNAL'
            userId: 'sa_repository'
          - userDir: 'INTERNAL'
            userId: 'sa_api'
          - userDir: 'USERDIR'
            userId: 'qs_admin_account'
        tag:                          # Users with these tags will never have their licenses released
          - License do not release
          - some other tag
        customProperty:               # Users with these custom properties will never have their licenses released
          - name: LicenseManage
            value: do-not-release
        userDirectory:                # List of user directories whose users should never have their licenses released
          - INTERNAL
          - ADMIN
        inactive: Ignore              # Ignore/Yes/No. The value is case insensitive
                                      #   No = Don't release licenses for users marked as "Inactive=No" in the QMC
                                      #   Yes = Don't release licenses for users marked as "Inactive=Yes" in the QMC
                                      #   Ignore = Disregard this setting
        blocked: Ignore               # Ignore/Yes/No, No = Don't release licenses for users marked as "Blocked=No" in the QMC
        removedExternally: ignore     # Ignore/Yes/No, No = Don't release licenses for users marked as "Removed externally=No" in the QMC
      licenseType:                    # License types to monitor and release
        analyzer:
          enable: true                # Monitor and release Analyzer licenses
          releaseThresholdDays: 30    # Number of days a license can be unused before it is released
        professional:
          enable: true                # Monitor and release Professional licenses
          releaseThresholdDays: 30    # Number of days a license can be unused before it is released
      destination:
        influxDb:                     # Store info about released licenses in InfluxDB
          enable: false
          tag:
            static:                   # Static attributes/tags to attach to the data sent to InfluxDB
              - name: foo
                value: bar
  ...
  ...
3.12 - Configuring the Butler scheduler
What’s this?
Some scheduling scenarios are difficult to achieve with the standard Qlik Sense scheduler. Butler attempts to solve this by offering a cron-based scheduler that can start Sense tasks according to schedule.
How it works
Butler’s scheduler can be used both via the REST API and by directly editing the scheduler config file.
Both options have their merits and use cases, the latter one can for example be useful if the scheduling file is kept on a Git server and copied to the Butler environment by means of some continuous delivery (CD) tool. The API can be useful when other systems need to change when Sense reloads take place, or to change the schedules from within Sense load scripts.
All schedules are stored in a YAML file. The location and name of the file is controlled by the config file property Butler.scheduler.configFile.
The Butler GitHub repository has a sample schedule file in the config directory, next to the main YAML config file:
config
├── email_templates
│   ├── aborted-reload.handlebars
│   └── failed-reload.handlebars
├── production_template.yaml
└── schedule_template.yaml
It’s important to understand when schedules are stored to and loaded from disk:
- The schedule file is read from disk when Butler starts.
- When schedules are added, changed or deleted using the APIs, the set of schedules currently in Butler’s memory will be written to the schedule YAML file on disk.
Schedule file format
The schedule file contains an array of zero or more schedule entries.
- The cron pattern in the
cronScheduleproperty can be either 6 positions (left-most character is seconds) or 5 positions (left-most character is minutes). qlikSenseTaskIdis the id of the task to be started. The Task view in the QMC is useful for getting these IDs.- The
nameproperty is for reference only. There may in theory be multiple schedule entries with the same (probably not a good idea though). - The
idproperty must be unique. If a schedule is created using the API, the schedule id will be a GUID - but any unique string can be used. startupStatedetermines whether the schedule will be started or remain stopped when Butler starts.lastKnownStateis the the schedule’s last known state (running/stopped) known to Butler at the time when the schedule file was written to disk.tagsare purely are way to categorize schedules. Not used by Butler in any way, nor are they related to Qlik Sense tags in any way.
A 6 position schedule that starts a task every 30 seconds can look like this:
butlerSchedule:
  - name: Every 30 sec
    cronSchedule: "*/30 * * * * *"
    timezone: Europe/Stockholm
    qlikSenseTaskId: 0fe447a9-ba1f-44a9-ac23-68c3a1d88d8b
    startupState: started
    tags:
      - Sales
      - abc 123 åäö
      - Transform
    id: task-1
    lastKnownState: started
A schedule that starts a task at the top of every 2nd hour looks like this:
butlerSchedule:
  - name: Every 2 hours
    cronSchedule: 0 */2 * * *
    timezone: Europe/London
    qlikSenseTaskId: 0fe447a9-ba1f-44a9-ac23-68c3a1d88d8b
    startupState: started
    tags:
      - Finance
      - Extract
    id: task-2
    lastKnownState: started
A full description of the scheduler and its file format is available in the Reference docs section.
Settings in config file
---
Butler:
  ...
  ...
  # Scheduler for Qlik Sense tasks
  scheduler:
    enable: false                                     # Should Butler's reload task scheduler be started?
    configfile: config/schedule.yaml                  # Path to file containing task start schedules
  ...
  ...
3.13 - Configuring the key-value store
What’s this?
The key-value has several use cases:
- Pass parameters between apps in a reload chain
- Share state or other data between app reloads
- Share state between extensions, mashups or other web apps.
- Store data with a time-to-live property. Can be used to create timeouts in app reload chains.,
How it works
The data in the key-value store is not persisted to disk, which means that key-value data will be lost if Butler is restarted.
This behavior could possibly be changed if there is a need, please open a GitHub ticket if key-value persistence is of interest.
Key-value data is manipulated using Butler’s REST API.
The Reference docs section has more information about the key-value store.
Settings in config file
---
Butler:
  ...
  ...
  # Key-value store
  keyValueStore:
    enable: false                                     # Should Butler's key-value store be enabled?
    maxKeysPerNamespace: 1000                         # Max keys that can be stored per namespace. Defaults to 1000 if not specified in this file.
  ...
  ...
3.14 - Configuring file system access via REST API
What’s this?
For (good) security reasons Qlik Sense does not allow direct access to the file system.
In QlikView this was possible, but also resulted in risks and potential attack vectors for poorly written or even malicious QlikView apps.
Still, from time to time you need to delete old QVDs, move config files from an inbox directory to a staging ditto etc. Butler solves this by allowing file copy/move/delete operations between pre-defined directories.
By using the these APIs you can do file system operations from within Sense load scripts.
How it works
There are three supported file system operations: copy, move and delete:
- For copy and move operations you specify which source and destination directories are allowed.
- For delete operations you specify which directories file delete operations are allowed in.
- Wildcards are supported.
- Butler will try to clean up paths when loading them from the config file. See below for example.
As the config file is only read when Butler starts, you must restart Butler in order for any config changes to take effect.
Settings in config file
---
Butler:
  ...
  ...
  # List of directories between which file copying via the REST API can be done.
  # Butler will try to clean up messy paths like this one, which resolves to /Users/goran/butler-test-dir1
  # How? First you have /Users/goran/butler-test-dir1//abc which cleans up to /Users/goran/butler-test-dir1/abc,
  # then up one level (..).
  fileCopyApprovedDirectories:
    - fromDirectory: /Users/goran/butler-test-dir1//abc//..
      toDirectory: /Users/goran/butler-test-dir2
    - fromDirectory: /Users/goran/butler-test-dir2
      toDirectory: /Users/goran/butler-test-dir1
    - fromDirectory: /from/some/directory2
      toDirectory: /to/some/directory2

  # List of directories between which file moves via the REST API can be done.
  fileMoveApprovedDirectories:
    - fromDirectory: /Users/goran/butler-test-dir1//abc//..
      toDirectory: /Users/goran/butler-test-dir2
    - fromDirectory: /Users/goran/butler-test-dir2
      toDirectory: /Users/goran/butler-test-dir1
    - fromDirectory: /from/some/directory2
      toDirectory: /to/some/directory2

  # List of directories in which file deletes via the REST API can be done.
  fileDeleteApprovedDirectories:
    - /Users/goran/butler-test-dir1
    - /Users/goran/butler-test-dir1//abc//..
    - /Users/goran/butler-test-dir2
  ...
  ...
3.15 - Incident management tools
Butler can integrate with such tools, for example forwarding information about failed reloads.
Below you find instructions for configuring the currently supported incident management tools.
3.15.1 - New Relic
They offer a uniform approach to dealing with metrics, logs and events - including a basic but working alert management feature.
If more advanced alert management is needed New Relic offers out-of-the-box integrations with tools like PagerDuty, ServiceNow, Jira, VictorOps and many other services.
The service is easy to get started with and has a generous free tier that works very well for testing Butler alerts.
New Relic is a great choice as it handles both reload failure alerts for the Butler tool as well as both server and Sense specific operational metrics (CPU load, available memory, number of currently connected users etc) from Butler SOS.
More info at newrelic.com
What’s this?
Butler can forward several kinds of information to New Relic:
- Reload failure/abort events and log entries. Once in New Relic, these can be used to create alerts and incidents.
- Windows service start/stop events and log entries
- Generic New Relic events and metrics via Butler’s REST API
- Uptime and performance metrics from Butler itself
Example here.
How it works
New Relic exposes APIs through which data such as log entries as well as generic events and metrics can be sent to New Relic.
These logs, metrics and events are stored in New Relic’s databases for a configurable retention period.
Rules and queries against this data are used to create monitoring dashboards and notifications when reload tasks fail or are aborted.
The retention period of New Relic’s free tier is usually more than enough for Butler’s use cases, but their paid product versions offers even longer retention periods if/when needed.
To use Butler with New Relic you must
- Create a New Relic account. The free/trial account is quite generous and will easily get you started.
- Create an API key with insert permissions. See New Relic docs how to do this.
- Configure the Butler config file.
More info about the New Relic event API that is used to send alerts can be found in New Relic’s API docs.
Rate limiting
If a reload task is set to run very frequently but fails every time, this will result in a lot of log entries and events sent to New Relic.
If New Relic alerts are configured to be sent for each reload failure event, there will be lots of alerts.
To handle this scenario Butler offers rate limiting for events sent to New Relic.
The Butler.incidentTool.newRelic.reloadTaskFailure.sharedSettings.rateLimit setting controls how often (seconds) reload-failed events will be sent to New Relic, at most.
A similar setting exists for aborted reloads.
Data sent to New Relic
Failed and aborted reloads
Butler can be configured to send neither, either or both of two different data sets to New Relic:
- Failed reloads can be sent to New Relic as events.
A New Relic event has a basic set of event attributes associated with it. Examples are task name, task ID, app name and app ID. These attributes are always sent to New Relic. - Failed reloads can also be sent to New Relic as log entries.
Log entries are more versatile than events and can contain any text in the log message. Butler uses the log message to pass along the last x rows (x=configurable number) from the script log to New Relic. Having the script log from the failed reload available in New Relic makes it possible to see where the reload script failed and possible even what caused the failure.
Aborted reloads can be configured in exactly the same way as failed reloads, described above.
New Relic events
The following data is sent as New Relic events when a reload task fails or is aborted:
- All http headers defined in the Butler config file.
- All shared, static attributes defined in the Butler config file.
- All event specific, static attributes defined in the Butler config file.
- All tags for the Sense app that was reloaded (can be turned on/off in Butler config file).
- All tags for the Sense reload task that was reloaded (can be turned on/off in Butler config file).
- Butler version the event originated from. This is useful to have in New Relic as it makes it possible to easily show in a dashboard what Butler version is used and whether an update is possible/needed.
- Event related data
- Event type. Either
qs_reloadTaskFailedEventorqs_reloadTaskAbortedEvent. - Timestamp when the event took place.
- Host where the reload task was executing.
- User directory and ID for user which was doing the reload. This will be the Sense service account in most cases.
- Reload task name.
- Reload task ID.
- App name.
- App ID.
- Timestamp for this event in Sense log files.
- Log level for this event in Sense log files.
- Sense execution ID for this event.
- Description of the event, as found in the Sense log files.
- Event type. Either
New Relic log entries
If Butler is configured to forward failed/aborted reload tasks to New Relic as log entries, the follow info is sent to New Relic:
- All information sent for events (see above), but with log specific static attributes rather than event specific ditto.
- The various states the reload task went through before failing, including timestamps when each state started.
- The last x lines from the reload script log. x is configurable in the
Butler.incidentTool.newRelic.reloadTaskFailure.destination.log.tailScriptLogLinessetting. - The host name of the Sense node where the reload took place
- Timestamp (in several different formats) when the reload started
- Timestamp (in several different formats) when the reload failed
- Duration of the reload task
- Result code of the reload task
- Result text of the reload task
- Total size of complete script log (number of characters).
- Number of lines included in the reload script log sent to New Relic
Monitoring Windows services
Butler can be configured to send Windows service start/stop events to New Relic as New Relic events and/or log entries.
Please see the setup instructions for Windows service monitoring.
Sending data to several New Relic accounts
The most common scenario is to send metrics and events to a single New Relic account.
There are however scenarios when sending data to multiple accounts can be of interest.
Workaround for lack of dashboard level access control
There is currently no access control on dashboard level in New Relic. This means that a user with read-only access to a New Relic account can access all dashboards in that account.
Let’s assume
- There are 3 separate Sense environments (DEV, TEST, PROD) that should be monitored for failed reload alerts.
- Different teams are responsible for the different Sense environments.
- Each team should only have access to New Relic dashboards containing data from their Sense environment.
- A central operations team should have dashboards containing data from all three environments.
A solution is then to create separate New Relic accounts for each team, plus one account for the central operations team.
Deploy separate Butler instances for DEV, TEST and PROD, and configure each to send data to both the central New Relic account and the separate DEV, TEST or PROD accounts.
Control which New Relic accounts to send data to
The Butler.thirdPartyToolsCredentials.newRelic section in the Butler config file defines which New Relic accounts metrics and events can be sent to:
Butler:
  ...
  ...
  thirdPartyToolsCredentials:
    newRelic:         # Array of New Relic accounts/insert keys. Any data sent to New Relic will be sent to both accounts.
      - accountName: First NR account
        insertApiKey: <API key 1 (with insert permissions) from New Relic>
        accountId: <New Relic account ID 1>
      - accountName: Second NR account
        insertApiKey: <API key 2 (with insert permissions) from New Relic>
        accountId: <New Relic account ID 2>
  ...
  ...
The accountName is used to differentiate between the different accounts. It is only used within Butler itself, i.e. it is not used when communicating with New Relic.
accountName is then referenced elsewhere in the config file, controlling which New Relic account metrics, events and logs is sent to.
For example, the destination(s) for Butler uptime metrics is controlled via this section of the config file:
Butler:
  ...
  ...
  uptimeMonitor:
    storeNewRelic:
      enable: true
      destinationAccount:
          - First NR account
In the example above uptime metrics will only be sent to the New Relic account called “First NR account”.
The account information can also be specified via command line options.
This is useful as it means the New Relic API keys do not have to be stored in the Butler config file. Instead the API keys can be stored in environment variables that are referenced from the command line options.
The configuration used in the YAML config file above can be specified via command line options:
PS C:\tools\butler> .\butler.exe -c production.yaml --new-relic-account-name "First NR account" "Second NR account" --new-relic-api-key "API key 1" "API key 2" --new-relic-account-id "account ID 1" "account ID 2"
Settings in config file
---
Butler:
  ...
  ...
  # Incident management tools integration
  # Used to trigger incidents in these tools when task reloads fail or are aborted.
  incidentTool:
    newRelic:
      enable: false
      destinationAccount:
        event:                    # Failed/aborted reload tasks are sent as events to these New Relic accounts
          - First NR account
          - Second NR account
        log:                      # Failed/aborted reload tasks are sent as log entries to these New Relic accounts
          - First NR account
          - Second NR account
      # New Relic uses different API URLs for different kinds of data (metrics, events, logs, ...)
      # There are different URLs depending on whther you have an EU or US region New Relic account.
      # The available URLs are listed here: https://docs.newrelic.com/docs/accounts/accounts-billing/account-setup/choose-your-data-center/
      url:
        # As of this writing the valid options are
        # https://insights-collector.eu01.nr-data.net
        # https://insights-collector.newrelic.com
        event: https://insights-collector.eu01.nr-data.net

        # Valid options are (1) EU/rest of world and 2) US)
        # https://log-api.eu.newrelic.com/log/v1
        # https://log-api.newrelic.com/log/v1
        log: https://log-api.eu.newrelic.com/log/v1
      reloadTaskFailure:
        destination:
          event:
            enable: false
            sendToAccount:              # Which reload task failures are sent to New Relic as events
              byCustomProperty:
                enable: false            # Control using a task custom property which reload task failures are sent as events
                customPropertyName: 'Butler_FailedTask_Event_NewRelicAccount'
              always:
                enable: false            # Controls which New Relic accounts ALL failed reload tasks are sent to (as events)
                account:
                  - First NR account
                  - Second NR account
            attribute:
              static:                 # Static attributes/dimensions to attach to events sent to New Relic.
                - name: event-specific-attribute 1  # Example
                  value: abc 123                    # Example
              dynamic:
                useAppTags: true      # Should app tags be sent to New Relic as attributes?
                useTaskTags: true     # Should task tags be sent to New Relic as attributes?
          log:
            enable: false
            tailScriptLogLines: 20
            sendToAccount:              # Which reload task failures are sent to New Relic as log entries
              byCustomProperty:
                enable: false            # Control using a task custom property which reload task failures are sent as log entries
                customPropertyName: 'Butler_FailedTask_Log_NewRelicAccount'
              always:
                enable: false            # Controls which New Relic accounts ALL failed reload tasks are sent to (as logs)
                account:
                  - First NR account
                  - Second NR account
            attribute:
              static:                 # Static attributes/dimensions to attach to events sent to New Relic.
                - name: log-specific-attribute 1    # Example
                  value: def 123                    # Example
              dynamic:
                useAppTags: true      # Should app tags be sent to New Relic as attributes?
                useTaskTags: true     # Should task tags be sent to New Relic as attributes?
        sharedSettings:
          rateLimit: 15             # Min seconds between events sent to New Relic for a given taskID. Defaults to 5 minutes.
          header:                   # Custom http headers
            - name: X-My-Header     # Example
              value: Header value 1 # Example
          attribute:
            static:                 # Static attributes/dimensions to attach to events sent to New Relic.
              - name: service       # Example
                value: butler       # Example
              - name: environment   # Example
                value: prod         # Example
      reloadTaskAborted:
        destination:
          event:
            enable: false
            sendToAccount:              # Which reload task aborts are sent to New Relic as events
              byCustomProperty:
                enable: false            # Control using a task custom property which reload task aborts are sent as events
                customPropertyName: 'Butler_AbortedTask_Event_NewRelicAccount'
              always:
                enable: false            # Controls which New Relic accounts ALL aborted reload tasks are sent to (as events)
                account:
                  - First NR account
                  - Second NR account
            attribute:
              static:                 # Static attributes/dimensions to attach to events sent to New Relic.
                - name: event-specific-attribute 2  # Example
                  value: abc 123                    # Example
              dynamic:
                useAppTags: true      # Should app tags be sent to New Relic as attributes?
                useTaskTags: true     # Should task tags be sent to New Relic as attributes?
          log:
            enable: false
            tailScriptLogLines: 20
            sendToAccount:              # Which reload task aborts are sent to New Relic as log entries
              byCustomProperty:
                enable: true            # Control using a task custom property which reload task aborts are sent as log entries
                customPropertyName: 'Butler_AbortedTask_Log_NewRelicAccount'
              always:
                enable: false          # Controls which New Relic accounts ALL aborted reload tasks are sent to (as logs)
                account:
                  - First NR account
                  - Second NR account
            attribute:
              static:                 # Static attributes/dimensions to attach to events sent to New Relic.
                - name: log-specific-attribute 2    # Example
                  value: def 123                    # Example
              dynamic:
                useAppTags: true      # Should app tags be sent to New Relic as attributes?
                useTaskTags: true     # Should task tags be sent to New Relic as attributes?
        sharedSettings:
          rateLimit: 15             # Min seconds between events sent to New Relic for a given taskID. Defaults to 5 minutes.
          header:                   # Custom http headers
            - name: X-My-Header     # Example
              value: Header value 2 # Example
          attribute:
            static:                 # Static attributes/dimensions to attach to events sent to New Relic.
              - name: service       # Example
                value: butler       # Example
              - name: environment   # Example
                value: prod         # Example
      serviceMonitor:
        destination:
          event:
            enable: false
            sendToAccount:                # Windows service events are sent to these New Relic accounts
              - First NR account
              - Second NR account
            attribute:
              static:                     # Static attributes/dimensions to attach to events sent to New Relic.
                - name: event-specific-attribute
                  value: abc 123
              dynamic:
                serviceHost: true         # Should host where service is running be sent to New Relic as attribute?
                serviceName: true         # Should service name be sent to New Relic as attribute?
                serviceDisplayName: true  # Should service display name be sent to New Relic as attribute?
                serviceState: true        # Should service state be sent to New Relic as attribute?
          log:
            enable: false
            sendToAccount:                # Windows service log entries are sent to these New Relic accounts
              - First NR account
              - Second NR account
            attribute:
              static:                     # Static attributes/dimensions to attach to events sent to New Relic.
                - name: log-specific-attribute
                  value: def 456
              dynamic:
                serviceHost: true         # Should host where service is running be sent to New Relic as attribute?
                serviceName: true         # Should service name be sent to New Relic as attribute?
                serviceDisplayName: true  # Should service display name be sent to New Relic as attribute?
                serviceState: true        # Should service state be sent to New Relic as attribute?
        monitorServiceState:              # Control whih service states are sent to New Relic
          running:
            enable: true
          stopped:
            enable: true
        sharedSettings:
          rateLimit: 5                    # Min seconds between events/logs sent to New Relic for a given host+service. Defaults to 5 minutes.
          header:                         # Custom http headers
            - name: X-My-Header           # Example
              value: Header value 2       # Example
          attribute:
            static:                       # Static attributes/dimensions to attach to events sent to New Relic.
              - name: service             # Example
                value: butler             # Example
              - name: environment         # Example
                value: prod               # Example
  ...
  ...
3.15.2 - Signl4
“Mobile Alerting and Incident Response. Automated Alerting. Anywhere Response”
It’s an easy to get started with, SaaS based solution for incident management.
It has good APIs and integrations as well as a generous free trial tier, which makes it great for Qlik Sense admins who wants to try a proper incident management tool.
www.signl4.com
What’s this?
Reload failure/abort events can be forwarded to Signl4, where they become incidents that are tracked, (maybe) escalated and eventually (hopefully!) closed.
Example here.
How it works
Signl4 exposes webhooks through which incidents can be created. The Butler.incidentTool.signl4.url is used to specify this webhook.
To use Butler with Signl4 you must first create a Signl4 team. Then note the secret key for that team:
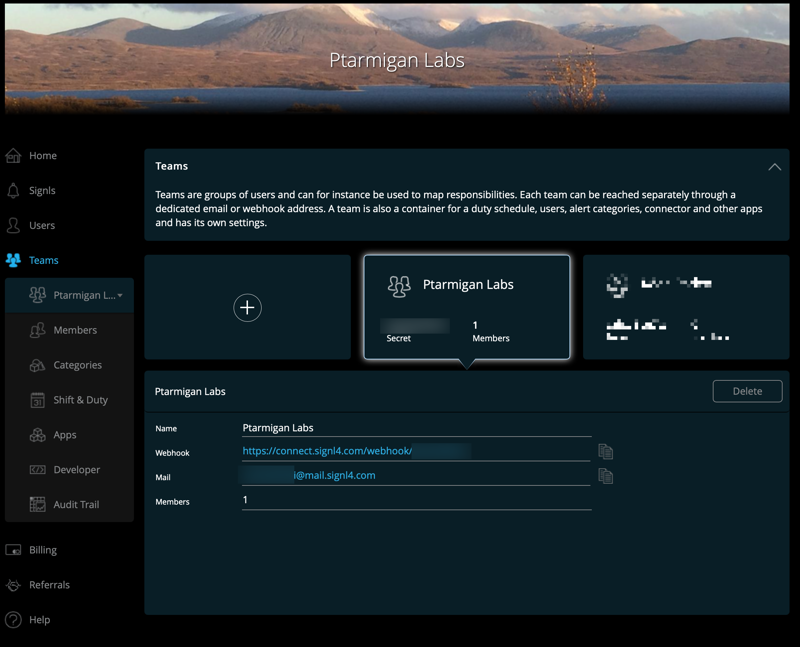
More info about the webhooks can be found in Signl4’s developer docs.
Settings in config file
---
Butler:
  ...
  ...
  # Incident management tools integration
  # Used to trigger incidents in these tools when task reloads fail or are aborted
  incidentTool:
    signl4:
      enable: false               # Enable/disable Signl4 integration as a whole
      url: https://connect.signl4.com/webhook/abcde12345
      reloadTaskFailure:
        enable: false             # Enable/disable reload failed handling in Signl4
        rateLimit: 15             # Min seconds between emails for a given taskID. Defaults to 5 minutes
        serviceName: Qlik Sense   # Signl4 "service name" to use
        severity: 1               # Signl4 severity level for failed reloads
      reloadTaskAborted:
        enable: false             # Enable/disable reload aborted handling in Signl4
        rateLimit: 15             # Min seconds between emails for a given taskID. Defaults to 5 minutes
        serviceName: Qlik Sense   # Signl4 "service name" to use
        severity: 10              # Signl4 severity level for aborted reloads
  ...
  ...
3.16 - Setting up MQTT messaging
What’s this?
MQTT is a light weight messaging protocol based on a publish-subscribe metaphore. It is widely used in the Internet of Things (IoT) and telecom sectors.
MQTT has features such as guaranteed delivery of messages, which makes it very useful for communicating between Sense and both up- and downstream source/destination systems.
Butler can be configured to forward events from Sense (reload task failures, aborted reload tasks, windows services starting/stopping, user session start/stop etc) as MQTT messages.
Butler’s REST API also has an endpoint that makes it possible to send MQTT messages from Sense apps’ load scripts.
Defining what MQTT broker/server to connect to
Butler can use either of two kinds of MQTT brokers:
- A standard MQTT broker, such as Mosquitto.
- An Azure Event Grid MQTT broker.
The former is useful if you want to use Butler in an on-prem environment where there is no need to communicate outside of the local network.
The latter is useful if you want to use Butler’s MQTT related features outside of the local network, for example in a cloud environment.
A concrete example could be that a system that Sense read data from is located in the cloud, and that system should trigger reload tasks in Sense when new data is available.
The Azure Event Grid option is also useful if you want to use Butler’s MQTT features in a hybrid environment, where some of the systems are on-prem and some are in the cloud.
The Butler config file controls which kind of MQTT broker Butler will connect to.
- If
Butler.mqttConfig.enableis set totrueandButler.mqttConfig.azureEventGrid.enableis set tofalse, Butler will connect the standard MQTT broker defined inButler.mqttConfig.brokerHostandButler.mqttConfig.brokerPort. No authentication is supported in this case. - If
Butler.mqttConfig.enableis set totrueandButler.mqttConfig.azureEventGrid.enableis set totrue, Butler will connect to an Azure Event Grid MQTT broker, using the settings defined inButler.mqttConfig.azureEventGridto authenticate with Azure.
Setting up MQTT in Azure Event Grid
Setting up Event Grid with MQTT support is described here.
It’s worth noting that there may be costs associated with using Event Grid, depending on the number of messages sent and received.
At the time of this writing, Azure Event Grid has a generous free tier that should be sufficient for most use cases.
Check the Azure pricing page for the latest information.
Using MQTT to get evens from Qlik Sense Cloud
Butler can use MQTT as a transport layer for events from Qlik Sense Cloud, for example app reload failure events. A separate MQTT configuration section in the config file is used for this, see below.
Settings in config file
The config file contains several settings related to MQTT:
- Defining what MQTT broker/server to connect to for handling client-managed Qlik Sense events and messages.
- What MQTT topics should be used when forwarding various client-managed Qlik Sense events to MQTT.
- Settings related to Butler’s use of MQTT for connecting with Qlik Sense Cloud.
---
Butler:
  ...
  ...
  mqttConfig:
    enable: false                                     # Should Qlik Sense events be forwarded as MQTT messages?
    brokerHost: <FQDN or IP of MQTT server>
    brokerPort: 1883
    azureEventGrid:
      enable: false              # If set to true, Butler will connect to an Azure Event Grid MQTT Broker, using brokerHost and brokerPort above
      clientId: <client ID>
      clientCertFile: <path to client certificate file>
      clientKeyFile: <path to client key file>
    taskFailureSendFull: true
    taskAbortedSendFull: true
    subscriptionRootTopic: qliksense/#                                  # Topic that Butler will subscribe to
    taskStartTopic: qliksense/start_task                                # Topic for incoming messages used to start Sense tasks. Should be subtopic to subscriptionRootTopic
    taskFailureTopic: qliksense/task_failure
    taskFailureFullTopic: qliksense/task_failure_full
    taskFailureServerStatusTopic: qliksense/butler/task_failure_server
    taskAbortedTopic: qliksense/task_aborted
    taskAbortedFullTopic: qliksense/task_aborted_full
    serviceRunningTopic: qliksense/service_running
    serviceStoppedTopic: qliksense/service_stopped
    serviceStatusTopic: qliksense/service_status
    qlikSenseServerLicenseTopic: qliksense/qliksense_server_license          # Topic to which Sense server license info is published
    qlikSenseServerLicenseExpireTopic: qliksense/qliksense_server_license_expire # Topic to which Sense server license expiration alerts are published
    qlikSenseCloud:                                                   # MQTT settings for Qlik Sense Cloud integration
      event:
        mqttForward:                                                  # QS Cloud events forwarded to MQTT topics, which Butler will subscribe to
          enable: false
          broker:                                                     # Settings for MQTT broker to which QS Cloud events are forwarded
            host: mqttbroker.company.com
            port: <port>
            username: <username>
            password: <password>
          topic:
            subscriptionRoot: qscloud/#                     # Topic that Butler will subscribe to
            appReload: qscloud/app/reload
  ...
  ...
3.17 - Configuring Butler heartbeats
Butler can send periodic heartbeat messages to a monitoring tool, which can then alert if Butler hasn’t checked in as expected.
What’s this?
A tool like Butler should be viewed as mission critical, at least if it’s features are used by mission critical Sense apps.
But how can you know whether Butler itself is working?
Somehow Butler itself should be monitored.
Butler (and most other tools in the Butler family) has a heartbeat feature.
It sends periodic messages to a monitoring tool, which can then alert if Butler hasn’t checked in as expected.
Healthchecks.io is an example of such as tool. It’s open source but also a SaaS option if so preferred.
Uptime Kuma is another open source option that in addition to monitoring Butler itself can also monitor infrastructure components such as Sense servers, databases, source systems etc.
More info on using Healthchecks.io with Butler can be found in this blog post.
Settings in config file
---
Butler:
  ...
  ...
  # Heartbeats can be used to send "I'm alive" messages to any other tool, e.g. an infrastructure monitoring tool
  heartbeat:
    enable: false
    remoteURL: http://my.monitoring.server/some/path/
    frequency: every 30 seconds         # https://bunkat.github.io/later/parsers.html
  ...
  ...
3.18 - Configuring Butler metrics & monitoring
Optionally the memory usage can also be stored to an external database for later viewing/alerting in for example a Grafana dashboard.
InfluxDB and New Relic are currently supported targets.
What’s this?
In some cases - especially when investigating issues or bugs - it can be useful to get log messages telling how long Butler has been running and how much memory it uses.
This feature is called “uptime monitoring” and can be enabled in the main config file.
The logging interval is configurable, as is the log level required for uptime messages to be shown.
InfluxDB
The memory usage data can optionally be written to InfluxDB, from where it can later be viewed in Grafana.
If the specified InfluxDB database does not exist it will be created. The same is true for the retention policy.
Select a reasonable retention policy and logging frequency!
You will rarely if ever need to know how much memory Butler used a month ago… A retention policy of 1-2 weeks is usually a good start, with logging every few minutes.
New Relic
Another option for storing the memory usage data is New Relic.
This is a SaaS solution that does not require a local InfluxDB database and can thus be easier to get started with compared to InfluxDB.
That said, InfluxDB does offer more flexibility with respect to what kinds of data can be stored.
The uptime related data sent to New Relic is:
- Timestamp
- Dimensions
- All static attributes/dimensions defined in the Butler config file
- Version of the Butler app, if enabled in Butler’s config file.
- Metrics
- qs_butlerHeapUsed
- qs_butlerHeapTotal
- qs_butlerExternalMem
- qs_butlerProcessMem
- qs_butlerUptimeMillisec
Settings in config file
---
Butler:
  ...
  ...
  # Uptime monitor
  uptimeMonitor:
    enable: false                   # Should uptime messages be written to the console and log files?
    frequency: every 15 minutes     # https://bunkat.github.io/later/parsers.html
    logLevel: verbose               # Starting at what log level should uptime messages be shown?
    storeInInfluxdb:
      enable: false                 # Should Butler memory usage be logged to InfluxDB?
    storeNewRelic:
      enable: false
      destinationAccount:
        - First NR account
        - Second NR account
      # There are different URLs depending on whther you have an EU or US region New Relic account.
      # The available URLs are listed here: https://docs.newrelic.com/docs/accounts/accounts-billing/account-setup/choose-your-data-center/
      # As of this writing the options for the New Relic metrics API are
      # https://insights-collector.eu01.nr-data.net/metric/v1
      # https://metric-api.newrelic.com/metric/v1
      url: https://insights-collector.eu01.nr-data.net/metric/v1   # Where should uptime data be sent?
      header:                       # Custom http headers
        - name: X-My-Header
          value: Header value
      metric:
        dynamic:
          butlerMemoryUsage:
            enable: true            # Should Butler's memory/RAM usage be sent to New Relic?
          butlerUptime:
            enable: true            # Should Butler's uptime (how long since it was started) be sent to New Relic?
      attribute:
        static:                     # Static attributes/dimensions to attach to the data sent to New Relic.
          - name: metricType
            value: butler-uptime
          - name: service
            value: butler
          - name: environment
            value: prod
        dynamic:
          butlerVersion:
            enable: true            # Should the Butler version be included in the data sent to New Relic?
  ...
  ...
3.19 - Docker healthcheck
Docker has a concept of “health checks”, which is a way for Docker containers to tell the Docker runtime engine that the container is alive and well.
Butler can be configured to send such health check messages to Docker.
Note: Enabling these health check messages is only meaningful when running Butler as a Docker container.
Settings in config file
---
Butler:
  ...
  ...
  # Docker health checks are used when running Butler as a Docker container.
  # The Docker engine will call the container's health check REST endpoint with a set interval to determine
  # whether the container is alive/well or not.
  # If you are not running Butler in Docker you can safely disable this feature.
  dockerHealthCheck:
    enable: false    # Control whether a REST endpoint will be set up to serve Docker health check messages
    port: 12398      # Port the Docker health check service runs on (if enabled)
  ...
  ...
3.20 - Creating Sense data connections
Two mandatory data connections must be created: Butler_GET and Butler_POST.
The latter is used both for POST calls and also PUT, DELETE and other HTTP operations.
The X-HTTP-Method-Override HTTP header is used with the Butler_POST data connection to tell Butler which HTTP operation should be used.
This is a way to work around a limitation of Qlik’s REST connector, as it only supports GET and POST operations.
One data connection is optional: URL encode table
It is used to URL encode strings, which is useful when passing strings to Butler’s REST API (or other APIs!).
URL encode table
Optional
Creating this data connection is optional.
That said, if you plan to use the Slack, Teams, email, or webhook connectivity features of Butler, you should create this data connection.
This is a basic “web file” connector pointing to http://www.w3schools.com/tags/ref_urlencode.asp:

Remember!
As with all new data connections, Sense will change the name your new connection (adding your username as a suffix).Use the QMC to change the name to “URL encode table”.
Butler_GET
Mandatory
These settings are mandatory if you plan to use Butler’s REST API from the load scripts of Sense apps.With Butler running, create a new REST data connection called “Butler_GET”.
It’s URL should point to Butler’s host/port.
When creating REST data connections it’s always a good idea to verify they work.
Using the /v4/butlerping endpoint is an easy way to do this (assuming that endpoint is enabled in Butler’s config file):
Creating the data connection can look like this:
 |
 |
 |
 |
No special settings are needed - just make sure the REST connector finds Butler as it should.
The actual URL of the data connection will be modified on the fly every time you call the Butler APIs, it’s thus not really important which URL is entered during the setup phase. But the /v4/butlerping endpoint is a convenient way to check that the data connection works.
Test the connection before creating it:

Remember!
As with all new data connections, Sense will change the name your new connection (adding your username as a suffix).Use the QMC to change the name to “Butler_GET”.
Butler_POST
Mandatory
These settings are mandatory if you plan to use Butler’s REST API from the load scripts of Sense apps.The data connection used for POST, PUT, DELETE and all other HTTP operations beyond GET should be named “Butler_POST”.
Its configuration is similar to that of Butler_GET, except that a message body is also needed for the POST to work.
Assuming Butler’s key-value store is enabled in the main config file, you can create a dummy key-value pair using a POST command with the following payload.
The effect is that the data connection is created and can be used for future POST/PUT/DELETE operations against Butler’s API.
The fact that is was created against the key-value store doesn’t matter, the data connection details will be replaced each time it is used.
{
  "key": "abc",
  "value": "123",
  "ttl": "5000"
}
Creating the data connection can look like this:
 |
 |
 |
 |
… and test the connection before creating it.

Remember!
As with all new data connections, Sense will change the name your new connection (adding your username as a suffix).Use the QMC to change the name to “Butler_POST”.
3.21 - Control which tasks can be started via Butler's API
Qlik Sense tasks can be started using Butler’s REST API.
Using the task filtering feature it’s possible to control which tasks can be started.
This can be useful for sysadmins when only a limited set of tasks should be available to third party systems.
Settings in config file
---
Butler:
  ...
  ...
  # Controls which tasks can be started via Butler's REST API.
  # Enabling this feature gives Qlik Sense sysadmins a way to control which tasks can be started by third party systems and applications.
  # If this feature is disabled all tasks can be started via the API (assuming the start task API itself is enabled).
  # Note that the taskId, tag and customProperty sections below are additive. I.e. a task only has to appear in one of those sections to be on the "allowed" list.
  startTaskFilter:
    enable: false
    allowTask:
      taskId:
        # Zero or more approved/allowed task IDs
        # If Butler.startTaskFilter.enable is true, only task IDs listed below will be started by Butler
        - e3b27f50-b1c0-4879-88fc-c7cdd9c1cf3e
        - 7552d9fc-d1bb-4975-9a38-18357de531ea
        - fb0f317d-da91-4b86-aafa-0174ae1e8c8f
      tag:
        # Zero or more tags used to indicate that a task is approved to be started by Butler.
        # Use the Qlik Sense QMC to set tags on tasks.
        # If Butler.startTaskFilter.enable is true, only tasks with the tags below will be started by Butler
        - startTask1
        - startTask2
      customProperty:
        # Zero or more custom properties name/value pairs used to indicate that a task is approved to be started by Butler.
        # Use the Qlik Sense QMC to set custom properties on tasks.
        # If Butler.startTaskFilter.enable is true, only tasks with the custom property values below will be started by Butler
        - name: taskGroup
          value: tasks1
        - name: taskGroup
          value: tasks2
  ...
  ...
Setting anonTelemetry to true enables telemetry, setting it to false disables telemetry.
3.22 - Configuring telemetry
What’s this?
A description of Butler’s telemetry feature is available here.
Settings in config file
---
Butler:
  # Logging configuration
  ...
  ...
  anonTelemetry: true     # Can Butler send anonymous data about what computer it is running on?
                          # More info on whata data is collected: https://butler.ptarmiganlabs.com/docs/about/telemetry/
                          # Please consider leaving this at true - it really helps future development of Butler!
  ...
  ...
Setting anonTelemetry to true enables telemetry, setting it to false disables telemetry.
3.23 - Visualise Butler's config file
What’s this?
Butler can start a web server that serves an (optionally obfuscated) view of the Butler config file.
This can be useful in situations such as
- When you need to check the configuration of Butler, but don’t have easy access to the machine where Butler is running.
- When you need to share the Butler config with someone else, but don’t want to share all the details.
The web server provides two views of the config file: JSON and YAML.
It is also possible to download the config file as YAML from the web page. If the config file is obfuscated, the downloaded file will be obfuscated as well.
Example
Here’s an example of what the YAML view could look like:

And here’s an example of the JSON view:

Settings in config file
Butler:
  ...
  ...
  # Should Butler start a web server that serves an obfuscated view of the Butler config file?
  configVisualisation:
    enable: true
    host: localhost       # Hostname or IP address where the web server will listen. Should be localhost in most cases.
    port: 3100            # Port where the web server will listen. Change if port 3100 is already in use.
    obfuscate: true        # Should the config file shown in the web UI be obfuscated?
  ...
  ...
3.24 - Forwarding user activity events to Butler
Warning
Deprecated feature
This feature was removed from Butler in version 7.0.
The reason is that Butler’s sibling project Butler SOS focuses on monitoring of Qlik Sense servers and is the best possible home for anything relating to real-time monitoring of Sense environments.
Butler SOS has a very complete feature set when it comes to monitoring - check it out!
4 - Day 2 operations
Running Butler
How to start Butler varies depending on whether you run it as a standalone app, as a Docker container or as a Node.js app.
Monitoring Butler
Once Butler is running it’s a good idea to also monitor it. Otherwise you stand the risk of not getting notified if Butler for some reason misbehaves.
Butler logs its own memory usage to the console and log files (if enabled), but can also send these metrics to an InfluxDB database and New Relic.
Butler will log its own memory usage to InfluxDB if
- The config file’s
Butler.uptimeMonitor.enableandButler.uptimeMonitor.storeInInfluxdb.enableproperties are both set totrue. - The remaining InfluxDB properties of the config file are correctly configured.
Similarly, uptime metrics will be sent to New Relic if
- The config file’s
Butler.uptimeMonitor.enableandButler.uptimeMonitor.storeNewRelic.enableproperties are both set totrue. - The remaining New Relic properties of the config file are correctly configured.
Assuming everything is correctly set up, you can then create a Grafana dashboard showing Butler’s memory use over time, using data from InfluxDB. You can also set up alerts in Grafana if so desired, with notifications going to most IM tools and email.
A Grafana dashboard can look like this. Note that one of the available metrics (external) is not used in this particular dashboard. It’s still logged to InfluxDB though.

There is a sample Grafana dashboard in Butler’s GitHub repo.
A New Relic graph covering the same information (but a different time range!) can look like this:

4.1 - Standalone app
Pre-built executables are available for Windows, macOS and Linux.
Running Butler as standalone, native app
Windows
Running standalone Butler on Windows Server 2016 looks like this:
PS C:\tools\butler> .\butler.exe
Usage: butler [options]

Butler gives superpowers to client-managed Qlik Sense Enterprise on Windows!
Advanced reload failure alerts, task scheduler, key-value store, file system access and much more.

Options:
  -V, --version                        output the version number
  -c, --configfile <file>              path to config file
  -l, --loglevel <level>               log level (choices: "error", "warn", "info", "verbose", "debug", "silly")
  --new-relic-account-name  <name...>  New Relic account name. Used within Butler to differentiate between different target New Relic accounts
  --new-relic-api-key <key...>         insert API key to use with New Relic
  --new-relic-account-id <id...>       New Relic account ID
  --test-email-address <address>       send test email to this address. Used to verify email settings in the config file.
  --test-email-from-address <address>  send test email from this address. Only relevant when SMTP server allows from address to be set.
  --no-qs-connection                   don't connect to Qlik Sense server at all. Run in isolated mode
  --api-rate-limit                     set the API rate limit, per minute. Default is 100 calls/minute. Set to 0 to disable rate limiting.
  -h, --help                           display help for command
PS C:\tools\butler>
Adding the --configfile option and pointing it to a valid config file gives Butler everything needed to start.
All other options are optional.
PS C:\tools\butler> dir


    Directory: C:\tools\butler


Mode                LastWriteTime         Length Name
----                -------------         ------ ----
d-----       11/25/2023  11:58 PM                config
d-----       12/10/2023   2:46 PM                log
-a----        12/6/2023   8:31 PM       70614688 butler.exe


PS C:\tools\butler> .\butler.exe -c .\config\butler-config.yaml -l info
...
...
2023-12-10T21:35:39.447Z info: CONFIG: Influxdb enabled: true
2023-12-10T21:35:39.452Z info: CONFIG: Influxdb host IP: 10.11.12.13
2023-12-10T21:35:39.453Z info: CONFIG: Influxdb host port: 8086
2023-12-10T21:35:39.454Z info: CONFIG: Influxdb db name: butler
2023-12-10T21:35:39.722Z info: CONFIG: Found InfluxDB database: butler
2023-12-10T21:35:45.938Z info: --------------------------------------
2023-12-10T21:35:45.939Z info: Starting Butler
2023-12-10T21:35:45.942Z info: Log level      : info
2023-12-10T21:35:45.943Z info: App version    : 9.3.0
2023-12-10T21:35:45.944Z info: Instance ID    : f024dc47...
2023-12-10T21:35:45.945Z info:
2023-12-10T21:35:45.945Z info: Node version   : v18.5.0
2023-12-10T21:35:45.946Z info: Architecture   : x64
2023-12-10T21:35:45.947Z info: Platform       : Windows
2023-12-10T21:35:45.948Z info: Release        : 10.0.14393
2023-12-10T21:35:45.949Z info: Distro         : Microsoft Windows Server 2016 Standard
2023-12-10T21:35:45.949Z info: Codename       :
2023-12-10T21:35:45.950Z info: Virtual        : true
2023-12-10T21:35:45.951Z info: Processors     : 2
2023-12-10T21:35:45.955Z info: Physical cores : 4
2023-12-10T21:35:45.956Z info: Cores          : 8
2023-12-10T21:35:45.957Z info: Docker arch.   : undefined
2023-12-10T21:35:45.958Z info: Total memory   : 34359267328
2023-12-10T21:35:45.959Z info:
2023-12-10T21:35:45.959Z info: Config file    : C:/tools/butler/config/butler-config.yaml
2023-12-10T21:35:45.960Z info: API rate limit : 100
2023-12-10T21:35:45.961Z info: --------------------------------------
...
...
Windows services & process monitors
You can use the excellent Nssm tool to make Butler run as a Windows Service, with all the benefits that follow (can be monitored using operations tools, automatic start/restart etc).
A step-by-step tutorial for running Butler as a Windows service is available over at ptarmiganlabs.com.
macOS and Linux
Running the standalone Butler tool without any parameters gives you a help text that explains which commands and options are available:
➜  butler ./butler
Usage: butler [options]

Butler gives superpowers to client-managed Qlik Sense Enterprise on Windows!
Advanced reload failure alerts, task scheduler, key-value store, file system access and much more.

Options:
  -V, --version                        output the version number
  -c, --configfile <file>              path to config file
  -l, --loglevel <level>               log level (choices: "error", "warn", "info", "verbose", "debug", "silly")
  --new-relic-account-name  <name...>  New Relic account name. Used within Butler to differentiate between different target New Relic accounts
  --new-relic-api-key <key...>         insert API key to use with New Relic
  --new-relic-account-id <id...>       New Relic account ID
  --test-email-address <address>       send test email to this address. Used to verify email settings in the config file.
  --test-email-from-address <address>  send test email from this address. Only relevant when SMTP server allows from address to be set.
  --no-qs-connection                   don't connect to Qlik Sense server at all. Run in isolated mode
  --api-rate-limit                     set the API rate limit, per minute. Default is 100 calls/minute. Set to 0 to disable rate limiting.
  -h, --help                           display help for command
➜  butler
The available options are exactly the same as for Windows.
Services & process monitors
The exact way of auto-starting apps when a computer boots varies between different versions of macOS and Linux.
If you want to do this Google is your friend.
That said, PM2 and Forever are two process monitors that both have been successfully tested with Butler. These tools basically monitor what processes are running and restart them if they for some reason fail.
Command line options
Tip
Any option given on the command line will override the same setting in the config file
--version, -V
Shows Butler’s version number.
--configfile, -c
The --configfile option is a must-have as it’s the only way to tell the standalone Butler executable where to find its config file.
--loglevel, -l
The --loglevel option can be quite useful when you want to temporarily switch from the info level logging set in the config file, to a more detailed verbose or debug level logging while investigating some problem.
--new-relic-account-name
A list of New Relic account names to which data can be sent from Butler.
The arguments to this option consists of one or more strings enclosed in single or double quotes (depending on which operating system is used), separated by a space.
For example --new-relic-account-name "First NR account" "Second NR account".
Note that the same number of arguments must be passed to all the command line options dealing with New Relic accounts!
--new-relic-api-key
It’s always better to store sensitive information in environment variable than in config files.
For that reason it’s possible to provide the New Relic insert API keys (used when sending data to New Relic) via a command line option.
It’s then possible to pass in the New Relic API key via the command line rather than store it within the config file.
The arguments to this option consists of one or more strings enclosed in single or double quotes (depending on which operating system is used), separated by a space.
For example --new-relic-api-key "API key 1" "API key 2".
--new-relic-account-id
Similar to the --new-relic-api-key, the account ID(s) used with New Relic can be provided as a command line option.
The arguments to this option consists of one or more strings enclosed in single or double quotes (depending on which operating system is used), separated by a space.
For example --new-relic-account-id "account ID 1" "account ID 2".
--test-email-address
Used to send a test email to an email addresses. Can be used to confirm that the SMTP settings used when sending reload failed/aborted notification emails are working as intended.
Example: --test-email-address joe@company.com
--test-email-from-address
Some SMTP servers, for example GMail, require you to authenticate before any emails can be sent. The sender will then be the logged in/authenticated user.
When using a non-authenticating SMTP server (common in enterprises where access to the SMTP server is limited to the internal network) the sender email address (and optionally name) has to be specified manually.
Example: --test-email-from-address "User Anna <anna@company.com>"
--no-qs-connection
When running Butler in standalone mode it’s possible to disable the connection to the Qlik Sense server. This is used when Butler is executed to provide a Swagger/OpenAPI specification file for the Butler API, i.e. not for any production use-cases.
--api-rate-limit
The --api-rate-limit option can be used to set the REST API rate limit, per minute. Default is 100 calls/minute. Set to 0 to disable rate limiting.
4.2 - Docker
Running Butler in Docker
First configure the docker-compose.yml file as needed, then start the Docker container in interactive mode (with output sent to the screen).
This is useful to ensure everything works as intended when first setting up Butler SOS.
docker-compose up
Once Butler has been verified to work as intended, hit ctrl-c to stop it.
Then start Butler in daemon (background) mode:
docker-compose up -d
From here on the Docker environment will make sure Butler is always running, including restarting it if it for some reason stops.
Tip
There is a sample docker-compose.yaml file available in the Butler repository over at GitHub.
4.3 - Node.js app
Running Butler as Node.js app
If the Butler source code has been installed in d:\tools\butler, starting Butler as a Node.js app on Windows could look like this:
d:
cd \tools\butler\src
node butler.js
It is of course also possible to put those commands in a command file (.bat or .ps1 on Windows) file and execute that file instead.
The commands above assume there is a d:\tools\butler\src\config directory in which there is a YAML config file.
The name of that config file should match the value set to the NODE_ENV environment variable.
For example, if NODE_ENV=dev the config file should be d:\tools\butler\src\config\dev.yaml.
The command line options introduced in Butler 7.2 are available also when running Butler as a Node.js app.
Use the --help command line option to show what options are available:
PS D:\tools\butler\src> node butler.js --help
Usage: butler [options]

Butler gives superpowers to client-managed Qlik Sense Enterprise on Windows!
Advanced reload failure alerts, task scheduler, key-value store, file system access and much more.

Options:
  -V, --version                        output the version number
  -c, --configfile <file>              path to config file
  -l, --loglevel <level>               log level (choices: "error", "warn", "info", "verbose", "debug", "silly")
  --new-relic-account-name  <name...>  New Relic account name. Used within Butler to differentiate between different target New Relic accounts
  --new-relic-api-key <key...>         insert API key to use with New Relic
  --new-relic-account-id <id...>       New Relic account ID
  --test-email-address <address>       send test email to this address. Used to verify email settings in the config file.
  --test-email-from-address <address>  send test email from this address. Only relevant when SMTP server allows from address to be set.
  --no-qs-connection                   don't connect to Qlik Sense server at all. Run in isolated mode
  --api-rate-limit                     set the API rate limit, per minute. Default is 100 calls/minute. Set to 0 to disable rate limiting.
  -h, --help                           display help for command
Looking at the above, it’s actually possible to use the --configfile to specify which config file to use.
Similarly the --loglevel option can be used to control Butler’s logging.
Tip
Any option given on the command line will override the same setting in the config file
Windows services
On Windows you can use the excellent Nssm tool to make Node.js (and also the Butler app) run as a Windows Service, with all the benefits that follow (can be monitored using operations tools, automatic restarts etc).
5 - Upgrade
Upgrading from one version of Butler to another is usually quite straightforward.
This page describes the upgrade process.
First: Don’t panic
Upgrading Butler is usually a smooth process:
- Get the new version from the assets section on the download page. Extract the ZIP file.
- Back up your existing Butler configuration file.
- Edit the configuration file to match the new version’s requirements.
- Stop the Butler process/service.
- Replace the Butler binary with the new version.
- Start the process/service.
- Verify that Butler is running as expected.
- 🥳 Celebrate!
Then: The details
Version number hints
Different kind of upgrades (usually) result in different levels on modifications needed in the main config file.
- “Small” Butler upgrades move from one patch version to another, without changing the feature version.
Example: Upgrading from 7.3.0 > 7.3.4. - “Medium” upgrades involves moving from one minor version to another, without changing the major version. Example: Upgrading from 7.2.3 > 7.3.0
- “Major” upgrades is when you move to a new major version. Example: 7.4.2 > 8.0.0
The versioning scheme used in Butler is described here.
Warning
You should always upgrade to the latest available version.
That version has the latest features, bug fixes and security patches.
Minor upgrades
The new release includes bug fixes, security patches, minor updates to documentation etc - but no new features.
In theory there should never be any changes to the config files when doing a minor upgrade.
Medium upgrades
This scenario means that new features are added to Butler.
Usually there are also various bug fixes included.
Most new features need to be configured somehow, meaning that medium upgrades usually require modification to the config files.
The most common change by far is that it’s the main config file that needs to be modified, but a new scheduler related feature could for example mean that the scheduler config file must be modified too.
The changes needed to the config files are usually additive in nature, i.e. some settings must be added to the config file, but the existing settings and general structure of the file remain the same.
Major upgrades
This scenario involves breaking changes of some kind.
These almost certainly require changes to the config files, sometimes even significant ones in the sense that the structure of the config file may have changed.
If very major rework has been done to Butler, this may also motivate a major version bump.
Know your config file
Butler is entirely driven by its configuration files, with the main YAML config file being the most important one.
There are other config files too, containing for example scheduling information.
InfluxDB considerations
Some versions include changes to the InfluxDB schema, meaning that you need to do some manual work in order to upgrade to the new schema.
The easiest way to do this is to delete the InfluxDB database used by Butler, then let Butler re-create it using the new schema.
If the InfluxDB database specified in the Butler config file does not exist, Butler will automatically create it for you.
Deleting the InfluxDB database “senseops” can be done with a command similar to this:
influx --host <ip-where-influxdb-is-running> --port <influxdb-port-usually-8086>
drop database senseops
exit
Upgrade checklist
Info
Starting with Butler version 9.0 there is a check that the config file has the correct format.
This means that if you forget to add or change some setting in the main YAML config file, Butler will tell you what’s missing and refuse to start.
A consequence of this is that all settings are now mandatory, even if you don’t use them.
- Make a backup of your YAML configuration file before upgrading. Just… do it.
- Look at the release notes to get a general feeling for what is new and what has changed.
Those are the areas that may require changes in the config file. - Compare your existing main config file with the template config file available on GitHub.
This comparison is a manual process and can be a bit tedious, but knowing your config file is really needed in order to make full and correct use of Butler.- That file is also included in the Butler ZIP file available on the download page.
- A more in-depth description of the config file is available in the Reference docs > Config file syntax section of the documentation.
- The result of the comparison will show you what parts of the config file are new (for medium-sized upgrades) and which parts have changed in a significant way (for major upgrades).
- Get the binaries for the new Butler version from the download page.
- Start the new Butler version and let it run for a few minutes.
- Review the console logs (or the log files) to make sure there are no warnings or errors.
- If there are warnings or errors it can be helpful to start Butler with more verbose logging.
Adding--log-level verboseor even--log-level debugwill give you more details on what Butler is doing and what might be causing the problems you are experiencing.
Finally: When things aren’t working - check the logs
By far the most common problem when upgrading to a new Butler version (or doing a fresh install) is an incorrect config file.
All config entries are mandatory, even if you don’t use them.
This may seem a bit harsh, but this way Butler can tell you exactly what is missing in the config file.
Butler is pretty good at figuring out what is wrong with the config file, but there may be cases where it’s not obvious what is wrong.
Thus, double check your config file, then triple check it.
Then start Butler and read the logs carefully.
If you need more details, start Butler with the --log-level verbose or even --log-level debug options to get more details on what’s going on.
If things still don’t work you can post a question in the Butler forums.
By sharing your installation and upgrade challenges/issues you enable future improvements, which will benefit both yourself and others.