Starting with version 11.2, the GitHub releases page is the place where release notes are found.
Release highlights
What’s new in version 11.1.0
🚀 Features
license: Monitor high level Qlik Sense license usage across different license types.
license: Scheduled removal of unused user Qlik Sense licenses.
🐛 Bug Fixes
config: Better, more complete check of config when starting Butler.
reload failed: Make handling of reload failed/aborted/succeeded messages more robust.
startup: Remove Node.js warnings on Butler startup.
startup: More consistent logging during startup.
startup: Tidy up formatting of startup info written to logs.
👉 Miscellaneous
Optimize GH Actions for building binaries.
Remove udp client from Butler project, move to its own repo.
Sign Win binaries with new signing solution.
Update dependencies.
What’s new in version 11.0.2
This is a maintenance release used to test the automatic building of Butler binaries, Docker images etc.
No new features or bug fixes were added in this version.
What’s new in version 11.0.1
This is a maintenance release used to test the automatic building of Butler binaries, Docker images etc.
No new features or bug fixes were added in this version.
What’s new in version 11.0.0
Focus of this release is to modernize the Butler code base.
No new features, but a lot of work has been done to make Butler more robust and easier to maintain in the future.
🐛 Bug Fixes
docker: Correctly report Docker status (72e1087), closes #939
general: Make path resolution for QIX schema files more robust (568aa2e)
mqtt: Better logging and check for cert existence (59dc4fa)
webhook: Deal with empty webhook list wo errors (3f42d02), closes #944
winsvc: Win service monitoring no longer rely on New Relic (e47124c), closes #967
What’s new in version 9.4.0
🚀 Features
influxdb: Add Butler version tag to uptime data sent to InfluxDb.
🐛 Bug Fixes
winsvc: Improve Winsvc checking efficiency
What’s new in version 9.3.2
⚙️ This release address several bugs related to Windows service monitoring.
Long story short - this should work a lot better now compared to previous versions.
🎉 A bonus is that the Windows service monitoring is significantly faster than before.
For example, if you monitor 5 services on a server, Butler’s monitoring code now executes ca 5 times faster than before!
🐛 Bug Fixes
mqtt: Don’t show MQTT startup info when MQTT is disabled.
winsvc: Bug fixes and better logging for win service monitoring.
winsvc: Make Windows service status checks quicker.
Miscellaneous
deps: Update dependencies to stay safe & secure.
What’s new in version 9.3.1
Bug Fixes
mqtt: More robust startup code for MQTT & Win svc monitoring.
winsvc: Don’t send Win svc alerts when Butler starts.
Refactoring
logging: More consistent log prefixes.
What’s new in version 9.3.0
Features
influxdb: Store failed reload info in InfluxDB.
mqtt: Add support for Azure Event Grid as MQTT broker.
influxdb: Store reload task success info in InfluxDB.
Bug Fixes
Disable SMTP mail appender in sample config.
More robust generation of anonymous Butler instance id.
mqtt: Better error handling when establishing MQTT connection.
Verify that all required config file entries exist.
winservice: Better handling of services that don’t exist.
Miscellaneous
Add sample config files to release ZIPs.
What’s new in version 9.2.0
Features
reload-alerts: Make app owner info available in reload failed alerts.
What’s new in version 9.1.0
Features
scrip logs: Only get failed-reload script logs once from Sense server.
telemetry: Change to using PostHog for telemetry collection.
What’s new in version 9.0.0
⚠ BREAKING CHANGES
Move InfluxDB settings to their own section in config file
Features
Add InfluxDB as destination for Windows service status monitoring
Add monitoring of Windows services
Log at startup current API rate limit
Log at startup which config file is used
Log warnings when API rate limits exceeded
Move InfluxDB settings to their own section in config file
New command line option for setting API rate limit
Verify structure of config file on Butler startup
Bug Fixes
Add missing fields to template config file
Only initiate InfluxDB connection if it’s actually enabled in config file
Only set up REST server if it’s actually enabled in the config file
Other
deps: Update dependencies to stay safe & secure
Update Docker image to use Node.js v20
What’s new in version 8.6.2
Other
deps: Update dependencies to stay safe & secure
What’s new in version 8.6.1
Bug Fixes
Allow empty New Relic settings in config file’s uptime section
Allow uptime reporting to New Relic without custom http headers
Better log messages when rate limiting for reload notifications passes
Config asset errors when starting Butler without any New Relic accounts specified
Improve warning when custom property names in config file don’t exist in Sense
Only send to New Relic if event/log is enabled AND custom property name specified.
Upgrade Swagger docs to latest version
Other
deps: Update dependencies to stay safe & secure
What’s new in version 8.6.0
Features
Add virus/malware scanning of standalone binaries during build,
Sign Windows binaries during build
Other
deps: Update dependencies to stay safe & secure
What’s new in version 8.5.3
Other
Update dependencies
What’s new in version 8.5.2
Bug Fixes
Handle startup error messages without… errors
Improved startup checks of custom properties handling New Relic destinations
Incorrect error messages in config assert module
Other
deps: Updated dependencies to stay safe and secure
What’s new in version 8.5.1
Bug Fixes
New Relic CLI options now work again
Other
deps: Updated dependencies to stay safe and secure
What’s new in version 8.5.0
This release enhances the integration between Butler and the New Relic SaaS monitoring platform.
Specifically, it’s now possible to control per reload task which New Relic account failed/aborted task notifications should be sent to.
The destination New Relic account(s) (where failed reload events/log entries are sent) is set via custom properties on the reload tasks.
Failed and aborted tasks can be sent to New Relic as events or log entries, or both.
Zero, one or more New Relic accounts can be defined in the Butler config file.
Features
new-relic: Allow per-reload-task control of to which New Relic account failed/aborted reload alerts are sent
Add new command line option –no-qs-connection. Used when no connection to Sense should be done, for example when generating API docs
Bug Fixes
scriptlog: Increase timeout when getting script logs
scriptlog: More descriptive messages when script log retrieval fails
Other
deps: Update dependencies to latest versions
What’s new in version 8.4.2
Bug Fixes
Add building of Linux binaries to build pipeline
What’s new in version 8.4.1
Bug Fixes
Properly store demo apps in GitHub
What’s new in version 8.4.0
Features
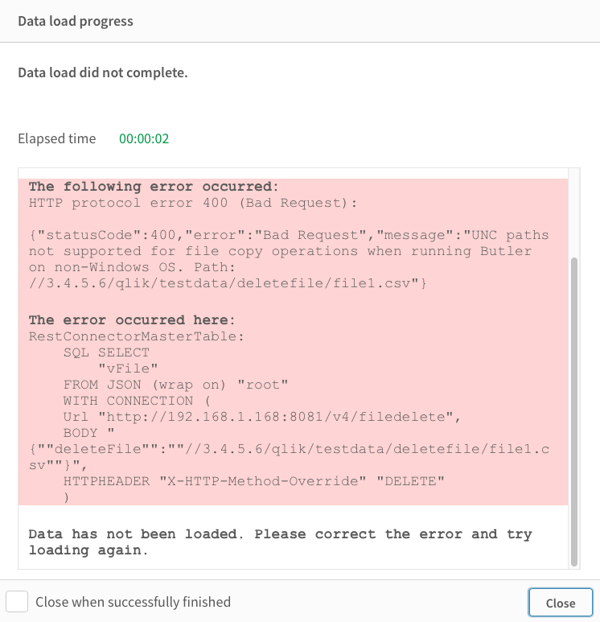
Make file copy/move/delete REST endpoints more robust
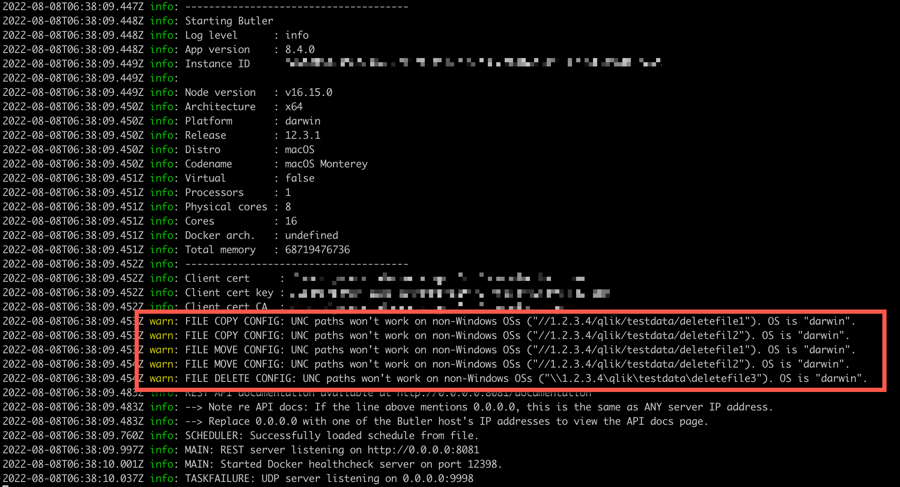
Warn if UNC paths are used with file API calls, when Butler runs on non-Windows OS
Bug Fixes
Make startup logging of approved directories for file copy/move/delete less verbose
Other
Update dependencies
What’s new in version 8.3.3
Bug Fixes
API endpoint /v4/schedules/status now respects enable/disable in config file #509
Incorrect return value from base conversion API endpoint #508
Incorrect telemetry status (true/false) for uptime data sent to InfluxDB. #401
Other
Update dependencies to stay sharp and secure.
Now using Node.js v18 when building Docker images.
What’s new in version 7.2
Features
Create stand-alone binaries to make it easier to get started with Butler. No need to install Node.js any more, just download Butler, configure it and run. #383
Make a few important config options available as command line parameters. Specifically, the config file to use and the log level can be specified via command line options --configfile and --loglevel, respectively. #381
Store full reload logs for failed reload tasks to disk, for easier analysis at later time. #94
Bug fixes
Better error checking when calling Qlik Sense APIs. #386
Better handling of long script logs in notifications sent to MS Teams. #389
Better handling of long script logs in notifications sent to Slack. #388
Other
What’s new in version 7.1
Features
Add control of what tasks can be started via Butler’s REST API. Also known as “task filtering”. #284
api: Verify that task IDs are valid (both that they are valid guids and that they exist in Sense) before trying to start the associated tasks. #319
Refactor API for starting tasks. Add magic task guid “-” that can be used as URL parameter when all task IDs (and other parameters) are passed in via the message body. #326
Show URL to API docs/Swagger page on Butler startup. #317
Bug fixes
api: API calls with http “Expect” header no longer fails. #322
Increase timeout in API test cases from 5 to 15 seconds. This gets rid of occasional timeouts in the test suite. #329
File copy/move APIs now respect options preserveTimestamp and overwrite. #263
Return proper JSON from successful API calls. Refactoring the API code in v6.0 introduced a bug, causing empty responses from successful calls to some API endpoints. #260
Added a new API endpoint for listing all keys in a key-value namespace. #150.
Fixed a bug where Butler would not start properly if there were empty config sections in the YAML config file. Butler is now more tolerant against slightly incorrectly formatted config files. #152.
What’s new in version 5.2
It’s now possible to include zero or more (i.e. optional) key-value pairs when starting QSEoW reload tasks using the /v4/reloadtask/{taskId}/start REST endpoint.
There are also helper subs available in the demo app included in the GitHub repository - as well as in the online docs at butler.ptarmiganlabs.com. (#147, #148)
What’s new in version 5.1
First version of telemetry added to Butler (#142). More info here.
Show high level system info when starting Butler (#140).
Don’t waste memory when MQTT is not used: Fixed #139.
Refined the documentation, fixed typos and updated dependencies. The usual stuff that comes with every release.
What’s new in version 5.0
Greatly improved failed reload notifications for both MS Teams and Slack.
Task failure alerts for these channels now use the same advanced templating solution that’s already available for Butler’s email notifications. This is in many ways a milestone as it brings a new level of reload alerts to Qlik Sense Enterprise.
The downside is that the Slack and Teams settings in Butler’s config file have been changed in a breaking way - make sure to update the config file as needed when upgrading Butler.
Due to the breaking nature of the config file changes, the version number was bumped to 5.0 rather than 4.4.
Added a new API endpoint for doing app reloads. Both full and partial reloads are supported. When the app has reloaded, a one or more reload tasks can be started based on whether the app reload completed successfully or not.
Added new API endpoints for listing all apps in the Sense server, as well as extracting metadata for a specific app. Those features have been available in Butler for many years, they just get a couple of new endpoints that better align with Butler’s current API naming standard.
Refined user session monitoring. The previous XML appender file provided by Butler was too generous and passed on too many user activity events to Butler. The new appender files provide a tighter/more relevant filtering and only returns session start/stop events to Butler (from which this info can be sent to Slack or MS Teams).
What’s new in version 4.3
Fixed a bug that in some cases prevented Sense reload tasks from being started using Butler’s API.
Added instruction for creating the data connections needed to use Butler APIs from Sense load scripts.
Added concept page explaining how Butler can be used to copy/move/delete files from load scripts.
Added example page showing how file manipulation (copy/move/delete) is done from Sense scripts, using Butler’s APIs.
What’s new in version 4.2
Email reload alerts taken to a new level. Emails are created using template files, with full support for HTML formatting, emoji support in both email subject/body etc.
This makes it possible to create nice looking alert emails that contain just the information you need, while also conforming to corporate design, colors etc.
Alert emails can be set up for either failed scheduled reloads, or running reloads that are stopped from the QMC or via APIs. Or both.
More than 40 templating fields available, including task history (what steps the task has been through), beginning and end of reload script log, app/task metadata, 5+ date formats and more.
Template fields can be used in both subject and body of email.
Rate limiter that prevents email spamming for frequently failing tasks.
What’s new in version 4.1
The REST API now lets you copy files in a controlled, secure way. Version 4.0 added similar features for file moving and deletes, so copying is a natural complement.
What’s new in version 4.0
An advanced scheduler that makes it possible to trigger reloads in Sense in a much more flexible way, compared to the scheduler available in the Qlik Sense QMC. It’s essentially Cron for Qlik Sense.
A generic key-value store can be used to send parameters between reload tasks. The reload script of the first task stash it’s parameters away in the KV store, and the following task(s) pull the parameters from the store.
KV pairs can optionally also have a time-to-live (TTL) value. This can be an easy way to keep the KV store clean and tidy, or as a way to tell Sense apps that they are reloading within x hours of some event happening, for example.
Key-value stores are a very versatile tool and a great addition to Qlik Sense.
Moving and deleting files in the file system of the Sense servers, or on any disks accessible by those servers. You customize what directories are approved for these operations, and thus prevent this feature from becoming a security risk.
Reload failure notifications can now be sent to Microsoft Teams, in addition to Slack and as email.
Better logging, including continuous logging of Butler’s own memory usage to InfluxDB, from where it can be graphed using for example Grafana.
API docs using the OpenAPI/Swagger format.
A totally re-engineered REST API that now better follows best practices when to use GET/POST/PUT/DELETE. Previously everything was done using GETs… which was really ugly. The downside is that this is a major breaking change! Please review the API docs for details.
1 - About
Information about the Butler software, community, docs and more.
Are you stuck on something while setting up Butler? Got ideas for new features?
Don’t hesitate to post your thoughts in the Butler forums.
1.1 - Butler
An introduction to Butler.
The Butler project is all about adding useful features to both the client-managed version of Qlik Sense, also known as Qlik Sense Enterprise on Windows (QSEoW) and Qlik Sense Cloud.
Some of the features can be used from Sense load scripts, other features provide integration with 3rd party systems.
Most of Butler’s features simply try to make daily life for a Qlik Sense administrator or developer a bit easier.
Given Butler’s history and the fact that it was originally developed for Qlik Sense Enterprise on Windows, most features are only available for that platform.
More and more Qlik Sense Cloud features are being added, for example the ability to send app reload failed alerts to email, Slack, Teams or script log on local disk.
The goal is to integrate battle-proven concepts and best-of-breed open-source tools into Butler and thus make them available to developers of Sense apps or those responsible for running Sense clusters.
In some cases it might be possible to use these tools from within Sense also without Butler (for example sending messages to Teams or Slack) - in those cases Butler simply tries to make things easier, lowering the barriers to get started and get things done.
There is also a clear goal that Butler should be very configurable. In practice this means that individual features can be turned on/off as needed, improving security and lowering memory usage.
Butler is written in Node.js and runs on most modern operating systems.
There are pre-built binaries for Windows, macOS and Linux, meaning that Node.js does not have to be separately installed to use Butler.
This simplifies things - just download, configure and run.
You can run Butler on the same server as Qlik Sense, in a Docker container on a Linux server, in Kubernetes, on Mac OS, on Raspberry Pi (not a good idea.. but possible and proven to work).
Butler is a member of a group of tools collectively referred to as the “Butler family”, more info is available here.
This picture might be useful to understand what Butler does and how it fits into the larger system map around Qlik Sense:
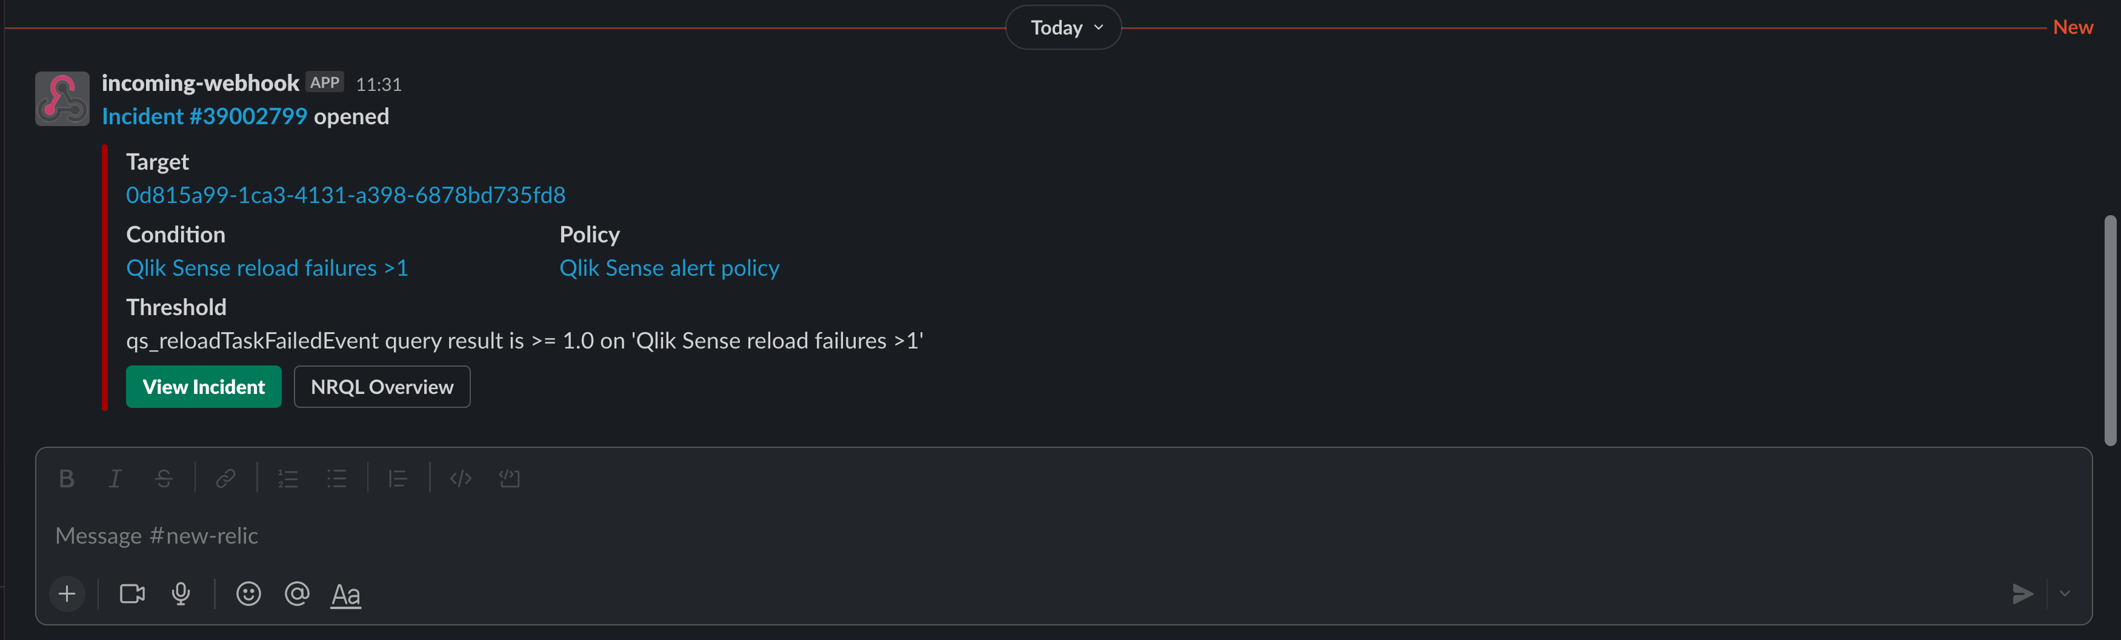
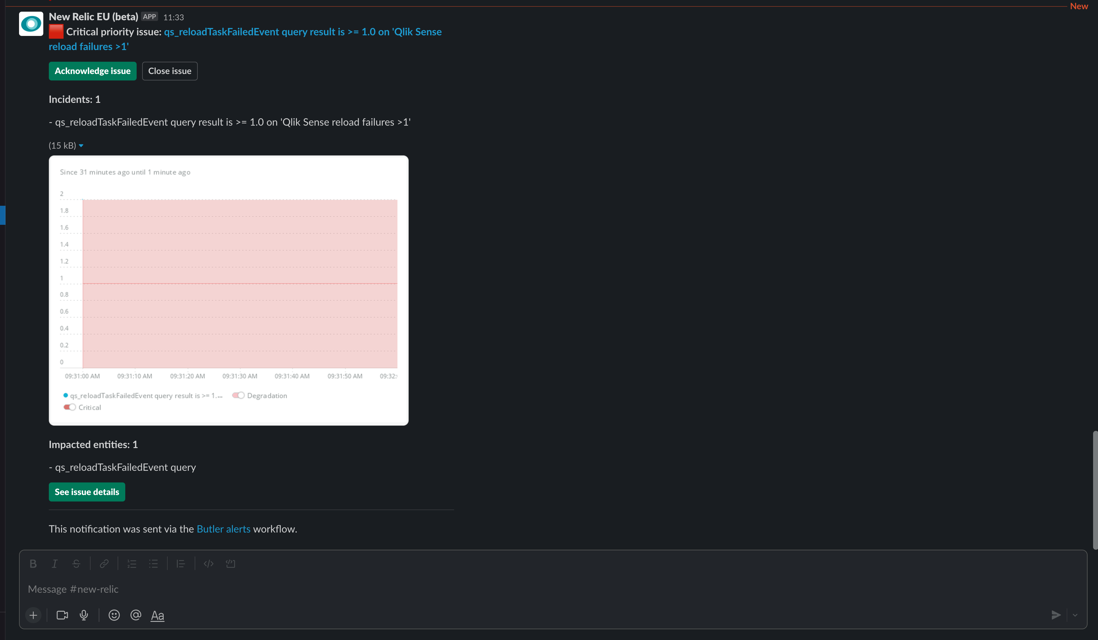
Instant notifications when reload tasks fail or are stopped
Information about failing tasks can be sent as emails, to Microsoft Teams, Slack, as MQTT messages or outgoing webhooks.
Tip
This feature is available for both Qlik Sense client-managed and Qlik Sense Cloud.
Email, Slack and MS Teams notifications all use a templating concept where HTML/Markdown template files describe what the alert message should look like. Before the alert is sent the template is populated with actual data from the failed reload task (client-managed Sense) or app reload (Sense Cloud).
For email alerts both subject and body of the email can be templated.
For both Slack and Teams there are options to use more flexible/configurable alert formats and more basic pre-configured alerts.
The result is a very powerful tool for both QSEoW sysadmins and those responsible for Qlik Cloud tenants, who both want to be notified when reloads fail.
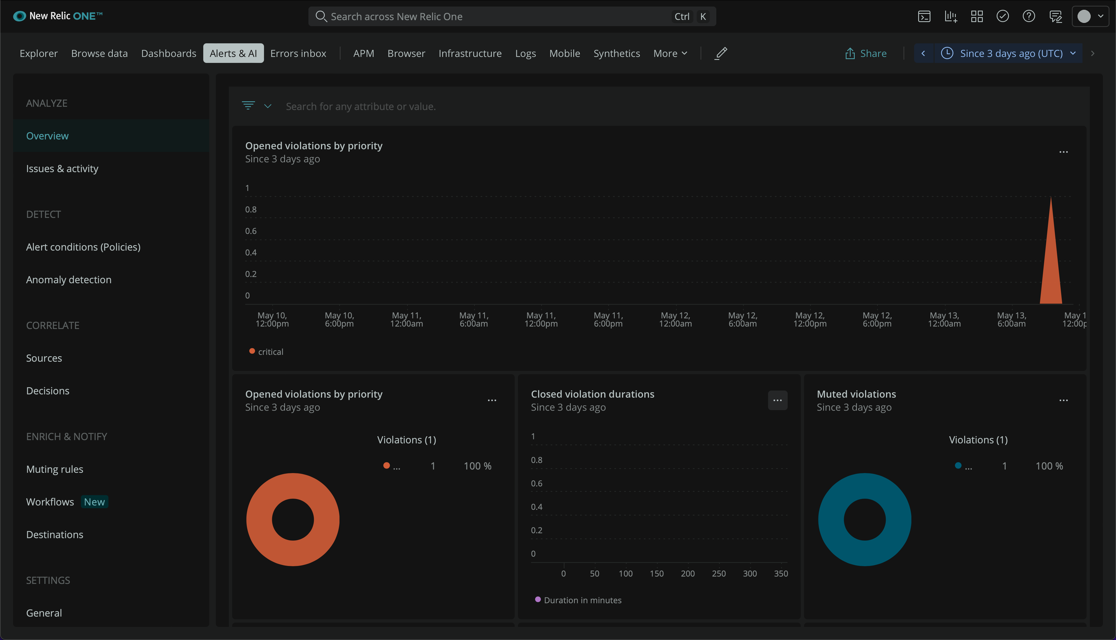
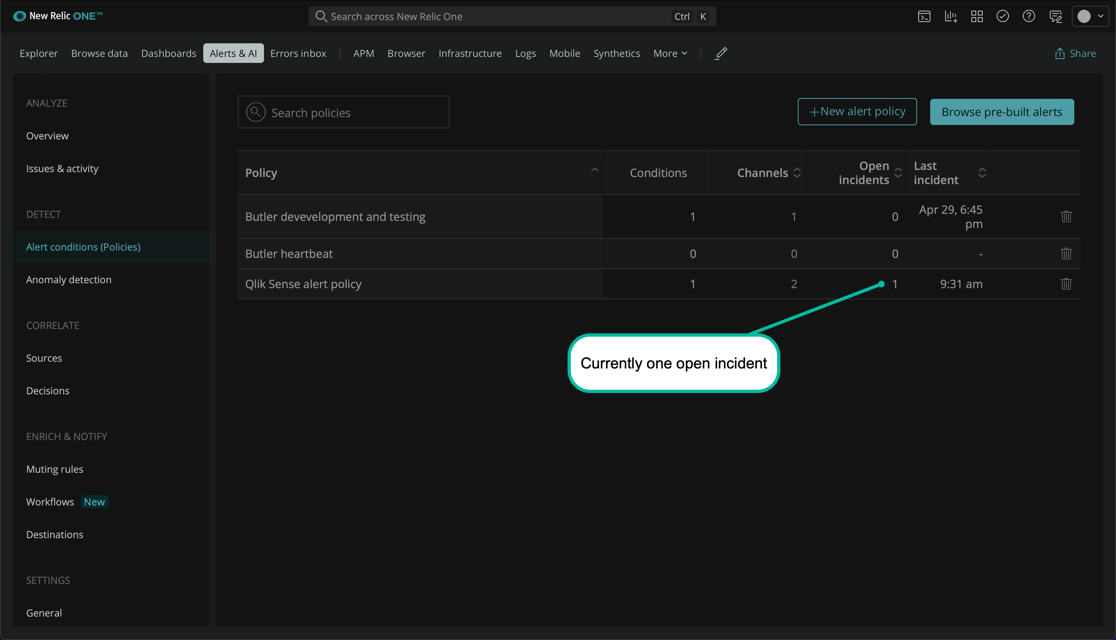
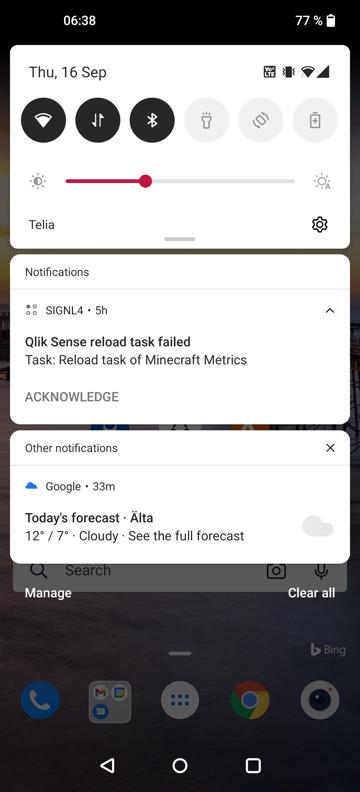
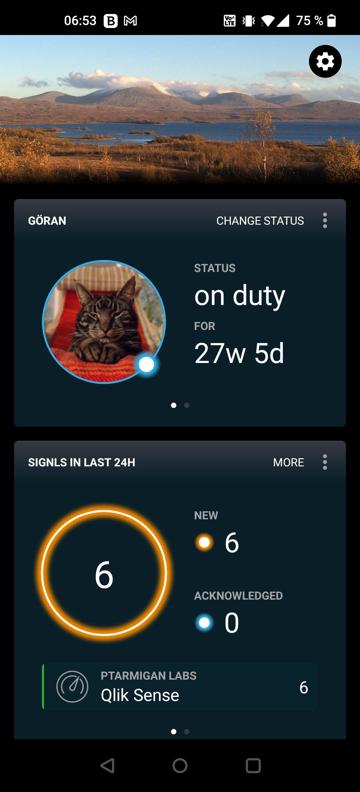
Forward failed reload events to incident management systems (New Relic, Signl4)
Butler offers advanced failed reload alerts via Slack, Teams, email and outgoing webhooks.
Configurable templates means you can customize emails/Teams/Slack messages.
Sometimes you want a bit more structure though.
This is especially true when Sense is used in the enterprise.
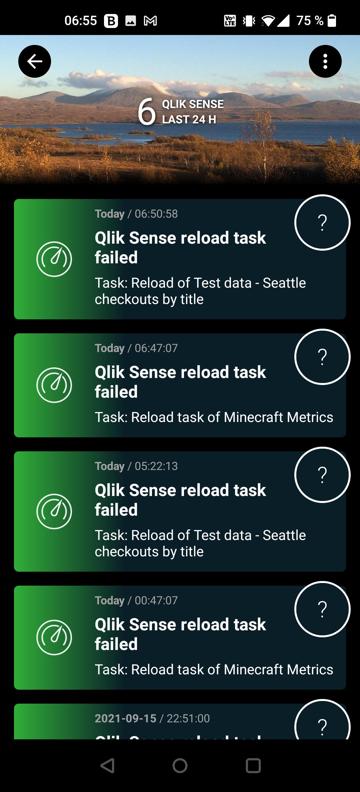
Butler integrates with both Signl4 and New Relic.
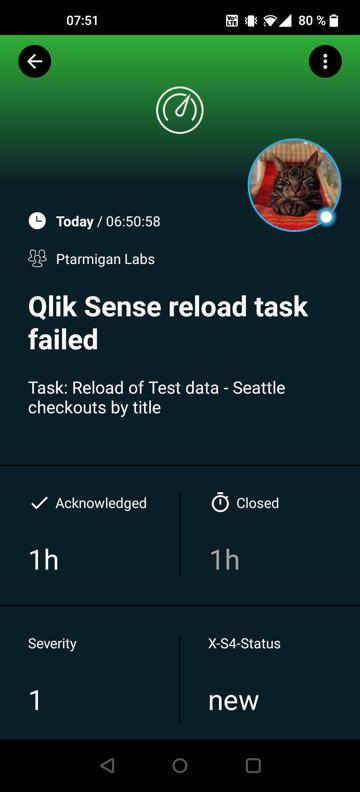
Both offer incident management features on both the web and via mobile clients.
Information about failed/aborted reloads can be sent to one or more New Relic accounts.
Tags for the reload task and associated app is sent to New Relic as metadata for the event/log entry that’s created there.
Send alerts when reload tasks succeed
Knowing about failed reloads is important, but sometimes it’s just as important to know when a reload has succeeded.
Get emails when those important reloads have completed successfully.
Nicely formatted with all the details you need.
Controlling which tasks should send success alerts is done using custom properties or via Butler’s config file.
Use InfluxDB/Grafana or New Relic to track Butler memory usage
Butler can be configured to log its own memory usage to InfluxDB, from where it can be visualized using Grafana.
If you prefer using New Relic One that’s possible too - sending Butler memory metrics to New Relic is super simple: Just add your New Relic credentials in the YAML config file or as command line options when starting Butler and you’re set.
Save a copy of the complete reload log for all failed reload tasks
Tip
This feature is available for both Qlik Sense client-managed and Qlik Sense Cloud.
Let’s say a scheduled reload task fails.
This can happen due to lots of reasons, from uncontrollable events that are impossible to predict to bugs in the script of a Sense app.
No matter what the cause is, as a Sense administrator you probably want to investigate the script reload logs.
Butler can send notifications (Slack, Teams, email, webhooks, …) when reloads fail.
These notifications can include the last 20-30-40 lines of the script log and this usually gives a good idea of what caused the reload to fail.
But what if you want to look at the complete reload log of that failed app reload?
So far you would have to dig into the log directory on the Sense server (for client-managed Sense) and find that specific reload log file among potentially thousands of other log files. Not very effective.
For Sense Cloud you would have to download the log file from the Sense Cloud hub. Doable, but could be easier.
Butler can store a copy of the complete reload log of failed reload tasks/app reloads in directories that you specify.
The log files are stored in separate directories, one for each date. Sense Cloud logs are stored in a separate directory tree from client-managed Sense logs.
This makes it easy to find the log file you are interested in.
Start reload tasks from load script or from upstream systems
Trigger Sense reload tasks from a reload script: This makes it possible to start different Sense tasks based on what data has been read from a database, what time of day it is etc.
Starting a task from the reload script is as easy as Call StartTask('fbf645f0-0c92-40a4-af9a-6e3eb1d3c35c').
Trigger Sense reloads from external systems: When new data is available in a source database, that database can trigger a reload in Sense, and the data is loaded from the database into Sense. This way delays caused by Sense polling for data are minimized and data arrives at end users as quickly as possible.
Starting reload tasks using REST API is described here.
Using MQTT messages to achieve this is described here.
Start any reload task from within any Qlik Sense or web app
Some HTML and Javascript magic is also needed, but given Butler’s start-task API it’s pretty easy to set up a button in a Sense app (or any web app!) to start any Sense reload task.
This can for example be used to allow end users to start an Extract-Transform when they (the user) need refreshed data.
Start reload tasks via REST API based on task tags or custom properties
Using tags and/or custom properties to identify what tasks should be started can be easier than having to know the tasks IDs.
This both makes it easier for 3rd party systems to start Qlik Sense tasks and easier for Sense admins to manage which tasks should be startable by 3rd party systems.
Trigger full/partial app reloads from load script or upstream systems
Sometimes you just want to reload an app without also having to create a reload task.
When it comes to partial app reloads it’s not even possible to do these from a Sense reload task.
Butler’s API makes provides a solution: Just pass in an app ID to reload together with task IDs of the tasks that should be started when the app is done reloading (different tasks can be started depending on app reload success or failure).
The partial reload feature is of special interest as it can be used to trigger faster incremental execution of of Extract-Transform reload chains. Great for keeping data in Sense apps updated during the course of a day!
Flexible scheduling of app reloads in Qlik Sense Enterprise on Windows
Using the scheduler built into Qlik Sense you can’t for example create schedules that are limited to a parts of a day.
This is a pretty common scenario though - you want to reload an app hourly from say 3 am to 3 pm.
You can set this up in Sense, but it involves creating a lot of triggers for the reload task, which becomes a nightmare to maintain.
Butler’s task scheduler is built on Cron, which has been used in Linux for decades. Battle proven and very flexible.
Passing parameters between reload tasks
This has always been hard both in QlikView and Sense.
Butler’s key-value store makes it much easier to pass values from one app to the next in a reload chain.
Storing state across several apps
The key-value store can also be used to keep state in general across several apps or parts of a Qlik Sense environment.
Maybe a Development cluster needs to share information in real time with the Test and Production clusters?
Easily solved using Butler’s key-value store.
A demo showing parameter passing between apps is found here.
Time-to-live (TTL) for key-value pairs
Key-value pairs can optionally be set up with a time-to-live (ttl) parameter. If ttl is set, the KV pair will auto-delete when the ttl expires.
Make new data reach end users as quickly as possible
See above. Have the upstream data source initiate Sense app reloads, either via Butler’s REST API or via MQTT messages sent to Butler.
Using MQTT to notify downstream systems that Sense is done processing data
Use Butler’s API endpoints for MQTT handling to send and receive MQTT publish-subscribe messages.
MQTT (and the pubsub concept in general) is a great way for systems to communicate reliably with each other.
A demo app is available, showing how MQTT messages can be sent from Sense load scripts. More info here.
Create directories, copy/move/delete files
In “standard mode” apps reloading in Qlik Sense Enterprise on Windows can’t access the file system of the Sense servers. This is a good thing because it adds a lot of security.
From time to time you need to delete temp QVDs though, or copy or move data files from one directory to another.
Butler has REST API endpoints for these use cases, but as those endpoints are locked down to only work on specific, configurable directories they don’t result in the same security issues as seen in for example QlikView or Sense running in legacy mode.
Exporting apps as JSON can be very useful for backup purposes. Doing regular snapshots of all apps in a Sense cluster is a fast and space-effective way of keeping point-in-time backups.
Slack messages can include full formatting (web links, text formatting etc), as well as “poking” users.
I.e. notifying specific Slack users that they have a new message.
Can for example be used to notify user(s) that an app has reloaded with new data, or that some error condition has occurred.
If Butler is running on Windows (server or even desktop) it can monitor one or more Windows services.
This feature is not available when running Butler on Linux, macOS or in Docker.
Monitoring here means tracking the services’ state and sending messages to email, InfluxDB, New Relic, MQTT, Webhooks, Slack or Teams when services stop or start.
It can for example be used to get alerts if a Qlik Sense service for some reason stops.
The concept is not limited to Qlik Sense services though - any Windows service can be monitored.
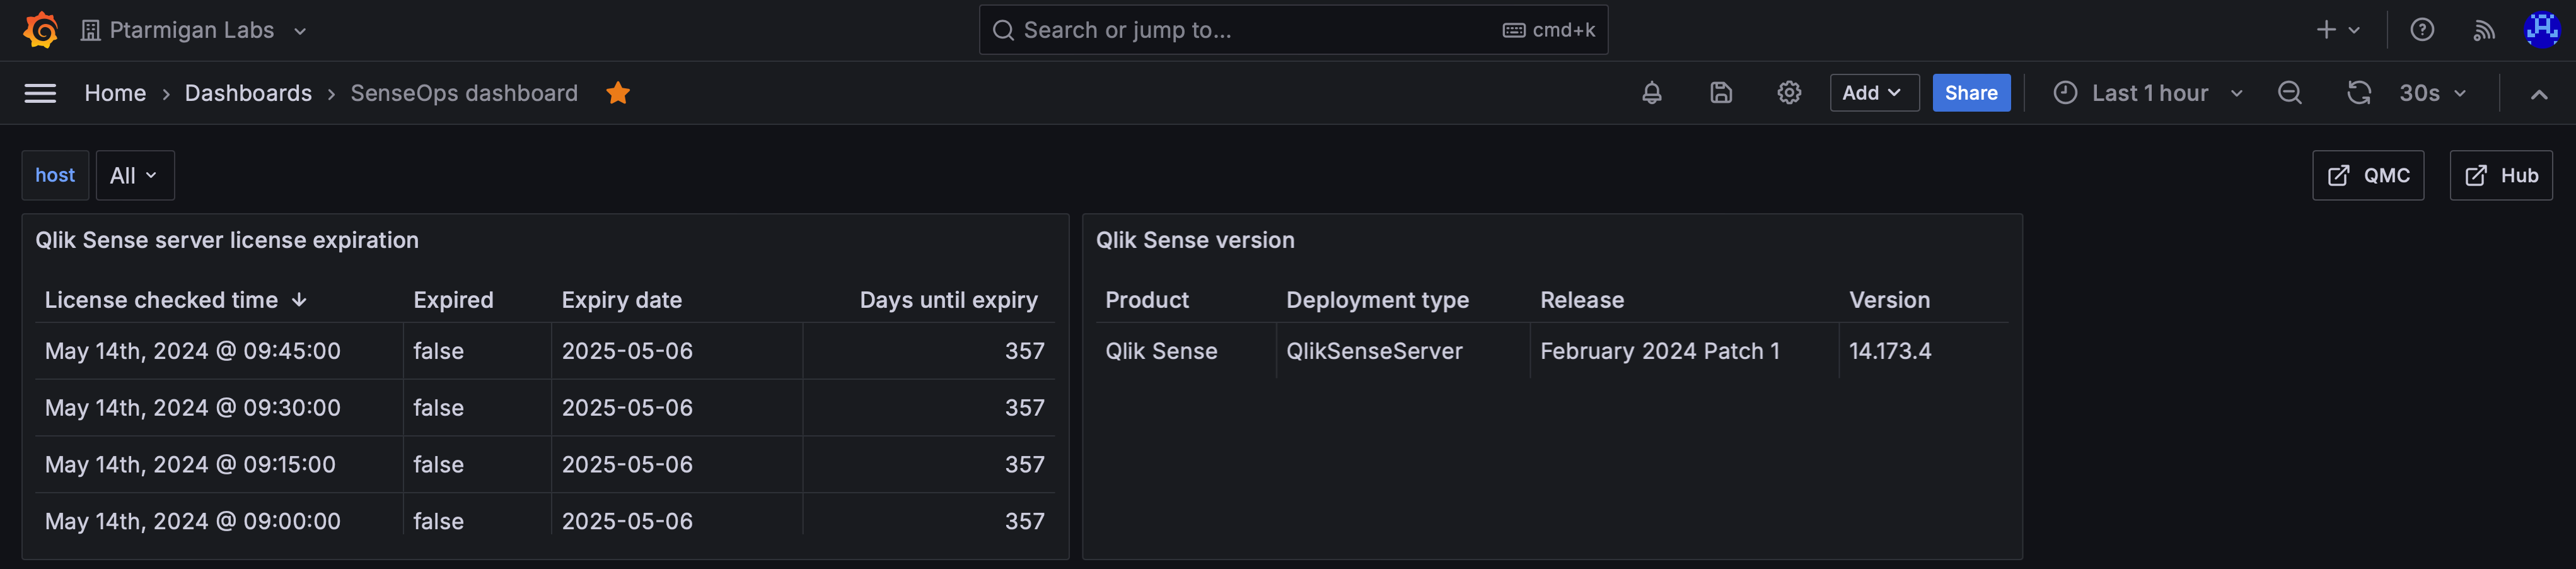
Monitor and release Qlik Sense user licenses
Butler can monitor the usage of Qlik Sense user licenses and store the data in InfluxDB, from where the license data can be visualized in Grafana.
This makes it easy to track (and alert if needed) on the number of used licenses, how many are available and when it’s time to get more licenses.
Butler can also automatically release Professional and Analyzer user licenses that have been inactive for a certain period of time.
This is useful in environments where some users use Sense sporadically, for example only during certain times of the year.
In such cases it’s a waste of resources to keep the license assigned to the user when it’s not being used.
Things that Butler used to do, but don’t really care for any more…
Some features age with grace, others don’t.
Here’s a list of features that are candidates for removal from Butler, or that have already been removed.
Candidates for removal in coming versions
Real-time metrics around active users
While a good idea in theory, Butler just wasn’t the vehicle for this.
The way Butler approached this was to have Sense’s log4net logging framework send UDP messages to Butler when users logged in/out or sessions started/ended. This certainly works (quite well in fact!), but it also has inherent issues.
For example, when Butler was started it wouldn’t capture currently active users or sessions - it was only after some event captured in the logs that Butler would update it’s internal counters. This meant that it would take some time (sometimes quite long) until the metrics were even approaching the real number of users using Sense.
There was also the risk of Butler missing UDP messages and not registering the associated log event.
The shortcomings above lead to the creation of the Butler SOS project, which has over the years evolved into a very comprehensive open source tool for professional grade, real-time monitoring of Qlik Sense.
Please meet the Butlers. They’re a nice, wild bunch!
Butler started out with a very specific need to start Sense reloads from outside systems.
Back in those days the cloud wasn’t a thing, and Sense was only available on Windows servers.
Over the years a few projects (for example Butler SOS, which simplifies day 2 operations of client-managed Sense ([1], [2]) have spun off from the original Butler project, and still other projects have been created from scratch to solve specific challenges around developing Sense apps and running Qlik Sense server environments or developing apps for Qlik Sense Cloud.
Real-time operational metrics for Qlik Sense. A must-have if you are responsible for a Sense environment with more than a dozen or so users.
Simplifies day 2 operations of client-managed Sense.
Butler SOS makes it possible to detect and alert on issues as they happen, rather than in retrospect much later.
Several storage and visualization options available, including InfluxDB + Grafana, and New Relic.
Automates the creation of sheet icons for both Qlik Sense Cloud and client-managed Qlik Sense Enterprise on Windows (QSEoW) applications.
It’s a cross platform command line tool which given the correct Sense credentials will take screen shots of all sheets in a Sense app (or all apps on a Sense server!), then create thumbnail versions of those screenshots.
Finally those thumbnails will be set as sheet icons.
No more manual screenshot taking, resizing images, navigating hundreds of sheets in dozens of apps.
Start Butler Sheet Icons instead and go get a nice fika.
The tool can be used stand-along or as part of an automated release process.
Given the name of this tool it doesn’t sound like a member of the Butler family.
Let’s say Ctrl-Q is a sibling of the Butler bunch.
While the Butler tools are (usually) intended to solve and simplify rather specific use cases, Ctrl-Q is aimed at being the lazy Qlik developer’s best friend.
Let’s say there is some manual, tedious, time consuming and error prone activity that a Qlik Sense developer is faced with.
For example importing dozens of apps from QVF files and creating a hundred associated reload tasks.
Ctrl-Q lets you do this with a single command, using definitions in an Excel file. Instead of spending a day on this the actual execution takes a minute or so.
In other words: Ctrl-Q focus on high-value use cases that are difficult or impossible to solve using other tools.
The following tools are no longer actively maintained, but they are still available on GitHub.
If you find them useful, feel free to use them.
Butler CW
Butler Cache Warmer. Cache warming is the process of proactively forcing Sense apps to be loaded into RAM, so they are readily available when users open them.
Using Butler CW is an easy way to make your end users’ experience of Sense a little better.
Now that client-managed Qlik Sense has its own cache warming feature (as of 1st half 2024), Butler CW will eventually be phased out.
This tool is mainly of interest if you have lots of QVDs and apps, but when that’s the case it’s of paramount importance to understand what apps use which QVDs. In other words what data lineage looks like.
Butler Spyglass also extracts full load scripts for all Sense apps, creating a historical record of all load scripts for all Sense apps.
This tool makes it easy to tap into the Qlik Sense notification API. From there you can get all kinds of notifications, including task reload failures and changes in session state (user login/logout etc).
Visual looks is important when it comes to analytics, and this holds true also for Sense apps.
The Butler Icon Uploader makes it easy to upload icon libraries (for example Font Awesome) to Qlik Sense Enterprise. With such icons available it is then easy for app developers to use professional quality sheet and app icons in their Sense apps.
Features are added, bugs fixed. How are Butler versions set?
In the spirit of not copying information to several places, the version history is kept as annotations of each release on the GitHub release page.
Version numbers include up to 3 levels, for example version 4.6.2 (which is a fictitious version):
4 is the major version. It is increased when Butler has added major new features, or in other ways changed in major ways. If following this principle, breaking changes should always result in a bumped major version.
6 is the minor version. This indicates a smaller update, when one or a few minor features have been added.
2 is the patch level. When individual bugs are fixed, these are released with an increased patch level.
Note 1: Major and minor updates usually include bug fixes too.
Note 2: If a version of 5.2 is mentioned, this implicitly means 5.2.0.
Documentation updates
Starting with Butler version 4.0, this documentation site will offer both latest and earlier site versions.
Select which doc site to view in drop-down list in the upper right corner of the page.
1.5 - Contribution guidelines
How to contribute to Butler.
Butler is an open source project, using the MIT license.
This means that all source code, documentation etc is available as-is, at no cost.
It however also means that anyone interested can - and is encouraged to - contribute to the project!
Butler is developed in Node.js, with support from various NPM modules.
We use Hugo to format and generate this documentation site, the Docsy theme for styling and site structure.
Hugo is an open-source static site generator that provides us with templates, content organization in a standard directory structure, and a website generation engine. You write the pages in Markdown (or HTML if you want), and Hugo wraps them up into a website.
All submissions, including submissions by project members, require review. We use GitHub pull requests for this purpose. Consult GitHub Help for more information on using pull requests.
Creating an issue
If you’ve found a problem - or have a feature suggestion - with Butler itself or the documentation, but you’re not sure how to fix it yourself, please create an issue in the Butler repo. You can also create an issue about a specific doc page by clicking the Create Issue button in the top right hand corner of the page.
Security/Disclosure
If you discover a serious bug with Butler that may pose a security problem, please disclose it confidentially to security@ptarmiganlabs.com first, so that it can be assessed and hopefully fixed prior to being exploited. Please do not raise GitHub issues for security-related doubts or problems.
1.6 - Telemetry
What’s telemetry and why is it important?
Sharing telemetry data from Butler is optional.
You can use all Butler features without sharing telemetry data.
That said, if you find the Butler tool useful you are strongly encouraged to leave Butler’s telemetry feature turned on.
Having access to this data greatly helps the Butler developers when they design new features, fix bugs etc.
The Butler developers care about you - sharing telemetry data is your way of showing you care about them.
Telemetry is the in situ collection of measurements or other data at remote points and their automatic transmission to receiving equipment (telecommunication) for monitoring.
In the context of software tools (including Butler) telemetry is often used to describe the process of sending information about the tool itself to some monitoring system.
Why telemetry in Butler
That is a very good question.
For many years there was no telemetry at all in Butler.
Development of new features were driven mainly by what features were needed at the time.
Or the fact that Qlik released some new feature in Sense and Butler was a way to test that new feature from the perspective of the Sense APIs.
That’s all good but today Butler is a rather significant tool with features spanning quite different areas (alerting, task scheduling, key-value store and more).
This multitude of features is also one of the core reasons for adding telemetry to Butler:
Which Butler APIs and features are actually used out there?
Which operating systems, Node.js versions and hardware platforms is Butler running on?
Without this information the Butler developers will keep working in the dark, not really knowing where to focus their efforts.
On the other hand - with access to telemetry data a lot of possibilities open up for the Butler developers:
If telemetry shows that no one uses a particular feature, maybe that feature should be scheduled for deprecation?
The opposite of the previous: If lots of users use a specific Butler feature, then that feature is a candidate for future focus and development.
Telemetry will show if lots of users run Butler on old Node.js versions. Knowing this its possible to set a migration schedule for what Node.js versions are supported - avoiding hard errors when some old Node.js version is no longer supported by Butler.
Same thing for understanding what operating systems Butler runs (and should be supported) on.
Information about what API endpoints are enabled in the Butler config file. Why: This tells the Butler developers which features are used and which aren’t. This is critical information when it comes to planning where to focus future development efforts.
Information about what features are enabled and which are disabled. Why: Same as above. Knowing which features are used (and are thus important) allows the Butler developers to better plan future work.
Information about Butler’s execution environment (operating system, hardware architecture, Node.js version etc). Why: Ideally the Butler developers want to use as modern versions of Node.js as possible. But if telemetry shows that lots os Butler instances use old Node.js versions or run on some (yet) untested/unverified Linux version - then maybe those older Node.js/Linux versions must be supported for yet some time.
What's not shared
The telemetry data will never include:
Data that can identify your Sense environment or the server on which Butler runs. This includes IP/MAC addresses or other network information, server names, Docker container metadata or similar.
Any actual data sent via Butler APIs.
Qlik Sense or other certificates or credentials in any shape or form.
Where is telemetry data sent
The telemetry data is sent to the PostHog service, using their database in the European Union.
Deleting telemetry data
Even though no-one (not even the Butler developers or Ptarmigan Labs who manage the telemetry database!) has any way of ever connecting the data sent by your Butler instance to you (it’s all anonymized, remember?), there can be cases where telemetry data must be deleted.
It’s purpose is to uniquely identify the Butler instance - nothing else.
If Butler is stopped and started again the same ID will be used.
Some sensitive information is used to create the ID, but as the ID is anonymized using a one-way hash function before sent as part of the telemetry data, no sensitive information leaves your servers.
The ID field is created as follows:
Combine the following information to a single string
MAC address of default network interface
IPv4 address of default network interface
IP or FQDN of Sense server where repository service is running
System unique ID as reported by the OS. Not all OSs support this though, which is why field 1-3 above are also needed to get a unique ID.
Run the created string through a one-way hashing/message digest function.
Butler uses Node.js’ own Crypto library to create a SHA-256 hash, using the default network interface’s MAC address as salt.
Security is increased due to the fact that the salt never leaves the server where Butler is running.
The bottom line is that it’s impossible to reverse the process and get your the IP, host name etc used in step 1 above.
Then again - this is cryptography and things change.
But if you trust the certificates securing Sense itself, then the ID anonymization used by Butler should be ok too.
The result is a string that uniquely identifies the Butler instance at hand, without giving away any sensitive data about the system where Butler is running.
See below for an example of what the id field looks like.
The id field is shown during Butler startup as “Instance ID”.
What data is included in the telemetry messages?
See above for details.
In general the telemetry includes information about which Butler API endpoints and features are enabled vs disabled.
A unique, anonymized ID is included too, it’s unique to each Butler instance and is used soley to distinguish between different Butler instances.
Finally some information about Butler’s execution environment is included. Things like operating system, Node.js version used etc.
Can my Sense environment be identified via telemetry data?
Short answer: No.
Longer answer: No information about your Sense environment is sent as part of telemetry. No IP addresses or server names, no IDs of Sense apps/tasks/etc, no information about what actual data passed through Butler’s APIs, or any other data that can be linked to your Sense environment is included in the telemetry data.
2 - Getting started
What you need to know to get Butler off the ground.
2.1 - Overview
Butler makes it both easier to develop Qlik Sense apps and run client-managed Qlik Sense clusters.
This page gives you the general steps to get started with Butler.
It also explains how Butler relates to and uses other tools and services.
Getting started: 1-2-3
The main components of Butler are outlined in the system diagram above.
Remember!
Individual parts of Butler can be enabled/disabled in the main config file.
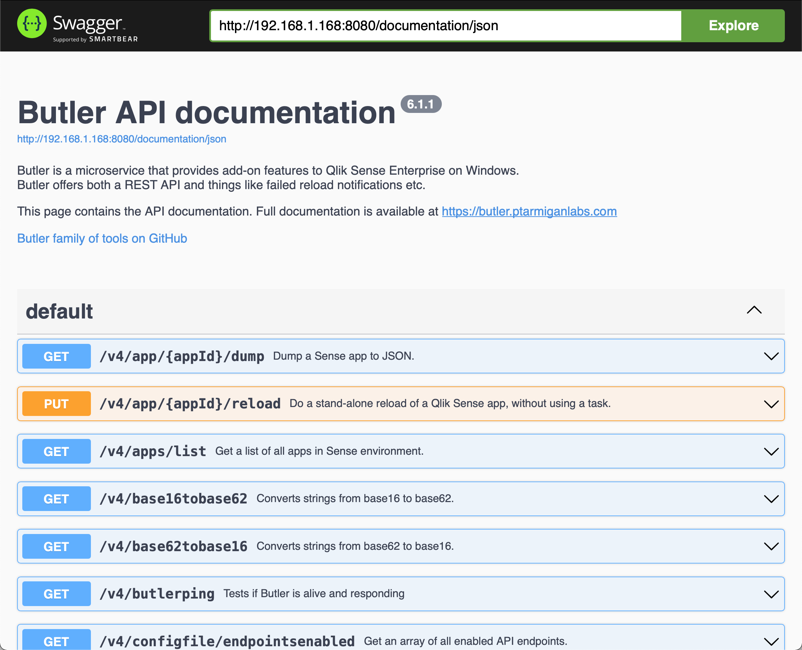
If you’re unsure what each REST API endpoint does, the API docs is the place to check.
1. Installation
Follow the installation instructions - they will guide through the setup process, including requirements and customization.
Feel free to browse through the concepts and examples to get an understanding of how to use Butler.
2.2 - Install
How to install Butler, including requirements and on what platforms Butler can be installed.
Warning
Butler was developed with InfluxDB version 1.x in mind.
If you intend to use Butler together with InfluxDB you need to be aware of the following:
InfluxDB is currently available in version 2.x and while this version brings lots of new goodies, it’s not out-of-the-box compatible with Butler.
For that reason you should use the latest 1.x version of InfluxDB, which at the time of this writing is 1.8.4.
If you do not intend to use any InfluxDB related features of Butler you can simply disregard this warning.
In due time Butler will be updated to support InfluxDB 2.x too.
Given the cross platform nature of Node.js (which is the language Butler is written in), Butler can run on lots of different hardware platforms and operating systems.
It is therefore difficult to give detailed installation instructions for each possible installation scenario. This site thus tries explain how to get started with Butler in some of the most common scenarios.
Pre-built binaries are available for Windows, macOS and Linux. When using these there is no need to install Node.js, as the Node.js runtime is bundled into the binaries.
Using these binaries is the easiest - and thus recommended - way of using Butler.
…unless you want to use Docker, which is also a great option.
Getting started
Sorry - there is no installer for Butler.
The pre-built binaries for Windows, macOS, Linux and Docker simply work as-is when combined with a properly set up configuration file.
If you still want to run Butler as Node.js app you will first need to install Node.js.
The instructions on the pages below should provide good guidance, if you still run into troubles you can always reach out via the GitHub discussion forums.
What’s required to use Butler
A Butler executable for your operating system
A Butler config file adapted to your specific Qlik Sense environment
A way to authenticate with Qlik Sense APIs
Certificates for Qlik Sense Enterprise on Windows
JSON Web Token (JWT) for Qlik Sense Cloud
What
Comment
Qlik Sense Enterprise on Windows
Most Butler features target client-managed Qlik Sense Enterprise on Windows (QSEoW).
Qlik Sense Cloud
Some features are available for Qlik Sense Cloud, for example the ability to send app reload failed alerts to email, Slack, Teams or script log on local disk.
Butler executable
Mandatory. A Butler executable of some kind. This would be a) a stand-alone binary for the operating system you plan to use, b) a Docker image from which a Butler container can be created or c) the Butler source code plus Node.js installed.
MQTT broker
Optional. MQTT is used for both in- and out-bound pub-sub messaging. Butler assumes a working MQTT broker is available, the IP of which is defined in the Butler config file. Mosquitto is a great open source broker. It requires very little hardware to run, even the smallest (usually free) Amazon/Google/Microsoft/… instance is enough, if you want a dedicated MQTT server. If you don’t care about the pubsub features of Butler, you don’t need a MQTT broker. In this case you can disable the MQTT features in the config YAML file.
Optional. A commercial online service offering a vast set of observability features of which Butler uses just a few. Reload failure alerts are for example very nicely handled in New Relic as you get access to the script logs (similar to what can be done with InfluxDB + Grafana) right in the New Relic UI. New Relic’s free tier usually goes a long way towards the need of SenseOps and Butler use cases, so it’s easy to try out New Relic.
Optional. A smaller but very nice, mobile-first incident management service. Using Signl4 it’s easy to get failed reload alerts to your phone. The service also makes it easy to set up on-call schedules, escalate incidents if needed etc.
2.2.1 - Decide how to run Butler
On what platforms does Butler run?
The short answer is: Almost anywhere.
The pre-built binaries for Windows, macOS, Linux and Docker should cater for most use cases.
If you have some other, more exotic platform or operating system you want to run Butler on that’s probably possible too.
Butler is built on Node.js and as long as Node.js is available on the platform/operating system of your choice there is a good chance Butler will run there.
Butler has been successfully used on Windows Server, Windows 10, various Linux distributions, in Docker, Kubernetes, on Mac OS and even on Raspberry Pis. And a Raspberry Pi based Kubernetes cluster.
Your platform options thus typically fall into three categories:
Butler as a stand-alone executable
Here you will be using the pre-built Butler binaries (Windows, Linux, Mac OS) that are available for Butler 7.2 and later.
When using third party tools these binaries can be started as services.
For example, on Windows the free NSSM tool is a great way to run Butler as a Windows service.
Another good tool is PM2 which works well on Linux-ish platforms.
If you have access to or can set up a container runtime environment, this is a great way to running Butler.
Installation is less error prone compared to installing Butler as a native Node.js app, you get all the benefits from the Docker ecosystem (monitoring of running containers etc), and upgrades to future Butler versions become trivial.
If you have access to a Kubernetes cluster, that is usually an even better option than Docker. Kubernetes can be daunting when first approached, but will give you superb reliability, failover and restarts if a server goes down or becomes unresponsive etc. All major cloud providers (Microsoft Azure, Google, Amazon etc) offer Kubernetes services.
Rancher’s K3s is a very good way to get started with self hosted Kubnernetes. Fully featured, well supported and a vibrant developer community.
Butler as a Node.js application
This option means you will first install Node.js on your server of choice, then Butler and it’s dependencies.
It works perfectly well but is the most demanding when it comes to amount of work needed to get started.
2.2.2 - Running Butler as a native, pre-built application
How to install the pre-built, stand alone Butler applications.
Downloading the app
Download Butler for your preferred operating system.
Decide where to install Butler
It is usually a good starting point to run Butler on the Sense server. If there are more than one server in the Sense cluster, Butler can be placed on the reload server (as the /createDir endpoint then can be used to create folders in which QVD and other files can be stored).
On the other hand, you might want to keep the Sense servers as clean as possible (with respect to software running on them). If that is a priority you should install Butler on some other server.
The bottom line is that Butler can run on any server, as long as there is network connectivity to the Sense server(s).
It’s usually a good idea to keep 3rd party tools installed in the same directory tree, to maintenance as easy as possible.
A good place for Butler could be c:\tools\butler or d:\tools\butler on Windows, for example.
Download Butler
Download the latest version from the releases page.
Make sure to get the binary file for your preferred operating system.
Unzip the downloaded file, then copy or move the butler binary to the desired directory (e.g. c:\tools\butler) and that’s it.
Tip
On Windows you must “unblock” the ZIP file before extracting the Butler binary from it.
This is basically a way to tell Windows that the ZIP is safe even though it was downloaded from Internet.
Right click on the ZIP file, then select Properties.
If there is an “Unblock” check box in the lower right part of the properties window you should click that box and hit OK.
Then unpack the ZIP file.
The macOS version of Butler is signed using Apple’s official app signing process.
This means you may see a warning the first time you start Butler, but after that there should be no more warnings.
2.2.3 - Running Butler in Docker
How to install Butler as a Docker container.
Installation steps
The following steps give some guidance on how to get Butler running on Docker.
Here Mac OS was used, things will look different on Linux and Windows.
Note: While the console logs below refer to an older version of Butler’s Docker image, the steps involved are the same also for current/most recent version of Butler.
proton:~ goran$ mkdir /Users/goran/butler
proton:~ goran$ cd /Users/goran/butler
proton:butler goran$ mkdir -p config/certificate
proton:butler goran$
proton:butler goran$ wget https://raw.githubusercontent.com/ptarmiganlabs/butler/master/src/docker-compose.yaml
--2021-10-25 17:07:23-- https://raw.githubusercontent.com/ptarmiganlabs/butler/master/src/docker-compose.yaml
Resolving raw.githubusercontent.com (raw.githubusercontent.com)... 185.199.108.133, 185.199.109.133, 185.199.110.133, ...
Connecting to raw.githubusercontent.com (raw.githubusercontent.com)|185.199.108.133|:443... connected.
HTTP request sent, awaiting response... 200 OK
Length: 660[text/plain]Saving to: ‘docker-compose.yaml’
docker-compose.yaml 100%[=====================================================================================================================================>]660 --.-KB/s in 0s
2021-10-25 17:07:23 (42.0 MB/s) - ‘docker-compose.yaml’ saved [660/660]proton:butler goran$ cat docker-compose.yaml
# docker-compose.ymlversion: '3.3'services:
butler:
image: ptarmiganlabs/butler:6.1.0
container_name: butler
restart: always
ports:
- "8080:8080"# REST API available on port 8180 to services outside the container - "9998:9998/udp"# UDP port for task failure events volumes:
# Make config file accessible outside of container - "./config:/nodeapp/config" - "./log:/nodeapp/log" environment:
- "NODE_ENV=production" logging:
driver: json-file
options:
max-file: "5" max-size: "5m"proton:butler goran$
At this point you should
Export certificates from the Qlik Sense QMC. Export a full set of certificates in PEM format, no password on the certificates.
Copy the certificates to the ./config/certificate directory.
Copy the template config file from the GitHub repository to the ./config directory, modify it as needed based on your system(s) and which Butler features you want enabled, and rename it to for example production.yaml.
You can name the config file anything, but its name has to match the NODE_ENV environment variable, as set it the docker-compose.yaml file.
Optional. Copy the template schedule file to the location specified in Butler’s config file. This is only needed if you manually want to add schedules. If using the API to create schedules, there is no need to first manually create a schedules file (the schedule file will be created by Butler in this case).
In the terminal where you ran docker-compose, you will see a new line saying that a app list was retrieved:
butler | 2021-10-25T19:20:50.356Z info: /v4/senselistapps called from 192.168.176.1
2.2.4 - Running Butler as a Node.js application
How to install Butler as a Node.js application.
Selecting an OS
While Qlik Sense Enterprise is a Windows only system, Butler should be able to run on any OS where Node.js is available.
Butler has been successfully used - during development and production - on Windows, Linux (Debian and Ubuntu tested) and mac OS.
Installation steps
The steps below outline the steps needed to install Butler as a native Node.js application on for example Windows Server.
Install node.js
Butler has been developed and tested using the 64 bit version of Node.js. The most recent LTS (Long Term Support) version is usually a good choice.
Decide where to install Butler
It is usually a good starting point to run Butler on the Sense server. If there are more than one server in the Sense cluster, Butler can be placed on the reload server (as the /createDir endpoint then can be used to create folders in which QVD and other files can be stored).
On the other hand, you might want to keep the Sense servers as clean as possible (with respect to software running on them). If that is a priority you should install Butler on some other server.
The bottom line is that Butler can run on any server, as long as there is network connectivity to the Sense server(s).
Download Butler
Download the repository zip from the releases page.
Do not just clone the Butler repository as that will give you the latest development version, which may not yet be fully tested and packaged.
The exception is of course if you want to contribute to Butler development - then forking and cloning the repository is the right thing to do.
Install node dependencies
From a Windows command prompt (assuming the Butler ZIP file/repository was saved to d:\node\butler):
  d:
  cd \node\butler\src
  npm install
This will download and install all Node.js modules used by Butler.
On some OSs you’ll get some warnings during the installation - they are usually harmless. Try to run Butler even if you got some warnings, chances are good that things will work just fine. This is common on especially Windows Server and is a result of some Butler dependencies being primarily developed on Linux rather than Windows.
2.3 - Setup
Everything you wanted to know about Butler configuration but never dared to ask.
Butler can use multiple config files. Here you learn to control which one is used by Butler.
A description of the config file format is available here.
Select which config file to use
Butler uses configuration files in YAML format.
A default config file called production_template.yaml is included in the release Zip files on the download page. It is also available in the GitHub repository.
Make a copy of it, then rename the copy default.yaml, production.yaml, staging.yaml or something else suitable to your specific use case.
Update it as needed (see the config file reference page for details).
Trying to run Butler with the default config file (the one on GitHub) will not work - you must adapt it to your server environment. For example, you need to enter the IP or host name of you Sense server(s), the IP or host name where Butler is running etc.
All config entries are mandatory
As of Butler 9.0 the config file’s structure will be validated when Butler starts. If there are any errors (missing entries etc) in the config file, Butler will not start.
This means that all config file entries are mandatory. If some feature is not use the corresponding entry can be left empty.
Finally, Butler must somehow be given instructions about where to look for the config file.
This can be done in several ways depending on how Butler is used, see below.
Config file for stand-alone Butler
Let’s run Butler on a Windows Server using PowerShell, without any options or parameters:
There is an option --configfile (or its short version -c) that let us control which config file to use.
In this example the config file .\config\butler-config.yaml is used.
Let’s try again with the -c option:
Butler now starts nicely using the specified config file.
Tip
When using the standalone Butler executables you can use an absolute or a relative path when specifying the location of the config file.
For example, c:\tools\butler\config\butler-config.yaml is an absolute path, while .\config\butler-config.yaml would be a relative path.
Config file when running Butler as a Node.js app
When running Butler as a Node.js app, i.e. starting it with node butler.js, Butler will look for a config file in the ./config subdirectory.
The name of the config file matters.
Butler looks for an environment variable called “NODE_ENV” and then tries to load a config file named with the value found in NODE_ENV.
Example: NODE_ENV=production
Butler will look for a config file config/production.yaml.
Config file when running Butler in a Docker container
The template docker-compose.yaml file in the GitHub repository shows how to specify which config file that will be used:
# docker-compose.ymlservices:butler:image:ptarmiganlabs/butler:latestcontainer_name:butlerrestart:alwaysports:- "8080:8080"# REST API available on port 8180 to services outside the container- "9998:9998/udp"# UDP port for task failure eventsvolumes:# Make config file accessible outside of container- "./config:/nodeapp/config"- "./log:/nodeapp/log"environment:- "NODE_ENV=production"logging:driver:json-fileoptions:max-file:"5"max-size:"5m"
Here the environment variable NODE_ENV is set to “production”, and the host OS’ ./config directory is mapped to the container’s /nodeapp/config directory.
As there is no --configfile command line option present the default setting will be used, which is to look for the config file in the config directory right under the directory where the docker-compose.yaml file is located.
The file name is determined by Butler (running in the container) looking at the NODE_ENV env variable.
Bottom line is that the ./config/production.yaml (relative to the location of docker-compose.yaml) file will be used.
Running several Butler instances in parallel
If you have several Sense clusters (for example DEV, TEST and PROD environments) you may want to run several Butler instances.
The solution is to create several config files: butler_dev.yaml, butler_test.yaml and butler_prod.yaml.
In this scenario three instances of Butler should be started, each given a different config file via the --configfile command line option.
Note: If running several Butler instances in parallel, you must also ensure that each one uses unique port numbers for their respective REST APIs, UDP servers etc.
Setting environment variables
The method for setting environment variables varies between operating systems:
On Windows: set NODE_ENV=production
Mac OS or Linux: export NODE_ENV=production
If using Docker, the NODE_ENV environment variable is set in the docker-compose.yml file (as already done in the template docker-compose file.)
2.3.2 - Minimal configuration to start Butler
The provided sample config file is a good starting point for your own config file.
It contains the minimum settings needed to start Butler, but a few settings in it must be updated to match your environment.
Starting Butler with a minimal config file
Configuring Butler via its YAML format config file is probably the most difficult part of setting up Butler.
It’s however also the only way to configure Butler, so it needs to be done.
To make that process easier, a minimal config file called production_template.yaml is included in the release Zip files on the download page.
Note
The included sample config file contains the minimum settings needed to start Butler, but a few settings in it must be updated to match your environment.
These are described in the comments at the beginning of the config file.
The settings are mostly related to the host names and ports of the Qlik Sense server(s) you want Butler to connect to, and the host name and port of the machine where Butler is running.
After working through the instructions in the config file, you should be able to start Butler with the following command (PowerShell in this case):
Most Butler features are disabled in the minimal config file, but it’s a good starting point for your own config file.
To summarize, the recommended steps to get Butler up and running are:
Download the latest Butler release from the download page. Precompiled binaries are available for Windows, Linux, macOS and Docker (on Docker Hub).
Copy the production_template.yaml config file (which is included in the Zip file) to a new file, e.g. butler-config.yaml.
Add the needed settings to butler-config.yaml as described in the comments at the beginning of that that file.
Start Butler, passing in the path to the config file as the --configfile (or -c) parameter.
Once Butler is running in this minimal configuration, you can start enabling more features in the config file, for example failed task monitoring, monitoring of Windows services, Sense licenses and much more.
Example: Things to change in the minimal config file
The following is an example of the comments at the beginning of the production_template.yaml config file, describing what needs to be changed in it to start Butler with a minimal configuration.
The example below is for Butler 12.4.0, but the same principle applies to later versions too.
---Butler:# General notes: # - File and directory paths in this sample config file use Linux/Mac syntax, i.e. using forward slashes.# Windows paths work just as well, just make sure to quote them with single or double quotes.# - All entries in the config file are mandatory in the sense that they must be present.# However, if a feature is not used the corresponding config entries can contain # any value (for example the provided default ones).# - Butler will start using the settings in this file if the follwing settings are set first:# - Butler.cert.clientCert: Set to the path of the client certificate file. If relative paths cause issues, use an absolute path.# - Butler.cert.clientCertKey: Set to the path of the client key file. If relative paths cause issues, use an absolute path.# - Butler.cert.clientCertCA: Set to the path of the CA certificate file. If relative paths cause issues, use an absolute path.# - Butler.configEngine.host: Set to the IP or FQDN of the host where the Sense engine service is running.# - Butler.configEngine.port: Set to the port where the Sense engine service is listening.# - Butler.configQRS.host: Set to the IP or FQDN of the host where the Qlik Repository Service (QRS) is running.# - Butler.configQRS.port: Set to the port where the Qlik Repository Service (QRS) is listening.# - Having set the above settings, Butler will start and run, but it will not do anything useful until you configure# the various monitoring and notification settings, as described at https://butler.ptarmiganlabs.com.......
2.3.3 - Connecting to a Qlik Sense server
Details on how to configure the connection from Butler to Qlik Sense Enterprise on Windows.
What’s this?
In order to interact with a Qlik Sense Enterprise on Windows (QSEoW) environment, Butler needs to know a few things about that environment. This is true no matter if the Sense cluster consists of a single Sense server or many.
Settings in config file
---Butler:......# Certificates to use when connecting to Sense. Get these from the Certificate Export in QMC.cert:clientCert:<path/to/cert/client.pem>clientCertKey:<path/to/cert/client_key.pem>clientCertCA:<path/to/cert/root.pem># If running Butler in a Docker container, the cert paths MUST be the following# clientCert: /nodeapp/config/certificate/client.pem# clientCertKey: /nodeapp/config/certificate/client_key.pem# clientCertCA: /nodeapp/config/certificate/root.pemconfigEngine:# engineVersion: 12.170.2 # Qlik Associative Engine version to use with Enigma.js. Ver 12.170.2 works with Feb 2019engineVersion:12.612.0# Qlik Associative Engine version to use with Enigma.js. Works with Feb 2020 and othershost:<FQDN or IP of Sense server where Sense Engine is running>port:<Port to connect to, usually 4747>useSSL:trueheaders:static:# http headers that are sent with every request to QRS. The "X-Qlik-User" is mandatory.- name:X-Qlik-User # Header used to identify what user connection to QRS is made asvalue:UserDirectory=Internal;UserId=sa_repository # What user connection to QRS is made as rejectUnauthorized:falseconfigQRS:authentication:certificateshost:<FQDN or IP of Sense server where QRS is running>useSSL:trueport:4242headers:static:# http headers that are sent with every request to QRS. The "X-Qlik-User" is mandatory.- name:X-Qlik-User # Header used to identify what user connection to QRS is made asvalue:UserDirectory=Internal;UserId=sa_repository # What user connection to QRS is made as rejectUnauthorized:false# Set to false to ignore warnings/errors caused by Qlik Sense's self-signed certificates.# Set to true if the Qlik Sense root CA is available on the computer where Butler SOS is running.......
2.3.4 - Connecting to Qlik Cloud
Details on how to configure the connection from Butler to Qlik Sense Cloud.
What’s this?
In order to interact with a Qlik Sense Cloud environment, Butler needs to know a few things about that environment.
How Butler gets events from Qlik Sense Cloud
A few things to note about how Butler gets events from Qlik Sense Cloud:
When an app reload fails in Qlik Sense Cloud, an outgoing webhook is triggered.
This webhook calls a https endpoint somewhere on the Internet, for example a serverless function in Azure or AWS (or on-prem).
The function forwards the event as an MQTT message to a MQTT broker, on a well-defined topic.
Butler listens to this topic and reacts to the event.
This model may seem a bit complex, but it has a few advantages:
It is scalable. The serverless function can be scaled up and down as needed. MQTT brokers also scale well.
It is flexible. The serverless function can be written in any language, and can be hosted anywhere.
It is secure. The serverless function can be locked down to only accept incoming webhooks from Qlik Sense Cloud. The option would be to expose Butler directly to the Internet, which is not recommended.
The effect is an asynchronous, scalable and secure way of getting events from Qlik Sense Cloud to Butler.
Settings in config file
Butler:......qlikSenseCloud:# Settings for Qlik Sense Cloud integrationenable:falseevent:mqtt:# Which QS Cloud tenant should Butler receive events from, in the form of MQTT messages?tenant:id:tenant.region.qlikcloud.comtenantUrl:https://tenant.region.qlikcloud.comauthType:jwt # Authentication type used to connect to the tenant. Valid options are "jwt" auth:jwt:token:<JWT token> # JWT token used to authenticate Butler when connecting to the tenant# Qlik Sense Cloud related links used in notification messagesqlikSenseUrls:qmc:<URL to QMC in Qlik Sense Cloud>hub:<URL to Hub in Qlik Sense Cloud>comment:This is a comment describing the tenant and its settings# Informational only......
2.3.5 - Configuring Butler's REST API
Butler’s REST API can be enabled/disabled in itself. If the API is enabled, individual API endpoints can then be enabled/disabled as needed.
By only enabling the endpoints needed for your Qlik Sense environment, memory usage is minimized and security maximized.
What’s this?
Butler offers a set of REST API endpoints. While these endpoints are tested for stability and correct functionality as part of each release, it’s always good practice to only enable the endpoints really needed.
Thus, individual endpoints of Butler’s API can be turned on or off in the main config file.
Configuring the REST API
Butler:......restServerConfig:enable:false# Should Butler's REST API be started? Must be true if *any* API endpoints are to be used.serverHost:<FQDN or IP (or localhost) of server where Butler is running> # Use 0.0.0.0 to listen on all network interfaces (e.g. when running in Docker!).serverPort:8080# Port where Butler's REST is available. Any free port on the server where Butler is running can bse used.backgroundServerPort:8081
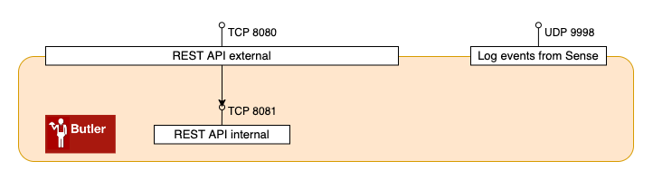
Ports used by Butler
Butler exposes its REST API on a TCP port defined in the Butler.restServerConfig.serverPort setting in the config file.
Similarly, the host name Butler listens at is defined by the Butler.restServerConfig.serverHost setting. This would typically be the IP number, host name or fully qualified domain name of the computer where Butler is running.
Note that Butler uses two ports for its REST API: One external facing port and one used internally. Both must be dedicated to Butler on the computer where Butler is running.
Using two ports (one external facing and one internal) is not ideal, but it was an easy yet stable way of solving some technical challenges around Butler’s use of the X-HTTP-Method-OverrideHTTP header.
Just make sure that the two settings Butler.restServerConfig.serverPort and Butler.restServerConfig.backgroundServerPort aren’t the same and aren’t already in use, and all should be fine.
Ports used by Butler
Rate limiting the REST API
Butler’s REST API can be rate limited to prevent abuse.
Rate limiting is configured by the --api-rate-limit command line parameter when starting Butler.
The parameter takes a single integer value, which is the number of API calls allowed per minute.
Set to 0 to disable rate limiting.
Enabling individual API endpoints
Each enabled endpoint will result in Butler using more memory and CPU. Thus only enable the endpoints that are needed.
Endpoint specific settings
In some cases some extra configuration is needed to make an API endpoint function properly.
This information is configured in the Butler.restServerEndpointsConfig section in the config file.
Settings in config file
---Butler:......# Enable/disable individual REST API endpoints. Set config item below to true to enable that endpoint.restServerEndpointsEnable:apiListEnbledEndpoints:falsebase62ToBase16:falsebase16ToBase62:falsebutlerping:falsecreateDir:falsecreateDirQVD:falsefileDelete:falsefileMove:falsefileCopy:falsekeyValueStore:falsemqttPublishMessage:falsenewRelic:postNewRelicMetric:falsepostNewRelicEvent:falsescheduler:createNewSchedule:falsegetSchedule:falsegetScheduleStatusAll:falseupdateSchedule:falsedeleteSchedule:falsestartSchedule:falsestopSchedule:falsesenseAppReload:falsesenseAppDump:falsesenseListApps:falsesenseStartTask:falseslackPostMessage:falserestServerEndpointsConfig:newRelic:postNewRelicMetric:# Setings used by post metric to New Relic API endpointdestinationAccount:- First NR account- Second NR account# As of this writing the valid options are# https://insights-collector.eu01.nr-data.net/metric/v1# https://insights-collector.newrelic.com/metric/v1url:https://insights-collector.eu01.nr-data.net/metric/v1header:# Custom http headers- name:X-My-Headervalue:Header valueattribute:static:# Static attributes/dimensions to attach to the metrics data sent to New Relic.- name:envvalue:prodpostNewRelicEvent:# Setings used by post event to New Relic API endpointdestinationAccount:- First NR account- Second NR account# Note that the URL path should *not* be included in the url setting below!# As of this writing the valid options are# https://insights-collector.eu01.nr-data.net# https://insights-collector.newrelic.comurl:https://insights-collector.eu01.nr-data.net/header:# Custom http headers- name:X-My-Headervalue:Header valueattribute:static:# Static attributes/dimensions to attach to the metrics data sent to New Relic.- name:envvalue:prod......
2.3.6 - Reload alerts
Butler handles reload alerts from both client-managed Qlik Sense and Qlik Sense Cloud.
The same kind of message templates are used, meaning that the look and feel of the alerts are the same regardless of where the alert originated.
This can be of particular interest for companies with a hybrid setup or that are in the process of migrating from client-managed to cloud-based Qlik Sense.
Getting the same kind of alerts from both environments can make it easier to understand what’s going on.
2.3.6.1 - Reload alerts for client-managed Qlik Sense
Butler offers a lot of flexibility when it comes to alerts when reloads fail, are aborted or succeed in Qlik Sense Enterprise on Windows (QSEoW).
Learn how to set up the desired features, the alert layout, formatting and more.
Alert types
These alert types are available:
Reload task failure. Send alerts when reload tasks fail, no matter if they were started on schedule or manually from the QMC.
Reload task aborted. Send alerts when reload tasks are manually aborted in the QMC.
Reload task success. Send alerts when reload tasks complete successfully.
Alert destinations and options
Alerts can be sent to these destinations, with different options available for each destination.
Each destination can be individually enabled/disabled in the config file.
The failed reload’s script log is available in InfluxDb.
New Relic
✅
✅
✅
✅
The failed reload’s script log is available in New Relic.
Signl4
✅
✅
✅
✅
Alerts are presented in Signl4’s own format in their mobile app.
Slack
✅
✅
✅
✅
MS Teams
✅
✅
✅
✅
Outgoing webhook
✅
✅
Formatting is not relevant for webhooks
MQTT
✅
✅
Formatting is not relevant for MQTT messages
How it works
In order for Butler initiated alerts to become a reality, Butler must somehow be notified that the event of interest (for example a failed reload task) has occurred.
This is achieved by adding a log appender to Qlik Sense Enterprise on Windows.
Log appenders offer a way to hook into Qlik Sense’s logging subsystem, which is called log4net.
By adding a carefully crafted .xml file in the right location on the Sense server(s), you can make Sense notify Butler by means of UDP messages when the events of interest occur. Conceptually it looks like this:
So what happens when a scheduled reload task fails?
Let’s look at the steps:
A reload task is started by the Sense scheduler, either on a time schedule, as a result of some other task(s) finishing or manually by a user in the QMC or from the Hub.
When the task’s state changes, entries are written to the Sense scheduler’s log files using log4net (which is built into Qlik Sense). If the filter defined in the log appender (= the .xml file on the Sense server) matches the log entry at hand, the associated action in the log appender will be carried out.
Log appenders can do all kinds of things, everything from writing custom log files, sending basic emails, writing to databases and much more.
Here we’re interested in the log appender sending a UDP message from Qlik Sense to Butler.
The log appender provided as part of Butler will make log4net send a UDP message to Butler, including various info (reload task ID, timestamp, host name etc) about the reload task that just failed or was stopped/aborted.
Butler will look at the incoming event and determine what it is about.
For example: Is the event about a reload task failure, a reload that has been aborted/stopped, or something else?
Butler thus first works as a dispatcher. In a second step, after the initial dispatch, the event is sent to the relevant handler function within Butler.
Response times are usually very good - Butler will typically get the UDP message within a few seconds after (for example) the reload failing, with alerts going out shortly thereafter.
Warning
The log appenders that catch failed and aborted reloads in the Qlik Sense engine and scheduler must be set up on all Qlik Sense servers where reloads are happening for this feature to work.
Failing to do so will result in Butler not being notified about some reload failures/aborted reloads.
Tip
The concept above is the same also for aborted and successful reload tasks.
Adding a log appender
This is possibly the trickiest part to get right when it comes to setting up log4net based alerts.
Still, if you start from the sample .xml file provided in the Butler repository on GitHub it’s not too hard.
Those sample .xml files are also included in the release Zip files available on the Butler releases page.
The steps are:
In this case you want to be notified when certain events occur in the scheduler log files.
This is important: Qlik Sense Enterprise on Windows consists of many different subsystems (engine, proxy, scheduler, printing etc) - here we’re interested in log events from the scheduler subsystem.
Add a file LocalLogConfig.xml in the C:\ProgramData\Qlik\Sense\Scheduler folder on the Sense server whose scheduler you want to get events from. If you have multiple Sense servers with schedulers running on them, the .xml file should be deployed on each server (assuming you want events from all the servers).
The contents of LocalLogConfig.xml will determine what events are forwarded to Butler, or what other actions will be taken by log4net. See below for examples.
Sense will eventually detect and load the new xml file, but it might take a while (minutes). Restarting the Qlik Sense Scheduler Windows service will make the changes take effect immediately.
Forwarding reload task events to Butler
Here’s the XML that should go into C:\ProgramData\Qlik\Sense\Scheduler\LocalLogConfig.xml to enable the various kinds of Butler task reload alerts.
The remoteAddress property should be set to the host name or IP where Butler is running.
The remotePort property should match the port number specified in Butler’s config file. Note that Butler uses different ports for task related and user activity related events.
The first appender looks for the text “Max retries reached” in the System.Scheduler.Scheduler.Master.Task.TaskSession log stream. That log entry will be created when a reload task has failed and also carried out all its retries. Once the search string is found a UDP message will be sent to port 9998 on IP 10.11.12.13.
The second appender looks for “Execution State Change to Aborting” in the System.Scheduler.Scheduler.Master.Task.TaskSession log stream. That log entry occurs when a user stops a running reload from the QMC’s task view, or using the Sense APIs. When the search string is found a UDP message is once again sent to 10.11.12.13:9998, but with a different message (as specified in the conversionpattern property of the appender).
The third appender looks for “Reload complete” in the System.Scheduler.Scheduler.Slave.Tasks.ReloadTask log stream.
That log entry occurs when a reload task has completed successfully.
Here is an XML file that would forward log events as UDP messages to Butler:
<?xml version="1.0" encoding="UTF-8"?><configuration><!-- Appender for detecting reload task failures. Only the last of potentially several retries is reported --><appendername="TaskFailureLogger"type="log4net.Appender.UdpAppender"><filtertype="log4net.Filter.StringMatchFilter"><paramname="stringToMatch"value="Max retries reached"/></filter><filtertype="log4net.Filter.DenyAllFilter"/><paramname="remoteAddress"value="<IP of server where Butler is running>"/><paramname="remotePort"value="9998"/><paramname="encoding"value="utf-8"/><layouttype="log4net.Layout.PatternLayout"><converter><paramname="name"value="hostname"/><paramname="type"value="Qlik.Sense.Logging.log4net.Layout.Pattern.HostNamePatternConverter"/></converter><paramname="conversionpattern"value="/scheduler-reload-failed/;%hostname;%property{TaskName};%property{AppName};%property{User};%property{TaskId};%property{AppId};%date;%level;%property{ExecutionId};%message"/></layout></appender><!-- Appender for detecting aborted reloads --><appendername="AbortedReloadTaskLogger"type="log4net.Appender.UdpAppender"><filtertype="log4net.Filter.StringMatchFilter"><paramname="stringToMatch"value="Execution State Change to Aborting"/></filter><filtertype="log4net.Filter.DenyAllFilter"/><paramname="remoteAddress"value="<IP of server where Butler is running>"/><paramname="remotePort"value="9998"/><paramname="encoding"value="utf-8"/><layouttype="log4net.Layout.PatternLayout"><converter><paramname="name"value="hostname"/><paramname="type"value="Qlik.Sense.Logging.log4net.Layout.Pattern.HostNamePatternConverter"/></converter><paramname="conversionpattern"value="/scheduler-reload-aborted/;%hostname;%property{TaskName};%property{AppName};%property{User};%property{TaskId};%property{AppId};%date;%level;%property{ExecutionId};%message"/></layout></appender><!-- Appender for detecting successful reload tasks --><appendername="ReloadTaskSuccessLogger"type="log4net.Appender.UdpAppender"><filtertype="log4net.Filter.StringMatchFilter"><paramname="stringToMatch"value="Execution State Change to FinishedSuccess"/></filter><filtertype="log4net.Filter.DenyAllFilter"/><paramname="remoteAddress"value="<IP of server where Butler is running>"/><paramname="remotePort"value="9998"/><paramname="encoding"value="utf-8"/><layouttype="log4net.Layout.PatternLayout"><converter><paramname="name"value="hostname"/><paramname="type"value="Qlik.Sense.Logging.log4net.Layout.Pattern.HostNamePatternConverter"/></converter><paramname="conversionpattern"value="/scheduler-reloadtask-success/;%hostname;%property{TaskName};%property{AppName};%property{User};%property{TaskId};%property{AppId};%date;%level;%property{ExecutionId};%message"/></layout></appender><!-- Send message to Butler on task failure --><!-- Send message to Butler on task abort --><!-- Send message to Butler on reload task success --><loggername="System.Scheduler.Scheduler.Master.Task.TaskSession"><appender-refref="TaskFailureLogger"/><appender-refref="AbortedReloadTaskLogger"/><appender-refref="ReloadTaskSuccessLogger"/></logger></configuration>
The above configuration is enough to support all task reload alerts currently supported by Butler.
Sending basic alert emails from Qlik Sense/log4net
If you are happy with the more basic/limited reload-failed alert emails provided by log4net, you can add a SMTP appender like this (the example below is for sending emails using Google GMail, customize as needed).
Note
If sending alert emails from Log4Net you will not get any of the nice formatting, script logs or other features that Butler provides in its alerts.
The email will instead just tell you that a task failed, and include some basic information about the task (task name, specifically).
<?xml version="1.0"?><configuration><!-- Mail appender--><appendername="MailAppender"type="log4net.Appender.SmtpAppender"><filtertype="log4net.Filter.StringMatchFilter"><paramname="stringToMatch"value="Message from ReloadProvider"/></filter><filtertype="log4net.Filter.DenyAllFilter"/><evaluatortype="log4net.Core.LevelEvaluator"><paramname="threshold"value="ERROR"/></evaluator><paramname="to"value="<email address to send failed task notification emails to>"/><paramname="from"value="<sender email address used in notification emails>"/><paramname="subject"value="Qlik Sense failed task (server <servername>)"/><paramname="smtpHost"value="smtp.gmail.com"/><paramname="port"value="587"/><paramname="EnableSsl"value="true"/><paramname="Authentication"value="Basic"/><paramname="username"value="<Gmail username>"/><paramname="password"value="<Gmail password>"/><paramname="bufferSize"value="0"/><!-- Set this to 0 to make sure an email is sent on every error --><paramname="lossy"value="true"/><layouttype="log4net.Layout.PatternLayout"><paramname="conversionPattern"value="%newline%date %-5level %newline%property{TaskName}%newline%property{AppName}%newline%message%newline%newline%newline"/></layout></appender><!--Send mail on task failure--><loggername="System.Scheduler.Scheduler.Slave.Tasks.ReloadTask"><appender-refref="MailAppender"/></logger></configuration>
References
Qlik’s documentation around log appenders and how to hook into the Sense logs is somewhat brief, but does provide a starting point if you want to dive deeper into this topic.
The main log4net documentation (log4net is the logging framework used by Qlik Sense Enterprise) can also be useful.
These links describe how emails can be sent from the log4net logging framework itself, directly to the recipient. Butler includes sample XML files for this use case too, but Butler takes things further by using the data in the Sense logs to pull in more data around the failed or stopped reload.
In other words - Butler’s alert emails are significantly more flexible and contain information (such as script logs) that are not available using purely log4net.
2.3.6.1.1 - Reload alerts sent as emails
Description of the various kinds of alert emails Butler can send.
What’s this?
Butler can send two kinds of alert emails:
When a reload task fails during execution.
When a running reload task is somehow stopped/aborted.
When a reload task completes successfully.
See the Concepts section for additional details and sample alert emails.
Basic vs formatted email alerts
If you want Butler to send email alerts you must provide an email template file.
For some other alert destinations (Slack and Teams) Butler offers a “basic” option. A fixed format alert is then sent by Butler.
The closest thing available for emails is to use the mail log appender described here, but if you set up a log appender AND have Butler running, you might as well use the formatted email option as it provides much more flexibility than log4net’s email appender.
Rate limiting and de-duplication
Butler has rate limiting feature to ensure alert recipients are not spammed with too many alert emails.
The rate limit is configured (in seconds) in the main config file and can be set independently for reload-failed and reload-aborted emails.
The corresponding config settings are Butler.emailNotification.reloadTaskFailure.rateLimit, Butler.emailNotification.reloadTaskAborted.rateLimit and Butler.emailNotification.reloadTaskSuccess.rateLimit.
Rate limiting is done based on task ID + email address.
Butler also has a de-duplication feature that ensure each email address that has qualified for an alert email only gets ONE email per alert.
Sending test emails to verify correct settings
It can be tricky to find the correct settings to use Butler with email servers.
Butler itself uses a very generic email components to send emails, but corporate email servers may impose restrictions on from where/what servers emails will be accepted, encryption may be used together with non-standard network ports etc.
Butler offers a command line option that when used will send a simple test email to the specified email address.
This makes is very easy to test if the email settings in Butler’s config file are working or not.
When this command line option is used Butler will start normally, but also send a test email during startup.
The command line option is --test-email-address <address>.
The sender of the test email can be specified with --test-email-from-address <address>.
If the settings in the config file’s Butler.emailNotification.smtp section are valid and correct a command like this can be used: butler.exe -c ./config/production.yaml --test-email-address myname@somedomain.com. Adapt config file location and email address as needed.
The resulting email looks like this:
Sending alert emails to app owners
Butler can optionally send alert emails to the owner of apps that fail reloading/were aborted.
Note
App owner notification email can only be sent to app owners that have an email stored in their Qlik Sense user profile.
This is typically the case if the Qlik Sense user directory has been synced from a Microsoft Active Directory - but there is no guarantee this is the case.
If there is no email available for an app owner, he/she will simply not receive any alert emails.
This feature is controlled by the config file properties Butler.emailNotification.reloadTaskAborted.appOwnerAlert.enable and Butler.emailNotification.reloadTaskFailure.appOwnerAlert.enable.
If set to true the app owner will be added to the send list of alert emails, in addition to the recipients specified in Butler.emailNotification.reloadTaskAborted.recipients and Butler.emailNotification.reloadTaskFailure.recipients.
The sections of the config file dealing with app owner notification emails looks like this:
appOwnerAlert:enable:true# Should app owner get notification email (assuming email address is available in Sense user directory)includeOwner:includeAll:true# true = Send notification to all app owners except those in exclude list# false = Send notification to all app owners in the include listuser:- directory:<Sense user directory>userId:<userId>- directory:<Sense user directory>userId:<userId>excludeOwner:user:- directory:<Sense user directory>userId:<userId>- directory:<Sense user directory>userId:<userId>
It works like this:
If appOwnerAlert.enable is set to false no app owner emails will be sent. If it’s set to true the rules below apply.
If appOwnerAlert.includeOwner.includeAll is set to true all app owners will get notification emails when apps the own fail/are aborted…
… except those app owners listed in the appOwnerAlert.excludeOwner.user array.
That array thus provides a way to exclude some app owners (e.g. system accounts) to receive notification emails.
If appOwnerAlert.includeOwner.includeAll is set to false it’s still possible to add individual app owners to the appOwnerAlert.includeOwner.user array.
Those users will then receive notification emails for apps they own.
Send alerts only for some reload tasks
Some reload tasks may be more important than others.
I.e. some tasks should generate alert emails when they fail/abort/succeed, but others not.
Butler controls which tasks to send alerts for by looking at a specific Qlik Sense custom property.
Note
The concept described below is the same for failed, aborted and successful reload tasks.
Each of these three types of tasks have their own settings in the config file.
If the config file setting Butler.emailNotification.reloadTaskFailure.alertEnableByCustomProperty.enable is set to false, all failed reload tasks will cause alert emails.
If that setting is true only some tasks will cause alert emails:
If a task has the value specified in Butler.emailNotification.reloadTaskFailure.alertEnableByCustomProperty.enabledValue set for the custom property named as specified in Butler.emailNotification.reloadTaskFailure.alertEnableByCustomProperty.customPropertyName, the alert will be sent.
If a task does not have that custom property set, no alert will be sent for that task.
A task can still cause an alert to be sent if a specific email address is specified for the task, see below for details.
Some configuration is needed to make this work:
Make changes to the config file. Specifically the three settings mentioned above needs to be reviewed and updated as needed.
Create a custom property in Sense.
The name and value of the custom property must match the one in the config file, Butler.emailNotification.reloadTaskFailure.alertEnableByCustomProperty.customPropertyName and Butler.emailNotification.reloadTaskFailure.alertEnableByCustomProperty.enabledValue.
The custom property should be available on reload tasks.
Set the custom property for reload tasks for which alert emails should be sent.
Aborted reload tasks (as compared to the failed reload tasks described above) are handled the same way, with their own settings in the config file.
In the QMC the custom property can look like this:
Send alerts to specific people, for some tasks
It’s possible to send alert emails to specific email addresses and control this on a per-task basis.
This is achieved by using a Sense custom property that contains the email addresses alerts should be sent to, for the task in question.
Note
The concept described below is the same for failed, aborted and successful reload tasks.
Each of these three types of tasks have their own settings in the config file.
These config setting Butler.emailNotification.reloadTaskFailure.alertEnableByEmailAddress.customPropertyName controls which custom property is used to store email addresses for failed reload tasks.
Email specific alert recipients is independent from the feature where alerts can be switched on/off for individual tasks (see above).
In other words: If an email address has been designated as recipient of alert emails, that address will always receive alert emails for all failed reload tasks.
Having set two different (blurred out) recipients of alert emails for a reload task:
Settings in config file
Warning
Don’t forget to create the log appender .xml files on the Sense server(s). This page describes how.
Those xml files are the foundation on top of which all Butler reload task alerts are built - without them the alerts described on this page won’t work.
---Butler:......# Qlik Sense related links used in notification messagesqlikSenseUrls:qmc:<Link to Qlik Sense QMC>hub:<Link to Qlik Sense Hub>......# Settings needed to send email notifications when for example reload tasks fail.# Reload failure notifications assume a log appender is configured in Sense AND that the UDP server in Butler is running.emailNotification:enable:falsereloadTaskSuccess:enable:false# Custom property used to control which task successes will cause alert emails to be sent# If this setting is true, alerts will not be sent for all tasks, but *only* for tasks with the CP set to the enabledValue.# If this setting is false, alerts will be sent for all failed reload tasks.alertEnableByCustomProperty:enable:falsecustomPropertyName:'Butler_SuccessAlertEnableEmail'enabledValue:'Yes'# Custom property used to say that alerts for a certain task should be sent to zero or more recipients# These alerts will be sent irrespective of the alertEnableByCustomProperty.enable setting.alertEnabledByEmailAddress:customPropertyName:'Butler_SuccessAlertSendToEmail'rateLimit:60# Min seconds between emails for a given taskID. Defaults to 5 minutes.headScriptLogLines:15tailScriptLogLines:25priority:high # high/normal/lowsubject: '✅ Qlik Sense reload success:"{{taskName}}"'
bodyFileDirectory: path/to/email_templates
htmlTemplateFile: success-reload-qseow
fromAddress: Qlik Sense (no-reply) <qliksense-noreply@ptarmiganlabs.com>
recipients:
- <Email address 1>
- <Email address 2>
reloadTaskAborted:
enable: false
appOwnerAlert:
enable: true # Should app owner get notification email (assuming email address is available in Sense user directory)
includeOwner:
includeAll: true # true = Send notification to all app owners except those in exclude list
# false = Send notification to app owners in the include list
user:
- directory: <Sense user directory>
userId: <userId>
- directory: <Sense user directory>
userId: <userId>
excludeOwner:
user:
- directory: <Sense user directory>
userId: <userId>
- directory: <Sense user directory>
userId: <userId>
# Custom property used to control which aborted tasks will cause alert emails to be sent
# If this setting is true, alerts will not be sent for all tasks, but *only* for tasks with the CP set to the enabledValue.
# If this setting is false, alerts will be sent for all aborted reload tasks.
alertEnableByCustomProperty:
enable: true
customPropertyName: 'Butler_AbortedAlertEnableEmail'enabledValue:'Yes'# Custom property used to say that alerts for a certain task should be sent to zero or more recipients# These alerts will be sent irrespective of the alertEnableByCustomProperty.enable setting.alertEnabledByEmailAddress:customPropertyName:'Butler_AbortedAlertSendToEmail'rateLimit:600# Min seconds between emails for a given taskID. Defaults to 5 minutes.headScriptLogLines:15# Number of lines from start of script to include in emailtailScriptLogLines:15# Number of lines from end of script to include in emailpriority:high # high/normal/lowsubject: 'Qlik Sense reload aborted:"{{taskName}}"' # Email subject. Can use template fields
bodyFileDirectory: path/to/email_templates # Directory where email body template files are stored
htmlTemplateFile: aborted-reload # Name of email body template file to use
fromAddress: Qlik Sense (no-reply) <qliksense-noreply@mydomain.com>
recipients: # Array of email addresses to which the notification email will be sent
- <Email address 1>
- <Email address 2>
reloadTaskFailure:
enable: false
appOwnerAlert:
enable: true # Should app owner get notification email (assuming email address is available in Sense user directory)
includeOwner:
includeAll: true # true = Send notification to all app owners except those in exclude list
# false = Send notification to app owners in the include list
user:
- directory: <Sense user directory>
userId: <userId>
- directory: <Sense user directory>
userId: <userId>
excludeOwner:
user:
- directory: <Sense user directory>
userId: <userId>
- directory: <Sense user directory>
userId: <userId>
# Custom property used to control which task failures will cause alert emails to be sent
# If this setting is true, alerts will not be sent for all tasks, but *only* for tasks with the CP set to the enabledValue.
# If this setting is false, alerts will be sent for all failed reload tasks.
alertEnableByCustomProperty:
enable: false
customPropertyName: 'Butler_FailedAlertEnableEmail'enabledValue:'Yes'# Custom property used to say that alerts for a certain task should be sent to zero or more recipients# These alerts will be sent irrespective of the alertEnableByCustomProperty.enable setting.alertEnabledByEmailAddress:customPropertyName:'Butler_FailedAlertSendToEmail'rateLimit:600# Min seconds between emails for a given taskID. Defaults to 5 minutes.headScriptLogLines:15# Number of lines from start of script to include in emailtailScriptLogLines:15# Number of lines from end of script to include in emailpriority:high # high/normal/lowsubject: 'Qlik Sense reload failed:"{{taskName}}"' # Email subject. Can use template fieldsbodyFileDirectory:path/to/email_templates # Directory where email body template files are storedhtmlTemplateFile:failed-reload # Name of email body template file to usefromAddress:Qlik Sense (no-reply) <qliksense-noreply@mydomain.com>recipients:# Array of email addresses to which the notification email will be sent- <Email address 1>- <Email address 2>......smtp:# Email server settings. See https://nodemailer.com/smtp/ for details on the meaning of these fields.host:<FQDN or IP or email server, e.g. smtp.gmail.com>port:<port on which SMTP server is listening>secure:true# true/falsetls:serverName:# If specified the serverName field will be used for TLS verification instead of the host field.ignoreTLS:falserequireTLS:truerejectUnauthorized:falseauth:enable:trueuser:<Username, email address etc>password:<your-secret-password>......udpServerConfig:enable:false# Should the UDP server responsible for receving task failure and session events be started? true/falseserverHost:<FQDN or IP (or localhost) of server where Butler is running>portTaskFailure:9998......
Templates: Configuring email appearance
Alert emails use standard HTML formatting. Inline CSS can be used (if so desired) for fine tuning the visual look of the alert email.
Butler’s process for sending alert emails is
Figure out which email body template file should be used. This is determine by two set of fields in the main config file:
For reload failure emails these config file properties are used:
Butler.emailNotification.reladTaskFailure.bodyFileDirectory and
Butler.emailNotification.reladTaskFailure.htmlTemplateFile. A .handlebars extension is assumed.
For aborted reload emails these config file properties are used:
Butler.emailNotification.reloadTaskAborted.bodyFileDirectory and
Butler.emailNotification.reloadTaskAborted.htmlTemplateFile. A .handlebars extension is assumed.
For successful reload emails these config file properties are used:
Butler.emailNotification.reloadTaskSuccess.bodyFileDirectory and
Butler.emailNotification.reloadTaskSuccess.htmlTemplateFile. A .handlebars extension is assumed.
For email subjects, these config properties are used:
Butler.emailNotification.reladTaskFailure.subject, Butler.emailNotification.reloadTaskAborted.subject and Butler.emailNotification.reloadTaskSuccess.subject.
Process the body template, replacing template fields with actual values.
Process the email subject template, replacing template fields with actual values.
Send the email.
A couple of sample template files are found in the src/config/email_templates directory of the GitHub repository.
Tip
You can use template fields in email subjects too!
Using custom links in templates
Links to Qlik Sense QMC and Hub (for both client-managed and Qlik Sense Cloud) can be included in email templates.
It is also possible to define custom links in the config file, and use them in email templates.
This is described here: Custom links in alerts.
Template fields reference
A complete list of template fields - including descriptions - is available in the Reference section.
2.3.6.1.2 - Reload alerts in InfluxDB
Description of how information of how successful and failed reload tasks can be stored in InfluxDB.
What’s this?
Butler can store information about both successful and failed reload tasks in InfluxDB.
If enabled, Butler will store information about all failed reload tasks to InfluxDB.
For successful reload tasks, there are two options:
Store information about all successful reload tasks to InfluxDB.
Store information about some successful reload tasks to InfluxDB.
Which tasks to store information about is controlled using a custom property on the reload task.
Once the information about the reload task is in InfluxDB it can be used in Grafana dashboards.
This way it is possible to get a good, continuous overview of the reload activity in your Qlik Sense environment.
You can also use the information to create alerts in Grafana using it’s comprehensive alerting capabilities, including alerting to Slack, Teams, email, etc.
Please note that InfluxDB must be enabled and correctly configured in the Butler config file for the below features to work.
Monitor failed reload tasks
If enabled using the Butler.influxDb.reloadTaskFailure.enable setting, Butler will store information about all failed reload tasks in InfluxDB.
The information stored includes (among other things):
The name and ID of the app that the failed reload task was reloading.
The name and ID of the reload task.
The name of the Qlik Sense node/server that the task was running on.
User who started the reload task. This will be the service account when the task was started by a schedule or via a task chain/trigger.
Execution ID of the reload. This is a unique ID that is generated by Qlik Sense for each reload task execution, it can be used to cross-reference the reload task with related entries in the Qlik Sense log files.
Last Butler.influxDb.reloadTaskFailure.tailScriptLogLines lines of the Sense log file for the reload task.
Static tags defined in the config file’s Butler.influxDb.reloadTaskFailure.tag.static section.
Dynamic app tags, i.e. Sense tags for the app being reloaded, if enabled in the config file Butler.influxDb.reloadTaskFailure.tag.dynamic.useAppTags section.
Dynamic reload task tags, i.e. Sense tags for the reload task being executed, if enabled in the config file Butler.influxDb.reloadTaskFailure.tag.dynamic.useTaskTags section.
A complete definition of all information sent to InfluxDB is available in the reference section.
Monitor successful reload tasks
Butler can monitor all reload tasks for successful completion, or only some of them.
Monitor all successful reload tasks
If enabled using the Butler.influxDb.reloadTaskSuccess.allReloadTasks.enable setting, Butler will store information about all successful reload tasks in InfluxDB.
The information stored is almost the same as for failed reload tasks, except that the Sense script log file is not included.
Monitor only some successful reload tasks
If enabled using the Butler.influxDb.reloadTaskSuccess.byCustomProperty.enable setting, Butler will store information about only some successful reload tasks in InfluxDB.
Which tasks to store information about is controlled using a custom property on the reload task.
The name of the custom property is defined in the Butler.influxDb.reloadTaskSuccess.byCustomProperty.customPropertyName setting.
The value of the custom property that will be used to indicate that the reload task should be monitored is defined in the Butler.influxDb.reloadTaskSuccess.byCustomProperty.enabledValue setting.
Static vs dynamic tags
Butler offers two kinds of tags: Static and dynamic.
Static tags are defined in the config file and are the same for all messages stored in InfluxDB.
An example of a static tag could be the name of the Qlik Sense server that Butler is running on, or whether the message related to a production or test Qlik Sense environment.
Dynamic attributes are determined at run-time when the message is stored in InfluxDB.
Settings in config file
---Butler:......influxDb:......reloadTaskFailure:enable:truetailScriptLogLines:20tag:static:# Static tags to attach to data stored in InfluxDB- name:butler_instancevalue:prod-1dynamic:useAppTags:true# Should app tags be stored in InfluxDB as tags?useTaskTags:true# Should task tags be stored in InfluxDB as tags?reloadTaskSuccess:enable:trueallReloadTasks:enable:falsebyCustomProperty:enable:truecustomPropertyName:'Butler_SuccessReloadTask_InfluxDB'enabledValue:'Yes'tag:static:# Static attributes/dimensions to attach to events sent to InfluxDb# - name: event-specific-tag 1# value: abc 123dynamic:useAppTags:true# Should app tags be sent to InfluxDb as tags?useTaskTags:true# Should task tags be sent to InfluxDb as tags?......
2.3.6.1.3 - Reload alerts via New Relic
Description of how reload alerts can be sent to New Relic as events and log messages.
What’s this?
Butler can send two kinds of messages to New Relic:
When a scheduled or started from the QMC reload task fails.
When a scheduled or started from the QMC reload task is somehow stopped/aborted.
See the Concepts section for examples on what a New Relic alert can look like.
This page has additional info on how to set up Butler to work with New Relic.
A complete reference to the config file format is found here.
Different kinds of New Relic messages
Two kinds of messages can be sent to New Relic: Events and log messages.
The difference between them is that New Relic events are meant to be used for alerting, while New Relic log messages are meant to be used for troubleshooting.
Events are more flexible in terms of what data can be included in them, whereas log messages are just that - parts of Sense log files sent to New Relic.
Together they provide a powerful combination of alerting and troubleshooting capabilities, but they can also be enabled independently of each other.
Destination accounts
New Relic does not have very good access control capabilities for their dashboards, so if you want certain people to see only some reload alerts, and other people to see other alerts, you need to create multiple New Relic accounts.
Butler supports this scenario and can send messages to one or more New Relic accounts.
It is possible to specify per reload task which New Relic account(s) to send alerts to.
Three pieces of information is needed for each New Relic account that Butler should send messages to:
The name of the New Relic account. This is just a name that you choose, it is not used for anything other than to identify the account in Butler’s config file and in the custom properties of Qlik Sense reload tasks.
The New Relic account ID.
The New Relic insert/API key. This is basically a secret key that is used to authenticate Butler with New Relic.
Account numbers and insert keys are available in the New Relic UI, under “Account settings” > “Data sharing”.
Authentication and credentials
Butler looks for New Relic account names, account ID and API keys in two places:
The command line, using the --new-relic-account-name, --new-relic-account-id and --new-relic-api-key options.
If you have multiple New Relic accounts they should be listed in sequence, separated by space.
Account names can include spaces, but should then be enclosed in double quotes.
Example: --new-relic-account-name "First New Relic account" "Second New Relic account" --new-relic-api-key 1234567890abcdef 0987654321fedcba --new-relic-account-id 1234567 7654321
The config file, in the Butler.thirdPartyToolsCredentials.newRelic section.
Standard attributes
When sending messages to New Relic you can include “attributes”.
Attributes are key/value pairs that can be used to provide additional information about the message.
They can be added to both events and log messages.
Attributes can be used in New Relic dashboards to filter and group messages in various ways.
Static vs dynamic attributes
Butler offers two kinds of attributes: Static and dynamic.
Static attributes are defined in the config file and are the same for all messages sent to New Relic.
An example of a static attribute could be the name of the Qlik Sense server that Butler is running on, or whether the message related to a production or test Qlik Sense environment.
Dynamic attributes are determined at run-time when the message is sent to New Relic.
Examples include:
Sense tags that are assigned to the reload task that failed. Their names are qs_appTag_<tag name>
App tags of the app that failed to reload. Their names are qs_taskTag_<tag name>
Shared settings
Some settings are shared between events and log messages, these are found in the sharedSettings sections of the config file.
Values there will be used for both events and log messages, unless they are overridden in the respective events or logMessages sections of the config file.
Settings in config file
---Butler:......thirdPartyToolsCredentials:newRelic:# Array of New Relic accounts/insert keys. Any data sent to New Relic will be sent to both accounts. - accountName:First NR accountinsertApiKey:<API key 1 (with insert permissions) from New Relic> accountId:<New Relic account ID 1>- accountName:Second NR accountinsertApiKey:<API key 2 (with insert permissions) from New Relic> accountId:<New Relic account ID 2>......incidentTool:newRelic:enable:falsedestinationAccount:event:# Failed/aborted reload tasks are sent as events to these New Relic accounts- First NR account- Second NR accountlog:# Failed/aborted reload tasks are sent as log entries to these New Relic accounts- First NR account- Second NR account# New Relic uses different API URLs for different kinds of data (metrics, events, logs, ...)# There are different URLs depending on whther you have an EU or US region New Relic account.# The available URLs are listed here: https://docs.newrelic.com/docs/accounts/accounts-billing/account-setup/choose-your-data-center/url:# As of this writing the valid options are# https://insights-collector.eu01.nr-data.net# https://insights-collector.newrelic.com event:https://insights-collector.eu01.nr-data.net# Valid options are (1) EU/rest of world and 2) US)# https://log-api.eu.newrelic.com/log/v1# https://log-api.newrelic.com/log/v1 log:https://log-api.eu.newrelic.com/log/v1reloadTaskFailure:destination:event:enable:falsesendToAccount:# Which reload task failures are sent to New Relic as eventsbyCustomProperty:enable:false# Control using a task custom property which reload task failures are sent as eventscustomPropertyName:'Butler_FailedTask_Event_NewRelicAccount'always:enable:false# Controls which New Relic accounts ALL failed reload tasks are sent to (as events)account:- First NR account- Second NR accountattribute:static:# Static attributes/dimensions to attach to events sent to New Relic.- name:event-specific-attribute 1 # Examplevalue:abc 123 # Exampledynamic:useAppTags:true# Should app tags be sent to New Relic as attributes?useTaskTags:true# Should task tags be sent to New Relic as attributes?log:enable:falsetailScriptLogLines:20sendToAccount:# Which reload task failures are sent to New Relic as log entriesbyCustomProperty:enable:false# Control using a task custom property which reload task failures are sent as log entriescustomPropertyName:'Butler_FailedTask_Log_NewRelicAccount'always:enable:false# Controls which New Relic accounts ALL failed reload tasks are sent to (as logs)account:- First NR account- Second NR accountattribute:static:# Static attributes/dimensions to attach to events sent to New Relic.- name:log-specific-attribute 1 # Examplevalue:def 123 # Exampledynamic:useAppTags:true# Should app tags be sent to New Relic as attributes?useTaskTags:true# Should task tags be sent to New Relic as attributes?sharedSettings:rateLimit:15# Min seconds between events sent to New Relic for a given taskID. Defaults to 5 minutes.header:# Custom http headers- name:X-My-Header # Examplevalue:Header value 1# Exampleattribute:static:# Static attributes/dimensions to attach to events sent to New Relic.- name:service # Examplevalue:butler # Example- name:environment # Examplevalue:prod # ExamplereloadTaskAborted:destination:event:enable:falsesendToAccount:# Which reload task aborts are sent to New Relic as eventsbyCustomProperty:enable:false# Control using a task custom property which reload task aborts are sent as eventscustomPropertyName:'Butler_AbortedTask_Event_NewRelicAccount'always:enable:false# Controls which New Relic accounts ALL aborted reload tasks are sent to (as events)account:- First NR account- Second NR accountattribute:static:# Static attributes/dimensions to attach to events sent to New Relic.- name:event-specific-attribute 2 # Examplevalue:abc 123 # Exampledynamic:useAppTags:true# Should app tags be sent to New Relic as attributes?useTaskTags:true# Should task tags be sent to New Relic as attributes?log:enable:falsetailScriptLogLines:20sendToAccount:# Which reload task aborts are sent to New Relic as log entriesbyCustomProperty:enable:true# Control using a task custom property which reload task aborts are sent as log entriescustomPropertyName:'Butler_AbortedTask_Log_NewRelicAccount'always:enable:false# Controls which New Relic accounts ALL aborted reload tasks are sent to (as logs)account:- First NR account- Second NR accountattribute:static:# Static attributes/dimensions to attach to events sent to New Relic.- name:log-specific-attribute 2 # Examplevalue:def 123 # Exampledynamic:useAppTags:true# Should app tags be sent to New Relic as attributes?useTaskTags:true# Should task tags be sent to New Relic as attributes?sharedSettings:rateLimit:15# Min seconds between events sent to New Relic for a given taskID. Defaults to 5 minutes.header:# Custom http headers- name:X-My-Header # Examplevalue:Header value 2# Exampleattribute:static:# Static attributes/dimensions to attach to events sent to New Relic.- name:service # Examplevalue:butler # Example- name:environment # Examplevalue:prod # ExampleserviceMonitor:destination:event:enable:falsesendToAccount:# Windows service events are sent to these New Relic accounts- First NR account- Second NR accountattribute:static:# Static attributes/dimensions to attach to events sent to New Relic.- name:event-specific-attributevalue:abc 123dynamic:serviceHost:true# Should host where service is running be sent to New Relic as attribute?serviceName:true# Should service name be sent to New Relic as attribute?serviceDisplayName:true# Should service display name be sent to New Relic as attribute?serviceState:true# Should service state be sent to New Relic as attribute?log:enable:falsesendToAccount:# Windows service log entries are sent to these New Relic accounts- First NR account- Second NR accountattribute:static:# Static attributes/dimensions to attach to events sent to New Relic.- name:log-specific-attributevalue:def 456dynamic:serviceHost:true# Should host where service is running be sent to New Relic as attribute?serviceName:true# Should service name be sent to New Relic as attribute?serviceDisplayName:true# Should service display name be sent to New Relic as attribute?serviceState:true# Should service state be sent to New Relic as attribute?monitorServiceState:# Control whih service states are sent to New Relicrunning:enable:truestopped:enable:truesharedSettings:rateLimit:5# Min seconds between events/logs sent to New Relic for a given host+service. Defaults to 5 minutes.header:# Custom http headers- name:X-My-Header # Examplevalue:Header value 2 # Exampleattribute:static:# Static attributes/dimensions to attach to events sent to New Relic.- name:service # Examplevalue:butler # Example- name:environment # Examplevalue:prod # Example......
2.3.6.1.4 - Reload alerts via Slack
Description of how reload alerts can be sent as Slack messages.
What’s this?
Butler can send two kinds of alert messages via Slack:
A complete reference to the config file format is found here.
Basic vs formatted Slack alerts
Slack alerts come in two forms:
Customizable formatting using a template concept. A standard template that will fit most use cases is included with Butler. Using this option the first and last parts of the script log can be included in the message, allowing you to tell from the Slack message what caused the reload to fail.
You can also add buttons to the message that can be used to open any URL you want, or open the app that failed reloading.
A fixed, more basic format that is built into Butler. No template file needed, but also less detailed.
Which option to go for depends on whether you want just a notification that something went wrong, or if you want as much detail as possible in the Slack message. In most cases the customizable formatting is the best option.
Sample message with custom formatting
Note
The concept described below is the same for failed and aborted reload tasks.
Each of these have their own settings in the config file.
A “reload task failed” Slack message using the custom formatting option could look like this:
Here’s how to set this up:
Create an incoming webhook in Slack, take note of its URL (you will need it in step 2 below).
Edit the Slack section of the config file, i.e. the settings in Butler.slackNotification.reloadTaskFailure.
The messageType property should be set to formatted.
The basicMsgTemplate property is not used with formatted messages and can thus be left empty,
Edit the template file if/as needed, the file is specified in Butler.slackNotification.reloadTaskFailure.templateFile. It uses the Handlebars templating engine, to which Butler provides template fields with actual values.
Sample template files are included in the release Zip file, and are also available in the GitHub repository’s src/config/slack_templates directory.
Restart Butler if it’s already running.
Sample message with basic formatting
Note
The concept described below is the same for failed and aborted reload tasks.
Each of these have their own settings in the config file.
A “reload task failed” Slack message with basic formatting could look like this:
To set it up:
Create an incoming webhook in Slack if you don’t already have one, take note of its URL (you will need it in step 2 below).
Edit the Slack section of the config file, i.e. in Butler.slackNotification.reloadTaskFailure.
The messageType property should be set to basic.
The basicMsgTemplate property is the message that will be sent via Slack. Template fields can be used.
Restart Butler if it’s already running.
Customizing Slack messages
When using the formatted Slack alerts you have full freedom to create the alert you need.
Behind the scenes Slack messages are constructed from blocks defined in a JSON object. Each block can then contain either plain text, Markdown, images, buttons etc.
The Slack documentation is the best place for learning how to customize messages.
When it comes to Butler, it uses the Handlebars templating engine to render the template files into Slack JSON objects that are then sent to Slack via their APIs.
A few things to keep in mind when creating custom Slack messages:
The handlebars syntax itself must be correct. If incorrect no Slack JSON object will be created. And no Slack messages sent.
The handlebars template must result in a JSON object that adheres to Slack’s API specifications.
If the JSON syntax is somehow invalid the Slack API will return errors and no messages sent. JSON can be pretty sensitive to details, there should for example not be any trailing commas in properly formatted JSON objects.
Block Kit Builder: Great sandbox with readily available examples of different message layouts, syntax and more. Note: You must be logged into your Slack account to use this tool.
Using custom links in templates
It is also possible to define custom links in the config file, and use them in Slack templates.
This is described here: Custom links in alerts.
How it works
Warning
Don’t forget to create the log appender .xml files on the Sense server(s).
Those xml files are the foundation on top of which all Butler alerts are built - without them the alerts described on this page won’t work.
The concept is the same for all alert types, see the email alerts for details.
Settings in config file
---Butler:......# Settings for notifications and messages sent to SlackslackNotification:enable:falserestMessage:webhookURL:<web hook URL from Slack> # Webhook to use when sending basic Slack messages via Butler's REST APIreloadTaskFailure:# Reload task failed in QSEoWenable:falsewebhookURL:<web hook URL from Slack>channel:sense-task-failure # Slack channel to which task failure notifications are sentmessageType:formatted # formatted / basic. Formatted means that template file below will be used to create the message.basicMsgTemplate: 'Qlik Sense reload failed:"{{taskName}}"' # Only needed if message type = basic
rateLimit: 300 # Min seconds between emails for a given taskID. Defaults to 5 minutes.
headScriptLogLines: 10
tailScriptLogLines: 10
templateFile: /path/to/slack/template/directory/failed-reload-qseow.handlebars
fromUser: Qlik Sense
iconEmoji: ':ghost:'reloadTaskAborted:# Reload task aborted in QSEoWenable:falsewebhookURL:<web hook URL from Slack>channel:sense-task-aborted # Slack channel to which task stopped notifications are sentmessageType:formatted # formatted / basic. Formatted means that template file below will be used to create the message.basicMsgTemplate: 'Qlik Sense reload aborted:"{{taskName}}"' # Only needed if message type = basic
rateLimit: 300 # Min seconds between emails for a given taskID. Defaults to 5 minutes.
headScriptLogLines: 10
tailScriptLogLines: 10
templateFile: /path/to/slack/template/directory/aborted-reload-qseow.handlebars
fromUser: Qlik Sense
iconEmoji: ':ghost:'......udpServerConfig:enable:false# Should the UDP server responsible for receving task failure and session events be started? true/falseserverHost:<FQDN or IP (or localhost) of server where Butler is running>portTaskFailure:9998......
2.3.6.1.5 - Reload alerts via Microsoft Teams
Description of how reload alerts can be sent as Microsoft Teams messages.
What’s this?
Butler can send two kinds of alert messages via Teams:
A complete reference to the config file format is found here.
Basic vs formatted Teams alerts
Teams alerts come in two forms:
Customizable formatting using a template concept. A standard template that will fit most use cases is included with Butler. With this option the first and last parts of the script log can be included in the message, allowing you to tell from the Teams message what caused the reload to fail.
You can also add buttons to the message that can be used to open any URL you want, or open the app that failed reloading.
A fixed, more basic format that is built into Butler. No template file needed.
Which option to go for depends on whether you want just a notification that something went wrong, or if you want as much detail as possible in the Teams message.
Sample message with custom formatting
Note
The concept described below is the same for failed and aborted reload tasks.
Each of these have their own settings in the config file.
A “reload task failed” Teams message using the custom formatting option could look like this:
Here’s how to set it up:
Create a workflow in Teams, take note of its URL (you will need it in step 2 below). More information on how to create a Teams workflow in the Concepts section.
Edit the Teams section of the config file, i.e. the settings in Butler.teamsNotification.reloadTaskFailure.
The messageType property should be set to formatted.
The basicMsgTemplate property is not used with formatted messages and can thus be left empty,
Edit the template file if/as needed, the file is specified in Butler.teamsNotification.reloadTaskFailure.templateFile.It uses the Handlebars templating engine, to which Butler provides template fields with actual values.
Sample template files are included in the release Zip file, and are also available in the GitHub repository’s src/config/teams_templates directory.
Restart Butler if it’s already running.
Sample message with basic formatting
Note
The concept described below is the same for failed and aborted reload tasks.
Each of these have their own settings in the config file.
A “reload task failed” Teams message with basic formatting could look like this:
To set it up:
Create an incoming webhook in Teams if you don’t already have one, take note of its URL (you will need it in step 2 below).
Edit the Teams section of the config file i.e. the settings in Butler.teamsNotification.reloadTaskFailure and/or Butler.teamsNotification.reloadTaskAborted sections of the config file.
The messageType property should be set to basic.
The basicMsgTemplate property is the message that will be sent via Teams. Template fields can be used.
Restart Butler if it’s already running.
Customizing Teams messages
When using the formatted Teams alerts you have full freedom to create the alert you need.
Behind the scenes Teams messages are constructed as “Adaptive Cards”, which is standardized JSON format that Teams understands.
More information on Adaptive Cards can be found here, here and here.
When it comes to Butler, it uses the Handlebars templating engine to render a template file into an adaptive card JSON object that is then sent to the workflow webhook.
A few things to keep in mind when creating custom Teams messages:
The handlebars syntax itself must be correct. If incorrect no Teams JSON object will be created. And no Teams message sent.
The handlebars template must result in a JSON object that adheres to Teams’s specifications for JSON payloads.
If the JSON syntax is somehow invalid the Teams API will return errors and no messages sent. JSON can be pretty sensitive to details, there should for example not be any trailing commas in properly formatted JSON objects.
Using custom links in templates
It is also possible to define custom links in the config file, and use them in Teams templates.
This is described here: Custom links in alerts.
How it works
Warning
Don’t forget to create the log appender .xml files on the Sense server(s).
---Butler:......# Settings for notifications and messages sent to MS TeamsteamsNotification:enable:falsereloadTaskFailure:enable:falsewebhookURL:<web hook URL from MS Teams>messageType:formatted # formatted / basic. Formatted means that template file below will be used to create the message.basicMsgTemplate: 'Qlik Sense reload failed:"{{taskName}}"' # Only needed if message type = basic
rateLimit: 300 # Min seconds between emails for a given taskID. Defaults to 5 minutes.
headScriptLogLines: 10
tailScriptLogLines: 10
templateFile: /path/to/teams/template/directory/failed-reload-qseow.handlebars
reloadTaskAborted:
enable: false
webhookURL: <web hook URL from MS Teams>
messageType: formatted # formatted / basic. Formatted means that template file below will be used to create the message.
basicMsgTemplate: 'Qlik Sense reload aborted:"{{taskName}}"' # Only needed if message type = basicrateLimit:300# Min seconds between emails for a given taskID. Defaults to 5 minutes.headScriptLogLines:10tailScriptLogLines:10templateFile:/path/to/teams/template/directory/aborted-reload-qseow.handlebars......udpServerConfig:enable:false# Should the UDP server responsible for receving task failure and session events be started? true/falseserverHost:<FQDN or IP (or localhost) of server where Butler is running>portTaskFailure:9998......
2.3.6.1.6 - Reload alerts via MQTT
Description of how reload alerts can be sent as MQTT messages.
What’s this?
Butler can send two kinds of alert messages as MQTT messages:
When a scheduled, running reload task fails.
When a scheduled, running reload task is somehow stopped.
How it works
Basic message
The MQTT message will be sent on the MQTT topic defined in the config file property Butler.mqttConfig.taskAbortedTopic or Butler.mqttConfig.taskFailureTopic, depending on the event type.
The task name will be sent in the message body.
The basic message looks like this when viewed in the MQTTLens app:
Complete message
Optionally a larger, more complete message is also sent if Butler.mqttConfig.taskFailureSendFull or Butler.mqttConfig.taskFailureSendFull are set to true.
This message contains a stringified JSON of all available information about the failed/aborted task.
The message is sent on the Butler.mqttConfig.taskFailureFullTopic or Butler.mqttConfig.taskAbortedFullTopic topics.
That message can look like this:
Remember
Don’t forget to create the log appender .xml files on the Sense server(s). This page describes how.
Those xml files are the foundation on top of which all Butler alerts are built - without them the alerts described on this page won’t work.
The concept is more or less the same as for alert emails.
Settings in config file
---Butler:......mqttConfig:enable:false# Should Qlik Sense events be forwarded as MQTT messages?brokerHost:<FQDN or IP of MQTT server>brokerPort:1883azureEventGrid:enable:false# If set to true, Butler will connect to an Azure Event Grid MQTT Broker, using brokerHost and brokerPort above clientId:<client ID>clientCertFile:<path to client certificate file>clientKeyFile:<path to client key file>taskFailureSendFull:truetaskAbortedSendFull:truesubscriptionRootTopic:qliksense/# # Topic that Butler will subscribe totaskStartTopic:qliksense/start_task # Topic for incoming messages used to start Sense tasks. Should be subtopic to subscriptionRootTopictaskFailureTopic:qliksense/task_failuretaskFailureFullTopic:qliksense/task_failure_fulltaskFailureServerStatusTopic:qliksense/butler/task_failure_servertaskAbortedTopic:qliksense/task_abortedtaskAbortedFullTopic:qliksense/task_aborted_full......udpServerConfig:enable:false# Should the UDP server responsible for receving task failure and session events be started? true/falseserverHost:<FQDN or IP (or localhost) of server where Butler is running>portTaskFailure:9998......
2.3.6.1.7 - Reload alerts via outgoing webhooks
Description of how reload alerts can be sent via outgoing webhooks.
What’s this?
Butler can send two kinds of alert messages as outgoing webhooks:
When a scheduled, running reload task fails.
When a scheduled, running reload task is somehow stopped/aborted.
How it works
Outgoing webhooks is a concept where Butler will do a GET, POST or PUT HTTP call to a specific URL when a task fails or is aborted/stopped.
The use case is to interface with currently unknown third party systems in a generic way.
Both http and https calls are supported, including the use of self-signed certificates and untrusted certificates.
As the call will include information about the failed/aborted task, the typical (and arguably most correct) way of doing this would be via a PUT call.
But some systems only handle GET calls - and Butler should still be able to notify them using webhooks.
The chosen solution is to offer full flexibility for outgoing webhooks and support both GET, PUT and POST calls.
Webhook notifications can be turned off all together with the Butler.webhookNotification.enable property in the config file.
If that property is true both task fail and abort webhooks are enabled.
If you don’t need any outgoing webhooks you should keep the Butler.webhookNotification.reloadTaskFailure.webhooks and Butler.webhookNotification.reloadTaskAborted.webhooks arrays empty.
There are also rate limiting properties that are used to ensure that webhooks are not sent too often.
Certificates and https
Outgoing webhooks can use http or https.
If https is used and the server being called uses a publicly trusted certificate, no additional configuration is needed.
If the server uses a self-signed certificate, the corresponding root CA certificate must be provided to Butler in order to avoid certificate validation errors.
Each webhook has its own certificate configuration, so Butler can be integrated with many systems, each using their own publicly verified or self-signed certificates - or just plain http without any certificates at all.
The certificate configuration is done in the Butler config file and looks like this for each webhook:
---cert:enable:true# Set to true to use a custom CA certificate when calling the webhookURLrejectUnauthorized:true# Set to false to ignore warnings/errors caused by self-signed certificates used on the webhooks server.certCA:/path/to/ca-certificate.pem# Path to the CA certificate file
If ...cert.enable is set to true Butler will use the certificate specified in ...cert.certCA when calling the webhook.
If ...cert.rejectUnauthorized is set to false Butler will ignore warnings/errors caused by self-signed certificates being used on the webhook server.
Data included in outgoing webhooks
This information is included in all outgoing webhook calls:
Field
Description
event
Type of event, for example Qlik Sense reload failed.
hostName
Name of server where the event took place.
user
User directory/userId of user causing the event. For task failures this will be the user account used to do the reload. For aborts it will be the user stopping/aborting the task.
taskName
Task name
taskId
Task ID
appName
App name
appId
App ID
logTimeStamp
Timestamp entry in the Qlik Sense log files when the event took place.
logLevel
Log level used in the Qlik Sense log file in which the event was detected by the log appender.
executionId
Execution ID of the failed/aborted task.
logMessage
Message in Qlik Sense log file that triggered the event.
GET call
When doing GET calls all the data fields will be passed as search parameters in the URL.
For example, a failed task GET call to a remote URL could look like this:
The received/remote system can then unpack the URL parameters and use them as needed.
PUT and POST calls
PUT and POST calls work the same when it comes to Butler’s outgoing webhooks:
A stringified JSON is created based on the event’s data fields.
The string is sent in the POST/PUT call’s body.
The same event as above looks like this:
{"event":"Qlik Sense reload failed","hostName":"pro2-win1","user":"LAB\\goran","taskName":"Manually triggered reload of Test failing reloads 2","taskId":"dec2a02a-1680-44ef-8dc2-e2bfb180af87","appName":"Test failing reloads 2","appId":"e7af59a0-c243-480d-9571-08727551a66f","logTimeStamp":"2021-02-16 09:24:59,099","logLevel":"INFO","executionId":"14a81bf5-f81c-4047-b1a1-193b0920de28","logMessage":"Max retries reached"}
Settings in config file
---Butler:......# Settings for notifications and messages sent using outgoing webhookswebhookNotification:enable:falsereloadTaskFailure:rateLimit:300# Min seconds between outgoing webhook calls for a given taskID. Defaults to 5 minutes.webhooks:- description:'This outgoing webhook is used to...'# Informational onlywebhookURL:http://host.my.domain:port/some/path # Outgoing webhook that Butler will callhttpMethod:POST # GET/POST/PUTcert:enable:false# Set to true to use a custom CA certificate when calling the webhookURLrejectUnauthorized:true# Set to false to ignore warnings/errors caused by self-signed certificates used on the webhooks server.certCA:/path/to/ca-certificate.pem # Path to the CA certificate file- description:'This outgoing webhook is used to...'# Informational onlywebhookURL:http://host.my.domain:port/some/path # Outgoing webhook that Butler will callhttpMethod:PUT # GET/POST/PUTcert:enable:false# Set to true to use a custom CA certificate when calling the webhookURLrejectUnauthorized:true# Set to false to ignore warnings/errors caused by self-signed certificates used on the webhooks server.certCA:/path/to/ca-certificate.pem # Path to the CA certificate file- description:'This outgoing webhook is used to...'# Informational onlywebhookURL:http://host.my.domain:port/some/path # Outgoing webhook that Butler will callhttpMethod:GET # GET/POST/PUTcert:enable:false# Set to true to use a custom CA certificate when calling the webhookURLrejectUnauthorized:true# Set to false to ignore warnings/errors caused by self-signed certificates used on the webhooks server.certCA:/path/to/ca-certificate.pem # Path to the CA certificate filereloadTaskAborted:rateLimit:300# Min seconds between outgoing webhook calls for a given taskID. Defaults to 5 minutes.webhooks:- description:'This outgoing webhook is used to...'# Informational onlywebhookURL:http://host.my.domain:port/some/path # Outgoing webhook that Butler will callhttpMethod:PUT # GET/POST/PUTcert:enable:false# Set to true to use a custom CA certificate when calling the webhookURLrejectUnauthorized:true# Set to false to ignore warnings/errors caused by self-signed certificates used on the webhooks server.certCA:/path/to/ca-certificate.pem # Path to the CA certificate file- description:'This outgoing webhook is used to...'# Informational onlywebhookURL:http://host.my.domain:port/some/path # Outgoing webhook that Butler will callhttpMethod:POST # GET/POST/PUTcert:enable:false# Set to true to use a custom CA certificate when calling the webhookURLrejectUnauthorized:true# Set to false to ignore warnings/errors caused by self-signed certificates used on the webhooks server.certCA:/path/to/ca-certificate.pem # Path to the CA certificate file- description:'This outgoing webhook is used to...'# Informational onlywebhookURL:http://host.my.domain:port/some/path # Outgoing webhook that Butler will callhttpMethod:GET # GET/POST/PUTcert:enable:false# Set to true to use a custom CA certificate when calling the webhookURLrejectUnauthorized:true# Set to false to ignore warnings/errors caused by self-signed certificates used on the webhooks server.certCA:/path/to/ca-certificate.pem # Path to the CA certificate file......
2.3.6.2 - Reload alerts for Qlik Sense Cloud
Butler offers a lot of flexibility when it comes to alerts when reloads fail in Qlik Sense Cloud.
Learn how to set up the desired features, the alert layout, formatting and more.
Warning
In general the information related to an app that failed reloading will not be very sensitive.
It’s app name, owner id, tenant id etc.
If this information is considered sensitive in your organization, you should consider the security implications of sending this information to service like Butler via the public Internet. The traffic will be https encrypted, but even so, the information will be sent over the public Internet.
As always, make sure to follow your organization’s security guidelines. Think before you act.
Alert types
These alert types are available:
Reload task failure. Send alerts when app reloads fail.
Alert destinations and options
Alerts can be sent to these destinations, with different options available for each destination.
Each destination can be individually enabled/disabled in the config file.
Destination
App reload failure
Enable/disable alert per app
Alerts to app owners
Flexible formatting
Basic formatting
Comment
Email
✅
✅
✅
✅
Slack
✅
✅
✅
✅
MS Teams
✅
✅
✅
✅
How it works
Somehow Butler needs to be notified when a reload task in Qlik Sense Cloud fails.
The only way to do this is currently (2024 October) to use Qlik Cloud’s outgoing webhooks, and have them triggered when the app reload fails.
So, the outbound webhook should call some URL it can reach.
In practice this means a URL on the public Internet.
This could be a Butler provided endpoint, but exposing Butler to the public Internet is not a good idea from a security perspective.
There are various ways to solve this, each described below.
More options for bringing Qlik Cloud events to Butler may be added in the future.
Option 1: Azure function forwarding event to MQTT
While this solution may be seen as a bit complex, it does offer some advantages:
No need to expose Butler to the public Internet.
The http-to-MQTT gateway is a minimal service that can be run as a serverless function in your cloud provider of choice, or on-premise in a de-militarized zone (DMZ). The point is that it’s a very small and simple service that both is easier to deploy and to secure, compared to a full Butler instance.
Not having complex services like Butler exposed to the public Internet is a good security practice.
The http-to-MQTT gateway can be used for other purposes too, such as sending MQTT messages to Butler when other events occur in your Qlik Cloud environment.
The http-to-MQTT gateway can be used to send MQTT messages to other systems too, not just Butler.
By exposing several https endpoints, The http-to-MQTT gateway can be used to send MQTT messages to Butler when events occur in other systems, not just Qlik Cloud.
By using a serverless function in a cloud provider, the solution scales well and can benefit from the cloud provider’s security features.
Low cost. The solution can even be run on a free tier in most cloud providers, and MQTT services are usually very cheap for the message volume in this scenario (one message per failed app reload).
Fast. Events typically reach Butler within a few seconds after they occur in Qlik Cloud.
Downsides include:
The solution is a bit complex to set up.
The solution requires the http-to-MQTT gateway to be up and running at all times.
A Internet connected MQTT broker is needed. There are several cloud based MQTT brokers available though.
The solution looks like this:
The webhook in Qlik Cloud is set up to call an Azure function when an app reload completes. The Azure function then sends an MQTT message to Butler.
The webhook is defined like this:
The webhook secret can be used in the gateway to verify that the webhook call is coming from an approved Qlik Cloud tenant.
Future options
Various solutions are possible, including:
Qlik Cloud supporting other notification mechanisms, such as sending MQTT messages when app reloads fail.
Qlik Cloud Application Automations supporting MQTT. The failed app reload could then be captured via an automation, and there forwarded to Butler via MQTT.
Using a 3rd party service that runs a webhook-to-MQTT gateway in the cloud.
If the basic assumption is that you want to expose as little attack surface on the Internet as possible, the solution will most likely involve some kind of intermediate service that can be reached by Qlik Cloud, and that can in turn asynchronously forward the event to Butler.
Setting up the http-to-MQTT gateway
An Azure Function App is used in this example, but the same concept can be used with other cloud providers, or on-premise.
In the example below the Azure function is written in Node.js.
Note that the code below is a basic example that should be extended before being used in a production environment:
Add proper error handling and logging
Add better security, using the Qlik Cloud webhook secret to verify that the incoming request is coming from an approved Qlik Cloud tenant.
The function does verify that the incoming request has a http header named x-myheader-foo1, but it does not check the value of that header. Room for improvement there.
All in all the function does work, it has been in test use for some months and should serve well as a starting point for your own implementation.
import{app,HttpRequest,HttpResponseInit,InvocationContext,}from"@azure/functions";import{connectAsync}from"mqtt";exportasyncfunctionqscloudreload(request:HttpRequest,context:InvocationContext):Promise<HttpResponseInit>{context.log(`Http function processed request for url "${request.url}"`);context.log(`Request method: ${request.method}`);// Get query string parameters
constquery=Object.fromEntries(request.query.entries());context.log(`Request query:\n${JSON.stringify(query,null,2)}`);// Ensure there are no query string parameters
if(Object.keys(query).length>0){context.log("Too many query string parameters. Expected none.");return{status:400,body:"Invalid query string parameters",};}// -----------------------------------------------------
// Get headers
constheaders=Object.fromEntries(request.headers.entries());context.log(`Request headers:\n${JSON.stringify(headers,null,2)}`);// Ensure the correct headers are present
// The following headers are required:
// - accept-encoding: gzip
// - client-ip: <The IP address of the client making the request>
// - content-length: <The length of the request body>
// - content-type: application/json
// - host: <The host name of the function app>
// - qlik-signature: <The Qlik Sense Cloud signature of the request>
// - user-agent: Qlik Webhook
// - x-forwarded-proto: https
// - x-forwarded-tlsversion: 1.3
//
// Custom https headers (must also be present):
// - x-myheader-foo1: bar1
constrequiredHeaders=["accept-encoding","client-ip","content-length","content-type","host","qlik-signature","user-agent","x-forwarded-proto","x-forwarded-tlsversion","x-myheader-foo1",];for(constheaderofrequiredHeaders){if(!headers[header]){context.log(`Missing required header: ${header}`);return{status:400,body:`Missing required header`,};}}// Make sure select headers contain correct values
// - accept-encoding: gzip
// - content-type: application/json
// - user-agent: Qlik Webhook
// - x-forwarded-proto: https
// - x-forwarded-tlsversion: 1.2 | 1.3
if(headers["accept-encoding"]!=="gzip"){context.log(`Invalid header value for accept-encoding: ${headers["accept-encoding"]}`);return{status:400,body:`Invalid header value for accept-encoding`,};}if(headers["content-type"]!=="application/json"){context.log(`Invalid header value for content-type: ${headers["content-type"]}`);return{status:400,body:`Invalid header value for content-type`,};}if(headers["user-agent"]!=="Qlik Webhook"){context.log(`Invalid header value for user-agent: ${headers["user-agent"]}`);return{status:400,body:`Invalid header value for user-agent`,};}if(headers["x-forwarded-proto"]!=="https"){context.log(`Invalid header value for x-forwarded-proto: ${headers["x-forwarded-proto"]}`);return{status:400,body:`Invalid header value for x-forwarded-proto`,};}if(headers["x-forwarded-tlsversion"]!=="1.2"&&headers["x-forwarded-tlsversion"]!=="1.3"){context.log(`Invalid header value for x-forwarded-tlsversion: ${headers["x-forwarded-tlsversion"]}`);return{status:400,body:`Invalid header value for x-forwarded-tlsversion`,};}// -----------------------------------------------------
// Get request body
letbody:any=JSON.parse(awaitrequest.text());letbodyString=JSON.stringify(body,null,2);context.log(`Request body:\n${bodyString}`);// Make sure the request body contains the expected properties
// The following properties are required:
// - cloudEventsVersion: 0.1
// - source: com.qlik/engine,
// - contentType: application/json,
// - eventId: b0f5c473-5dea-4d7e-a188-5e0b904cde33,
// - eventTime: 2024-07-27T13:57:27Z,
// - eventTypeVersion: 1.0.0,
// - eventType: com.qlik.v1.app.reload.finished,
// - extensions: <object with the following properties>
// - ownerId: <userID of the owner of the Qlik Sense resource that triggered the event>
// - tenantId: <tenantID of the Qlik Sense tenant that contains the Qlik Sense resource that triggered the event>
// - userId: <userID of the user that triggered the event>
// data: <object>
constrequiredProperties=["cloudEventsVersion","source","contentType","eventId","eventTime","eventTypeVersion","eventType","extensions","data",];for(constpropertyofrequiredProperties){if(!body[property]){context.log(`Missing required body property: ${property}`);return{status:400,body:`Missing required body property`,};}}// Make sure the extensions object contains the expected properties
// The following properties are required:
// - ownerId: <userID of the owner of the Qlik Sense resource that triggered the event>
// - tenantId: <tenantID of the Qlik Sense tenant that contains the Qlik Sense resource that triggered the event>
// - userId: <userID of the user that triggered the event>
constextensions=body.extensions;constextensionsProperties=["ownerId","tenantId","userId"];for(constpropertyofextensionsProperties){if(!extensions[property]){context.log(`Missing required extensions property in request body: ${property}`);return{status:400,body:`Missing required extensions property`,};}}// Make sure select properties contain correct values
// - cloudEventsVersion: 0.1
// - contentType: application/json
if(body.cloudEventsVersion!=="0.1"){context.log(`Invalid body value for cloudEventsVersion: ${body.cloudEventsVersion}`);return{status:400,body:`Invalid body value for cloudEventsVersion`,};}if(body.contentType!=="application/json"){context.log(`Invalid body value for contentType: ${body.contentType}`);return{status:400,body:`Invalid body value for contentType`,};}// -----------------------------------------------------
// Forward message to MQTT broker
constbrokerHost="hostname.of.mqtt.broker";constbrokerPort=8765;constmqttClient=awaitconnectAsync(`mqtts://${brokerHost}:${brokerPort}`,{username:"my-username",password:"my-password",});consttopic=`qscloud/app/reload/${body?.extensions?.tenantId}`;context.log(`Using MQTT topic: ${topic}`);context.log("MQTT client connected");mqttClient.publish(topic,bodyString,(err)=>{if(err){context.log(`Error publishing message: ${err}`);}});context.log("Message published");awaitmqttClient.endAsync();context.log("MQTT client disconnected");// Return a 200 response
return{status:200,// body: `Body received:\n${bodyString}`
body:`OK. Message received.`,};}app.http("qscloudreload",{methods:["POST"],authLevel:"anonymous",handler:qscloudreload,});
Customizing the alerts
The alerts can be customized in the same ways as for Qlik Sense client-managed. More info at links below.
2.3.6.2.1 - Qlik Cloud reload alerts sent as emails
Description of the various kinds of alert emails Butler can send when an app reload fails in Qlik Cloud.
What’s this?
Butler can send these alert emails:
When an app reload fails during execution.
See the Concepts section for additional details and sample alert emails.
Basic vs formatted email alerts
If you want Butler to send email alerts you must provide an email template file.
For some other alert destinations (Slack and Teams) Butler offers a “basic” option. A fixed format alert is then sent by Butler.
This is not the case for email alerts - there you must provide Butler with a template file.
Rate limiting and de-duplication
Butler has rate limiting feature to ensure alert recipients are not spammed with too many alert emails.
The rate limit is configured (in seconds) in the main config file in the Butler.qlikSenseCloud.event.mqtt.tenant.alert.emailNotification.reloadAppFailure.rateLimit setting in the config file.
Rate limiting is done based on app reload ID + email address.
Butler also has a de-duplication feature that ensure each email address that has qualified for an alert email only gets ONE email per alert, even if the email address (for example) appears as both an app owner and is specified via an app tag.
Butler can optionally send alert emails to the owner of apps that fail reloading.
Note
App owner notification email can only be sent to app owners that have an email stored in their Qlik Cloud user profile.
If there is no email available for an app owner, he/she will simply not receive any alert emails.
This feature is controlled by the config file properties Butler.qlikSenseCloud.event.mqtt.tenant.alert.emailNotification.reloadAppFailure.appOwnerAlert.enable.
If set to true the app owner will be added to the send list of alert emails, in addition to the recipients specified in Butler.qlikSenseCloud.event.mqtt.tenant.alert.emailNotification.reloadAppFailure.recipients.
The sections of the config file dealing with app owner notification emails looks like this:
appOwnerAlert:enable:false# Should app owner get notification email (assuming email address is available in Sense)?includeOwner:includeAll:true# true = Send notification to all app owners except those in exclude list# false = Send notification to app owners in the include listuser:# Array of app owner email addresses that should get notifications# - email: anna@somecompany.com# - email: joe@somecompany.comexcludeOwner:user:# - email: daniel@somecompany.com
It works like this:
If appOwnerAlert.enable is set to false no app owner emails will be sent. If it’s set to true the rules below apply.
If appOwnerAlert.includeOwner.includeAll is set to true all app owners will get notification emails when apps the own fail/are aborted…
… except those app owners listed in the appOwnerAlert.excludeOwner.user array.
That array thus provides a way to exclude some app owners (e.g. system accounts) to receive notification emails.
If appOwnerAlert.includeOwner.includeAll is set to false it’s still possible to add individual app owners to the appOwnerAlert.includeOwner.user array.
Those users will then receive notification emails for apps they own.
Send alerts only for some apps
Some apps may be more important than others.
I.e. some apps should result in alert emails when they fail reloading, but others not.
Butler controls which app reload failures cause email alerts by looking at a specific app tag.
If the config file setting Butler.qlikSenseCloud.event.mqtt.tenant.alert.emailNotification.reloadAppFailure.alertEnableByTag.enable is set to false, all failed app reloads will result in alert emails.
If that setting is true only some apps will cause alert emails when their reload fails:
If an app has the tag specified in Butler.qlikSenseCloud.event.mqtt.tenant.alert.emailNotification.reloadAppFailure.alertEnableByTag.tag, an email alert will be sent for that app if it fails reloading.
If an app does not have that tag set, no alert will be sent for that app.
Some configuration in Sense is needed to make this work:
Make changes to the config file. Specifically the settings mentioned above needs to be reviewed and (probably) updated.
In Qlik Cloud, tag the apps that should cause alert emails when they fail reloading.
Use the same tag as specified in the config file.
Looks like this in Qlik Sense Cloud:
How it works
The concept is the same for all alert types, see the this page for details.
Settings in config file
---Butler:......mqttConfig:enable:false# Should Qlik Sense events be forwarded as MQTT messages?......qlikSenseCloud:# MQTT settings for Qlik Sense Cloud integrationevent:mqttForward:# QS Cloud events forwarded to MQTT topics, which Butler will subscribe toenable:falsebroker:# Settings for MQTT broker to which QS Cloud events are forwardedhost:mqttbroker.company.comport:<port>username:<username>password:<password>topic:subscriptionRoot:qscloud/# # Topic that Butler will subscribe toappReload:qscloud/app/reload......qlikSenseCloud:# Settings for Qlik Sense Cloud integrationenable:falseevent:mqtt:# Which QS Cloud tenant should Butler receive events from, in the form of MQTT messages?tenant:id:tenant.region.qlikcloud.comtenantUrl:https://tenant.region.qlikcloud.comauthType:jwt # Authentication type used to connect to the tenant. Valid options are "jwt"auth:jwt:token:<JWT token> # JWT token used to authenticate Butler when connecting to the tenant# Qlik Sense Cloud related links used in notification messagesqlikSenseUrls:qmc:<URL to QMC in Qlik Sense Cloud>hub:<URL to Hub in Qlik Sense Cloud>comment:This is a comment describing the tenant and its settings# Informational onlyalert:......# Settings needed to send email notifications when for example reload tasks fail.# Reload failure notifications assume a log appender is configured in Sense AND that the UDP server in Butler is running.emailNotification:reloadAppFailure:enable:false# Enable/disable app reload failed notifications via emailalertEnableByTag:enable:falsetag:Butler - Send email if app reload failsappOwnerAlert:enable:false# Should app owner get notification email (assuming email address is available in Sense)?includeOwner:includeAll:true# true = Send notification to all app owners except those in exclude list# false = Send notification to app owners in the include listuser:# Array of app owner email addresses that should get notifications# - email: anna@somecompany.com# - email: joe@somecompany.comexcludeOwner:user:# - email: daniel@somecompany.comrateLimit:60# Min seconds between emails for a given taskID. Defaults to 5 minutes.headScriptLogLines:15tailScriptLogLines:25priority:high # high/normal/lowsubject: '❌ Qlik Sense reload failed:"{{taskName}}"'bodyFileDirectory:/path/to//email_templateshtmlTemplateFile:failed-reload-qscloudfromAddress:Qlik Sense (no-reply) <qliksense-noreply@ptarmiganlabs.com>recipients:# - emma@somecompany.com# - patrick@somecompany.com......
Templates: Configuring email appearance
Alert emails use standard HTML formatting. Inline CSS can be used (if so desired) for fine tuning the visual look of the alert email.
Butler’s process for sending alert emails is
Figure out which email body template file should be used. This is determine by two set of fields in the main config file:
For reload failure emails these config file properties are used:
Butler.qlikSenseCloud.event.mqtt.tenant.alert.emailNotification.reloadAppFailure.bodyFileDirectory and Butler.qlikSenseCloud.event.mqtt.tenant.alert.emailNotification.reloadAppFailure.htmlTemplateFile. A .handlebars extension is assumed.
Email subjects are specified in the config property Butler.qlikSenseCloud.event.mqtt.tenant.alert.emailNotification.reloadAppFailure.subject.
Process the body template, replacing template fields with actual values.
Process the email subject template, replacing template fields with actual values.
Send the email.
A couple of sample template files are found in the src/config/email_templates directory of the GitHub repository.
Tip
You can use template fields in email subjects too!
Using custom links in templates
It is also possible to define custom links in the config file, and use them in email templates.
This is described here: Custom links in alerts.
Template fields reference
A complete list of template fields - including descriptions - is available in the Reference section.
2.3.6.2.2 - Reload alerts via Slack
Description of how app reload failed alerts can be sent as Slack messages.
What’s this?
Butler can send two kinds of alert messages via Slack:
A complete reference to the config file format is found here.
Basic vs formatted Slack alerts
Slack alerts come in two forms:
Customizable formatting using a template concept. A standard template that will fit most use cases is included with Butler. Using this option the first and last parts of the script log can be included in the message, making it possible to tell from the Slack message what caused the reload to fail.
You can also add buttons to the message that can be used to open any URL you want, or open the app that failed reloading.
A fixed, more basic format that is built into Butler. No template file needed, but also less detailed.
Which option to go for depends on whether you want just a notification that something went wrong, or if you want as much detail as possible in the Slack message. In most cases the customizable formatting is the best option.
Sample message with custom formatting
An “app reload failed” Slack message using the custom formatting option could look like this:
Here’s how to set this up:
Create an incoming webhook in Slack, take note of its URL (you will need it in step 2 below).
Edit the Slack section of the config file, i.e. the settings in Butler.qlikSenseCloud.event.mqtt.tenant.alert.slackNotification.reloadAppFailure.
The messageType property should be set to formatted.
The basicMsgTemplate property is not used with formatted messages and can thus be left empty,
Edit the template file if/as needed, the file is specified in Butler.qlikSenseCloud.event.mqtt.tenant.alert.slackNotification.reloadAppFailure.templateFile. It uses the Handlebars templating engine, to which Butler provides template fields with actual values.
Sample template files are included in the release Zip file, and are also available in the GitHub repository’s src/config/slack_templates directory.
Restart Butler if it’s already running.
Sample message with basic formatting
A “reload task failed” Slack message with basic formatting could look like this:
To set it up:
Create an incoming webhook in Slack if you don’t already have one, take note of its URL (you will need it in step 2 below).
Edit the Slack section of the config file, i.e. in Butler.qlikSenseCloud.event.mqtt.tenant.alert.slackNotification.reloadAppFailure.
The messageType property should be set to basic.
The basicMsgTemplate property is the message that will be sent via Slack. Template fields can be used.
Restart Butler if it’s already running.
Customizing Slack messages
When using the formatted Slack alerts you have full freedom to create the alert you need.
Behind the scenes Slack messages are constructed from blocks defined in a JSON object. Each block can then contain either plain text, Markdown, images, buttons etc.
The Slack documentation is the best place for learning how to customize messages.
When it comes to Butler, it uses the Handlebars templating engine to render the template files into Slack JSON objects that are then sent to Slack via their APIs.
A few things to keep in mind when creating custom Slack messages:
The handlebars syntax itself must be correct. If incorrect no Slack JSON object will be created. And no Slack messages sent.
The handlebars template must result in a JSON object that adheres to Slack’s API specifications.
If the JSON syntax is somehow invalid the Slack API will return errors and no messages sent. JSON can be pretty sensitive to details, there should for example not be any trailing commas in properly formatted JSON objects.
Block Kit Builder: Great sandbox with readily available examples of different message layouts, syntax and more. Note: You must be logged into your Slack account to use this tool.
Using custom links in templates
It is also possible to define custom links in the config file, and use them in Slack templates.
This is described here: Custom links in alerts.
How it works
The concept is the same for all alert types, see the this page for details.
Settings in config file
---Butler:......mqttConfig:enable:false# Should Qlik Sense events be forwarded as MQTT messages?......qlikSenseCloud:# MQTT settings for Qlik Sense Cloud integrationevent:mqttForward:# QS Cloud events forwarded to MQTT topics, which Butler will subscribe toenable:falsebroker:# Settings for MQTT broker to which QS Cloud events are forwardedhost:mqttbroker.company.comport:<port>username:<username>password:<password>topic:subscriptionRoot:qscloud/# # Topic that Butler will subscribe toappReload:qscloud/app/reload......qlikSenseCloud:# Settings for Qlik Sense Cloud integrationenable:falseevent:mqtt:# Which QS Cloud tenant should Butler receive events from, in the form of MQTT messages?tenant:id:tenant.region.qlikcloud.comtenantUrl:https://tenant.region.qlikcloud.comauthType:jwt # Authentication type used to connect to the tenant. Valid options are "jwt"auth:jwt:token:<JWT token> # JWT token used to authenticate Butler when connecting to the tenant# Qlik Sense Cloud related links used in notification messagesqlikSenseUrls:qmc:<URL to QMC in Qlik Sense Cloud>hub:<URL to Hub in Qlik Sense Cloud>comment:This is a comment describing the tenant and its settings# Informational onlyalert:......# Settings for notifications and messages sent to SlackslackNotification:reloadAppFailure:enable:falsealertEnableByTag:enable:falsetag:Butler - Send Slack alert if app reload failsbasicContentOnly:falsewebhookURL:<URL to Slack webhook>channel:sense-task-failure # Slack channel to which app reload failure notifications are sentmessageType:formatted # formatted / basic. Formatted means that template file below will be used to create the message.basicMsgTemplate: 'Qlik Sense Cloud app reload failed:"{{appName}}"' # Only needed if message type = basic
rateLimit: 60 # Min seconds between emails for a given appId/recipient combo. Defaults to 5 minutes.
headScriptLogLines: 10
tailScriptLogLines: 20
templateFile: /path/to/slack_templates/failed-reload-qscloud.handlebars
fromUser: Qlik Sense
iconEmoji: ':ghost:'......
2.3.6.2.3 - Reload alerts via Microsoft Teams
Description of how reload alerts can be sent as Microsoft Teams messages.
What’s this?
Butler can send two kinds of alert messages via Teams:
A complete reference to the config file format is found here.
Basic vs formatted Teams alerts
Teams alerts come in two forms:
Customizable formatting using a template concept. A standard template that will fit most use cases is included with Butler. With this option the first and last parts of the script log can be included in the message, allowing you to tell from the Teams message what caused the reload to fail.
You can also add buttons to the message that can be used to open any URL you want, or open the app that failed reloading.
A fixed, more basic format that is built into Butler. No template file needed, but also less detailed.
Which option to go for depends on whether you want just a notification that something went wrong, or if you want as much detail as possible in the Teams message. In most cases the customizable formatting is the best option.
Sample message with custom formatting
An “app reload failed” Teams message using the custom formatting option could look like this:
Here’s how to set it up:
Create a workflow in Teams, take note of its URL (you will need it in step 2 below). More information on how to create a Teams workflow in the Concepts section.
Edit the Teams section of the config file, i.e. the settings in Butler.qlikSenseCloud.event.mqtt.tenant.alert.teamsNotification.reloadAppFailure.
The messageType property should be set to formatted.
The basicMsgTemplate property is not used with formatted messages and can thus be left empty,
Edit the template file if/as needed, the file is specified in Butler.qlikSenseCloud.event.mqtt.tenant.alert.teamsNotification.reloadAppFailure.templateFile.It uses the Handlebars templating engine, to which Butler provides template fields with actual values.
Sample template files are included in the release Zip file, and are also available in the GitHub repository’s src/config/teams_templates directory.
Restart Butler if it’s already running.
Sample message with basic formatting
A “reload task failed” Teams message with basic formatting could look like this:
To set it up:
Create a workflow in Teams if you don’t already have one, take note of its URL (you will need it in step 2 below).
Edit the Teams section of the config file i.e. Butler.qlikSenseCloud.event.mqtt.tenant.alert.teamsNotification.reloadAppFailure.
The messageType property should be set to basic.
The basicMsgTemplate property is the message that will be sent via Teams. Template fields can be used.
Restart Butler if it’s already running.
Customizing Teams messages
When using the formatted Teams alerts you have full freedom to create the alert you need.
Behind the scenes Teams messages are constructed as “Adaptive Cards”, which is standardized JSON format that Teams understands.
More information on Adaptive Cards can be found here, here and here.
When it comes to Butler, it uses the Handlebars templating engine to render a template file into an adaptive card JSON object that is then sent to the workflow webhook.
A few things to keep in mind when creating custom Teams messages:
The handlebars syntax itself must be correct. If incorrect no Teams JSON object will be created. And no Teams message sent.
The handlebars template must result in a JSON object that adheres to Teams’s specifications for JSON payloads.
If the JSON syntax is somehow invalid the Teams API will return errors and no messages sent. JSON can be pretty sensitive to details, there should for example not be any trailing commas in properly formatted JSON objects.
Using custom links in templates
It is also possible to define custom links in the config file, and use them in Teams templates.
This is described here: Custom links in alerts.
How it works
The concept is the same for all alert types, see the this page for details.
Settings in config file
---Butler:......mqttConfig:enable:false# Should Qlik Sense events be forwarded as MQTT messages?......qlikSenseCloud:# MQTT settings for Qlik Sense Cloud integrationevent:mqttForward:# QS Cloud events forwarded to MQTT topics, which Butler will subscribe toenable:falsebroker:# Settings for MQTT broker to which QS Cloud events are forwardedhost:mqttbroker.company.comport:<port>username:<username>password:<password>topic:subscriptionRoot:qscloud/# # Topic that Butler will subscribe toappReload:qscloud/app/reload......qlikSenseCloud:# Settings for Qlik Sense Cloud integrationenable:falseevent:mqtt:# Which QS Cloud tenant should Butler receive events from, in the form of MQTT messages?tenant:id:tenant.region.qlikcloud.comtenantUrl:https://tenant.region.qlikcloud.comauthType:jwt # Authentication type used to connect to the tenant. Valid options are "jwt"auth:jwt:token:<JWT token> # JWT token used to authenticate Butler when connecting to the tenant# Qlik Sense Cloud related links used in notification messagesqlikSenseUrls:qmc:<URL to QMC in Qlik Sense Cloud>hub:<URL to Hub in Qlik Sense Cloud>comment:This is a comment describing the tenant and its settings# Informational onlyalert:# Settings for notifications and messages sent to MS TeamsteamsNotification:reloadAppFailure:enable:falsealertEnableByTag:enable:falsetag:Butler - Send Teams alert if app reload failsbasicContentOnly:falsewebhookURL:<URL to MS Teams webhook>messageType:formatted # formatted / basicbasicMsgTemplate: 'Qlik Sense Cloud app reload failed:"{{appName}}"' # Only needed if message type = basicrateLimit:15# Min seconds between emails for a given appId. Defaults to 5 minutes.headScriptLogLines:15tailScriptLogLines:15templateFile:/path/to/teams_templates/failed-reload-qscloud-workflow.handlebars......
2.3.7 - Reload script logs
Butler can detect, capture and store all script logs of reload tasks that failed.
This makes it much easier to find and analyze the script logs of failed reloads.
Works with both client-managed Qlik Sense and Qlik Sense Cloud.
What’s this?
The idea is to save the full script logs of failed reloads.
Having access to the full logs can sometimes be what’s needed to understand what caused the failure.
Log files from client-managed Qlik Sense are stored in one directory hierarchy, while logs from Qlik Sense Cloud are stored in another.
The files are store in separate directories for each date.
The file name of the script log consists of
Client-managed: <timestamp of the reload failure>_<app ID>_<task ID>.log
Qlik Sense Cloud: <timestamp of the reload failure>_<app ID>_<reload ID>
This feature relies on the same Qlik Sense log appenders that the reload alerts uses. Please see that page for an in-depth discussion on how log appenders work and how to set them up.
Warning
The log appenders that catch failed reloads in the Qlik Sense scheduler must be set up on all Qlik Sense servers where reloads are happening for this feature to reliably capture all failed reloads.
Qlik Sense Cloud
Storing script logs on disk is closely associated with sending alerts about failed reloads.
Those alerts (email, Slack, Teams) can include the first and last few lines of the script log, whereas the full log is stored on disk using the feature described on this page.
Butler listens to the Qlik Sense Cloud event stream and captures the script logs of failed reloads.
Settings in config file
---Butler:......# Store script logs of failed reloads on disk.# The script logs will be stored in daily directories under the specified main directory below# NOTE: Use an absolute path when running Butler as a standalone executable!scriptLog:storeOnDisk:clientManaged:reloadTaskFailure:enable:falselogDirectory:/path/to/scriptlogs/qseowqsCloud:appReloadFailure:enable:falselogDirectory:/path/to/scriptlogs/qscloud......
2.3.8 - Monitoring Windows services
Butler can monitor Windows services and alert if they are not running.
This is useful for monitoring services that are critical for Qlik Sense to function - or any other important service.
Messages can be sent when services stop or start, with message destinations such as Slack, Teams, email, New Relic, InfluxDB, webhooks and MQTT.
What’s this?
Qlik Sense uses Windows Services to run the Qlik Sense Engine, Qlik Sense Repository Service, Qlik Sense Scheduler Service and more.
If any of these services stop, Qlik Sense will not work.
Butler can monitor these services and alert if they are not running and when they start again.
This feature is only available when Butler is running on Windows, on other OSs a warning will be logged when Butler is starting and the feature will be disabled.
How it works
Butler will poll the Windows Service Control Manager (SCM) for the status of the services that are configured to be monitored.
The polling interval is configurable via the Butler.serviceMonitor.frequency setting, but defaults to 30 seconds.
The services to be monitored are listed in Butler.serviceMonitor.monitor section of the config file.
If firewalls etc allow it it is possible to monitor services on remote Windows machines as well.
Three pieces of information are needed for each service to be monitored:
The host name of the machine where the service is running (Butler.serviceMonitor.monitor.<host>).
This config entry is shared for all services monitored on the same host.
The name of the service (Butler.serviceMonitor.monitor.<services>.name).
This is the name of the service as it appears in the Windows Service Control Manager (SCM).
Right click on a service in the Windows Services app and select Properties, then find the “Service name” on the General tab.
A “friendly name” that can be anything (Butler.serviceMonitor.monitor.<services>.friendlyName). This is useful as the Windows service name are not always very descriptive.
The friendly name is used in the alert messages sent to the various alert destinations, including InfluxDB and New Relic.
Each alert destination can be enabled or disabled via the Butler.serviceMonitor.alertDestination.<destination>.enable setting.
Settings in config file
The configuration of each alert destination is done in the destinations’ own section of the config file, for example Butler.teamsNotification.serviceStopped, Butler.emailNotification.serviceStopped, Butler.emailNotification.serviceStarted etc.
Those settings are described in sub-pages of this page.
---Butler:......# Monitor Windows services.# This feature only works when Butler is running on Windows Server or desktop.# On other OSs service monitoring will be automatically disabled.serviceMonitor:enable:false# Main on/off switch for service monitoringfrequency:every 30 seconds # https://bunkat.github.io/later/parsers.htmlmonitor:- host:<hostname or IP> # Host name of Windows computer where services are runningservices:# List of services to monitor- name:postgresql-x64-12 # Posgress/repository dbfriendlyName:Repository DB- name:QlikSenseEngineServicefriendlyName:Engine- name:QlikSensePrintingServicefriendlyName:Printing- name:QlikSenseProxyServicefriendlyName:Proxy- name:QlikSenseRepositoryServicefriendlyName:Repository- name:QlikSenseSchedulerServicefriendlyName:Scheduler- name:QlikSenseServiceDispatcherfriendlyName:Service DispatcheralertDestination:# Control to thich destinations service related alerts are sentinfluxDb:# Send service alerts to InfluxDBenable:truenewRelic:# Send service alerts to New Relicenable:trueemail:# Send service alerts as emailsenable:truemqtt:# Send service alerts as MQTT messagesenable:trueteams:# Send service alerts as MS Teams messagesenable:trueslack:# Send service alerts as Slack messagesenable:truewebhook:# Send service alerts as outbound webhooks/http callsenable:true......
2.3.8.1 - Sending Windows service alerts as email
This page contains information on how to configure Butler to send email alerts when Windows services stop or start.
What’s this?
These config settings are specific to the email alert destination.
They are used in addition to the general Windows Service monitoring settings in Butler.serviceMonitor.
How it works
The sent emails are created from template files using the Handlebars templating engine.
The template files are located in the Butler.emailNotification.<alertType>.bodyFileDirectory directory, with the actual file name specified in Butler.emailNotification.<alertType>.htmlTemplateFile.
The template files can contain Handlebars expressions to insert values from the alert data.
The available values are:
Value
Description
{{host}}
The hostname of the server where the service is running
{{serviceStatus}}
The status of the service, e.g. RUNNING or STOPPED
{{servicePrevStatus}}
The previous status of the service, e.g. RUNNING or STOPPED
{{serviceName}}
The name of the service as defined in Windows
{{serviceDisplayName}}
The display name of the service as defined in Windows. Can sometimes be a bit more human readable than the serviceName.
{{serviceFriendlyName}}
The display name of the service as defined in the Butler config file. Used to give the service a good name when both serviceName and serviceDisplayName are unsuitable for use in for example Grafana dashboards.
{{serviceStartType}}
The startup mode of the service, e.g. Automatic or Manual
{{serviceExePath}}
The path to the executable of the service
Settings in config file
---Butler:......emailNotification:serviceStopped:rateLimit:30# Min seconds between emails for a given service. Defaults to 5 minutes.priority:high # high/normal/lowsubject:'❌ Windows service stopped on host {{host}}: "{{serviceDisplayName}}"'bodyFileDirectory:path/to/email_templates/email_templateshtmlTemplateFile:service-stoppedfromAdress:Qlik Sense (no-reply) <qliksense-noreply@mydomain.com>recipients:- <Email address 1>- <Email address 2>serviceStarted:rateLimit:30# Min seconds between emails for a given service. Defaults to 5 minutes.priority:high # high/normal/lowsubject:'✅ Windows service started on host {{host}}: "{{serviceDisplayName}}"'bodyFileDirectory:path/to/email_templates/email_templateshtmlTemplateFile:service-startedfromAdress:Qlik Sense (no-reply) <qliksense-noreply@mydomain.com>recipients:- <Email address 1>- <Email address 2>smtp:# Email server settings. See https://nodemailer.com/smtp/ for details on the meaning of these fields.host:<FQDN or IP or email server, e.g. smtp.gmail.com>port:<port on which SMTP server is listening>secure:true# true/falsetls:serverName:# If specified the serverName field will be used for TLS verification instead of the host field.ignoreTLS:falserequireTLS:truerejectUnauthorized:falseauth:enable:trueuser:<Username, email address etc>password:<your-secret-password>... ...
2.3.8.2 - Sending Windows service alerts to New Relic
This page contains information on how to configure Butler to send alerts messages to New Relic when Windows services stop or start.
What’s this?
These config settings are specific to the New Relic alert destination.
They are used in addition to the general Windows Service monitoring settings in Butler.serviceMonitor.
How it works
All settings are found in the Butler.incidetTool.newRelic.serviceMonitor section of the config file.
Butler can send two kinds of messages to New Relic: events and logs entries.
New Relic events and log entries are good at different things, and you can choose to send either or both.
In general, events are good for monitoring and alerting while log entries are good for logging and troubleshooting.
If in doubt, send both - that will give you the freedom to choose later which to use in the New Relic dashboards, alerts and incidents.
New Relic events
Windows service events will be sent to New Relic with the name of qs_serviceStateEvent.
The static attributes attached to events sent to New Relic events are the ones defined in the config file.
These can be used to identify which of potentially several Butler instances the message originated from, and to filter and group messages in New Relic.
The values of dynamic attributes are determined at runtime and can be enabled or disabled in the config file:
Dynamic attribute name in New Relic
Description
butler_serviceHost
The hostname of the server where the service is running
butler_serviceName
The name of the service as defined in Windows
butler_serviceDisplayName
The display name of the service as defined in Windows. Can sometimes be a bit more human readable than the serviceName.
butler_serviceStatus
The status of the service, e.g. RUNNING or STOPPED
New Relic log entries
Windows service log entries will be sent to New Relic with a log type of qs_serviceStateLog.
Static and dynamic attributes are handled in the same way as for events.
The raw data of a New Relic lg entry will look something like this:
Settings in config file
---Butler:......incidentTool:newRelic:serviceMonitor:destination:event:enable:falsesendToAccount:# Windows service events are sent to these New Relic accounts- First NR account- Second NR accountattribute:static:# Static attributes/dimensions to attach to events sent to New Relic.- name:event-specific-attributevalue:abc 123dynamic:serviceHost:true# Should host where service is running be sent to New Relic as attribute?serviceName:true# Should service name be sent to New Relic as attribute?serviceDisplayName:true# Should service display name be sent to New Relic as attribute?serviceState:true# Should service state be sent to New Relic as attribute?log:enable:falsesendToAccount:# Windows service log entries are sent to these New Relic accounts- First NR account- Second NR accountattribute:static:# Static attributes/dimensions to attach to events sent to New Relic.- name:log-specific-attributevalue:def 456dynamic:serviceHost:true# Should host where service is running be sent to New Relic as attribute?serviceName:true# Should service name be sent to New Relic as attribute?serviceDisplayName:true# Should service display name be sent to New Relic as attribute?serviceState:true# Should service state be sent to New Relic as attribute?monitorServiceState:# Control whih service states are sent to New Relicrunning:enable:truestopped:enable:truesharedSettings:rateLimit:5# Min seconds between events/logs sent to New Relic for a given host+service. Defaults to 5 minutes.header:# Custom http headers- name:X-My-Header # Examplevalue:Header value 2 # Exampleattribute:static:# Static attributes/dimensions to attach to events sent to New Relic.- name:service # Examplevalue:butler # Example- name:environment # Examplevalue:prod # Example......
2.3.8.3 - Storing Windows service alerts in InfluxDB
This page contains information on how to configure Butler to store alert information in InfluxDB when Windows services stop or start.
What’s this?
These config settings are specific to the InfluxDB alert destination.
They are used in addition to the general Windows Service monitoring settings in Butler.serviceMonitor.
How it works
There is no specific InfluxDB configuration for Windows Service monitoring, so the general InfluxDB in Butler.influxDb settings are used.
This means that information about Windows service alerts are stored in the same InfluxDB database as other data points sent to InfluxDB from Butler (e.g. uptime metrics).
Settings in config file
---Butler:......# InfluxDB settingsinfluxDb:enable:false# Master switch for InfluxDB integration. If false, no data will be sent to InfluxDB.hostIP:<IP or host name> # Where is InfluxDB server located?hostPort:8086# InfluxDB portauth:enable:false# Does InfluxDB require login?username:user_joepassword:joesecretdbName:butler # Name of database in InfluxDB to which Butler's data is writteninstanceTag:DEV # Tag that can be used to differentiate data from multiple Butler instances# Default retention policy that should be created in InfluxDB when Butler creates a new database there.# Any data older than retention policy threshold will be purged from InfluxDB.retentionPolicy:name:10dduration:10d......
2.3.8.4 - Sending Windows service alerts to Slack
This page contains information on how to configure Butler to send alerts messages to Slack when Windows services stop or start.
What’s this?
These config settings are specific to the Slack alert destination.
They are used in addition to the general Windows Service monitoring settings in Butler.serviceMonitor.
How it works
All settings are found in the Butler.slackNotification.serviceStopped and Butler.slackNotification.serviceStarted sections of the config file.
Butler will send a Slack message to the channel specified in the config file when a Windows service stops or starts.
Similarly to how reload-failed Slack alerts work, Butler can send two types of Slack messages:
A simple message with just the name of the service that stopped or started. This will be the case if Butler.slackNotification.serviceStopped.messageType or Butler.slackNotification.serviceStarted.messageType is set to basic.
A more detailed and better formatted message with information about the service, the server it’s running on etc. This will be the case if Butler.slackNotification.serviceStopped.messageType or Butler.slackNotification.serviceStarted.messageType is set to formatted.
Rate limiting is controlled by the Butler.slackNotification.serviceStopped.rateLimit and Butler.slackNotification.serviceStarted.rateLimit settings.
Tip
The template used to create formatted Slack messages can be customized.
A formatted Slack message can look something like this:
Information available in formatted Slack messages
Similar to how failed-reload email notifications work, the templating engine Handlebars is used to format the Slack messages.
The following information is available in formatted Slack messages:
Handlebars variable
Description
{{host}}
The hostname of the server where the service is running
{{serviceStatus}}
The status of the service, e.g. RUNNING or STOPPED
{{servicePrevStatus}}
The previous status of the service, e.g. RUNNING or STOPPED
{{serviceName}}
The name of the service as defined in Windows
{{serviceDisplayName}}
The display name of the service as defined in Windows. Can sometimes be a bit more human readable than the serviceName.
{{serviceFriendlyName}}
The friendly name of the service as defined in the config file.
{{serviceStartType}}
The start type of the service, e.g. AUTO_START or DEMAND_START
{{serviceExePath}}
The path to the service executable
Settings in config file
---Butler:......# Settings for notifications and messages sent to SlackslackNotification:serviceStopped:webhookURL:<web hook URL from Slack>channel:qliksense-service-alert # Slack channel to which Windows service stopped notifications are sentmessageType:formatted # formatted / basic. Formatted means that template file below will be used to create the message.basicMsgTemplate: 'Windows service stopped:"{{serviceName}}"onhost "{{host}}"' # Only needed if message type = basicrateLimit:30# Min seconds between messages for a given Windows service. Defaults to 5 minutes.templateFile:/path/to/slack/template/directory/service-stopped.handlebarsfromUser:Qlik SenseiconEmoji:':ghost:'serviceStarted:webhookURL:<web hook URL from Slack>channel:qliksense-service-alert # Slack channel to which Windows service stopped notifications are sentmessageType:formatted # formatted / basic. Formatted means that template file below will be used to create the message.basicMsgTemplate: 'Windows service started:"{{serviceName}}"onhost "{{host}}"' # Only needed if message type = basicrateLimit:30# Min seconds between messages for a given Windows service. Defaults to 5 minutes.templateFile:/path/to/slack/template/directory/service-started.handlebarsfromUser:Qlik SenseiconEmoji:':ghost:'......
2.3.8.5 - Sending Windows service alerts to Microsoft Teams
This page contains information on how to configure Butler to send alerts messages to Microsoft Teams when Windows services stop or start.
What’s this?
These config settings are specific to the Microsoft Teams alert destination.
They are used in addition to the general Windows Service monitoring settings in Butler.serviceMonitor.
How it works
All settings are found in the Butler.teamsNotification.serviceStopped and Butler.teamsNotification.serviceStarted sections of the config file.
Butler will send a Teams message to the channel associated with Butler.teamsNotification.<serviceStopped|servierStarted>.webhookRL in the config file when a Windows service stops or starts.
Similarly to how reload-failed Teams alerts work, Butler can send two types of Teams messages:
A simple message with just the name of the service that stopped or started. This will be the case if Butler.teamsNotification.serviceStopped.messageType or Butler.teamsNotification.serviceStarted.messageType is set to basic.
A more detailed and better formatted message with information about the service, the server it’s running on etc. This will be the case if Butler.teamsNotification.serviceStopped.messageType or Butler.teamsNotification.serviceStarted.messageType is set to formatted.
Rate limiting is controlled by the Butler.teamsNotification.serviceStopped.rateLimit and Butler.teamsNotification.serviceStarted.rateLimit settings.
Tip
The template used to create formatted Teams messages can be customized.
A formatted Teams message can look something like this:
Information available in formatted Teams messages
Similar to how failed-reload email notifications work, the templating engine Handlebars is used to format the Teams messages.
The following information is available in formatted Teams messages:
Handlebars variable
Description
{{host}}
The hostname of the server where the service is running.
{{serviceStatus}}
The status of the service, e.g. RUNNING or STOPPED.
{{servicePrevStatus}}
The previous status of the service, e.g. RUNNING or STOPPED.
{{serviceName}}
The name of the service as defined in Windows.
{{serviceDisplayName}}
The display name of the service as defined in Windows. Can sometimes be a bit more human readable than the serviceName.
{{serviceFriendlyName}}
The friendly name of the service as defined in the config file.
{{serviceStartType}}
The start type of the service, e.g. AUTO_START or DEMAND_START.
{{serviceExePath}}
The path to the service executable.
Creating a MS Teams webhook
To create a webhook in MS Teams, follow the steps in the Concepts section.
Settings in config file
---Butler:......# Settings for notifications and messages sent to MS TeamsteamsNotification:serviceStopped:webhookURL:<web hook URL from MS Teams>messageType:formatted # formatted / basic. Formatted means that template file below will be used to create the message.basicMsgTemplate: 'Windows service stopped:"{{serviceName}}"onhost "{{host}}"' # Only needed if message type = basicrateLimit:30# Min seconds between messages for a given Windows service. Defaults to 5 minutes.templateFile:/path/to/teams/template/directory/service-stopped.handlebarsserviceStarted:webhookURL:<web hook URL from MS Teams>messageType:formatted # formatted / basic. Formatted means that template file below will be used to create the message.basicMsgTemplate: 'Windows service started:"{{serviceName}}"onhost "{{host}}"' # Only needed if message type = basicrateLimit:30# Min seconds between messages for a given Windows service. Defaults to 5 minutes.templateFile:/path/to/teams/template/directory/service-started.handlebars......
2.3.8.6 - Sending Windows service alerts as MQTT messages
This page contains information on how to configure Butler to send alerts as MQTT messages when Windows services stop or start.
What’s this?
These config settings are specific to the MQTT alert destination.
They are used in addition to the general Windows Service monitoring settings in Butler.serviceMonitor.
How it works
All settings are found in the Butler.mqttConfig section of the config file.
Butler will send two kinds of MQTT messages:
A state message indicating that a service has changed its state, for example from RUNNING to STOPPED.
When a service stops or starts, Butler will send a message to the topic defined in Butler.mqttConfig.serviceStoppedTopic, with /<hostname>/<serviceName> appended to the topic.
The payload will be a JSON with information about the service (name, display name, current state, previous state, dependencies, EXE path etc.).)
When a service starts the same thing happens, but the base topic used is defined in Butler.mqttConfig.serviceStartedTopic.
A message containing the current state of a service. These messages are sent when Butler starts up and when the state of a service changes.
The base MQTT topic for these messages are defined in the Butler.mqttConfig.serviceStateTopic setting. To this topic, Butler will append /<hostname>/<serviceName> before sending the message.
These messages are sent every time Butler checks the status of the Windows services, i.e. every Butler.serviceMonitor.frequency seconds.
The MQTT message will be sent as a JSON with information about the service (name, display name, current state, dependencies, EXE path etc.).
A few MQTT message can look like this when viewed in MQTT Explorer:
Settings in config file
---Butler:......mqttConfig:enable:false# Should Qlik Sense events be forwarded as MQTT messages?brokerHost:<FQDN or IP of MQTT server>brokerPort:1883serviceRunningTopic:qliksense/service_runningserviceStoppedTopic:qliksense/service_stoppedserviceStatusTopic:qliksense/service_status ... ...
2.3.8.7 - Sending Windows service alerts as outgoing webhooks (=http messages)
This page contains information on how to configure Butler to send alerts as outbound http calls, also known as “outbound webhooks”.
What’s this?
These config settings are specific to the outbound webhook alert destination.
They are used in addition to the general Windows Service monitoring settings in Butler.serviceMonitor.
How it works
All settings are found in the Butler.webhookNotification section of the config file.
Butler can send three kinds of http messages: POST, PUT and GET.
Some services only support one/some of these, so you need to check the documentation for the service you want to send the message to.
It is possible to define any number of webhook, and each destination can have its own settings such as http method and URL.
It is for example possible to send POST messages to different URLs if needed.
The rate limit defined in Butler.webhookNotification.rateLimit is calculated against each state change of the monitored Windows service.
There is no check with respect to rate limits how many URLs are defined (and thus outbound http messages are sent).
Payload of outbound http calls
The same webhooks/URLs are used for both Windows service start and stop events.
The details of the Windows service events are sent in the payload of the http message - exactly how depends on the http method used.
POST
The payload is sent as JSON in the body of the http message.
Here Node-RED is used to receive the http message and display it in a debug window:
PUT
The message payload is sent in the body, exactly as for POST messages.
The fields are the same as for POST and PUT messages, except that the field names are in lower case.
Settings in config file
---Butler:......# Settings for notifications and messages sent using outgoing webhookswebhookNotification:enable:falseserviceMonitor:rateLimit:15# Min seconds between outgoing webhook calls, per Windows service that is monitored. Defaults to 5 minutes.webhooks:- description:'This outgoing webhook is used to...'webhookURL:http://host.my.domain:port/some/path # outgoing webhook that Butler will callhttpMethod:POST # GET/POST/PUT. Note that the body and URL query parameters differs depending on which method is used- description:'This outgoing webhook is used to...'webhookURL:http://host.my.domain:port/some/path # outgoing webhook that Butler will callhttpMethod:PUT # GET/POST/PUT. Note that the body and URL query parameters differs depending on which method is used- description:'This outgoing webhook is used to...'webhookURL:http://host.my.domain:port/some/path # outgoing webhook that Butler will callhttpMethod:GET # GET/POST/PUT. Note that the body and URL query parameters differs depending on which method is used......
2.3.9 - Qlik Sense server version
Butler can monitor the server version of the client-managed Qlik Sense environment that Butler is configured to connect to.
Check server version at regular intervals.
Save version to InfluxDB.
Makes it easy to keep track of versions running on different Qlik Sense environments, for example PROD, TEST and DEV.
What’s this?
As with most software, client-managed Qlik Sense is updated regularly.
Butler can monitor the server version of the Qlik Sense environment that Butler is connected to and store this information in InfluxDB.
Having this information in InfluxDB makes it easy to visualize it in a Grafana dashboard, or similar tool.
If you are running multiple Qlik Sense environments, for example PROD, TEST and DEV, you probably have one Butler instance running for each environment.
By storing the server version in InfluxDB, you can easily keep track of which Sense version is running on which environment.
How it works
Butler will periodically poll the Qlik Sense server for information about the server version.
The retrieved information is logged to the log file and can also optionally be stored in InfluxDB.
It is possible to add additional tags to the data sent to InfluxDB, for example to differentiate between PROD, TEST and DEV environments, to make later visualizations easier and richer.
How often to check the server version
The frequency of the server version check is configurable in the Butler.qlikSenseVersion.versionMonitor.frequency setting.
It uses the later.js syntax, for example every 24 hours or every 14 days.
Which InfluxDB database is used?
The data sent to InfluxDB is stored in the database specified in the Butler.influxDb setting.
Settings in config file
---Butler:......# Settings for monitoring Qlik Sense version info# Version info is retrieved from the hostname:9032/v1/systeminfo endpoint in Qlik SenseqlikSenseVersion:versionMonitor:enable:false# Should Qlik Sense version info be retrieved?frequency:every 24 hours # https://bunkat.github.io/later/parsers.html#texthost:<FQDN or IP of Qlik Sense central node>rejectUnauthorized:false# Set to false to ignore warnings/errors caused by Qlik Sense's self-signed certificates.destination:influxDb:# Store version data in InfluxDB.# If enabled, version info will be stored as measurements in InfluxDB.enable:falsetag:static:# Static attributes/tags to attach to the data sent to InfluxDB- name:foovalue:bar......
2.3.10 - Qlik Sense server license
Butler can monitor the Qlik Sense server license that is used to run client-managed Qlik Sense (=Qlik Sense Enterprise on Windows).
Check license expiration date and alert a configurable number of days before expiration.
Send license status and expiration alerts to InfluxDB, webhooks and MQTT.
What’s this?
If the Qlik Sense server license expires, the Qlik Sense environment will go into a disabled state and users will not be able to access Sense.
Butler can monitor the Qlik Sense server license and alert if the license is about to expire.
How it works
Butler will periodically poll the Qlik Sense server for information about the Qlik Sense server license.
The retrieved information can be stored in/sent to zero or more of InfluxDB, webhooks and MQTT.
If the license is about to expire, Butler will send an alert to the configured alert destinations.
The alert will be sent a configurable number of days before the license expires, giving you time to renew the license.
The alert can also be stored in InfluxDB and/or sent to webhooks and MQTT.
How often to check the license
The frequency of the license check is configurable in the Butler.qlikSenseLicense.serverLicenseMonitor.frequency setting.
It uses the later.js syntax, for example every 24 hours or every 14 days.
What’s sendRecurring?
For each destination, you can configure if Butler should send the license status to the destination every time the license is checked.
This is useful if you want to keep track of the license status over time, for example in a Grafana dashboard.
What’s sendAlert?
For each destination, you can configure if Butler should send an alert if the license is about to expire, i.e. if the number of days left on the license is below the threshold specified in the Butler.qlikSenseLicense.serverLicenseMonitor.alert.thresholdDays setting.
This is useful if you want to be alerted (repeatedly) if the license is about to expire and possibly also store the alerts in InfluxDB.
Which InfluxDB database is used?
The data sent to InfluxDB is stored in the database specified in the Butler.influxDb setting.
Settings in config file
---Butler:......# Settings for monitoring Qlik Sense licensesqlikSenseLicense:serverLicenseMonitor:enable:falsefrequency:every 24 hours # https://bunkat.github.io/later/parsers.html#textalert:# Alert if the number of days left on the license is below the threshold# License expiry alerts on a global level are enabled here, then configured on# a per-destination basis elsewhere in this config file.thresholdDays:60destination:influxDb:# Store license data in InfluxDBenable:falsetag:static:# Static attributes/tags to attach to the data sent to InfluxDB- name:foovalue:barmqtt:enable:falsesendRecurring:# Send license data to the MQTT broker at the frequency specified aboveenable:truesendAlert:# Send an MQTT alert if the number of days left on the license is below the thresholdenable:truewebhook:enable:falsesendRecurring:# Send license data to webhook(s) at the frequency specified aboveenable:truesendAlert:# Send alert to webhook(s) if the number of days left on the license is below# the threshold or the license has already expiredenable:true......
2.3.11 - Qlik Sense access licenses
Butler can monitor Qlik Sense user access licenses.
High level metrics per user license type (professional, analyzer etc) are gathered and stored in your database of choice (at the time of writing, InfluxDB is supported).
User licenses can be released automatically after a certain period of inactivity, allowing them to be used by other users.
What’s this?
It’s important to keep track of how Qlik Sense end user licenses are used.
If your Sense environment runs out of licenses, users without a license - but entitled to one - will not be able to access Sense.
By monitoring license usage you can make sure that you have enough licenses available, and get an early warning if you’re about to run out.
New licenses can then be ordered and installed before the current ones run out.
Additionally, some Sense users might only use Sense sporadically.
For example, a user might only use Sense during certain times of the year.
In such cases it’s a waste of resources to keep the license assigned to the user when it’s not being used.
Butler can be configured to periodically release Professional and Analyzer user licenses that have been inactive for a certain period of time.
How it works
Butler periodically polls the Qlik Sense Repository Service (QRS) for information about user licenses and store this information in the database specified in the Butler config file.
Similarly, Butler will periodically release Professional and/or Analyzer user licenses that have been inactive for a certain (configurable) period of time.
Monitoring Qlik Sense license usage
The config file settings below will (if enabled):
Every 6 hours, poll Qlik Sense for information about user licenses.
Store this information in InfluxDB and add a tag foo with the value bar to the data sent to InfluxDB.
Adapt as needed to your environment.
Releasing inactive user licenses
The config file settings below will (if enabled):
Every 24 hours, release Professional and Analyzer access licenses that have been inactive for 30 days or more.
Never release access licenses for…
users INTERNAL\sa_repository, INTERNAL\sa_api and USERDIR\qs_admin_account.
users tagged with License do not release or some other tag.
users with custom property LicenseManage set to do-not-release.
users in user directories INTERNAL and ADMIN.
Disregard users’ inactive, blocked and removed externally status when deciding whether to release their access licenses.
Store information about released licenses in InfluxDB and add a tag foo with the value bar to the data sent to InfluxDB.
Which InfluxDB database is used?
The data sent to InfluxDB is stored in the database specified in the Butler.influxDb setting.
Settings in config file
---Butler:......# Settings for monitoring Qlik Sense licensesqlikSenseLicense:......licenseMonitor:# Monitor Qlik Sense accesds license usageenable:falsefrequency:every 6 hours # https://bunkat.github.io/later/parsers.html#textdestination:influxDb:# Store license data in InfluxDBenable:falsetag:static:# Static attributes/tags to attach to the data sent to InfluxDB- name:foovalue:barlicenseRelease:# Release unused Qlik Sense access licensesenable:false# true/false. If true, Butler will release unused licenses according to settings belowdryRun:true# true/false. If true, Butler will not actually release any licenses, just log what it would have done.frequency:every 24 hours # https://bunkat.github.io/later/parsers.html#textneverRelease:# Various ways of defining which users should never have their licenses releaseduser:# Users who should never have their licenses released- userDir:'INTERNAL'userId:'sa_repository'- userDir:'INTERNAL'userId:'sa_api'- userDir:'USERDIR'userId:'qs_admin_account'tag:# Users with these tags will never have their licenses released- License do not release- some other tagcustomProperty:# Users with these custom properties will never have their licenses released- name:LicenseManagevalue:do-not-releaseuserDirectory:# List of user directories whose users should never have their licenses released- INTERNAL- ADMINinactive:Ignore # Ignore/Yes/No. The value is case insensitive# No = Don't release licenses for users marked as "Inactive=No" in the QMC# Yes = Don't release licenses for users marked as "Inactive=Yes" in the QMC# Ignore = Disregard this settingblocked:Ignore # Ignore/Yes/No, No = Don't release licenses for users marked as "Blocked=No" in the QMCremovedExternally:ignore # Ignore/Yes/No, No = Don't release licenses for users marked as "Removed externally=No" in the QMClicenseType:# License types to monitor and releaseanalyzer:enable:true# Monitor and release Analyzer licensesreleaseThresholdDays:30# Number of days a license can be unused before it is releasedprofessional:enable:true# Monitor and release Professional licensesreleaseThresholdDays:30# Number of days a license can be unused before it is releaseddestination:influxDb:# Store info about released licenses in InfluxDBenable:falsetag:static:# Static attributes/tags to attach to the data sent to InfluxDB- name:foovalue:bar......
2.3.12 - Configuring the Butler scheduler
Butler’s scheduler complements the Qlik Sense built-in scheduler with more flexible triggers and a DevOps friendly API/file format for storing scheduling data.
What’s this?
Some scheduling scenarios are difficult to achieve with the standard Qlik Sense scheduler. Butler attempts to solve this by offering a cron-based scheduler that can start Sense tasks according to schedule.
How it works
Butler’s scheduler can be used both via the REST API and by directly editing the scheduler config file.
Both options have their merits and use cases, the latter one can for example be useful if the scheduling file is kept on a Git server and copied to the Butler environment by means of some continuous delivery (CD) tool. The API can be useful when other systems need to change when Sense reloads take place, or to change the schedules from within Sense load scripts.
All schedules are stored in a YAML file. The location and name of the file is controlled by the config file property Butler.scheduler.configFile.
The Butler GitHub repository has a sample schedule file in the config directory, next to the main YAML config file:
It’s important to understand when schedules are stored to and loaded from disk:
The schedule file is read from disk when Butler starts.
When schedules are added, changed or deleted using the APIs, the set of schedules currently in Butler’s memory will be written to the schedule YAML file on disk.
Schedule file format
The schedule file contains an array of zero or more schedule entries.
The cron pattern in the cronSchedule property can be either 6 positions (left-most character is seconds) or 5 positions (left-most character is minutes).
qlikSenseTaskId is the id of the task to be started. The Task view in the QMC is useful for getting these IDs.
The name property is for reference only. There may in theory be multiple schedule entries with the same (probably not a good idea though).
The id property must be unique. If a schedule is created using the API, the schedule id will be a GUID - but any unique string can be used.
startupState determines whether the schedule will be started or remain stopped when Butler starts.
lastKnownState is the the schedule’s last known state (running/stopped) known to Butler at the time when the schedule file was written to disk.
tags are purely are way to categorize schedules. Not used by Butler in any way, nor are they related to Qlik Sense tags in any way.
A 6 position schedule that starts a task every 30 seconds can look like this:
A full description of the scheduler and its file format is available in the Reference docs section.
Settings in config file
---Butler:......# Scheduler for Qlik Sense tasksscheduler:enable:false# Should Butler's reload task scheduler be started?configfile:config/schedule.yaml # Path to file containing task start schedules......
2.3.13 - Configuring the key-value store
Butler contains a key-value store that is accessible via the REST API.
What’s this?
The key-value has several use cases:
Pass parameters between apps in a reload chain
Share state or other data between app reloads
Share state between extensions, mashups or other web apps.
Store data with a time-to-live property. Can be used to create timeouts in app reload chains.,
How it works
The data in the key-value store is not persisted to disk, which means that key-value data will be lost if Butler is restarted.
This behavior could possibly be changed if there is a need, please open a GitHub ticket if key-value persistence is of interest.
Key-value data is manipulated using Butler’s REST API.
The Reference docs section has more information about the key-value store.
Settings in config file
---Butler:......# Key-value storekeyValueStore:enable:false# Should Butler's key-value store be enabled?maxKeysPerNamespace:1000# Max keys that can be stored per namespace. Defaults to 1000 if not specified in this file.......
2.3.14 - Configuring file system access via REST API
Butler contains REST API endpoints for moving, copying and deleting files.
What’s this?
For (good) security reasons Qlik Sense does not allow direct access to the file system.
In QlikView this was possible, but also resulted in risks and potential attack vectors for poorly written or even malicious QlikView apps.
Still, from time to time you need to delete old QVDs, move config files from an inbox directory to a staging ditto etc. Butler solves this by allowing file copy/move/delete operations between pre-defined directories.
By using the these APIs you can do file system operations from within Sense load scripts.
How it works
There are three supported file system operations: copy, move and delete:
For copy and move operations you specify which source and destination directories are allowed.
For delete operations you specify which directories file delete operations are allowed in.
Wildcards are supported.
Butler will try to clean up paths when loading them from the config file. See below for example.
As the config file is only read when Butler starts, you must restart Butler in order for any config changes to take effect.
Settings in config file
---Butler:......# List of directories between which file copying via the REST API can be done.# Butler will try to clean up messy paths like this one, which resolves to /Users/goran/butler-test-dir1# How? First you have /Users/goran/butler-test-dir1//abc which cleans up to /Users/goran/butler-test-dir1/abc,# then up one level (..).fileCopyApprovedDirectories:- fromDirectory:/Users/goran/butler-test-dir1//abc//..toDirectory:/Users/goran/butler-test-dir2- fromDirectory:/Users/goran/butler-test-dir2toDirectory:/Users/goran/butler-test-dir1- fromDirectory:/from/some/directory2toDirectory:/to/some/directory2# List of directories between which file moves via the REST API can be done.fileMoveApprovedDirectories:- fromDirectory:/Users/goran/butler-test-dir1//abc//..toDirectory:/Users/goran/butler-test-dir2- fromDirectory:/Users/goran/butler-test-dir2toDirectory:/Users/goran/butler-test-dir1- fromDirectory:/from/some/directory2toDirectory:/to/some/directory2# List of directories in which file deletes via the REST API can be done.fileDeleteApprovedDirectories:- /Users/goran/butler-test-dir1- /Users/goran/butler-test-dir1//abc//..- /Users/goran/butler-test-dir2......
2.3.15 - Incident management tools
There are various enterprise grade tools for handling IT incidents.
Butler can integrate with such tools, for example forwarding information about failed reloads.
Below you find instructions for configuring the currently supported incident management tools.
2.3.15.1 - New Relic
New Relic is an enterprise grade observability solution in a SaaS package.
They offer a uniform approach to dealing with metrics, logs and events - including a basic but working alert management feature. If more advanced alert management is needed New Relic offers out-of-the-box integrations with tools like PagerDuty, ServiceNow, Jira, VictorOps and many other services.
The service is easy to get started with and has a generous free tier that works very well for testing Butler alerts. New Relic is a great choice as it handles both reload failure alerts for the Butler tool as well as both server and Sense specific operational metrics (CPU load, available memory, number of currently connected users etc) from Butler SOS.
New Relic exposes APIs through which data such as log entries as well as generic events and metrics can be sent to New Relic.
These logs, metrics and events are stored in New Relic’s databases for a configurable retention period.
Rules and queries against this data are used to create monitoring dashboards and notifications when reload tasks fail or are aborted.
The retention period of New Relic’s free tier is usually more than enough for Butler’s use cases, but their paid product versions offers even longer retention periods if/when needed.
To use Butler with New Relic you must
Create a New Relic account. The free/trial account is quite generous and will easily get you started.
Create an API key with insert permissions. See New Relic docs how to do this.
Configure the Butler config file.
More info about the New Relic event API that is used to send alerts can be found in New Relic’s API docs.
Rate limiting
If a reload task is set to run very frequently but fails every time, this will result in a lot of log entries and events sent to New Relic.
If New Relic alerts are configured to be sent for each reload failure event, there will be lots of alerts.
To handle this scenario Butler offers rate limiting for events sent to New Relic.
The Butler.incidentTool.newRelic.reloadTaskFailure.sharedSettings.rateLimit setting controls how often (seconds) reload-failed events will be sent to New Relic, at most.
A similar setting exists for aborted reloads.
Data sent to New Relic
Failed and aborted reloads
Butler can be configured to send neither, either or both of two different data sets to New Relic:
Failed reloads can be sent to New Relic as events.
A New Relic event has a basic set of event attributes associated with it. Examples are task name, task ID, app name and app ID. These attributes are always sent to New Relic.
Failed reloads can also be sent to New Relic as log entries.
Log entries are more versatile than events and can contain any text in the log message. Butler uses the log message to pass along the last x rows (x=configurable number) from the script log to New Relic. Having the script log from the failed reload available in New Relic makes it possible to see where the reload script failed and possible even what caused the failure.
Aborted reloads can be configured in exactly the same way as failed reloads, described above.
New Relic events
The following data is sent as New Relic events when a reload task fails or is aborted:
All http headers defined in the Butler config file.
All shared, static attributes defined in the Butler config file.
All event specific, static attributes defined in the Butler config file.
All tags for the Sense app that was reloaded (can be turned on/off in Butler config file).
All tags for the Sense reload task that was reloaded (can be turned on/off in Butler config file).
Butler version the event originated from. This is useful to have in New Relic as it makes it possible to easily show in a dashboard what Butler version is used and whether an update is possible/needed.
Event related data
Event type. Either qs_reloadTaskFailedEvent or qs_reloadTaskAbortedEvent.
Timestamp when the event took place.
Host where the reload task was executing.
User directory and ID for user which was doing the reload. This will be the Sense service account in most cases.
Reload task name.
Reload task ID.
App name.
App ID.
Timestamp for this event in Sense log files.
Log level for this event in Sense log files.
Sense execution ID for this event.
Description of the event, as found in the Sense log files.
New Relic log entries
If Butler is configured to forward failed/aborted reload tasks to New Relic as log entries, the follow info is sent to New Relic:
All information sent for events (see above), but with log specific static attributes rather than event specific ditto.
The various states the reload task went through before failing, including timestamps when each state started.
The last x lines from the reload script log. x is configurable in the Butler.incidentTool.newRelic.reloadTaskFailure.destination.log.tailScriptLogLines setting.
The host name of the Sense node where the reload took place
Timestamp (in several different formats) when the reload started
Timestamp (in several different formats) when the reload failed
Duration of the reload task
Result code of the reload task
Result text of the reload task
Total size of complete script log (number of characters).
Number of lines included in the reload script log sent to New Relic
Monitoring Windows services
Butler can be configured to send Windows service start/stop events to New Relic as New Relic events and/or log entries.
The most common scenario is to send metrics and events to a single New Relic account.
There are however scenarios when sending data to multiple accounts can be of interest.
Workaround for lack of dashboard level access control
There is currently no access control on dashboard level in New Relic. This means that a user with read-only access to a New Relic account can access all dashboards in that account.
Let’s assume
There are 3 separate Sense environments (DEV, TEST, PROD) that should be monitored for failed reload alerts.
Different teams are responsible for the different Sense environments.
Each team should only have access to New Relic dashboards containing data from their Sense environment.
A central operations team should have dashboards containing data from all three environments.
A solution is then to create separate New Relic accounts for each team, plus one account for the central operations team.
Deploy separate Butler instances for DEV, TEST and PROD, and configure each to send data to both the central New Relic account and the separate DEV, TEST or PROD accounts.
Control which New Relic accounts to send data to
The Butler.thirdPartyToolsCredentials.newRelic section in the Butler config file defines which New Relic accounts metrics and events can be sent to:
Butler:......thirdPartyToolsCredentials:newRelic:# Array of New Relic accounts/insert keys. Any data sent to New Relic will be sent to both accounts.- accountName:First NR accountinsertApiKey:<API key 1 (with insert permissions) from New Relic>accountId:<New Relic account ID 1>- accountName:Second NR accountinsertApiKey:<API key 2 (with insert permissions) from New Relic>accountId:<New Relic account ID 2>......
The accountName is used to differentiate between the different accounts. It is only used within Butler itself, i.e. it is not used when communicating with New Relic.
accountName is then referenced elsewhere in the config file, controlling which New Relic account metrics, events and logs is sent to.
For example, the destination(s) for Butler uptime metrics is controlled via this section of the config file:
Butler:......uptimeMonitor:storeNewRelic:enable:truedestinationAccount:- First NR account
In the example above uptime metrics will only be sent to the New Relic account called “First NR account”.
The account information can also be specified via command line options.
This is useful as it means the New Relic API keys do not have to be stored in the Butler config file. Instead the API keys can be stored in environment variables that are referenced from the command line options.
The configuration used in the YAML config file above can be specified via command line options:
PS C:\tools\butler>.\butler.exe-cproduction.yaml--new-relic-account-name"First NR account""Second NR account"--new-relic-api-key"API key 1""API key 2"--new-relic-account-id"account ID 1""account ID 2"
Settings in config file
---Butler:......# Incident management tools integration# Used to trigger incidents in these tools when task reloads fail or are aborted.incidentTool:newRelic:enable:falsedestinationAccount:event:# Failed/aborted reload tasks are sent as events to these New Relic accounts- First NR account- Second NR accountlog:# Failed/aborted reload tasks are sent as log entries to these New Relic accounts- First NR account- Second NR account# New Relic uses different API URLs for different kinds of data (metrics, events, logs, ...)# There are different URLs depending on whther you have an EU or US region New Relic account.# The available URLs are listed here: https://docs.newrelic.com/docs/accounts/accounts-billing/account-setup/choose-your-data-center/url:# As of this writing the valid options are# https://insights-collector.eu01.nr-data.net# https://insights-collector.newrelic.comevent:https://insights-collector.eu01.nr-data.net# Valid options are (1) EU/rest of world and 2) US)# https://log-api.eu.newrelic.com/log/v1# https://log-api.newrelic.com/log/v1log:https://log-api.eu.newrelic.com/log/v1reloadTaskFailure:destination:event:enable:falsesendToAccount:# Which reload task failures are sent to New Relic as eventsbyCustomProperty:enable:false# Control using a task custom property which reload task failures are sent as eventscustomPropertyName:'Butler_FailedTask_Event_NewRelicAccount'always:enable:false# Controls which New Relic accounts ALL failed reload tasks are sent to (as events)account:- First NR account- Second NR accountattribute:static:# Static attributes/dimensions to attach to events sent to New Relic.- name:event-specific-attribute 1 # Examplevalue:abc 123 # Exampledynamic:useAppTags:true# Should app tags be sent to New Relic as attributes?useTaskTags:true# Should task tags be sent to New Relic as attributes?log:enable:falsetailScriptLogLines:20sendToAccount:# Which reload task failures are sent to New Relic as log entriesbyCustomProperty:enable:false# Control using a task custom property which reload task failures are sent as log entriescustomPropertyName:'Butler_FailedTask_Log_NewRelicAccount'always:enable:false# Controls which New Relic accounts ALL failed reload tasks are sent to (as logs)account:- First NR account- Second NR accountattribute:static:# Static attributes/dimensions to attach to events sent to New Relic.- name:log-specific-attribute 1 # Examplevalue:def 123 # Exampledynamic:useAppTags:true# Should app tags be sent to New Relic as attributes?useTaskTags:true# Should task tags be sent to New Relic as attributes?sharedSettings:rateLimit:15# Min seconds between events sent to New Relic for a given taskID. Defaults to 5 minutes.header:# Custom http headers- name:X-My-Header # Examplevalue:Header value 1# Exampleattribute:static:# Static attributes/dimensions to attach to events sent to New Relic.- name:service # Examplevalue:butler # Example- name:environment # Examplevalue:prod # ExamplereloadTaskAborted:destination:event:enable:falsesendToAccount:# Which reload task aborts are sent to New Relic as eventsbyCustomProperty:enable:false# Control using a task custom property which reload task aborts are sent as eventscustomPropertyName:'Butler_AbortedTask_Event_NewRelicAccount'always:enable:false# Controls which New Relic accounts ALL aborted reload tasks are sent to (as events)account:- First NR account- Second NR accountattribute:static:# Static attributes/dimensions to attach to events sent to New Relic.- name:event-specific-attribute 2 # Examplevalue:abc 123 # Exampledynamic:useAppTags:true# Should app tags be sent to New Relic as attributes?useTaskTags:true# Should task tags be sent to New Relic as attributes?log:enable:falsetailScriptLogLines:20sendToAccount:# Which reload task aborts are sent to New Relic as log entriesbyCustomProperty:enable:true# Control using a task custom property which reload task aborts are sent as log entriescustomPropertyName:'Butler_AbortedTask_Log_NewRelicAccount'always:enable:false# Controls which New Relic accounts ALL aborted reload tasks are sent to (as logs)account:- First NR account- Second NR accountattribute:static:# Static attributes/dimensions to attach to events sent to New Relic.- name:log-specific-attribute 2 # Examplevalue:def 123 # Exampledynamic:useAppTags:true# Should app tags be sent to New Relic as attributes?useTaskTags:true# Should task tags be sent to New Relic as attributes?sharedSettings:rateLimit:15# Min seconds between events sent to New Relic for a given taskID. Defaults to 5 minutes.header:# Custom http headers- name:X-My-Header # Examplevalue:Header value 2# Exampleattribute:static:# Static attributes/dimensions to attach to events sent to New Relic.- name:service # Examplevalue:butler # Example- name:environment # Examplevalue:prod # ExampleserviceMonitor:destination:event:enable:falsesendToAccount:# Windows service events are sent to these New Relic accounts- First NR account- Second NR accountattribute:static:# Static attributes/dimensions to attach to events sent to New Relic.- name:event-specific-attributevalue:abc 123dynamic:serviceHost:true# Should host where service is running be sent to New Relic as attribute?serviceName:true# Should service name be sent to New Relic as attribute?serviceDisplayName:true# Should service display name be sent to New Relic as attribute?serviceState:true# Should service state be sent to New Relic as attribute?log:enable:falsesendToAccount:# Windows service log entries are sent to these New Relic accounts- First NR account- Second NR accountattribute:static:# Static attributes/dimensions to attach to events sent to New Relic.- name:log-specific-attributevalue:def 456dynamic:serviceHost:true# Should host where service is running be sent to New Relic as attribute?serviceName:true# Should service name be sent to New Relic as attribute?serviceDisplayName:true# Should service display name be sent to New Relic as attribute?serviceState:true# Should service state be sent to New Relic as attribute?monitorServiceState:# Control whih service states are sent to New Relicrunning:enable:truestopped:enable:truesharedSettings:rateLimit:5# Min seconds between events/logs sent to New Relic for a given host+service. Defaults to 5 minutes.header:# Custom http headers- name:X-My-Header # Examplevalue:Header value 2 # Exampleattribute:static:# Static attributes/dimensions to attach to events sent to New Relic.- name:service # Examplevalue:butler # Example- name:environment # Examplevalue:prod # Example......
2.3.15.2 - Signl4
Signl4 describes themselves as
“Mobile Alerting and Incident Response. Automated Alerting. Anywhere Response”
It’s an easy to get started with, SaaS based solution for incident management. It has good APIs and integrations as well as a generous free trial tier, which makes it great for Qlik Sense admins who wants to try a proper incident management tool.
Reload failure/abort events can be forwarded to Signl4, where they become incidents that are tracked, (maybe) escalated and eventually (hopefully!) closed.
---Butler:......# Incident management tools integration# Used to trigger incidents in these tools when task reloads fail or are abortedincidentTool:signl4:enable:false# Enable/disable Signl4 integration as a wholeurl:https://connect.signl4.com/webhook/abcde12345reloadTaskFailure:enable:false# Enable/disable reload failed handling in Signl4rateLimit:15# Min seconds between emails for a given taskID. Defaults to 5 minutesserviceName:Qlik Sense # Signl4 "service name" to useseverity:1# Signl4 severity level for failed reloadsreloadTaskAborted:enable:false# Enable/disable reload aborted handling in Signl4rateLimit:15# Min seconds between emails for a given taskID. Defaults to 5 minutesserviceName:Qlik Sense # Signl4 "service name" to useseverity:10# Signl4 severity level for aborted reloads......
2.3.16 - Setting up MQTT messaging
Butler can use MQTT as a channel for pub-sub style M2M (machine to machine) messages. This page describes how to configure MQTT in Butler.
What’s this?
MQTT is a light weight messaging protocol based on a publish-subscribe metaphore. It is widely used in the Internet of Things (IoT) and telecom sectors.
MQTT has features such as guaranteed delivery of messages, which makes it very useful for communicating between Sense and both up- and downstream source/destination systems.
Butler can be configured to forward events from Sense (reload task failures, aborted reload tasks, windows services starting/stopping, user session start/stop etc) as MQTT messages.
Butler’s REST API also has an endpoint that makes it possible to send MQTT messages from Sense apps’ load scripts.
Defining what MQTT broker/server to connect to
Butler can use either of two kinds of MQTT brokers:
The former is useful if you want to use Butler in an on-prem environment where there is no need to communicate outside of the local network.
The latter is useful if you want to use Butler’s MQTT related features outside of the local network, for example in a cloud environment.
A concrete example could be that a system that Sense read data from is located in the cloud, and that system should trigger reload tasks in Sense when new data is available.
The Azure Event Grid option is also useful if you want to use Butler’s MQTT features in a hybrid environment, where some of the systems are on-prem and some are in the cloud.
The Butler config file controls which kind of MQTT broker Butler will connect to.
If Butler.mqttConfig.enable is set to true and Butler.mqttConfig.azureEventGrid.enable is set to false, Butler will connect the standard MQTT broker defined in Butler.mqttConfig.brokerHost and Butler.mqttConfig.brokerPort. No authentication is supported in this case.
If Butler.mqttConfig.enable is set to true and Butler.mqttConfig.azureEventGrid.enable is set to true, Butler will connect to an Azure Event Grid MQTT broker, using the settings defined in Butler.mqttConfig.azureEventGrid to authenticate with Azure.
Setting up MQTT in Azure Event Grid
Setting up Event Grid with MQTT support is described here.
It’s worth noting that there may be costs associated with using Event Grid, depending on the number of messages sent and received.
At the time of this writing, Azure Event Grid has a generous free tier that should be sufficient for most use cases.
Check the Azure pricing page for the latest information.
Using MQTT to get evens from Qlik Sense Cloud
Butler can use MQTT as a transport layer for events from Qlik Sense Cloud, for example app reload failure events.
A separate MQTT configuration section in the config file is used for this, see below.
Settings in config file
The config file contains several settings related to MQTT:
Defining what MQTT broker/server to connect to for handling client-managed Qlik Sense events and messages.
What MQTT topics should be used when forwarding various client-managed Qlik Sense events to MQTT.
Settings related to Butler’s use of MQTT for connecting with Qlik Sense Cloud.
---Butler:......mqttConfig:enable:false# Should Qlik Sense events be forwarded as MQTT messages?brokerHost:<FQDN or IP of MQTT server>brokerPort:1883azureEventGrid:enable:false# If set to true, Butler will connect to an Azure Event Grid MQTT Broker, using brokerHost and brokerPort aboveclientId:<client ID>clientCertFile:<path to client certificate file>clientKeyFile:<path to client key file>taskFailureSendFull:truetaskAbortedSendFull:truesubscriptionRootTopic:qliksense/# # Topic that Butler will subscribe totaskStartTopic:qliksense/start_task # Topic for incoming messages used to start Sense tasks. Should be subtopic to subscriptionRootTopictaskFailureTopic:qliksense/task_failuretaskFailureFullTopic:qliksense/task_failure_fulltaskFailureServerStatusTopic:qliksense/butler/task_failure_servertaskAbortedTopic:qliksense/task_abortedtaskAbortedFullTopic:qliksense/task_aborted_fullserviceRunningTopic:qliksense/service_runningserviceStoppedTopic:qliksense/service_stoppedserviceStatusTopic:qliksense/service_statusqlikSenseServerLicenseTopic:qliksense/qliksense_server_license # Topic to which Sense server license info is publishedqlikSenseServerLicenseExpireTopic:qliksense/qliksense_server_license_expire# Topic to which Sense server license expiration alerts are publishedqlikSenseCloud:# MQTT settings for Qlik Sense Cloud integrationevent:mqttForward:# QS Cloud events forwarded to MQTT topics, which Butler will subscribe toenable:falsebroker:# Settings for MQTT broker to which QS Cloud events are forwardedhost:mqttbroker.company.comport:<port>username:<username>password:<password>topic:subscriptionRoot:qscloud/# # Topic that Butler will subscribe toappReload:qscloud/app/reload......
2.3.17 - Configuring Butler heartbeats
Heartbeats provide a way to monitor that Butler is running and working as intended.
Butler can send periodic heartbeat messages to a monitoring tool, which can then alert if Butler hasn’t checked in as expected.
What’s this?
A tool like Butler should be viewed as mission critical, at least if it’s features are used by mission critical Sense apps.
But how can you know whether Butler itself is working?
Somehow Butler itself should be monitored.
Butler (and most other tools in the Butler family) has a heartbeat feature.
It sends periodic messages to a monitoring tool, which can then alert if Butler hasn’t checked in as expected.
Healthchecks.io is an example of such as tool. It’s open source but also a SaaS option if so preferred.
Uptime Kuma is another open source option that in addition to monitoring Butler itself can also monitor infrastructure components such as Sense servers, databases, source systems etc.
More info on using Healthchecks.io with Butler can be found in this blog post.
Settings in config file
---Butler:......# Heartbeats can be used to send "I'm alive" messages to any other tool, e.g. an infrastructure monitoring toolheartbeat:enable:falseremoteURL:http://my.monitoring.server/some/path/frequency:every 30 seconds # https://bunkat.github.io/later/parsers.html......
2.3.18 - Configuring Butler metrics & monitoring
Butler can optionally log to the console and its logfiles how long it’s been running and how much memory it uses.
Optionally the memory usage can also be stored to an external database for later viewing/alerting in for example a Grafana dashboard. InfluxDB and New Relic are currently supported targets.
What’s this?
In some cases - especially when investigating issues or bugs - it can be useful to get log messages telling how long Butler has been running and how much memory it uses.
This feature is called “uptime monitoring” and can be enabled in the main config file.
The logging interval is configurable, as is the log level required for uptime messages to be shown.
InfluxDB
The memory usage data can optionally be written to InfluxDB, from where it can later be viewed in Grafana.
If the specified InfluxDB database does not exist it will be created. The same is true for the retention policy.
Select a reasonable retention policy and logging frequency!
You will rarely if ever need to know how much memory Butler used a month ago… A retention policy of 1-2 weeks is usually a good start, with logging every few minutes.
New Relic
Another option for storing the memory usage data is New Relic.
This is a SaaS solution that does not require a local InfluxDB database and can thus be easier to get started with compared to InfluxDB.
That said, InfluxDB does offer more flexibility with respect to what kinds of data can be stored.
The uptime related data sent to New Relic is:
Timestamp
Dimensions
All static attributes/dimensions defined in the Butler config file
Version of the Butler app, if enabled in Butler’s config file.
Metrics
qs_butlerHeapUsed
qs_butlerHeapTotal
qs_butlerExternalMem
qs_butlerProcessMem
qs_butlerUptimeMillisec
Settings in config file
---Butler:......# Uptime monitoruptimeMonitor:enable:false# Should uptime messages be written to the console and log files?frequency:every 15 minutes # https://bunkat.github.io/later/parsers.htmllogLevel:verbose # Starting at what log level should uptime messages be shown?storeInInfluxdb:enable:false# Should Butler memory usage be logged to InfluxDB?storeNewRelic:enable:falsedestinationAccount:- First NR account- Second NR account# There are different URLs depending on whther you have an EU or US region New Relic account.# The available URLs are listed here: https://docs.newrelic.com/docs/accounts/accounts-billing/account-setup/choose-your-data-center/# As of this writing the options for the New Relic metrics API are# https://insights-collector.eu01.nr-data.net/metric/v1# https://metric-api.newrelic.com/metric/v1url:https://insights-collector.eu01.nr-data.net/metric/v1 # Where should uptime data be sent?header:# Custom http headers- name:X-My-Headervalue:Header valuemetric:dynamic:butlerMemoryUsage:enable:true# Should Butler's memory/RAM usage be sent to New Relic?butlerUptime:enable:true# Should Butler's uptime (how long since it was started) be sent to New Relic?attribute:static:# Static attributes/dimensions to attach to the data sent to New Relic.- name:metricTypevalue:butler-uptime- name:servicevalue:butler- name:environmentvalue:proddynamic:butlerVersion:enable:true# Should the Butler version be included in the data sent to New Relic?......
2.3.19 - Docker healthcheck
Docker has a concept of “health checks”, which is a way for Docker containers to tell the Docker runtime engine that the container is alive and well.
Butler can be configured to send such health check messages to Docker.
Note: Enabling these health check messages is only meaningful when running Butler as a Docker container.
Settings in config file
---Butler:......# Docker health checks are used when running Butler as a Docker container. # The Docker engine will call the container's health check REST endpoint with a set interval to determine# whether the container is alive/well or not.# If you are not running Butler in Docker you can safely disable this feature. dockerHealthCheck:enable:false# Control whether a REST endpoint will be set up to serve Docker health check messagesport:12398# Port the Docker health check service runs on (if enabled)......
2.3.20 - Creating Sense data connections
If you intend to call Butler’s REST API from the load script of Sense apps, you must create a few data connections first.
A couple of them are mandatory, one is optional.
Two mandatory data connections must be created: Butler_GET and Butler_POST.
The latter is used both for POST calls and also PUT, DELETE and other HTTP operations.
The X-HTTP-Method-Override HTTP header is used with the Butler_POST data connection to tell Butler which HTTP operation should be used.
This is a way to work around a limitation of Qlik’s REST connector, as it only supports GET and POST operations.
One data connection is optional: URL encode table
It is used to URL encode strings, which is useful when passing strings to Butler’s REST API (or other APIs!).
URL encode table
Optional
Creating this data connection is optional.
That said, if you plan to use the Slack, Teams, email, or webhook connectivity features of Butler, you should create this data connection.
This is a basic “web file” connector pointing to http://www.w3schools.com/tags/ref_urlencode.asp:
Remember!
As with all new data connections, Sense will change the name your new connection (adding your username as a suffix). Use the QMC to change the name to “URL encode table”.
Butler_GET
Mandatory
These settings are mandatory if you plan to use Butler’s REST API from the load scripts of Sense apps.
With Butler running, create a new REST data connection called “Butler_GET”.
It’s URL should point to Butler’s host/port.
When creating REST data connections it’s always a good idea to verify they work.
Using the /v4/butlerping endpoint is an easy way to do this (assuming that endpoint is enabled in Butler’s config file):
Creating the data connection can look like this:
No special settings are needed - just make sure the REST connector finds Butler as it should.
The actual URL of the data connection will be modified on the fly every time you call the Butler APIs, it’s thus not really important which URL is entered during the setup phase. But the /v4/butlerping endpoint is a convenient way to check that the data connection works.
Test the connection before creating it:
Remember!
As with all new data connections, Sense will change the name your new connection (adding your username as a suffix). Use the QMC to change the name to “Butler_GET”.
Butler_POST
Mandatory
These settings are mandatory if you plan to use Butler’s REST API from the load scripts of Sense apps.
The data connection used for POST, PUT, DELETE and all other HTTP operations beyond GET should be named “Butler_POST”.
Its configuration is similar to that of Butler_GET, except that a message body is also needed for the POST to work.
Assuming Butler’s key-value store is enabled in the main config file, you can create a dummy key-value pair using a POST command with the following payload.
The effect is that the data connection is created and can be used for future POST/PUT/DELETE operations against Butler’s API.
The fact that is was created against the key-value store doesn’t matter, the data connection details will be replaced each time it is used.
{"key":"abc","value":"123","ttl":"5000"}
Creating the data connection can look like this:
… and test the connection before creating it.
Remember!
As with all new data connections, Sense will change the name your new connection (adding your username as a suffix). Use the QMC to change the name to “Butler_POST”.
2.3.21 - Control which tasks can be started via Butler's API
Qlik Sense tasks can be started using Butler’s REST API.
Using the task filtering feature it’s possible to control which tasks can be started.
This can be useful for sysadmins when only a limited set of tasks should be available to third party systems.
Settings in config file
---Butler:......# Controls which tasks can be started via Butler's REST API.# Enabling this feature gives Qlik Sense sysadmins a way to control which tasks can be started by third party systems and applications.# If this feature is disabled all tasks can be started via the API (assuming the start task API itself is enabled).# Note that the taskId, tag and customProperty sections below are additive. I.e. a task only has to appear in one of those sections to be on the "allowed" list.startTaskFilter:enable:falseallowTask:taskId:# Zero or more approved/allowed task IDs# If Butler.startTaskFilter.enable is true, only task IDs listed below will be started by Butler - e3b27f50-b1c0-4879-88fc-c7cdd9c1cf3e- 7552d9fc-d1bb-4975-9a38-18357de531ea- fb0f317d-da91-4b86-aafa-0174ae1e8c8ftag:# Zero or more tags used to indicate that a task is approved to be started by Butler.# Use the Qlik Sense QMC to set tags on tasks.# If Butler.startTaskFilter.enable is true, only tasks with the tags below will be started by Butler - startTask1- startTask2customProperty:# Zero or more custom properties name/value pairs used to indicate that a task is approved to be started by Butler.# Use the Qlik Sense QMC to set custom properties on tasks.# If Butler.startTaskFilter.enable is true, only tasks with the custom property values below will be started by Butler - name:taskGroupvalue:tasks1- name:taskGroupvalue:tasks2......
Setting anonTelemetry to true enables telemetry, setting it to false disables telemetry.
2.3.22 - Configuring telemetry
What’s this?
A description of Butler’s telemetry feature is available here.
Settings in config file
---Butler:# Logging configuration......anonTelemetry:true# Can Butler send anonymous data about what computer it is running on? # More info on whata data is collected: https://butler.ptarmiganlabs.com/docs/about/telemetry/# Please consider leaving this at true - it really helps future development of Butler!......
Setting anonTelemetry to true enables telemetry, setting it to false disables telemetry.
2.3.23 - Visualise Butler's config file
What’s this?
Butler can start a web server that serves an (optionally obfuscated) view of the Butler config file.
This can be useful in situations such as
When you need to check the configuration of Butler, but don’t have easy access to the machine where Butler is running.
When you need to share the Butler config with someone else, but don’t want to share all the details.
The web server provides two views of the config file: JSON and YAML.
It is also possible to download the config file as YAML from the web page.
If the config file is obfuscated, the downloaded file will be obfuscated as well.
Example
Here’s an example of what the YAML view could look like:
And here’s an example of the JSON view:
Settings in config file
Butler:......# Should Butler start a web server that serves an obfuscated view of the Butler config file?configVisualisation:enable:truehost:localhost # Hostname or IP address where the web server will listen. Should be localhost in most cases.port:3100# Port where the web server will listen. Change if port 3100 is already in use.obfuscate:true# Should the config file shown in the web UI be obfuscated?......
2.3.24 - Forwarding user activity events to Butler
Butler can receive and act on any user event detected in the Sense log files. This page describes how to set this up using Sense log appenders.
Warning
Deprecated feature
This feature was removed from Butler in version 7.0.
The reason is that Butler’s sibling project Butler SOS focuses on monitoring of Qlik Sense servers and is the best possible home for anything relating to real-time monitoring of Sense environments.
Butler SOS has a very complete feature set when it comes to monitoring - check it out!
How to start Butler varies depending on whether you run it as a standalone app, as a Docker container or as a Node.js app.
Monitoring Butler
Once Butler is running it’s a good idea to also monitor it. Otherwise you stand the risk of not getting notified if Butler for some reason misbehaves.
Butler logs its own memory usage to the console and log files (if enabled), but can also send these metrics to an InfluxDB database and New Relic.
Butler will log its own memory usage to InfluxDB if
The config file’s Butler.uptimeMonitor.enable and Butler.uptimeMonitor.storeInInfluxdb.enable properties are both set to true.
The remaining InfluxDB properties of the config file are correctly configured.
Similarly, uptime metrics will be sent to New Relic if
The config file’s Butler.uptimeMonitor.enable and Butler.uptimeMonitor.storeNewRelic.enable properties are both set to true.
The remaining New Relic properties of the config file are correctly configured.
Assuming everything is correctly set up, you can then create a Grafana dashboard showing Butler’s memory use over time, using data from InfluxDB.
You can also set up alerts in Grafana if so desired, with notifications going to most IM tools and email.
A Grafana dashboard can look like this. Note that one of the available metrics (external) is not used in this particular dashboard. It’s still logged to InfluxDB though.
You can use the excellent Nssm tool to make Butler run as a Windows Service, with all the benefits that follow (can be monitored using operations tools, automatic start/restart etc).
A step-by-step tutorial for running Butler as a Windows service is available over at ptarmiganlabs.com.
macOS and Linux
Running the standalone Butler tool without any parameters gives you a help text that explains which commands and options are available:
➜ butler ./butler
Usage: butler [options]Butler gives superpowers to client-managed Qlik Sense Enterprise on Windows!
Advanced reload failure alerts, task scheduler, key-value store, file system access and much more.
Options:
-V, --version output the version number
-c, --configfile <file> path to config file
-l, --loglevel <level> log level (choices: "error", "warn", "info", "verbose", "debug", "silly") --new-relic-account-name <name...> New Relic account name. Used within Butler to differentiate between different target New Relic accounts
--new-relic-api-key <key...> insert API key to use with New Relic
--new-relic-account-id <id...> New Relic account ID
--test-email-address <address> send test email to this address. Used to verify email settings in the config file.
--test-email-from-address <address> send test email from this address. Only relevant when SMTP server allows from address to be set.
--no-qs-connection don't connect to Qlik Sense server at all. Run in isolated mode
--api-rate-limit set the API rate limit, per minute. Default is 100 calls/minute. Set to 0 to disable rate limiting.
-h, --help display helpforcommand➜ butler
The available options are exactly the same as for Windows.
Services & process monitors
The exact way of auto-starting apps when a computer boots varies between different versions of macOS and Linux.
If you want to do this Google is your friend.
That said, PM2 and Forever are two process monitors that both have been successfully tested with Butler. These tools basically monitor what processes are running and restart them if they for some reason fail.
Command line options
Tip
Any option given on the command line will override the same setting in the config file
--version, -V
Shows Butler’s version number.
--configfile, -c
The --configfile option is a must-have as it’s the only way to tell the standalone Butler executable where to find its config file.
--loglevel, -l
The --loglevel option can be quite useful when you want to temporarily switch from the info level logging set in the config file, to a more detailed verbose or debug level logging while investigating some problem.
--new-relic-account-name
A list of New Relic account names to which data can be sent from Butler.
The arguments to this option consists of one or more strings enclosed in single or double quotes (depending on which operating system is used), separated by a space.
For example --new-relic-account-name "First NR account" "Second NR account".
Note that the same number of arguments must be passed to all the command line options dealing with New Relic accounts!
--new-relic-api-key
It’s always better to store sensitive information in environment variable than in config files.
For that reason it’s possible to provide the New Relic insert API keys (used when sending data to New Relic) via a command line option.
It’s then possible to pass in the New Relic API key via the command line rather than store it within the config file.
The arguments to this option consists of one or more strings enclosed in single or double quotes (depending on which operating system is used), separated by a space.
For example --new-relic-api-key "API key 1" "API key 2".
--new-relic-account-id
Similar to the --new-relic-api-key, the account ID(s) used with New Relic can be provided as a command line option.
The arguments to this option consists of one or more strings enclosed in single or double quotes (depending on which operating system is used), separated by a space.
For example --new-relic-account-id "account ID 1" "account ID 2".
--test-email-address
Used to send a test email to an email addresses. Can be used to confirm that the SMTP settings used when sending reload failed/aborted notification emails are working as intended.
Example: --test-email-address joe@company.com
--test-email-from-address
Some SMTP servers, for example GMail, require you to authenticate before any emails can be sent. The sender will then be the logged in/authenticated user.
When using a non-authenticating SMTP server (common in enterprises where access to the SMTP server is limited to the internal network) the sender email address (and optionally name) has to be specified manually.
Example: --test-email-from-address "User Anna <anna@company.com>"
--no-qs-connection
When running Butler in standalone mode it’s possible to disable the connection to the Qlik Sense server.
This is used when Butler is executed to provide a Swagger/OpenAPI specification file for the Butler API, i.e. not for any production use-cases.
--api-rate-limit
The --api-rate-limit option can be used to set the REST API rate limit, per minute. Default is 100 calls/minute. Set to 0 to disable rate limiting.
2.4.2 - Docker
Running Butler in Docker
First configure the docker-compose.yml file as needed, then start the Docker container in interactive mode (with output sent to the screen).
This is useful to ensure everything works as intended when first setting up Butler SOS.
docker-compose up
Once Butler has been verified to work as intended, hit ctrl-c to stop it.
Then start Butler in daemon (background) mode:
docker-compose up -d
From here on the Docker environment will make sure Butler is always running, including restarting it if it for some reason stops.
If the Butler source code has been installed in d:\tools\butler, starting Butler as a Node.js app on Windows could look like this:
d:
cd \tools\butler\src
node butler.js
It is of course also possible to put those commands in a command file (.bat or .ps1 on Windows) file and execute that file instead.
The commands above assume there is a d:\tools\butler\src\config directory in which there is a YAML config file.
The name of that config file should match the value set to the NODE_ENV environment variable.
For example, if NODE_ENV=dev the config file should be d:\tools\butler\src\config\dev.yaml.
The command line options introduced in Butler 7.2 are available also when running Butler as a Node.js app.
Use the --help command line option to show what options are available:
Looking at the above, it’s actually possible to use the --configfile to specify which config file to use.
Similarly the --loglevel option can be used to control Butler’s logging.
Tip
Any option given on the command line will override the same setting in the config file
Windows services
On Windows you can use the excellent Nssm tool to make Node.js (and also the Butler app) run as a Windows Service, with all the benefits that follow (can be monitored using operations tools, automatic restarts etc).
2.5 - Upgrade
Upgrading from one version of Butler to another is usually quite straightforward.
This page describes the upgrade process.
First: Don’t panic
Upgrading Butler is usually a smooth process:
Get the new version from the assets section on the download page. Extract the ZIP file.
Back up your existing Butler configuration file.
Edit the configuration file to match the new version’s requirements.
Stop the Butler process/service.
Replace the Butler binary with the new version.
Start the process/service.
Verify that Butler is running as expected.
🥳 Celebrate!
Then: The details
Version number hints
Different kind of upgrades (usually) result in different levels on modifications needed in the main config file.
“Small” Butler upgrades move from one patch version to another, without changing the feature version.
Example: Upgrading from 7.3.0 > 7.3.4.
“Medium” upgrades involves moving from one minor version to another, without changing the major version.
Example: Upgrading from 7.2.3 > 7.3.0
“Major” upgrades is when you move to a new major version.
Example: 7.4.2 > 8.0.0
The versioning scheme used in Butler is described here.
Warning
You should always upgrade to the latest available version.
That version has the latest features, bug fixes and security patches.
Minor upgrades
The new release includes bug fixes, security patches, minor updates to documentation etc - but no new features.
In theory there should never be any changes to the config files when doing a minor upgrade.
Medium upgrades
This scenario means that new features are added to Butler.
Usually there are also various bug fixes included.
Most new features need to be configured somehow, meaning that medium upgrades usually require modification to the config files.
The most common change by far is that it’s the main config file that needs to be modified, but a new scheduler related feature could for example mean that the scheduler config file must be modified too.
The changes needed to the config files are usually additive in nature, i.e. some settings must be added to the config file, but the existing settings and general structure of the file remain the same.
Major upgrades
This scenario involves breaking changes of some kind.
These almost certainly require changes to the config files, sometimes even significant ones in the sense that the structure of the config file may have changed.
If very major rework has been done to Butler, this may also motivate a major version bump.
Know your config file
Butler is entirely driven by its configuration files, with the main YAML config file being the most important one.
There are other config files too, containing for example scheduling information.
InfluxDB considerations
Some versions include changes to the InfluxDB schema, meaning that you need to do some manual work in order to upgrade to the new schema.
The easiest way to do this is to delete the InfluxDB database used by Butler, then let Butler re-create it using the new schema.
If the InfluxDB database specified in the Butler config file does not exist, Butler will automatically create it for you.
Deleting the InfluxDB database “senseops” can be done with a command similar to this:
influx --host <ip-where-influxdb-is-running> --port <influxdb-port-usually-8086>
drop database senseops
exit
Upgrade checklist
Info
Starting with Butler version 9.0 there is a check that the config file has the correct format.
This means that if you forget to add or change some setting in the main YAML config file, Butler will tell you what’s missing and refuse to start.
A consequence of this is that all settings are now mandatory, even if you don’t use them.
Make a backup of your YAML configuration file before upgrading. Just… do it.
Look at the release notes to get a general feeling for what is new and what has changed.
Those are the areas that may require changes in the config file.
Compare your existing main config file with the template config file available on GitHub.
This comparison is a manual process and can be a bit tedious, but knowing your config file is really needed in order to make full and correct use of Butler.
That file is also included in the Butler ZIP file available on the download page.
The result of the comparison will show you what parts of the config file are new (for medium-sized upgrades) and which parts have changed in a significant way (for major upgrades).
Get the binaries for the new Butler version from the download page.
Start the new Butler version and let it run for a few minutes.
Review the console logs (or the log files) to make sure there are no warnings or errors.
If there are warnings or errors it can be helpful to start Butler with more verbose logging.
Adding --log-level verbose or even --log-level debug will give you more details on what Butler is doing and what might be causing the problems you are experiencing.
Finally: When things aren’t working - check the logs
By far the most common problem when upgrading to a new Butler version (or doing a fresh install) is an incorrect config file.
All config entries are mandatory, even if you don’t use them.
This may seem a bit harsh, but this way Butler can tell you exactly what is missing in the config file.
Butler is pretty good at figuring out what is wrong with the config file, but there may be cases where it’s not obvious what is wrong.
Thus, double check your config file, then triple check it.
Then start Butler and read the logs carefully.
If you need more details, start Butler with the --log-level verbose or even --log-level debug options to get more details on what’s going on.
If things still don’t work you can post a question in the Butler forums.
By sharing your installation and upgrade challenges/issues you enable future improvements, which will benefit both yourself and others.
3 - Concepts
Deep dive into the various components that make up Butler.
3.1 - Key-value store
Overview of the key-value database concept and how it is implemented in Butler.
Storing key-value pairs in Butler
The key-value (=KV) feature in Butler is a basic variant of the more complex KV databases available out there, with etcd, Apache Ignite and memcached being popular open source options. All the major cloud providers also have their own KV database products.
Butler’s KV features are basic, yet very useful in the context of Qlik Sense. The only assumptions are:
You have a value you want to store for some time outside of your Sense app.
There is a unique key for each value you want to store.
Put differently: Think of Butler’s KV store as a way to stash away some values, then get them back later when they are needed again.
Each KV pair is associated with a namespace. Namespaces are simply a way to categorize KV pairs.
Remember
Both key and value are strings in Butler’s KV store. You must thus make sure to convert your data to strings before creating or updating a KV pair.
There is also an optional, per KV-pair Time To Live (TTL) feature. If used it will auto-delete the KV pair when a certain time has passed from the KV-pair’s last update.
The API docs shows what methods are available to work with KV pairs.
How can a key-value store be used in Sense apps?
As mentioned above - A KV store can be useful whenever you need to stash data away for a while and then get it back. I.e. keeping track of the state of something.
For example
Easily pass parameters between apps in a reload chain
Let’s assume data is created when appA reloads as part of an hourly reload schedule. That data is needed in appB, which is triggered to reload when appA finishes its reload. But how do you get the data from appA to appB?
Historically you solve this by writing the data to a temporary QVD or CSV file. This still works of course, but if it’s only some dimensional value that needs to be passed, a KV store might be a cleaner option.
Keep a time limited state
The TTL feature is useful to keep things tidy. If you know for sure that your KV pair only needs to be stored for a limited time, it’s good practice to either delete it when its no longer needed, or set a TTL when the KV pair is first created.
This way you keep the KV namespaces relevant and reasonable in size.
Use app IDs as namespace names
If you need to keep state between successive reloads of a particular app, you can use the app ID as namespace. That way it will be very clear which a specific KV pair belongs to.
Keep track of what users should be notified after an app reload is complete
Let’s say you have a button in an app that when clicked kicks of a reload of the app (or some other app).
Let’s also assume several users might be interested in triggering a refresh of this dataset.
By pushing each user’s username to a KV namespace when they request the data refresh (by clicking that button in the app), it’s possible to notify them using Teams, Slack, email etc as the last step of the app’s reload script (i.e. when the app
is just about done refreshing the data).
The effect is a solution where users can request a data refresh and be notified when the new data is available.
Keeping state in visualization extensions
Extensions are built using Javascript, and they can thus also make use of the KV store.
There might be times when several extension instances in an app need to keep in sync or share some state - a KV store might be useful there.
The KV store could even allow an extension to share state with its siblings in other Sense apps.
Persistence of key-value data
As of current Butler version (v4.0), KV pairs are not persisted to disk.
Is this good or bad? It depends:
Good as it reduces complexity in Butler.
Bad as all KV pairs are lost when Butler is restarted. Now, Butler tends to be very stable, so spontaneous restarts are usually not a problem. But the flushing of all KV data is still something to consider when for example upgrading Butler to new versions.
3.2 - Scheduler
The how and why of the Butler scheduler.
What is a scheduler?
In the context of Qlik Sense, a scheduler is a tool that triggers Qlik Sense tasks at some specific time or interval.
Qlik Sense Enterprise has its own, built-in scheduler that can be accessed via the QMC.
The QMC interface to Sense’s standard scheduler lets you create schedules for two kinds of tasks:
App reload tasks
User directory sync tasks
What’s wrong with Sense’s own scheduler?
The built-in scheduler in Qlik Sense is ok in most aspects, but lack significantly in some.
Specifically, it doesn’t allow you to run a task certain hours of the day. At least not without resorting to creating lots of task triggers - which is not an attractive option from a maintenance perspective.
This is a quite common scenario and thus Butler gets its own scheduler to solve the issue.
The Butler scheduler
Butler’s scheduler is based on cron.
Cron has been the standard scheduler for decades in most Linux systems, it’s thus a proven concept.
Features of the Butler scheduler:
6 position cron pattern. The leftmost position represents seconds.
5 position patterns are also supported, the leftmost position then represents minutes.
Hundreds of schedules tested and confirmed working as expected.
A Qlik Sense task ID is associated with each schedule. When the schedule fires, the associated task is started.
Schedules can be added either manually in the YAML schedules file (as defined in the main Butler config file) or using Butler’s API. A sample schedule file is included in the GitHub repository. Schedules added using the API will be stored in the schedule YAML file referenced in the main Butler config file.
The two supported schedule formats look like this:
┌───────────── seconds (0 - 59)
│ ┌───────────── minute (0 - 59)
│ │ ┌───────────── hour (0 - 23)
│ │ │ ┌───────────── day of the month (1 - 31)
│ │ │ │ ┌───────────── month (0 - 11)
│ │ │ │ │ ┌───────────── day of the week (0 - 6) (Sunday to Saturday)
│ │ │ │ │ │
* * * * * *
Valid cron patterns are:
Asterisk. E.g. *
Ranges. E.g. 1-3,5
Steps. E.g. */2
Using a tool like these can save some time when setting things up, but keep in mind that most online tools use minutes as the smallest unit. Some manual tweaking might thus be needed before using the generated pattern in Butler’s scheduler.
3.3 - Reload alerts
Overview of the actions Butler can take when a reload task fails, is aborted or succeeds.
Note that client-managed and cloud versions of Qlik Sense
Info
Client-managed and cloud versions of Qlik Sense support different source triggers (reload failed/stopped/succeeded) and alert destinations (email, Teams, Slack, etc).
Check each section below for information about which triggers and destinations are supported for each version.
3.3.1 - Client-managed Qlik Sense
Below follows a list of destinations to which Butler can send notifications when a reload task fails or is aborted.
A comparison of the different alert destinations can be found here.
3.3.1.1 - Alert emails
Overview of the various kinds of alert emails Butler can send.
Scheduled vs manual app reloads
It might not be obvious at first, but there are several kinds of reloads in Qlik Sense Enterprise on Windows:
Reloads started from QMC. These are usually created and managed in the QMC. Quite often they are also combined into reload chains. The common thing about these reloads is that they - under the hood - are managed by Sense’s scheduling service.
Manual reloads started from the script editor. When developing apps in the standard Sense client/script editor you usually reload the apps from there. This does trigger an app reload, but not via the Sense scheduling service. Instead the reload is done directly in the engine service.
The reload failure notifications described here work by looking at log entries written by the scheduling service. When that service writes information to the logs about a failed reload, your logging appender will detect it and send a UDP message to Butler - who will forward the message to all the notification destinations configured in the config file.
It’s also possible to have the log appender send emails without using Butler.
It works perfectly fine, but the emails will be very basic when it comes to formatting and you will not get any of the features offered by Butler (last few lines of the reload script log included in the email, customizable email subjects etc).
Alert emails
Butler can send two kinds of alert emails:
When a scheduled reload task fails.
When a running reload task is stopped.
Alert emails can be formatted using HTML, use CSS styling, emojis etc.
There’s no reason an alert email can’t look good!
Alert emails viewed on a mobile phone give direct insight into what has happened:
Failed reload alert email on mobile home screen.
Failed reload alert email viewed on mobile.
In a regular email client a reload failed email could look like below.
Note the end of the script - the last few lines of the reload log are often very useful when it comes to understanding what caused the reload failure.
Basic alert emails also possible
Qlik Sense Enterprise on Windows uses the log4net logging framework to create log files. Log4net is quite flexible and can - among other things - send emails when events such as reload failures occur. There is however little flexibility when it comes to layout and contents of those emails. They are text only (no formatting, tables, different fonts, colors etc) and the email subjects cannot contain any dynamic fields (for example the name of the failed reload task).
The goal of Butler’s alert emails is to address these limitations and offer a flexible foundation not only for emails, but for all kinds of alerts.
If you want to explore what’s possible using just the features offered by log4net, Christof Schwarz has a good post on sending basic notification emails when scheduled reloads fail, with links to Levi Turner’s great examples.
Alert emails to app owners
Qlik Sense can be configured in many ways. In some companies all apps are owned by a central service account.
Other companies set the developer as app owner also for published apps.
In the latter case it might be relevant to send the app owner a notification email when a reload task fails or is aborted. That way the developer is immediately made aware of the issue and can act on it as needed.
This feature assumes the app owner’s user account (in the Sense user directory) has an email address associated with it. When syncing users from Active Directory the users’ emails are often brought along into Sense, but there is no guarantee for this.
If an email address is available for a Sense user, the QMC user section can look like this:
Alert emails only for some tasks
Sometimes there is a desire to only have email alerts for some tasks.
One example can be a Sense cluster that hosts both development and production apps, maybe separated on different servers.
As of Butler 7.4.0 it is possible to control per task if an alert email should be sent when the task fails or is aborted from the QMC.
Conceptually it works like this:
Instructions for how to configure this feature is available here.
Note: This feature is similar to - but independent from - the “task specific email recipients” feature below. Either feature can be enabled or disabled independently of the other in Butler’s config file.
Task specific email recipients
They may be cases where all alert emails should normally go to for example a Sense administrator, but some alerts should instead (or also) go to some other recipients.
An example could be a sales related Sense app. If it fails reloading the standard alert email should go to the Sense administrator, but there should also be an alert email sent to the sales operations team, to notify them that they won’t find updated numbers in the Sales app.
Butler handles this scenario by using a custom property (its name is configurable in the Butler config file) to set alert email recipients on a per-task basis.
Conceptually it works like this:
Instructions for how to configure this feature is available here.
Note: This feature is similar to - but independent from - the “alert emails only for some tasks” feature below. Either feature can be enabled or disabled independently of the other in Butler’s config file.
How it works
Butler uses a templating engine called Handlebars. It is used when Butler sense alert emails.
The high-level system overview below shows how email (and other alert types) are sent by Butler:
Template fields
The Handlebars templating engine looks for template fields in the template files you create.
A complete list of template fields - including descriptions - is available in the Reference section.
Not all failed reloads will cause alert emails
While not obvious at first, there are different kinds of reloads taking place in a Qlik Sense Enterprise environment:
Reloads started by the Sense Scheduler service. These reloads always have a task associated with them.
Reloads started from Sense’s standard script editor. These reloads are not started by the Sense scheduler, but rather directly in the Sense engine. Progress for such reloads will therefore go to the engine logs.
The log appenders that drive Butler’s alerts rely on the Scheduler logs - not the engine logs.
This is an intentional design decision.
It is certainly possible to add log appenders also for engine logs and that way get notified when any reload fail. The question is whether that’s an interesting use case. In most cases sys admins aren’t very interested in reloads that fail during app development - they only care about failures caused by apps in production - i.e. app reload tasks managed by the Sense Scheduler. Thus, Butler currently doesn’t deal with reload failures reported from the Sense engine.
References
Qlik’s documentation around log appenders and how to hook into the Sense logs is somewhat brief, but does provide a starting point if you want to dive deeper into this topic.
The main log4net documentation (log4net is the logging framework used by Qlik Sense Enterprise) can also be useful.
These links describe how emails can be sent from the log4net logging framework itself, directly to the recipient. Butler includes sample XML files for this use case too, but Butler takes things further by using the data in the Sense logs to pull in more data around the failed or stopped reload.
In other words - Butler’s alert emails are significantly more flexible and contain information (such as script logs) that are not available using purely log4net.
Sending alerts to IM services like Slack and Microsoft Teams can be a great way to quickly notify people about urgent issues.
Teams, Slack and email notifications
Microsoft Teams, Slack and email are all notification destinations.
Alert messages/notifications come in two variants: “basic” and “formatted”.
Formatted messages
These messages take full advantage of the formatting available in each notification destination.
Slack has its own way for creating messages with rich layout and formatting - as does Teams and email.
Formatted messages are created using template files.
Each notification destination has its own set of template files. It’s therefore possible to take advantage of each destination’s specific features when it comes to formatting the messages sent by Butler.
Message templates can include “template fields”. These are placeholders that are replaced with actual event values before the message is sent.
The GitHub repository includes fully functional template files for all destinations.
Basic messages
Basic message formats are available for all notification destinations.
This message type is useful if you only want a short, basic notification that a task failed or was aborted. The basic formats are pre-defined and are thus easy to set up.
Microsoft Teams notifications
Basic and formatted reload task failure notifications can look like this in Teams:
The configuration needed for setting this up is described here.
Slack notifications
Basic and formatted reload task failure notifications can look like this in Teams:
The configuration needed for setting this up is described here.
3.3.1.3 - Storing script logs of failed reloads to disk
When investigating reload failures it can often be useful to have access to the entire reload log. Butler detects failed reloads and can store the entire reload log into easy to find and analyze files on disk.
Reload script logs
When doing a scheduled reload or a reload started from the QMC, Sense will create a detailed log file that includes all the commands executed during the reload.
If a reload for reason fails it can be very useful to look at these reload logs.
The latest reload log file for each reload task is available via the QMC, but logs for previous reload attempts are not available via the QMC.
Using the same mechanism used by reload failure alerts in general, Butler can be configured to store the reload logs of all failed reloads to disk.
The reload logs are stored in the directory configured in the Butler config file, with separate directories for each date:
Storing information about failed reloads in InfluxDB can be useful for monitoring and analysis purposes.
Once the data is in InfluxDB it can be visualized in Grafana or similar tools.
Visualizing failed reloads in Grafana
When a reload fails, Butler can send information about the failed reload to InfluxDB.
The data stored in InfluxDB is described here.
Once the data is in InfluxDB it can be visualized in Grafana or similar tools.
Grafana has a good log viewer that can be used to visualize the data.
Note how even the script log is stored in InfluxDB, so you can see the last few lines of the reload script log in Grafana.
This makes it easy to right away see what went wrong, especially when dealing with reloads that happened a while back.
When investigating reload failures it can often be useful to have access to the entire reload log, as this usually tells immediately what went wrong.
Butler forwards a very comprehensive set of data to New Relic when a reload fails, including the failing part of the app’s script.
This means that companies using New Relic as their enterprise monitoring solution can now also use it to monitor their Qlik Sense reloads, as well as all the Sense real-time metrics provided by Butler’s sibling tool Butler SOS.
As of this writing, New Relic also offers a free tier that will be more than enough for most Butler users.
It is thus possible to get started with monitoring Sense reloads in New Relic without any additional cost.
More information about how Butler integrates with New Relic can be found here.
When a reload fails, Butler can send information about the failed reload to an MQTT broker.
MQTT is a lightweight messaging protocol that is commonly used in IoT applications, but it is a mature and versatile protocol that can be used in many different scenarios.
In short, MQTT works by having a broker that clients can connect to. Clients can publish messages to the broker, and clients can subscribe to messages from the broker.
This makes MQTT a great way to integrate different systems in a publish/subscribe pattern.
By sending information about failed reloads to an MQTT broker, Butler can be integrated with any system that can consume MQTT messages - which is a lot of systems.
The information included in the MQTT message is described here.
Here is an example of how the information about a failed reload can be viewed in MQTT Explorer:
Signl4 is a mobile alerting app that offers an easy way to get started with monitoring and alerting in general, including Qlik Sense reloads via Butler’s integration with Signl4.
Mobile alerting
Signl4 has a great mobile app that can be used to receive reload-failed alerts from Butler.
It can look something like this:
More information about how Butler integrates with Signl4 can be found here.
Webhooks provide a generic way to send information about failed/aborted reloads to any system that can receive HTTP POST/PUT/GET requests.
When nothing else works
Webhooks may be somewhat limited in terms of what they can do, but their simplicity is also their strength.
When you need to send information about failed/aborted reloads to a system that doesn’t have a dedicated integration with Butler, webhooks may be a good solution.
Butler offers a lot of flexibility in terms of how each webhook is configured.
You can…
specify the URL to send the webhook to.
specify the HTTP method to use (POST, PUT, GET).
use http or https.
specify if a custom certificate should be used.
In this case the root CA certificate is provided to Butler per webhook, which means Butler can be integrated to many systems, each using their own self-signed certificate.
specify if an untrusted certificate should be accepted.
This is useful when integrating with systems that use self-signed certificates and you don’t have access to the root CA certificate.
Sending reload-failed information to a GET http webhook provided by Node-RED can look like this in the Node-RED editor:
Overview of the various kinds of alert emails Butler can send when app reloads fail in Qlik Sense Cloud.
Scheduled vs manual app reloads
Qlik Sense Cloud has a few different ways to reload apps:
Scheduled reloads: Apps can be set to reload at specific times, for example every night at 3am.
Manually started reload: Right clicking an app in the Qlik Cloud web UI, then select “Reload now”. This is a manual reload and is not managed by the Sense scheduling service.
Manual reloads started from the script editor: When developing apps in the Sense client/script editor you usually reload the apps from there. This triggers an app reload too, but in a slightly different way than previous example. Instead the reload is done directly in the engine service. Butler is not notified in this case, so no alert emails are sent for these reloads.
Note
The reload failure notifications described here work in all cases except the “manual reloads started from the script editor”.
There is currently no way around that, it’s just how Qlik Cloud works.
Alert emails
Butler can send the following alert emails:
When an app reload fails.
Alert emails can be formatted using HTML, use CSS styling, emojis etc.
There’s no reason an alert email can’t look good!
Here is an example of how a failed reload alert email could look like:
Alert emails to app owners
All apps in Qlik Sense Cloud has an app owner, typically the user who created the app.
If there is an email address associated with the app owner, Butler can send an alert email to the app owner when a reload task fails or is aborted.
This feature can be turned on/off in the Butler config file.
It is also possible to only send alert emails to some app owners but not others, this page describes how to configure that.
Alert emails only for some apps
Sometimes there is a desire to only have email alerts for some apps.
Maybe some apps are critical and should always trigger an alert email when they fail, while other apps are less critical and should not trigger any alert emails.
This is possible using a tag set on apps in Qlik Sense Cloud:
Butler uses a templating engine called Handlebars. It is used when sending all kinds of alert emails supported by Butler.
For an overview of how Butler deals with alert messages for Qlik Sense Cloud, please see the setup section.
Template fields
The Handlebars templating engine looks for template fields in the template files you create.
A complete list of template fields - including descriptions - is available in the Reference section.
3.3.2.2 - Alerts via Slack and Microsoft Teams
Sending alerts to IM services like Slack and Microsoft Teams can be a great way to quickly notify people about urgent issues.
Teams, Slack and email notifications
Microsoft Teams, Slack and email are all notification destinations.
Alert messages/notifications come in two variants: “basic” and “formatted”.
Formatted messages
These messages take full advantage of the formatting available in each notification destination.
Slack has its own way for creating messages with rich layout and formatting - as does Teams and email.
Formatted messages are created using template files.
Each notification destination has its own set of template files. It’s therefore possible to take advantage of each destination’s specific features when it comes to formatting the messages sent by Butler.
Message templates can include “template fields”. These are placeholders that are replaced with actual event values before the message is sent.
The GitHub repository includes fully functional template files for all destinations.
Basic messages
Basic message formats are available for all notification destinations.
This message type is useful if you only want a short, basic notification that a task failed or was aborted. The basic formats are pre-defined and are thus easy to set up.
Microsoft Teams notifications
Basic and formatted reload task failure notifications can look like this in Teams:
The configuration needed for setting this up is described here.
Slack notifications
Basic and formatted reload task failure notifications can look like this in Teams:
The configuration needed for setting this up is described here.
3.3.2.3 - Storing script logs of failed reloads to disk
When investigating reload failures it can often be useful to have access to the entire reload log.
Butler can store complete script logs for failed app reloads on local disk, making it easy to figure out what happened without having to log into Qlik Cloud.
Reload script logs
Butler can be configured to retrieve and store the reload logs of all failed app reloads to disk.
The feature is identical to that of client-managed Qlik Sense, but those features can be individually enabled/disabled and configured.
The reload logs are stored in the directory configured in the Butler config file, with separate directories for each date:
Tracking successful reloads can be useful for various reasons, for example knowing how long different app reloads takes on average.
What’s this?
Butler can optionally track successfully completed reload tasks.
Historically few Sense admins have probably paid much attention to successful reloads (but rather looked at failed ditto), but from a performance planning perspective it’s relevant to also monitor successful reloads.
Monitoring some successful reloads or all
Butler can be configured to track all successful reloads, or only those that have a specific custom property set.
This can be useful if you want to track successful reloads for some apps but not others.
To enable this feature for all reload tasks, set Butler.influxDb.reloadTaskSuccess.allReloadTasks.enable to true.
To enable this feature for only some reload tasks, set Butler.influxDb.reloadTaskSuccess.byCustomProperty.enable to true.
This setting will have no effect if Butler.influxDb.reloadTaskSuccess.allReloadTasks.enable is set to true.
The name of the custom property is configured in the Butler config file, Butler.influxDb.reloadTaskSuccess.byCustomProperty.customPropertyName.
The value of the custom property that will enable per-task-tracking is found in Butler.influxDb.reloadTaskSuccess.byCustomProperty.enabledValue.
Using tags
Both Sense apps and reload tasks can have tags attached to them (set in the QMC).
Butler can be configured to get these tags and include them in the data sent to the enabled destinations.
In the case of InfluxDB the Sense tags will be sent as InfluxDB tags, which means they can be used to filter data in InfluxDB queries and Grafana dashboards.
The config file also allows for adding static tags to the data sent to InfluxDB, this is set in Butler.influxDb.reloadTaskSuccess.tag.static.
Grafana dashboards
Given the information stored in InfluxDB, several interesting Grafana dashboards can be created:
Distribution of reload durations. If filtering on a specific reload task this will show how much the task duration vary. Can be very useful when investigating server performance problems.
Number of successful reloads per (for example) 15-minute blocks. This shows how reloads are distributed over the course of a day, and can be useful when deciding when to schedule reloads.
Sample dashboard showing the above charts:
Here is another set of charts, also showing what metadata is available for each reload task:
How it works
Reload success UDP server
Butler includes a UDP server to which Sense’s logging framework Log4Net can send reload success messages.
The UDP server is configured in the Butler config file, and is disabled by default.
When enabled, the UDP server listens for UDP messages on the configured port.
When a UDP message is received, the UDP server will parse the message to determine what it is about and to extract relevant data, then dispatch the message to the enabled destinations.
The XML appenders must be correctly deployed on the Sense servers for this to work.
See this page for more information on setting up the XML appenders.
In the case of successful reload tasks, the UDP server will determine which app was reloaded, the duration of the reload task, who started the task etc.
Butler will then send this information to the enabled destinations.
Email notifications
Butler can be configured to send email notifications when a reload task completes successfully.
The concept is the same as for failed/aborted reload tasks (described here), except that emails are never sent to app owners for successfully completed reload tasks.
Can look like this:
Supported destinations
The following destinations are supported:
InfluxDB
Email
Config file settings
Butler:...... # InfluxDB settingsinfluxDb:enable:false# Master switch for InfluxDB integration. If false, no data will be sent to InfluxDB.......reloadTaskSuccess:enable:trueallReloadTasks:enable:falsebyCustomProperty:enable:truecustomPropertyName:'Butler_SuccessReloadTask_InfluxDB'enabledValue:'Yes'tag:static:# Static attributes/dimensions to attach to events sent to InfluxDb# - name: event-specific-tag 1# value: abc 123dynamic:useAppTags:true# Should app tags be sent to InfluxDb as tags?useTaskTags:true# Should task tags be sent to InfluxDb as tags?......# Settings needed to send email notifications when for example reload tasks fail.# Reload failure notifications assume a log appender is configured in Sense AND that the UDP server in Butler is running.emailNotification:enable:falsereloadTaskSuccess:enable:false# Custom property used to control which task successes will cause alert emails to be sent# If this setting is true, alerts will not be sent for all tasks, but *only* for tasks with the CP set to the enabledValue.# If this setting is false, alerts will be sent for all failed reload tasks.alertEnableByCustomProperty:enable:falsecustomPropertyName:'Butler_SuccessAlertEnableEmail'enabledValue:'Yes'# Custom property used to say that alerts for a certain task should be sent to zero or more recipients# These alerts will be sent irrespective of the alertEnableByCustomProperty.enable setting.alertEnabledByEmailAddress:customPropertyName:'Butler_SuccessAlertSendToEmail'rateLimit:60# Min seconds between emails for a given taskID/recipient combo. Defaults to 5 minutes.headScriptLogLines:15tailScriptLogLines:25priority:high # high/normal/lowsubject: '✅ Qlik Sense reload success:"{{taskName}}"'bodyFileDirectory:path/to/email_templateshtmlTemplateFile:success-reload-qseowfromAddress:Qlik Sense (no-reply) <qliksense-noreply@ptarmiganlabs.com>recipients:- <Email address 1>- <Email address 2>......smtp:# Email server settings. See https://nodemailer.com/smtp/ for details on the meaning of these fields.host:<FQDN or IP or email server, e.g. smtp.gmail.com>port:<port on which SMTP server is listening>secure:true# true/falsetls:serverName:# If specified the serverName field will be used for TLS verification instead of the host field.ignoreTLS:falserequireTLS:truerejectUnauthorized:falseauth:enable:trueuser:<Username, email address etc>password:<your-secret-password>
3.5 - Starting Sense tasks in style
Starting Sense reload tasks (and other tasks) is usually done from the QMC. Using Butler’s REST API it’s however very easy to start tasks from any third party system capable of making a REST call.
What’s wrong with starting tasks from the QMC?
Nothing really. At least not if starting tasks is considered a manual activity.
There are also scenarios that benefit from automation.
Consider a Sense environment that gets its data from some source system, for example a financial ERP system.:
Sense could poll that source system for data ever so often - or the source system could start the needed tasks when new data is available.
Or simply: Notifications are usually (always?) a better solution than polling for new data.
The good news is that Butler includes solid support for starting Sense tasks from 3rd party systems.
Below the concept is described on a high level.
Actual examples are available here.
Start tasks by IDs, tags and custom properties
Butler’s /v4/reloadtask/<taskid>/start API endpoint is used to start tasks.
For historical reasons there are two variants: POST and PUT. Both do the exactly the same though.
The general idea of this API is
One task should be started. The task is identified by its task ID.
Done using just a properly formatted URL. This is usually the most common scenario.
More than one task should be started. The tasks are identified by their IDs.
The first task can be specified in the URL and the rest in an array in the call’s body.
Or all task IDs can be specified in the call’s body.
One or more tasks should be started. The tasks are identified by tags set in the QMC.
The tags are specified in the call’s body.
All tasks having the tags included in the call will be started.
One or more tasks should be started. The tasks are identified by custom property values set in the QMC.
Same principle as for tags, but using custom properties instead.
All tasks having the custom property/value combinations in the call will be started.
Remember
Task IDs are permanent for a specific task, but if tasks are re-created they will get new task IDs.
By specifying tasks using tags and/or custom properties instead, the outside systems that need to start tasks don’t have to deal with task IDs that may change.
Lower risk for issues and less maintenance thus.
Start tasks by ID
While this may be the most obvious way to control what task(s) should be started, it requires the caller to know the exact ID of the task of interest.
If the task for some reason is re-created its ID will change.
Still, there are certainly cases where task IDs are relevant and the easiest option to use and set up.
Start tasks by tags
Given the example below, a single call to Butlers API could start all four of the tasks tagged Butler 5.0 demo.
Or the three tasks tagged startTask1.
Or all of those tasks, if both tags were passed to the Butler API.
Start tasks by custom properties
Using custom properties to identify which tasks to start works similarly to how tags are used (see above).
The main difference is that the caller must know the name of the custom property and at least one of the possible values for that custom property, in order to start the associated task.
In the example below, calling the Butler API with parameters taskGroup=tasks2 would result in all tasks having the taskGroup custom property set to tasks2 to be started.
3.6 - Incident management tools
There are various enterprise grade tools for handling IT incidents. Butler can integrate with such tools, for example forwarding information about failed reloads to an IT operations team.
3.6.1 - New Relic
New Relic is an enterprise grade observability solution in a SaaS package.
They offer a uniform approach to dealing with metrics, logs and events - including a basic but working alert management feature.
The service is easy to get started with and has a generous free tier that works well for testing Butler alerts. New Relic is a good choice for both metrics storage and alerting as it handles both reload failure alerts generated by the Butler tool as well as operational metrics from Butler SOS.
New Relic is not primarily an incident management tool, but rather a complete SaaS platform for handling metrics, logs, events and trace messages.
Their event handling however has some alert handling features built in, and these can be nicely integrated with Butler and Qlik Sense.
Furthermore, New Relic also integrates with several dedicated incident management tools (PagerDuty, VictorOps, OpsGenie and others) and also other notification channels such as Slack, Teams, email, and generic webhooks.
Together these capabilities makes New Relic a very good match to the features offered by Butler and Butler SOS.
The concept looks like this:
Alerts (for example a reload task fails in Qlik Sense) are sent to New Relic using their event and log APIs.
Butler integrates tightly with those APIs, creating a seamless, almost instantaneous forwarding of incidents.
Metadata about the failed or aborted reload task and associate Sense app is sent to New Relic together with the last parts of the reload script log.
The script log can then be viewed from within New Relic’s web interface and usually provides instant insight into what caused the reload to fail.
As part of the setup process, “alert conditions” are created in New Relic. These define when New Relic alerts should be created, given the event data sent from Butler.
New Relic “alert policies” are used to group together several conditions and also associate notification channels (Slack, Teams, PagerDuty, …) to each alert policy.
New Relic incidents stay in an open state until they are acknowledged, which can be done from the web interface or from within email or Teams/Slack messages.
The Getting started section has hands-on instructions for setting up Butler to work with New Relic.
New Relic screen shots
Sample New Relics dashboards are found below.
Please note that some of the charts (server RAM, CPU, user sessions etc) in these dashboards use data from Butler SOS.
Butler provides data for failed/aborted reloads tables and charts.
New Relic metrics & incident dashboard (light mode)
New Relic metrics & incident dashboard (dark mode, different time range than previous dashboard above).
Detailed information about failed reloads, including the last part of the script log, is available from within New Relic dashboards.
Butler SOS metrics in a dark mode New Relic dashboard.
New Relic incidents overview page (dark mode)
New Relic alert conditions (dark mode)
Basic New Relic Slack alert (dark mode)
More comprehensive New Relic Slack alert (dark mode)
3.6.2 - Signl4
Signl4 describes themselves as
“Mobile Alerting and Incident Response. Automated Alerting. Anywhere Response”
It’s an easy to get started with, SaaS based solution for incident management. It has good APIs and integrations as well as a generous free trial tier, which makes it great for Qlik Sense admins who wants to try a proper incident management tool.
Signl4 offers both an online SaaS service and a mobile app.
The concept looks like this:
Alerts (for example an important Sense app fails reloading) are sent to Signl4 using their APIs.
Using their API an incident is created.
Butler integrates with these APIs, creating a seamless, almost instantaneous handling of incidents.
The incident is assigned to whoever is on duty at that time. This person (or group of people in larger organizations) will be notified via their Signl4 mobile apps.
The person on duty can acknowledge that an incident is being looked into and eventually also that the incident has been resolved.
If no-one acknowledge the incident within a configurable time the incident can be escalated.
… and much more.
The Getting started section has hands-on instructions for setting up Butler to work with Signl4.
Example: Qlik Sense and Signl4 on Android
Below are screen shots from an Android phone in which the Signl4 mobile app is installed.
Signl4 message on Android lock screen.
Signl4 message on Android lock screen.
Overview of incidents.
List of incidents during past 24 hours.
Incident details.
3.7 - Qlik Sense server version
Monitor Qlik Sense server version.
Check server version at regular, configurable intervals.
Store version info in InfluxDB, then visualize in Grafana.
Butler can monitor the server version of the client-managed Qlik Sense environment that Butler is configured to connect to.
Configuring this is described here.
Why is this useful?
You can always see the version of the Qlik Sense server in the main page of the Qlik Management Console (QMC).
But let’s say you use Butler and/or Butler SOS to collect operational Sense server metrics (like CPU, memory, failed reload tasks etc) in InfluxDB, and visualize this info in Grafana.
If you also store the version of the Sense server in InfluxDB, you can include that info in your Grafana dashboards, making it easy to see what the current version of the Sense server is.
Another use case is if you have multiple Sense servers (maybe PROD, TEST, DEV - or different Sense environments for different parts of the company, or…), and you want to keep track of which version each server is running.
You then probably run one Butler instance for each Sense environment, and each Butler instance can then retrieve and store in InfluxDB the version of the Sense server it is connected to.
It’s then easy to create a Grafana dashboard that shows the version of each Sense server, and you can quickly see if any server is running an outdated version.
Information stored in InfluxDB
Description of what data is stored in InfluxDB is available here.
Sample Grafana dashboard
Here is an example of a Grafana dashboard that shows the version of the Sense server, and also some info related to the Sense server license:
3.8 - Qlik Sense server license
Monitor and alert on expiring Qlik Sense server license.
Check server license status at regular, configurable intervals.
Store license status in InfluxDB, then visualize in Grafana. Or send license status to webhooks or MQTT.
Alert via InfluxDB/Grafana, webhooks or MQTT when the license is about to expire.
Why is this useful?
If the Qlik Sense server license expires, the Qlik Sense environment will go into a disabled state and users will not be able to access Sense.
Butler can monitor the Qlik Sense server license and alert if the license is about to expire.
The number of days before expiration that the alert should be sent is configurable in the Butler.qlikSenseLicense.serverLicenseMonitor.alert.thresholdDays setting.
How it works
Butler will periodically poll the Qlik Sense server for information about the Qlik Sense server license.
The retrieved information can be stored in/sent to zero or more of InfluxDB, webhooks and MQTT.
If the license is about to expire, Butler will send an alert to the configured alert destinations.
The alert will be sent a configurable number of days before the license expires, giving you time to renew the license.
Continuously storing info in InfluxDB and sending to other destinations, as well as sending alerts, can be individually enabled/disabled for each destination using the sendRecurring and sendAlert settings for each destination in the config file.
Information stored in InfluxDB
Description of what data is stored in InfluxDB is available here.
Sample Grafana dashboard
Here is an example of a Grafana dashboard that shows the version of the Sense server, and also some info related to the Sense server license:
3.9 - Qlik Sense access licenses
Monitor and manage Qlik Sense end user access licenses.
High level metrics per user license type (professional, analyzer etc) are gathered and stored in your database of choice (at the time of writing, InfluxDB is supported).
User licenses can be released automatically after a certain period of inactivity, allowing them to be used by other users.
Monitor user licenses
In order to use Qlik Sense end users must be assigned some kind of access license.
There are different types of licenses, for example Professional, Analyzer and Analyzer Capacity licenses.
Butler can monitor the usage of these licenses and store the data in InfluxDB, from where the license data can be visualized in Grafana.
This makes it easy to track (and alert if needed) on the number of used licenses, how many are available and when it’s time to get more licenses.
Release inactive user licenses
Butler can automatically release Professional and Analyzer user licenses that have been inactive for a certain period of time.
This is useful in environments where some users use Sense sporadically, for example only during certain times of the year.
In such cases it’s a waste of resources to keep the license assigned to the user when it’s not being used.
Here is how it works:
Butler will evaluate allocation of professional and analyzer access licenses on a configurable schedule, for example once per day.
Licenses that have not been used for a certain period of time (e.g. 30 days) will be released.
Separate inactivity periods can be configured for professional and analyzer licenses.
Licenses that are within quarantine period will never be released.
It is possible to exclude certain users from having their licenses released, i.e. guarantee they will always have a license available.
Can be useful for administrators or users that need guaranteed access to Sense.
The following criteria can be used to exclude users from having their licenses released:
Specific users (by userDirectory\userId)
Specific tag(s) assigned to a user.
Specific custom property value(s) assigned to a user.
Users belonging to a user directory.
Users being marked as (not) active in the QMC.
Users being marked as (not) blocked in the QMC.
Users being marked as (not) externally removed in the QMC.
Disclaimer
This feature has the potential to let more users use your Sense environment, compared to a scenario where no release of licenses is done.
In order to avoid users not being able to access Sense you should still ensure to have a good margin, i.e. get more licenses from Qlik once you are running low. This is the only (and correct and proper) way to ensure that users are not denied access to Sense due to missing licenses.
Also, you must ensure that managing licenses this way is not in conflict with your license agreement with Qlik.
Butler’s license release feature uses APIs that are publicly documented by Qlik (example here).
The same APIs are used by the QMC to release licenses.
Butler simply automates what is otherwise a manual task in the QMC.
3.10 - File system access: copy/move/delete files
Manipulating files from Sense load scripts in a secure yet flexible way.
Unrestricted file system access is a security risk
Qlik Sense locked down things quite a bit compared to its QlikView predecessor.
In QlikView your app scripts could do almost anything with any file on the server’s disks as long as the QlikView service account had access to the file.
This was not ideal from a security perspective and Qlik Sense therefore introduced the concept of folder data connections and in general much stricter file system access restrictions.
With this change Qlik Sense had a much better position with respect to security, as access to files was now boxed by the folder data connection the access used (by means of lib:// statements).
It’s also possible to include .qvs script files via the same mechanism.
The problem now is that it’s no longer possible to do file level operations on individual or groups of files.
No more deleting, copying or moving of files from within the load script.
Now - there is a per-server setting that disables this new “standard mode” and reverts back to what’s known as “legacy mode”, which is essentially how QlikView worked (and still works). But then the Sense environment is once again vulnerable to badly written or even malicious Sense apps.
Butler adds controlled file system access to Qlik Sense Enterprise
Butler’s solution is to add a set of REST API endpoints for file copy/move/delete operations, but only allow these to operate on pre-defined folders.
For example, you might have a QVD folder at e:\data\qvd\sales\temp.
You also need to remove old QVDs from that folder.
This could be done with scheduled BAT/CMD files or PowerShell scripts, but it might be better/more flexible/easier/preferred to do this cleanup from the load script of a Sense app.
The solution: Add e:\data\qvd\sales\temp to Butler’s list of folders in which files can be deleted, then call Butler’s /v4/filedeleteAPI endpoint from within your app’s load script. Done!
Convenience subs
Butler includes a set of Subs that make it easy to use the file copy/move/delete APIs.
These subs are found in this .qvs file as well as embedded in the Butler demo app.
The examples section shows how to use these subs - or call the Butler APIs directly.
3.11 - MQTT integration
Details about how Qlik Sense can use Butler to send pub-sub messages using MQTT.
What is MQTT?
MQTT is a light weight publish-subscribe (“pub-sub”) protocol.
Used in both the telecomms industry and various Internet of Things applications, there are client libraries available for many different languages and platforms. This is important, as there is a good chance other systems can find a way of sending MQTT messages, which Butler can then listen for/subscribe to.
Outgoing MQTT from Butler itself
If MQTT is enabled, Butler will forward events (reload failed, user opened a session to Sense etc) to MQTT. These events are sent to the MQTT topics defined in the Butler.mqttConfig section of Butler’s config file.
Outgoing MQTT - publish
Butler can post messages to MQTT topics. The /v4/mqttpublishmessage API endpoint is used for this.
This way Butler can send status information and notifications to other systems, outside of Qlik Sense. Use cases include:
Notify downstream systems that Sense has finished creating some data set that the downstream system depends on.
Send debug or trace messages to MQTT instead of to the Sense log. Using a MQTT client (there are multiple ones on both Windows, OSX and Linux) you can then monitor the messages in real time. Very useful during development of tricky Sense load scripts!
Start Sense tasks (typically reloads) from the Sense load script. Very useful when you need to trigger a second app reload once the first app’s load script reaches some specific point of execution.
This way the scheduling and execution of Sense tasks can be made much more flexible than using the built in QMC scheduler.
Note: While possible to start reload tasks using MQTT, it’s usually easier to do this using Butler’s REST API.
Send messages to platforms such as Node-RED. Node-RED is an open source platform (with a graphical editor) intended for integrating different systems and data sources. As it is built on node.red there are many different modules available, offering integrations with all sorts of systems and protocols.
Using Node.RED together with Qlik Sense and Butler, it is possible to interface with social media from the Sense load script (send a Tweet when some condition occur during app reload, for example).
Incoming MQTT - subscribe
Butler subscribes to all MQTT messages in the topic specified in the config setting Butler.mqttConfig.subscriptionRootTopic.
Which in MQTT lingo means “listen to all messages in the this topic, as well as in any subtopics”.
When Butler gets a message as a result of this subscription it is analyzed and if the topic matches any of the predefined topics with special meaning, the associated tasks are carried out.
Topics with special meaning are:
Start Sense task. The exact topic is defined in config property Butler.mqttConfig.taskStartTopic.
Note that this topic must be a subtopic to the topic specified in Butler.mqttConfig.subscriptionRootTopic!
Starts the Sense task identified by the ID sent in the message body. More info in the examples section.
As Butler listens to all messages in the topic tree specified by Butler.mqttConfig.subscriptionRootTopic it can easily be extended with handlers for additional topics.
3.12 - UDP client
A basic, stand-alone UDP client is included in Butler.
Butler includes a very basic UDP client, which can be used to send test messages to Butler’s UDP servers.
This can be useful when debugging a Butler server, when adding new UDP handlers etc.
The client is built using node.js, and is found in the src/udp_client directory.
Run the app to show its help text (in this case the UDP client is executed on a Mac):
$ node udp_client.js
Usage: node udp_client.js [options]
This app sends messages to the UDP server(s) built into Butler (or any other UDP
server)
Options:
--version Show version number [boolean]
-i, --ip IP address of UDP server message will be sent to [required]
-p, --port Port on UDP server [required]
-m, --msg Message to send [default: "Test message"]
-h, --help Show help [boolean]
Missing required arguments: i, p
$
Testing the failed task UDP server
Sending a message to port 9998 will test the UDP server responsible for handling task failure messages:
Sending a message to Butler looks like this (with a fake IP address):
$ node udp_client.js --ip 1.2.3.4 -p 9998 -m "Abc;123;456;test"
UDP message sent to 1.2.3.4:9998, 16 bytes.
$
The resulting Slack message looks like this:
3.13 - Monitor Windows services
Butler can monitor Windows services and send alerts if a service is not running.
Services on multiple servers can be monitored, and Butler can send alerts to destinations such as Slack, Teams, email, webhooks, InfluxDB, New Relic and MQTT.
Windows only
Windows services is obviously a feature only available on computers running Windows.
Butler can be installed on any platform, but the Windows service monitoring feature will only work when Butler is installed on a Windows computer.
Be the first to know when a service stops
If a Sense service stops (for whatever reason), end users will most likely be impacted one way or another.
Maybe apps will not be reloaded with new data, or users will not be able to access the hub or QMC.
Some companies have dedicated teams that monitors the IT infrastructure, but in many cases the Sense platform is monitored by the same team that develops and maintains the Sense apps.
For these teams, it is important to be notified as soon as possible when a Sense service stops - Butler can help with this.
Grafana dashboards and alerts
Butler can send service related alerts to InfluxDB, and Grafana can then be used to create dashboards and alerts based on the data in InfluxDB.
A Grafana “state timeline” chart showing the status of Qlik Sense services across 4 servers can look like below.
Note the red bar indicating that all Qlik Sense services were restarted at one point, but also note that a couple of the servers had additional, shorter outages:
With the above in place, Grafana alerts can be created that will trigger when a service stops, sending messages to incident management systems such as PagerDuty, OpsGenie and VictorOps - or to Slack, Teams, email etc.
Many servers, many services - and permissions
Butler can monitor services on multiple servers, and it can monitor multiple services on each server.
It should be noted though that each check is executed sequentially, so if you have many servers and many services, it will take some time to complete all checks.
This is especially true if you are monitoring services on remote servers, as the latency will add up.
In order to monitor services on remote servers, Butler needs to be able to connect to the remote server using WMI (Windows Management Instrumentation).
Long story short, the easiest way to set things up is to make the account used to run Butler a member of the local Administrators group on the remote server.
This should be done on all remote servers that Butler will monitor services on.
How it works
Butler uses a state machine to keep track of the status of each service.
The available states and the possible transitions between them are:
When a service check reveals that a service has changed state compared to the state stored in the state machine, Butler will send an alert message to the configured destinations.
Note 1: Windows services technically have more states than the ones shown above, but for our use case the above states are sufficient.
Note 2: The state machine is not persisted to disk, so if Butler is restarted it will not remember the state of the services it was monitoring before the restart.
Note 3: The states shown above are the ones used by Butler internally. The actual alert messages sent to the configured destinations may use different wording.
Config file settings
The configuration for Windows service monitoring is done in several sections in the Butler config file.
First, the general services configuration section defines
Which services should be monitored on what servers.
How often the checks should be executed.
What destinations should receive service related alerts.
Butler:......# Monitor Windows services.# This feature only works when Butler is running on Windows Server or desktop.# On other OSs service monitoring will be automatically disabled.serviceMonitor:enable:false# Main on/off switch for service monitoringfrequency:every 5 minutes # https://bunkat.github.io/later/parsers.htmlmonitor:- host:<hostname or IP> # Host name of Windows computer where services are runningservices:# List of services to monitor- name:postgresql-x64-12 # Posgress/repository dbfriendlyName:Repository DB- name:QlikSenseEngineServicefriendlyName:Engine- name:QlikSensePrintingServicefriendlyName:Printing- name:QlikSenseProxyServicefriendlyName:Proxy- name:QlikSenseRepositoryServicefriendlyName:Repository- name:QlikSenseSchedulerServicefriendlyName:Scheduler- name:QlikSenseServiceDispatcherfriendlyName:Service DispatcheralertDestination:# Control to thich destinations service related alerts are sentinfluxDb:# Send service alerts to InfluxDBenable:truenewRelic:# Send service alerts to New Relicenable:trueemail:# Send service alerts as emailsenable:truemqtt:# Send service alerts as MQTT messagesenable:trueteams:# Send service alerts as MS Teams messagesenable:trueslack:# Send service alerts as Slack messagesenable:truewebhook:# Send service alerts as outbound webhooks/http callsenable:true......
Secondly, the configuration for the various destinations may also contain settings specific to service monitoring.
Not all destinations support this, but for example the Teams destination does:
Butler:......# Settings for notifications and messages sent to MS TeamsteamsNotification:enable:true......serviceStopped:webhookURL:<web hook URL from MS Teams>messageType:formatted # formatted / basic. Formatted means that template file below will be used to create the message.basicMsgTemplate: 'Windows service stopped:"{{serviceName}}"onhost "{{host}}"' # Only needed if message type = basicrateLimit:30# Min seconds between messages for a given Windows service. Defaults to 5 minutes.templateFile:/path/to/teams/template/directory/service-stopped.handlebarsserviceStarted:webhookURL:<web hook URL from MS Teams>messageType:formatted # formatted / basic. Formatted means that template file below will be used to create the message.basicMsgTemplate: 'Windows service started:"{{serviceName}}"onhost "{{host}}"' # Only needed if message type = basicrateLimit:30# Min seconds between messages for a given Windows service. Defaults to 5 minutes.templateFile:/path/to/teams/template/directory/service-started.handlebars......
Similarly, service state changes can be sent to outbound webhooks:
Butler:......# Settings for notifications and messages sent using outgoing webhookswebhookNotification:enable:true......serviceMonitor:rateLimit:15# Min seconds between outgoing webhook calls, per Windows service that is monitored. Defaults to 5 minutes.webhooks:- description:'This outgoing webhook is used to...'webhookURL:http://host.my.domain:port/some/path # outgoing webhook that Butler will callhttpMethod:POST # GET/POST/PUT. Note that the body and URL query parameters differs depending on which method is used- description:'This outgoing webhook is used to...'webhookURL:http://host.my.domain:port/some/path # outgoing webhook that Butler will callhttpMethod:PUT # GET/POST/PUT. Note that the body and URL query parameters differs depending on which method is used- description:'This outgoing webhook is used to...'webhookURL:http://host.my.domain:port/some/path # outgoing webhook that Butler will callhttpMethod:GET # GET/POST/PUT. Note that the body and URL query parameters differs depending on which method is used
To get MQTT messages when a service stops or starts, configure the MQTT section of the config file:
Butler:......mqttConfig:enable:true# Should Qlik Sense events be forwarded as MQTT messages?brokerHost:<FQDN or IP of MQTT server>brokerPort:1883azureEventGrid:enable:false# If set to true, Butler will connect to an Azure Event Grid MQTT Broker, using brokerHost and brokerPort above clientId:<client ID>clientCertFile:<path to client certificate file>clientKeyFile:<path to client key file>......serviceRunningTopic:qliksense/service_runningserviceStoppedTopic:qliksense/service_stoppedserviceStatusTopic:qliksense/service_status......
3.14 - Sending messages to MS Teams
MS Teams have moved away from simple webhooks to a concept called “workflows”, which are really MS Power Automate workflows.
This means that a Power Automate webhook is needed in order for Butler to send messages to Teams.
This page describes both how to create new channels in Teams and how to set up new webhooks that can be used to send messages to the new channel.
Overview
The goal is to create a new Teams channel to which Butler will send alerts when monitored Windows services are stopped or started.
The same concept is used to create channels and/or webhooks for other Butler alert features, such as failed reload tasks (client-managed Qlik Sense) or failed app reloads (Qlik Sense Cloud).
All screen shots below are from Teams running on macOS.
Should look more or less the same on Windows…
Create a new channel
Creating a new channel is an easy two-step process:
Select which team the channel should belong to, the channel name/description and permissions.
Click Create.
Create a new, webhook triggered workflow
Now let’s create a new workflow, with associated webhook that can be used to send messages to the channel.
Open the workflow view by clicking on the “Workflows” link in the menu on the left. It may be hidden under the three-button-link.
Existing workflow are listed, for all channels the user has access to.
Create a new workflow by clicking the “New flow” button in upper right corner.
Search for “webhook” in the “Search templates” text box.
The one we need is called “Post to a channel when a webhook request is received”.
Give the workflow a name and sign in.
In most cases you will already be signed in, which shows by the green check mark to the right of the “Microsoft Teams” text.
Select which team and channel post should be sent to.
Workflow has been created.
Copy the shown URL - it should be pasted into the Butler config file.
The new workflow shows up in the overview.
It may take a few minutes (5-10) until it starts working, so don’t be worried if alerts messages from Butler don’t show up right away.
Example messages in the new channel
Here the “Print Spooler” service was stopped and started again on a Windows server.
3.15 - Using custom links in alerts
Email, Slack and MS Teams alert messages can include custom links to external systems.
This pages describes how to set this up.
What’s this?
Butler can include custom links in alert messages sent to email, Slack and MS Teams.
This can be used to link to external systems, such as a ticketing system or a monitoring tool.
The links defined in the config file are available as template variables in the alert messages.
Documentation for the alert message templates is available here.
Differences between client-managed and Qlik Sense Cloud
Standardized links relating to client-managed Qlik Sense alerts are set in this section of the config file:
Butler:......# Qlik Sense related links used in notification messagesqlikSenseUrls:qmc:<URL to Qlik Sense QMC>hub:<URL to Qlik Sense Hub>appBaseUrl:<URL to Qlik Sense hub>/<virtual proxy, if any>/sense/app # Base URL for Qlik Sense apps, for example http://sense.mycompany.net/sense/app. App ID will be appended to this URL.
Qlik Sense Cloud has slightly different names for things, but the general principle is the same.
Cloud related links are set in this section of the config file:
qlikSenseCloud:# Settings for Qlik Sense Cloud integrationenable:falseevent:mqtt:# Which QS Cloud tenant should Butler receive events from, in the form of MQTT messages?tenant:...tenantUrl:https://tenant.region.qlikcloud.com...# Qlik Sense Cloud related links used in notification messagesqlikSenseUrls:qmc:<URL to QMC in Qlik Sense Cloud>hub:<URL to Hub in Qlik Sense Cloud>
Note
There is no appBaseUrl setting for Qlik Sense Cloud.
That URL is instead constructed on the fly by Butler based on tenantUrl and app ID.
Settings in the config file
Butler:......# Qlik Sense (client-managed) related links used in notification messagesqlikSenseUrls:qmc:<URL to Qlik Sense QMC>hub:<URL to Qlik Sense Hub>appBaseUrl:<URL to Qlik Sense hub>/<virtual proxy, if any>/sense/app # Base URL for Qlik Sense apps, for example http://sense.mycompany.net/sense/app. App ID will be appended to this URL.# Links available as template variables in notification messagesgenericUrls:- id:ptarmiganlabs_comlinkText:Ptarmigan Labs home pagecomment:The home page of the company behind Butlerurl:https://ptarmiganlabs.com- id:butler_docslinkText:Butler documentationcomment:The documentation for Butlerurl:https://butler.ptarmiganlabs.com......qlikSenseCloud:# Settings for Qlik Sense Cloud integrationenable:falseevent:mqtt:# Which QS Cloud tenant should Butler receive events from, in the form of MQTT messages?tenant:id:tenant.region.qlikcloud.comtenantUrl:https://tenant.region.qlikcloud.comauthType:jwt # Authentication type used to connect to the tenant. Valid options are "jwt"auth:jwt:token:<JWT token> # JWT token used to authenticate Butler when connecting to the tenant# Qlik Sense Cloud related links used in notification messagesqlikSenseUrls:qmc:<URL to QMC in Qlik Sense Cloud>hub:<URL to Hub in Qlik Sense Cloud>
3.16 - Real-time metrics (deprecated)
Details about the real-time metrics (active user count etc) provided by Butler.
Deprecated feature
Looking for info on number of active Sense users, what apps are loaded into the Sense engine or what warnings and errors are logged by Sense?
The metrics offered by Butler (this tool) are rather basic and has some inherit design issue that have been addressed in Butler SOS.
That said, there certainly are cases where Butler’s metrics will work fine.
Take a look at both tools and then decide which suits your needs best. The most common scenario is actually to use both tools: Butler for it’s REST API and MQTT integration, and Butler SOS for enterprise grade operational monitoring of Qlik Sense Enterprise.
4 - Examples
Butler in action!
First things first:
If you intend to use the various Qlik script snippets included in the GitHub repository, you first need to initialize things.
Initializing Butler in an app’s load script is easy, just call the ButlerInit function.
Note: It’s usually a good idea to create a shared data connection for scripts that are available to all Sense apps.
In the example below this shared data connection is simply called “Butler scripts”:
4.1 - Swagger UI: Try out the Butler API using the API docs
Assuming Butler is properly configured and running, it’s easy to try out Butler’s API.
This page shows some examples of interactions with the Butler API.
Below are some examples of how Butler’s built-in Swagger docs can be used to test-drive the Butler API.
Note: Some of the videos below were created with older Butler versions.
Details may have changed (for example what API parameters are available), the general concepts remain the same though.
OpenAPI documentation built into Butler
The complete documentation for Butler’s REST API is built into Butler itself.
This means that its very easy to try out and get familiar with the various API endpoints, without having to create Sense apps for everything you want to try out.
If Butler’s config file contains the settings below, the API will be available at http://192.168.1.168:8080.
In addition to the API endpoints, the API documentation will be available at http://192.168.1.168:8080/documentation.
The beauty of the Swagger docs is that you can also test drive the API itself. If you have Butler running it’s thus super easy to test the various REST API endpoints.
The API doc page looks like this:
Other tools for exploring APIs
If the OpenAPI interface to Butler’s API feels limited, there are lots of tools dedicated to this task.
Two good ones are:
Paw is Mac only, costs a bit of money, but is very, very good. Highly recommended.
Create, query, edit and delete task reload schedules using Butler’s scheduling API.
When watching the video below, you will notice there are two pre-defined schedules.
One of them fires every 30 seconds and this is also visible in the Butler logs:
List available Sense apps and extract them as JSON
List existing apps on Sense server, then export one of them to JSON.
4.2 - Flexible scheduling of Sense reload tasks
Examples showing how to use the Butler scheduler using direct API calls.
There are many ways to call REST APIs. In this page curl is used, but the same tests can be done using Paw, Postman and by using the REST connector from within Qlik Sense load scripts.
All the examples assume Butler is exposing it’s API on 192.168.1.168:8080.
List all defined schedules
Looks like there is currently one schedule:
➜ ~ curl "http://192.168.1.168:8080/v4/schedules"| json_pp
% Total % Received % Xferd Average Speed Time Time Time Current
Dload Upload Total Spent Left Speed
10030610030600164980 --:--:-- --:--:-- --:--:-- 20400[{"created" : "2021-10-08T07:24:38.373Z",
"cronSchedule" : "* */2 * * *",
"id" : "3702cec1-b6c8-463e-bda3-58d6a94dd9ac",
"lastKnownState" : "started",
"name" : "Every 2 hours",
"qlikSenseTaskId" : "0fe447a9-ba1f-44a9-ac23-68c3a1d88d8b",
"startupState" : "started",
"tags" : ["tag 3",
"abc 123 åäö"],
"timezone" : "Europe/London"}]➜ ~
Get a specific schedule
Let’s try to get a schedule that doesn’t exist:
➜ ~ curl "http://192.168.1.168:8080/v4/schedules?id=Manually-added-schedule-1"| json_pp
% Total % Received % Xferd Average Speed Time Time Time Current
Dload Upload Total Spent Left Speed
10011710011700145630 --:--:-- --:--:-- --:--:-- 29250{"error" : "Bad Request",
"message" : "REST SCHEDULER: Schedule ID Manually-added-schedule-1 not found.",
"statusCode" : 400}➜ ~
Here’s a schedule that does exist (as per the API call above):
➜ ~ curl "http://192.168.1.168:8080/v4/schedules?id=3702cec1-b6c8-463e-bda3-58d6a94dd9ac"| json_pp
% Total % Received % Xferd Average Speed Time Time Time Current
Dload Upload Total Spent Left Speed
10035410035400504990 --:--:-- --:--:-- --:--:-- 115k
{"created" : "2021-10-08T07:24:38.373Z",
"cronSchedule" : "* */2 * * *",
"id" : "3702cec1-b6c8-463e-bda3-58d6a94dd9ac",
"lastKnownState" : "started",
"name" : "Every 2 hours",
"qlikSenseTaskId" : "0fe447a9-ba1f-44a9-ac23-68c3a1d88d8b",
"startupState" : "started",
"tags" : ["tag 3",
"abc 123 åäö"],
"timezone" : "Europe/London"}➜ ~
Add new schedule
Note how we get back information about the newly created schedule. It’s the same data that was sent to the API method, with the addition of schedule id, created timestamp and last known state.
Looking in the Butler logs we see that the every-5-seconds schedule with an ID ending in …a300 indeed fires every 5 seconds:
Starting and stopping a schedule
Let’s stop the schedule we just created:
➜ ~ curl -X "PUT""http://192.168.1.168:8080/v4/schedules/b028d0a2-7116-41bf-b15a-4f01bd126464/stop"| json_pp
% Total % Received % Xferd Average Speed Time Time Time Current
Dload Upload Total Spent Left Speed
10021002002460 --:--:-- --:--:-- --:--:-- 500{}➜ ~
If we get info about this schedule, it should have lastKnownState=stopped… Let’s verify.
➜ ~ curl "http://192.168.1.168:8080/v4/schedules?id=fb9b16f1-e2cf-4291-8036-24ef90efa300"| json_pp
% Total % Received % Xferd Average Speed Time Time Time Current
Dload Upload Total Spent Left Speed
10030710030700 99k 0 --:--:-- --:--:-- --:--:-- 99k
{"created" : "2020-10-16T15:23:36.957Z",
"cronSchedule" : "*/5 * * * * *",
"id" : "fb9b16f1-e2cf-4291-8036-24ef90efa300",
"lastKnownState" : "stopped",
"name" : "Every 5 sec",
"qlikSenseTaskId" : "0fe447a9-ba1f-44a9-ac23-68c3a1d88d8b",
"startupState" : "started",
"tags" : ["tag 1",
"abc 123 åäö"],
"timezone" : "Europe/Stockholm"}➜ ~
Great!
As a final step, let’s start the schedule again, as well as verifying it was successfully started:
➜ ~ curl -X "PUT""http://192.168.1.168:8080/v4/schedules/fb9b16f1-e2cf-4291-8036-24ef90efa300/start"| json_pp
% Total % Received % Xferd Average Speed Time Time Time Current
Dload Upload Total Spent Left Speed
10030910030900772500 --:--:-- --:--:-- --:--:-- 77250[{"created" : "2020-10-16T15:23:36.957Z",
"cronSchedule" : "*/5 * * * * *",
"id" : "fb9b16f1-e2cf-4291-8036-24ef90efa300",
"lastKnownState" : "started",
"name" : "Every 5 sec",
"qlikSenseTaskId" : "0fe447a9-ba1f-44a9-ac23-68c3a1d88d8b",
"startupState" : "started",
"tags" : ["tag 1",
"abc 123 åäö"],
"timezone" : "Europe/Stockholm"}]➜ ~ curl "http://192.168.1.168:8080/v4/schedules?id=fb9b16f1-e2cf-4291-8036-24ef90efa300"| json_pp
% Total % Received % Xferd Average Speed Time Time Time Current
Dload Upload Total Spent Left Speed
10030710030700 149k 0 --:--:-- --:--:-- --:--:-- 149k
{"created" : "2020-10-16T15:23:36.957Z",
"cronSchedule" : "*/5 * * * * *",
"id" : "fb9b16f1-e2cf-4291-8036-24ef90efa300",
"lastKnownState" : "started",
"name" : "Every 5 sec",
"qlikSenseTaskId" : "0fe447a9-ba1f-44a9-ac23-68c3a1d88d8b",
"startupState" : "started",
"tags" : ["tag 1",
"abc 123 åäö"],
"timezone" : "Europe/Stockholm"}➜ ~
All good!
4.3 - Reload task chaining with parameters
Examples showing how to use Butler’s key-value store to pass parameters between apps in a reload chain, using calls to Butler’s API.
Reload chaining with parameters à la Butler
First: Some people argue that apps in an ETL chain should be atomic and not pass parameters to each other.
There is certainly some merit to this view, but there are also cases where you just have to tell the following app(s) what happened in a previous step in the reload chain. Some kind of parameter passing is thus needed.
Passing parameters between apps in a QMC reload chain can be done in various ways.
The most common option is to use what’s available in Sense out of the box:
Store the parameters in a disk file (CSV, QVD etc) in the first app, then load the parameters back into the second app when it is reloading.
Butler offers a different approach: Store and manipulate named key-value pairs within Butler, using its REST API.
It works like this:
Pretty easy, right?
One more thing. There is an optional but useful property for each KV pair: TTL, or time-to-live.
If a ttl is set (in milliseconds) for a KV pair, it will be automatically deleted when the ttl clock expire. This is an easy way to keep the Butler key-value store nice and tidy.
Data connections not included
In order to call Butler’s REST API you need a couple of REST data connections defined in Qlik Sense. The apps described in this example assumes Butler_Get and Butler_POST exists. They look like this:
Butler_GET
This data connection is trivial. When creating it any REST API that responds to GET requests can be used. Later on (before the calls to the Butler API) the URL will be replaced with the correct one = host:port where Butler is running.
Butler_POST
This data connection is a bit more complex.
First, in order to create the connection you need a REST endpoint that takes a POST with data passed in the body of the message. The data connection used by the apps in this example are found below. Note the http method, the request body and the Content-Type Query header. Any other settings can be ignored.
Secondly, Qlik Sense’s REST connector only supports GET and POST methods over http. That’s fine in this particular case, because we’ll use a POST to create a new key-value pair. On a general levels it’s however really quite bad that Qlik’s REST connector only supports GET and POST: PUT, DELETE and other http methods are certainly also used out there on the Internet, and should be supported too.
Some of the Butler API endpoints use PUT or DELETE methods, which is nothing strange at all - rather the opposite. Butler tries to follow best practices when it comes to using GET, POST, PUT and DELETE at the appropriate times.
We still need a way to invoke PUT and DELETE endpoints from Sense load script.
This is done in the script, by adding an extra http header in the call to Butler’s API: X-HTTP-Method-Override
If X-HTTP-Method-Override is set to PUT in the call to Butler’s API, the Butler will convert the call to a PUT call before it reaches the message dispatching within Butler. Same thing for DELETEs.
Parameter passing in action
The scenario is as follows:
App 1 needs to pass a parameter called “Parameter 1” to App 2
App 2 is scheduled to reload either directly or in some later stage after App 1.
App 1 stores the parameter in Butler’s key-value store during reload of App 1.
When App 2 reloads it pulls the parameter from the KV store.
When App 1 reloads the reload window looks like this. Note how the app has created a key-value pair within Butler.
App 2 is scheduled to reload when App 1 has finished reloading. Note that we get back the same value that was set by App 1. Mission accomplished.
Qlik script for passing parameters between apps
Let’s take a closer look at the two apps. The apps are available in the sense_apps directory of the Butler repository on GitHub.
The apps are called Butler 4.0 - Reload chain parameters, app 1.qvf and Butler 4.0 - Reload chain parameters, app 2.qvf.
App 1
The app has three script sections, each is shown below.
Script section 1: Init
The interesting parts here are the two variables towards the end. These tell the rest of the script where Butler is running.
SET ThousandSep=',';
SET DecimalSep='.';
SET MoneyThousandSep=',';
SET MoneyDecimalSep='.';
SET MoneyFormat='$#,##0.00;-$#,##0.00';
SET TimeFormat='h:mm:ss TT';
SET DateFormat='M/D/YYYY';
SET TimestampFormat='M/D/YYYY h:mm:ss[.fff] TT';
SET FirstWeekDay=6;
SET BrokenWeeks=1;
SET ReferenceDay=0;
SET FirstMonthOfYear=1;
SET CollationLocale='en-US';
SET CreateSearchIndexOnReload=1;
SET MonthNames='Jan;Feb;Mar;Apr;May;Jun;Jul;Aug;Sep;Oct;Nov;Dec';
SET LongMonthNames='January;February;March;April;May;June;July;August;September;October;November;December';
SET DayNames='Mon;Tue;Wed;Thu;Fri;Sat;Sun';
SET LongDayNames='Monday;Tuesday;Wednesday;Thursday;Friday;Saturday;Sunday';
SET NumericalAbbreviation='3:k;6:M;9:G;12:T;15:P;18:E;21:Z;24:Y;-3:m;-6:μ;-9:n;-12:p;-15:f;-18:a;-21:z;-24:y';
// The Butler instance is running at this IP/port:
let vButlerHost = '192.168.1.168';
let vButlerPort = '8080';
Script section 2: Sub definitions
Here we define two subs: One to get a bit more friendly looking trace messages, and one that encapsulates the code needed to store key-value pairs in Butler.
// ------------------------------------------------------------
// ** Time stamped trace messages **
//
// Get nice trace lines in the reload log by calling the line with
// CALL NiceTrace('My trace message. Variable value=$(vVariableName)');
//
// Parameters:
// vMsg : Message sent to reload log
// ------------------------------------------------------------
sub NiceTrace(vMsg)
let vNow = Now(1);
TRACE >>> $(vNow): $(vMsg);
// Clear timestamp variable
set vNow=;
end sub
// ------------------------------------------------------------
// ** Add key-value pair to a namespace **
//
// Parameters:
// vNamespace : Namespace in which the KV pair will be stored
// vKey : Key name
// vValue : Value to store together with key
// vTimeToLive : How long should the KV pair exist before being automatically deleted?
// Set to 0 to disable TTL feature (=no auto-delete of KV pair)
// ------------------------------------------------------------
sub AddKeyValue(vNamespace, vKey, vValue, vTimeToLive)
LIB CONNECT TO 'Butler_POST';
if (vTimeToLive>0) then
let vRequestBody = '{"key": "$(vKey)", "value": "$(vValue)", "ttl": "$(vTimeToLive)"}';
else
let vRequestBody = '{"key": "$(vKey)", "value": "$(vValue)"}';
end if
// Escape " in request body
let vRequestBody = replace(vRequestBody,'"', chr(34)&chr(34));
RestConnectorMasterTable:
SQL SELECT
"namespace",
"key",
"value",
"ttl"
FROM JSON (wrap on) "root"
WITH CONNECTION (
Url "http://$(vButlerHost):$(vButlerPort)/v4/keyvalues/$(vNamespace)",
BODY "$(vRequestBody)",
HTTPHEADER "Content-Type" "application/json"
);
DROP TABLE RestConnectorMasterTable;
end sub
Script section 3: Write parameters to KV store
Finally, the code needed to actually store the parameter in Butler is just a few lines:
Set host and port where Butler is running. Exactly the same script as in App 1.
SET ThousandSep=',';
SET DecimalSep='.';
SET MoneyThousandSep=',';
SET MoneyDecimalSep='.';
SET MoneyFormat='$#,##0.00;-$#,##0.00';
SET TimeFormat='h:mm:ss TT';
SET DateFormat='M/D/YYYY';
SET TimestampFormat='M/D/YYYY h:mm:ss[.fff] TT';
SET FirstWeekDay=6;
SET BrokenWeeks=1;
SET ReferenceDay=0;
SET FirstMonthOfYear=1;
SET CollationLocale='en-US';
SET CreateSearchIndexOnReload=1;
SET MonthNames='Jan;Feb;Mar;Apr;May;Jun;Jul;Aug;Sep;Oct;Nov;Dec';
SET LongMonthNames='January;February;March;April;May;June;July;August;September;October;November;December';
SET DayNames='Mon;Tue;Wed;Thu;Fri;Sat;Sun';
SET LongDayNames='Monday;Tuesday;Wednesday;Thursday;Friday;Saturday;Sunday';
SET NumericalAbbreviation='3:k;6:M;9:G;12:T;15:P;18:E;21:Z;24:Y;-3:m;-6:μ;-9:n;-12:p;-15:f;-18:a;-21:z;-24:y';
// The Butler instance is running at this IP/port:
let vButlerHost = '192.168.1.168';
let vButlerPort = '8080';
Script section 2: Sub definitions
Here we define a NiceTrace sub, and a sub for retrieving key-value pairs from Butler.
// ------------------------------------------------------------
// ** Time stamped trace messages **
//
// Get nice trace lines in the reload log by calling the line with
// CALL NiceTrace('My trace message. Variable value=$(vVariableName)');
//
// Parameters:
// vMsg : Message sent to reload log
// ------------------------------------------------------------
sub NiceTrace(vMsg)
let vNow = Now(1);
TRACE >>> $(vNow): $(vMsg);
// Clear timestamp variable
set vNow=;
end sub
// ------------------------------------------------------------
// ** Get key-value pair from a namespace **
//
// Parameters:
// vNamespace : Namespace in which the KV pair will be stored
// vKey : Key name
// vResultVarName : Name of variable in wich value will be placed
// ------------------------------------------------------------
sub GetKeyValue(vNamespace, vKey, vResultVarName)
LIB CONNECT TO 'Butler_GET';
RestConnectorMasterTable:
SQL SELECT
"key",
"value"
FROM JSON (wrap on) "root"
WITH CONNECTION (
Url "http://$(vButlerHost):$(vButlerPort)/v4/keyvalues/$(vNamespace)?key=$(vKey)"
);
let $(vResultVarName) = Peek('value', 0, 'RestConnectorMasterTable');
set vResultVarName=;
DROP TABLE RestConnectorMasterTable;
end sub
Script section 3: Read parameter from KV store
Again, the code needed to interact with the key-value API is pretty compact:
// Define variable to store the retrieved parameter in
let vParam1='';
Call NiceTrace('---------------------------')
Call NiceTrace('Loading parameter from Butler key-value store.')
Call GetKeyValue('Reload chain parameter demo', 'Parameter 1', 'vParam1')
Call NiceTrace('Retrieved parameter value:')
Call NiceTrace('Namespace="Reload chain parameter demo", Key="Parameter 1", Value="$(vParam1)"')
set vParam1=;
4.4 - Monitoring Butler's memory usage using Grafana
Butler can be configured to store its own memory usage in InfluxDB.
Here we look at how this works and how Grafana real-time charts can be created.
Butler can optionally store uptime information (Butler version number and memory usage) in InfluxDB or New Relic.
InfluxDB is a database for time-series data such as measurements, while New Relic is an enterprise grade, SaaS observability solution.
Once in InfluxDB it’s easy to create nice monitoring charts in Grafana or similar tools.
New Relic has their own built-in dashboard tool (but Grafana can actually load data from New Relic too!).
But hey - why spend CPU cycles and disk space on this?
Well, if you are serious about your Qlik Sense Enterprise environment, you should also be serious about your supporting tools and microservices, Butler included.
Even though Butler over the years has proven to be a very stable piece of software, there is always the risk of new features misbehaving or new bugs appearing.
It’s thus a good idea to monitor for example how much memory (RAM) tools like Butler use over time and alert if things go wrong.
Enable Butler’s uptime monitor
Both he uptime monitor and the logging to desired destination (InfluxDB or New Relic) must be enabled. Note that there are two settings for this. If your InfluxDB uses authentication you’ll need to enable this too in Butler’s config file.
If you use New Relic to monitor your uptime metrics you must first define the New Relic API credentials in the Butler config file’s Butler.thirdPartyToolsCredentials.newRelic settings, then configure the uptime monitoring specifics in Butler.uptimeMonitor.storeNewRelic.
The uptime monitoring part of the config file could looks like this:
# Uptime monitoruptimeMonitor:enable:false# Should uptime messages be written to the console and log files?frequency:every 15 minutes# https://bunkat.github.io/later/parsers.htmllogLevel:verbose# Starting at what log level should uptime messages be shown?storeInInfluxdb:enable:false# Should Butler memory usage be logged to InfluxDB?storeNewRelic:enable:falsedestinationAccount:- First NR account- Second NR account# There are different URLs depending on whther you have an EU or US region New Relic account.# The available URLs are listed here: https://docs.newrelic.com/docs/accounts/accounts-billing/account-setup/choose-your-data-center/# As of this writing the options for the New Relic metrics API are# https://insights-collector.eu01.nr-data.net/metric/v1# https://metric-api.newrelic.com/metric/v1url:https://insights-collector.eu01.nr-data.net/metric/v1# Where should uptime data be sent?header:# Custom http headers- name:X-My-Headervalue:Header valuemetric:dynamic:butlerMemoryUsage:enable:true# Should Butler's memory/RAM usage be sent to New Relic?butlerUptime:enable:true# Should Butler's uptime (how long since it was started) be sent to New Relic?attribute:static:# Static attributes/dimensions to attach to the data sent to New Relic.- name:metricTypevalue:butler-uptime- name:servicevalue:butler- name:environmentvalue:proddynamic:butlerVersion:enable:true# Should the Butler version be included in the data sent to New Relic?
Creating a InfluxDB database
When starting Butler for the first time and InfluxDB is enabled, it will connect to InfluxDB and if needed create a new database with a name controlled by the Butler.influxDb.dbName setting in the Butler config file.
A retention policy with its name controlled by the Butler.influxDb.retentionPolicy.name setting in the Butler config file will also be created:
Note that the only thing needed is a running InfluxDB instance. Butler creates the database in InfluxDB if needed, together with a retention policy that is defined in the Butler config file.
Hey data, are you there?
So far so good. Let’s wait a few minutes and then verify that New Relic and/or InfluxDB has received a few dataspoints.
The interval between the uptime messages is controlled by the Butler.uptimeMonitor.frequency setting in the Butler config file.
Using the InfluxDB command line client to connect to InfluxDB we can do a manual query:
Indeed, there are a few data points in InfluxDB. Butler’s uptime monitor seems to be working.
Butler + InfluxDB + Grafana = 🎉📈
Grafana has excellent support for InfluxDB, it’s therefore a good way to visualize Butler memory use over time.
To use the Grafana dashboard included in the Butler GitHub repository you first need to create a Grafana data source named Butler ops metrics, and point it to the InfluxDB database in which Butler stores its data.
Once the Grafana data source is in place and working you can import the Grafana dashboard file Butler operational metrics.json (available in the docs/grafana folder in the GitHub repo).
If everything works you’ll see something like this:
Looks like Butler is using ca 70 MByte here. This is pretty normal, memory usage is usually around 100 MByte, even when Butler has been running for days, weeks and months. Exact memory usage will vary depending on which features are enabled.
Butler’s version number is also included in the data sent to InfluxDB.
This means that you can easily create a Grafana dashboard showing which Butler version is running on which server.
If you have multiple Butler instances running in your environment, this can be very useful.
Butler + New Relic = 😎🌟
While InfluxDB combined with Grafana is hard to beat when it comes to flexibility and look’n’feel of the dashboards, New Relic is outstanding when it comes to ease of setup.
New Relic is a SaaS product which means you don’t have to host neither databases nor dashboard tool yourself.
It’s all there within New Relic.
What about cost? Is New Relic expensive?
Well, if you have lots of metrics, log files etc New Relic can become quite expensive as they charge you based on how much data you send to New Relic.
But given that Butler will send very little data you are unlikely to ever reach the limit of New Relic’s free tier.
There is thus a good chance you won’t even have to pay for New Relic if you only use it to monitor Butler.
A New Relic chart showing Butler memory usage can look like this:
Similarly to the Grafana dashboard, Butler’s version number is also included in the data sent to New Relic, and can be used to create a chart showing which Butler version is running on which server:
4.5 - Start Sense tasks using Butler APIs
4.5.1 - Start Sense tasks using REST API
Use Butler’s REST API to start Sense tasks
If the Butler config file is properly set up it’s possible to start Sense tasks by doing a PUT or POST call to /v4/reloadtask/{taskId}/start endpoint.
A great use case is to have upstream systems that feed Qlik Sense with data trigger a Sense task when new data is available.
That way Sense doesn’t have to poll for new data, with less system resources used in both upstream system and in Sense.
AND users get the new data as quickly as possible!
General principles
The API docs contain the best info for how the API works, a few things to keep in mind though:
Butler will verify that all specified task IDs exist before trying to start them. Invalid task IDs will be reported in the http response.
If the allTaskIdsMustExist URL parameter is set to true it means that all specified task IDs must be valid for any of them to be started.
Tasks associated with tags and custom properties are not affected by the allTaskIdsMustExist flag.
Requirements
These config file settings must be set up before Butler can use the REST API to start tasks:
Configure Butler’s REST server:
Butler.restServerConfig.enable: true
Butler.restServerConfig.serverHost: <IP or hostname where Butler’s REST server is running>
Two tasks, specified in the request body, were started.
Start multiple tasks using task IDs, all task IDs must exist, task filtering ON
Here two task IDs are valid and on the list of approved task IDs. One task ID is invalid (too short).
As allTaskIdsMustExist=true we expect that no task is started (all task IDs must exist for any task to be started based on task ID!).
Task filtering is turned on in the config file’s Butler.startTaskFilter.enable entry.
One invalid (too short!) task is returned in the response.
As there was one or more invalid task IDs, the two valid and approved task IDs were not started.
Their task IDs are returned in the denied array in the response.
Start multiple tasks using task IDs, all task IDs must exist, task filtering OFF
Here two task IDs are valid and on the list of approved task IDs. One task ID is invalid (too short).
As allTaskIdsMustExist=true we expect that no task is started (all task IDs must exist for any task to be started based on task ID!).
Task filtering is turned off in the config file’s Butler.startTaskFilter.enable entry.
The response and its message is the same as in the previous example:
No tasks were started based on task IDs.
One invalid (too short!) task is returned in the response.
As there was one or more invalid task IDs, the two valid and approved task IDs were not started.
Their task IDs are returned in the denied array in the response.
Start multiple tasks using task IDs, task filtering ON
Two task IDs are valid and on the list of approved task IDs.
One task ID is valid but not on list of approved task IDs.
One task ID is invalid (too short).
Task filtering is turned on in the config file’s Butler.startTaskFilter.enable entry.
As the task “Reload task of App2” had both values set for the custom property, this task was started twice.
Sending parameters to apps
Sometimes there is a need to send parameters from outside of Sense to an app that should be reloaded.
This is supported by Butler as follows:
Start a task and pass in one or more key-value pairs (=the parameters that should be sent to the app(s)) in the body of the call.
Have the app being reloaded read the key-value pairs from within the load script, using the Butler APIs.
Optional: Clear up (delete KV pairs or the namespace used) the key-value store when done.
Here a single task, identified by its ID in the URL, is started.
Two key-value pairs are passed along as parameters to the app. One has a TimeToLive of 10 seconds, the other has no TTL (=it will not be automatically deleted).
Task filtering is off, i.e. any task can be started using this API.
4.5.2 - Start Sense tasks from load script of Sense apps
Helper functions included
It is very much possible to call Butler’s REST API from the load script of Sense apps.
Create a REST connector in the Sense editor, configure it for the endpoint you want to call and use it from the load script.
This works but is tedious and quickly leads to lots of script code - especially if you need to make many calls to the Butler API.
To make things a bit easier the Butler GitHub repository includes a set of helper .qvs files.
These contain functions/subs that encapsulate various Butler APIs (include starting tasks) and make them easier to use.
Just include the butler_subs.qvs file from the GitHub release package and you get (among many other things) a helper function that’s called StartTask.
Requirements for starting tasks via REST API
These config file settings must be set up before Butler can use the REST API to start tasks:
Connection to Qlik Sense:
Butler.configQRS.*
Configure Butler’s REST server:
Butler.restServerConfig.enable: true
Butler.restServerConfig.serverHost: <IP or hostname where Butler’s REST server is running>
Sense data connections as described in the Getting started section.
Helper functions
There are two helper functions/sub for starting tasks:
StartTask(...) is a generic function that can be called with a single task ID, or with complex combinations of task IDs, tags, custom properties and key-value pairs.
StartTask_KeyValue(...) makes it easy to start a single task and pass along one key-value pair as parameter. This function is essentially a specialized version of the more generic StartTask sub.
Start a single task
The function(=sub in Sense lingo) StartTask takes a single taskId parameter, which means that starting a reload task from an app’s load script is as simple as
Call StartTask(<TaskId>)
The demo app Butler 8.4 demo app.qvf (link) contains such a demo (and many others).
Need to pass along parameters to a task? There’s a Sub for that!
Sometimes you need to send parameters to a reload task (or rather to the load script of the app associated with the task).
This can be done by using the StartTask_KeyValue helper function/Sub.
That Sub takes a taskId as parameter (similarly to its StartTask sibling), but it also takes parameters for a full key-value pair:
Call StartTask_KeyValue('fbf645f0-0c92-40a4-af9a-6e3eb1d3c35c', 'MyNamespace', 'An important key', 'The value', 3000)
The parameters are
The namespace to store the key-value pair in (required).
The key (required).
The value (required).
An time-to-live value in milliseconds (optional). When the ttl times out the key-value pair is automatically deleted.
Documentation about Butler’s key-value store is available here.
An example showing how task chaining with parameters can be done using key-values is found here.
Start several tasks using task IDs
If several tasks should be started using task IDs, those IDs need to be passed into the StartTask sub.
This is done by storing the task IDs in a separate table whose name is passed as a parameter into StartTask:
These tables can be called anything as long as
They are qualified (i.e. keep the “Qualify *;” statement!).
The table names are passed as parameters to the StartTask function.
The table MUST have a field called TaskId that contains the IDs of reload tasks to be started.
Regarding parameters to StartTask:
Trailing, unused parameters can be omitted.
Unused parameters that are followed by used parameters should be set to Null().
Example 1
The script below will start tasks fbf645f0-0c92-40a4-af9a-6e3eb1d3c35c (via the first parameter), 7552d9fc-d1bb-4975-9a38-18357de531ea (via second parameter, i.e. a table) and fb0f317d-da91-4b86-aafa-0174ae1e8c8f (via second parameter too).
Similar to how multiple tasks can be started using a table of task IDs (see above), tasks can also be started using a table containing custom property names and values.
Example 1
The script below will start all reload tasks that have the taskGroup custom property set to a value of tasks1.
Butler can be configured to listen to a specific MQTT topic (specified in config file property Butler.mqttConfig.taskStartTopic) and use any message received in that topic as a Sense task ID, which is then started.
For example:
A Sense app, used by end users, relies on data in a source system that talks MQTT (there are lots of MQTT libraries available, covering most operating systems).
The data in the source system can be updated at any time.
In order to update the Sense app with data the most common approach is to schedule reloads of the Qlik Sense app at certain intervals, i.e. polling the source system.
But if the source system instead posts a MQTT message on a well defined topic when new data is available, that message will trigger the Sense app’s reload.
This way the Sense app will be updated as quickly as possible after new data is available in the source system.
I.e. the end user will have access to more up-to-date data, compared to the polling based solution.
Requirements for starting tasks via MQTT
These config file settings must be set up before Butler will use MQTT messages to start tasks:
Connection to MQTT broker (=server):
Butler.mqttConfig.enable: true
Butler.mqttConfig.brokerHost:
Butler.mqttConfig.brokerPort:
MQTT topics that Butler should subscribe to
Butler.mqttConfig.subscriptionRootTopic: <Root topic that Butler should subscribe to. Something like qliksense/#>
Butler.mqttConfig.taskStartTopic: <Topic used to start Sense tasks. MUST be a suptopic to the root topic above!>
4.6 - Controlled and secure file system operations
For security reasons Qlik Sense does not offer direct access to the file system from load scripts. Using lib:// constructs files can be read and written, but not copied, moved or deleted.
Butler has APIs that enabled file copy/move/delete in a secure, controlled way.
Goal: Copy, move and delete files from Sense load scripts
These steps are needed to achieve the goal:
Install and configure Butler’s general settings.
Add the directories in which file operations should be allowed to Butler’s config file.
Make sure the account Butler runs under has the appropriate access to those directories.
Call the Butler APIs directly or use the subs included in the GitHub repo to do the desired file operations.
Warning: UNC paths only on Windows
UNC paths (i.e. “\\host\fileshare\folder1\folder2”) is a Windows-only feature and as such only supported when Butler is running on Windows.
If Butler is running on a non-Windows operating system and directories on network file shares should be accessible via Butler’s REST API, those directories must be mounted on the server using the standard OS mechanisms, then accessed via the server’s local file system.
Butler will warn in the console and file logs if UNC paths are specified in the config file, and Butler is NOT running on Windows.
The general idea is:
For each file system operation (copy, move and delete) you can specify in which (or between which) directories that operation should be allowed.
This is straight forward, but because Butler can run on different operating systems AND access file shares hosted by various OSs, things can get a bit complicated.
In most cases the paths to use are the expected ones, but when it comes to UNC paths they can for example either use forward slash “/” or back ditto “\”.
Both work as all paths are normalized into an internal, uniform format when loaded into Butler.
Note that all subdirectories of the directories listed in the config file are also considered to be approved directories by Butler.
A few examples show how to deal with some common scenarios:
fileCopyApprovedDirectories:- fromDirectory:/data1/qvd# Butler running on Linux, with either a local directory in /data1, or a remote fileshare mounted into /data1toDirectory:/data2/qvd_archive- fromDirectory:e:\data3\qvd# Butler running on Windows Server, accessing files/directories in the local file systemtoDirectory:e:\data4\qvd_archive- fromDirectory://server1.my.domain/fileshare1/data1# Butler running on Windows server, accessing a SMB file share (which can be on a Windows or Linux server)toDirectory://server1.my.domain/fileshare1/data2- fromDirectory:\\server1.my.domain\fileshare1\data1toDirectory:\\server1.my.domain\fileshare1\data2fileMoveApprovedDirectories:- fromDirectory:/data7/qvdtoDirectory:/data8/qvd_archive- fromDirectory:e:\data9\qvdtoDirectory:e:\data10\qvd_archive- fromDirectory://server2.my.domain/data1/qvdtoDirectory://server2.my.domain/data1/qvd_archivefileDeleteApprovedDirectories:- /data1/qvd_archive- e:\data1\qvd_archive- //server3.my.domain/data1/qvd_archive- \\server3.my.domain\data1\qvd_archive
This configuration (for example) means:
Copying can be done from e:\data3\qvd to e:\data4\qvd_archive, but not from e:\data3\qvd to e:\data6\qvd_archive
Moving files can be done from /data7/qvd to /data8/qvd_archive, but not from /data7/qvd to e:\data9\qvd
Files can be deleted in the directories /data1/qvd_archive, e:\data1\qvd_archive and (using UNC notation) \\server3.my.domain\data1\qvd_archive.
3. Create Sense data connections used to call Butler’s REST API
Once you know what file path format to use (see above), using the helper subs is pretty easy:
// Where is Butler running?
let vButlerHost = 'http://10.11.12.13';
let vButlerPort = 8080;
// Delete files
Call DeleteFile('/data1/qvd_archive/a.txt')
Call DeleteFile('e:\data1\qvd_archive\a.txt')
Call DeleteFile('//server3.my.domain/data1/qvd_archive\a.txt')
// Copy files with options overwrite-if-exists=true and keep-source-timestamp=true
Call CopyFile('/data1/qvd/a.txt', '/data2/qvd_archive/a.txt', 'true', 'true')
Call CopyFile('e:\data5\qvd\a.txt', 'e:\data6\qvd_archive\a.txt', 'true', 'true')
// Move files with option overwrite-if-exists=true
Call MoveFile('/data7/qvd/a.txt', '/data8/qvd_archive/a.txt', 'true')
Call MoveFile('e:\data9\qvd\a.txt', 'e:\data10\qvd_archive\a.txt', 'true')
If you prefer to call the REST API directly, the DeleteFile sub might provide some inspiration:
// ------------------------------------------------------------
// ** Delete file **
//
// Files can only be deleted in folders (and subfolders of) directories that
// have been approved in the Butler config file.
//
// Parameters:
// vFile : File to be deleted.
// ------------------------------------------------------------
sub DeleteFile(vFile)
let vFile = Replace('$(vFile)', '\', '/');
let vFile = Replace('$(vFile)', '#', '%23');
let vRequestBody = '{""deleteFile"":""$(vFile)""}';
LIB CONNECT TO 'Butler_POST';
RestConnectorMasterTable:
SQL SELECT
"vFile"
FROM JSON (wrap on) "root"
WITH CONNECTION (
Url "$(vButlerHost):$(vButlerPort)/v4/filedelete",
BODY "$(vRequestBody)",
HTTPHEADER "X-HTTP-Method-Override" "DELETE"
);
set vFile=;
set vRequestBody=;
DROP TABLE RestConnectorMasterTable;
end sub
Note how the HTTP operation is set using the X-HTTP-Method-Override HTTP header.
This is a way to work around a limitation of Qlik’s REST connector, as it only supports GET and POST operations. The extra HTTP header tells Butler what kind of HTTP operation should really be carried out.
Examples using UNC paths
When specifying UNC paths in the Butler config file and running Butler on a non-Windows operating system, you will get warnings like the ones below.
The approved directories sections of the config file look like this:
Butler:....# List of directories between which file copying via the REST API can be done.fileCopyApprovedDirectories:- fromDirectory:/from/some/directory2toDirectory:/to/some/directory2- fromDirectory://1.2.3.4/qlik/testdata/deletefile1toDirectory://1.2.3.4/qlik/testdata/deletefil2# List of directories between which file moves via the REST API can be done.fileMoveApprovedDirectories:- fromDirectory:/from/some/directory3toDirectory:/to/some/directory3- fromDirectory://1.2.3.4/qlik/testdata/deletefile1toDirectory://1.2.3.4/qlik/testdata/deletefil2fileDeleteApprovedDirectories:- /from/some/directory2- \\1.2.3.4\qlik\testdata\deletefile3
In this case Butler is running on macOS (with IP 192.168.1.168 on port 8081) and we get warnings in the logs when starting Butler:
Startup warnings about non-compatible UNC paths when running Butler on macOS.
When trying to do a file operation (in this case a delete) using an UNC path (Butler is still running on macOS!) we get a warning in the logs and a http error returned to the Sense script:
http error returned when trying to delete a file via a UNC path, and Butler is running on macOS.
Warnings in log for the previous scenario.
4.7 - Sense apps that explain and highlight various Butler features
Butler comes with several demo apps.
Feel free to review them to get a better understanding of how Butler can be used.
4.7.1 - Using Butler APIs from Sense load script
This app uses the helper subs call some of Butler’s APIs. It’s not diving too deep into any particular feature, but rather just calls most APIs to show how it’s done.
If unsure what the parameters of the helper subs should look like, this page might be useful.
Calling the Butler API from Sense app’s load script
The demo app Butler 5.0 - demo app.qvf is available in the GitHub repository.
The app includes examples on how to use many of Butler’s REST APIs endpoints.
It doesn’t have much of a user interface (it just shows what API endpoints are enabled) so you should look at the load script to get examples of how to use the Butler APIs.
The app includes a copy of the helper functions that are also available in the GitHub repository.
4.7.2 - Partial loads in Qlik Sense
It’s surprisingly difficult to do partial loads in Qlik Sense Enterprise on Windows.
In QlikView that feature was easily available, but in QSEoW it’s currently not possible to create reload tasks that do partial app reloads.
Butler has an API for doing partial reloads of apps. A couple of demo apps are also included in the GitHub repository.
Partial reload API
The full API documentation is available in the Reference section, here we’re interested in the PUT /v4/app/{appId}/reload endpoint.
Demo app showing how to post message to Slack from Qlik Sense load script.
Load script
Assuming the .qvs helper subs are used, only one line of script is needed to send a Slack message:
// -------------------------------------------
// Post message to Slack
// -------------------------------------------
// Post a basic message to Slack
Call PostToSlack('#general', 'Butler the Bot', '👽 Greetings, we come in peace.' , ':ghost:')
Note how emojis can be used in the message and a message specific icon can be used (":ghost:" above).
Demo app showing how to publish message to MQTT from Qlik Sense load script.
Load script
Assuming the .qvs helper subs are used, only one line of script is needed to publish a MQTT message.
The demo app does a bit more. First it posts a startup message to MQTT, then it loads some data and finally an all-done message is sent:
// -------------------------------------------
// Publish a MQTT message, load some data and publish another message
Call PostToMQTT('butler/5.0/demo-reloading/status', 'reload started')
// Load some data
Characters:
Load Chr(RecNo()+Ord('A')-1) as Alpha, RecNo() as Num autogenerate 26;
// Publish final message
Call PostToMQTT('butler/5.0/demo-reloading/status', 'reload done')
The MQTT messages look like this in the MQTT Explorer app on mac OS:
If running Butler on a Windows computer it is possible to install Butler as a Windows service.
This means that Butler will start automatically when the computer starts, and will run in the background without any user interaction.
A blog post on ptarmiganlabs.com goes through the steps required to install Butler SOS as a Windows service, the steps needed for Butler are virtually identical.
Butler is a complex piece of software, and it is not uncommon to run into issues when setting up and configuring Butler.
In the vast majority of cases, the issues are caused by misconfiguration, and not by bugs in the tool itself.
This page contains some tips and tricks that can be useful when troubleshooting a Butler instance.
General things to check
Is Butler running?
The first thing to check is if Butler is running at all.
If Butler is running as a Windows service, check the Windows Services applet to see if the service is running.
If Butler is running as a Docker container, check the Docker container status with the docker ps command.
Logs
Make sure logging to file is enabled in the Butler configuration file.
Take note of the log file location.
Then check the log files for errors and warnings.
In theory errors and warnings can occur as part of normal operation, but that should be rate.
If there are errors or warnings during startup, or if there are a lot of errors and warnings, then there is most likely a problem.
You can also try increasing the log level to verbose or even debug to get more information about what’s happening, and where in Butler the problem is occurring.
Logging level is configured in the Butler configuration file or via the --loglevel command line parameter (which takes precedence over the configuration file).
Incorrect config file
The Butler configuration file is a YAML file, and it is easy to make mistakes when editing it.
Butler validates the configuration file when it starts and if there are any syntax errors in the file, Butler will not start.
It will also show what the error is.
Can look like below, starting Butler 13.0 with a 12.x config file on Windows Server 2019:
.\butler.exe --configfile .\config\butler-config.yaml
...
...
2024-10-15T06:42:34.564Z info: CONFIG: Influxdb enabled: true
2024-10-15T06:42:34.565Z info: CONFIG: Influxdb host IP: 10.11.12.13
2024-10-15T06:42:34.568Z info: CONFIG: Influxdb host port: 8086
2024-10-15T06:42:34.569Z info: CONFIG: Influxdb db name: butler
2024-10-15T06:42:35.512Z error: VERIFY CONFIG FILE: /Butler/scriptLog/storeOnDisk : must have required property 'clientMan
2024-10-15T06:42:35.513Z error: VERIFY CONFIG FILE: /Butler/scriptLog/storeOnDisk : must have required property 'qsCloud'
2024-10-15T06:42:35.516Z error: VERIFY CONFIG FILE: /Butler/scriptLog/storeOnDisk : must NOT have additional properties
Here Butler is complaining about missing required properties in the scriptLog section of the configuration file.
And indeed, that section has changed in version 13.0, and the configuration file needs to be updated.
Feature specific issues
Failed reload alerts not working
Butler offers quite comprehensive support for dealing with failed or aborted reloads tasks.
As such there are a number of things that can go wrong and settings that can be misconfigured.
When configured correctly, Butler’s logs can look like below.
In this example Butler has received a reload task failure event from Qlik Sense, and is now sending out notifications to the following channels:
Script log archive (all failed reload logs are archived to a folder on disk)
InfluxDB (from where the reload failure can be visualized in a Grafana dashboard)
Slack
Teams
Outgoing webhook
Email
2024-01-10T05:47:52.992Z info: SCRIPTLOG STORE: Writing failed task script log: C:\tools\butler\config\scriptlog\2024-01-10\2024-01-10_06-47-52_appId=8f1d1ecf-97a6-4eb5-8f47-f9156300b854_taskId=22b106a8-e7ed-4466-b700-014f060bef16.log
2024-01-10T05:47:52.994Z info: INFLUXDB RELOAD TASK FAILED: Sending reload task notification to InfluxDB
2024-01-10T05:47:53.008Z info: SLACK RELOAD TASK FAILED: Rate limiting check passed for failed task notification. Task name: "Reload of Test failing reloads 1 (emojis supported! 🤪)"
2024-01-10T05:47:53.017Z info: TEAMS RELOAD TASK FAILED: Rate limiting check passed for failed task notification. Task name: "Reload of Test failing reloads 1 (emojis supported! 🤪)"
2024-01-10T05:47:53.021Z info: WEBHOOK OUT RELOAD TASK FAILED: Rate limiting check passed for failed task notification. Task name: "Reload of Test failing reloads 1 (emojis supported! 🤪)"
2024-01-10T05:47:53.300Z info: EMAIL RELOAD TASK FAILED ALERT: Rate limiting check passed for failed task notification. Task name: "Reload of Test failing reloads 1 (emojis supported! 🤪)", Recipient: "joe@company.com"
Tip
Rate limiting is defined in the Butler configuration file.
If the rate limiting condition is met, this will be shown as “Rate limiting check passed for failed task notification” in the logs.
Things to check:
Is Butler receiving the reload task events from Qlik Sense?
Is the failed/aborted reload UDP server in Butler enabled and working?
The UDP server is enabled via the Butler.udpServerConfig.enabled setting in the Butler configuration file.
The IP address/host and port where Butler is listening for UDP events is configured via the Butler.udpServerConfig.serverHost and Butler.udpServerConfig.portTaskFailure settings in the Butler configuration file.
If working correctly, the log will show a message like this: TASKFAILURE: UDP server listening on 10.11.12.13:9998
If there is a problem with the UDP server, the log might show a message like this (in this case the IP address is not valid for the Butler host): TASKFAILURE: Error in UDP error handler: Error: getsockname EINVAL
Check the Butler log files.
When Butler receives a reload task event from Qlik Sense, it will check if rate limiting conditions are met, and also log a message about that.
If there are no such messages:
Butler has not received the event from Qlik Sense.
Check the XML appender files deployed to the Qlik Sense servers. Make sure they send UDP events to the host and port where Butler is listening.
Try pinging the host where Butler is running, from the Qlik Sense server (ping <butler host>). If the ping fails, there is probably a network issue.
Try doing a telnet to the UDP port where Butler is listening from the Qlik Sense server (telnet <butler host> <butler port>). If the telnet fails, there is for sure a network issue.
Make sure reload failure events are enabled in the Butler configuration file.
Are reload failure events received from some Sense nodes, but not others?
Check the XML appenders on the nodes where the events are not received.
Check the network connectivity between the nodes and the Butler host.
The XML appender files can be identical on all nodes.
Are some reload failure events forwarded to destinations, but not others?
Check the Butler log files.
Is rate limiting enabled? If so, check the rate limiting settings in the Butler configuration file.
If events arrive more frequently than the rate limiting settings allow, Butler will not forward all events.
A failed rate limiting check will result in a log warning: Rate limiting failed. Not sending reload notification email for task ...
Are alerts forwarded to some destination, but not others?
Each destination can be enabled/disabled individually in the Butler configuration file.
Make sure the destination you are interested in is enabled.
5 - Reference docs
Detailed, more technical descriptions of Butler’s REST API and other parts of Butler.
5.1 - Command line options
Description of Butler’s command line options.
Command line options
When starting Butler, you can pass command line options to customize its behavior.
Looks like this:
Usage: butler [options]Butler gives superpowers to client-managed Qlik Sense Enterprise on Windows!
Advanced reload failure alerts, task scheduler, key-value store, file system access and much more.
Options:
-V, --version output the version number
-c, --configfile <file> path to config file
-l, --loglevel <level> log level (choices: "error", "warn", "info", "verbose", "debug", "silly") --new-relic-account-name <name...> New Relic account name. Used within Butler to differentiate between different target New Relic accounts
--new-relic-api-key <key...> insert API key to use with New Relic
--new-relic-account-id <id...> New Relic account ID
--test-email-address <address> send test email to this address. Used to verify email settings in the config file.
--test-email-from-address <address> send test email from this address. Only relevant when SMTP server allows from address to be set.
--no-qs-connection don't connect to Qlik Sense server at all. Run in isolated mode
--api-rate-limit set the API rate limit, per minute. Default is 100 calls/minute. Set to 0 to disable rate limiting.
--skip-config-verification Disable config file verification (default: false) -h, --help display helpforcommand
-V, –version
Output the version number of Butler.
-c, –configfile
Specifies the configuration file to use.
Valid values: A path to a configuration file.
Default: Whatever is specified in the NODE_ENV environment variable, with a .yaml extension added. Butler will look for that file in the ./config directory.
Example:
-c or --configfile are not specified. NODE_ENV is set to production. Butler will try to read settings from ./config/production.yaml.
-l, –loglevel
Specifies the log level to use.
When set, this overrides the log level specified in the configuration file.
When using New Relic as backend for storing logs, information about failed reloads etc, you can specify New Relic credentials in the config file - but that is not ideal from a security perspective.
To avoid that, you can specify the New Relic credentials on the command line using the following options.
–new-relic-account-name
List of New Relic account names. Used within Butler to differentiate between different target New Relic accounts to which data can be sent. This name has nothing to do with the account name used in New Relic - it’s purely for Butler’s internal use.
Specifically, it’s at multiple places in the config file where you can specify to which New Relic account to send data.
Enclose account names in quotes if they contain spaces.
Separate multiple account names with a space.
List of New Relic API keys. Used to authenticate with New Relic.
Enclose API keys in quotes if they contain spaces.
Separate multiple API keys with a space. Note that the order of the API keys must match the order of the account names, i.e. the first API key corresponds to the first account name, the second API key corresponds to the second account name, and so on.
List of New Relic account IDs. Used to identify the New Relic account to which data should be sent.
Enclose account IDs in quotes if they contain spaces.
Separate multiple account IDs with a space. Note that the order of the account IDs must match the order of the account names, i.e. the first account ID corresponds to the first account name, the second account ID corresponds to the second account name, and so on.
Send test email
Butler has several alerting features for sending emails when some event happens (typically something failing…) in Sense.
To verify that the email settings in the config file are correct, you can send a test email using the following options.
–test-email-address
Send a test email to this address, using the SMTP configuration in the config file.
Used to verify email settings in the config file.
This is the destination address for the test email.
–test-email-from-address
Send a test email to this address, using the SMTP configuration in the config file.
Used to verify email settings in the config file.
This is the sender address for the test email. Only relevant when the SMTP server allows the from address to be set.
–no-qs-connection
Don’t connect to Qlik Sense server at all. Run in isolated mode.
This is probably only relevant when you’re developing Butler and don’t have a Qlik Sense server available, or when you want to automatically exporting the API docs for Butler’s REST API (this is done during the build process).
–api-rate-limit
Set the rate limit of Butler’s REST API, per minute. Default is 100 calls/minute. Set to 0 to disable rate limiting.
Useful when you want to ensure that Butler (or the server it runs on) doesn’t get overloaded with requests.
–skip-config-verification
Disable config file verification.
By default, Butler verifies the config file when it starts. If the config file is invalid, Butler will log an error and exit.
Use this option to disable config file verification.
-h, –help
Display help for command.
5.2 - Config file syntax
Description of Butler’s config file.
Main Butler config file
The production_template.yaml config file looks like this (sorry for the incorrect syntax coloring, the issue is noted and is being worked on):
Info
Starting with Butler version 9.0 there is a check that the config file has the correct format.
This means that if you forget to add or change some setting in the main YAML config file, Butler will tell you what’s missing and refuse to start.
A consequence of this is that all settings are now mandatory, even if you don’t use them.
Trying to start Butler without some mandatory settings in the config file will result in an error message like this:
Adding the missing settings and restarting Butler will result in a successful startup.
---Butler:# General notes:# - File and directory paths in this sample config file use Linux/Mac syntax, i.e. using forward slashes.# Windows paths work just as well, just make sure to quote them with single or double quotes.# - All entries in the config file are mandatory in the sense that they must be present.# However, if a feature is not used the corresponding config entries can contain# any value (for example the provided default ones).# - Butler will start using the settings in this file if the follwing settings are set first:# - Butler.cert.clientCert: Set to the path of the client certificate file. If relative paths cause issues, use an absolute path.# - Butler.cert.clientCertKey: Set to the path of the client key file. If relative paths cause issues, use an absolute path.# - Butler.cert.clientCertCA: Set to the path of the CA certificate file. If relative paths cause issues, use an absolute path.# - Butler.configEngine.host: Set to the IP or FQDN of the host where the Sense engine service is running.# - Butler.configEngine.port: Set to the port where the Sense engine service is listening.# - Butler.configQRS.host: Set to the IP or FQDN of the host where the Qlik Repository Service (QRS) is running.# - Butler.configQRS.port: Set to the port where the Qlik Repository Service (QRS) is listening.# - Having set the above settings, Butler will start and run, but it will not do anything useful until you configure# the various monitoring and notification settings, as described at https://butler.ptarmiganlabs.com.# Logging configurationlogLevel:info# Log level. Possible log levels are silly, debug, verbose, info, warn, errorfileLogging:false# true/false to enable/disable logging to disk filelogDirectory:log# Directory where log files are stored (no trailing / )anonTelemetry:true# Can Butler send anonymous telemetry data?# More info on whata data is collected: https://butler.ptarmiganlabs.com/docs/about/telemetry/# Please consider leaving this at true - it really helps future development of Butler!# Should Butler start a web server that serves an obfuscated view of the Butler config file?configVisualisation:enable:truehost:localhost# Hostname or IP address where the web server will listen. Should be localhost in most cases.port:3100# Port where the web server will listen. Change if port 3100 is already in use.obfuscate:true# Should the config file shown in the web UI be obfuscated?# Heartbeats can be used to send "I'm alive" messages to any other tool, e.g. an infrastructure monitoring toolheartbeat:enable:falseremoteURL:http://my.monitoring.server/some/path/frequency:every 30 seconds# https://bunkat.github.io/later/parsers.html#text# Docker health checks are used when running Butler as a Docker container.# The Docker engine will call the container's health check REST endpoint with a set interval to determine# whether the container is alive/well or not.# If you are not running Butler in Docker you can safely disable this feature.dockerHealthCheck:enable:false# Control whether a REST endpoint will be set up to serve Docker health check messagesport:12398# Port the Docker health check service runs on (if enabled)# Uptime monitoruptimeMonitor:enable:false# Should uptime messages be written to the console and log files?frequency:every 15 minutes# https://bunkat.github.io/later/parsers.html#textlogLevel:verbose# Starting at what log level should uptime messages be shown?storeInInfluxdb:enable:false# Should Butler memory usage be logged to InfluxDB?storeNewRelic:enable:falsedestinationAccount:- First NR account- Second NR account# There are different URLs depending on whther you have an EU or US region New Relic account.# The available URLs are listed here: https://docs.newrelic.com/docs/accounts/accounts-billing/account-setup/choose-your-data-center/# As of this writing the options for the New Relic metrics API are# https://insights-collector.eu01.nr-data.net/metric/v1# https://metric-api.newrelic.com/metric/v1url:https://insights-collector.eu01.nr-data.net/metric/v1# Where should uptime data be sent?header:# Custom http headers- name:X-My-Headervalue:Header valuemetric:dynamic:butlerMemoryUsage:enable:true# Should Butler's memory/RAM usage be sent to New Relic?butlerUptime:enable:true# Should Butler's uptime (how long since it was started) be sent to New Relic?attribute:static:# Static attributes/dimensions to attach to the data sent to New Relic.- name:metricTypevalue:butler-uptime- name:servicevalue:butler- name:environmentvalue:proddynamic:butlerVersion:enable:true# Should the Butler version be included in the data sent to New Relic?# Credentials for third party systems that Butler integrate with.# These can also be specified via command line parameters when starting Butler.# Command line options takes precedence over settings in this config file.thirdPartyToolsCredentials:newRelic:# Array of New Relic accounts/insert keys. Any data sent to New Relic will be sent to both accounts.# - accountName: First NR account# insertApiKey: <API key 1 (with insert permissions) from New Relic># accountId: <New Relic account ID 1># - accountName: Second NR account# insertApiKey: <API key 2 (with insert permissions) from New Relic># accountId: <New Relic account ID 2># InfluxDB settingsinfluxDb:enable:false# Master switch for InfluxDB integration. If false, no data will be sent to InfluxDB.hostIP:influxdb.mycompany.com# IP or FQDN of Influxdb serverhostPort:8086# Port where Influxdb is listening. Default=8086auth:enable:false# Does InfluxDB require login?username:user_joepassword:joesecretdbName:butler# Name of database in InfluxDB to which Butler's data is written# Default retention policy that should be created in InfluxDB when Butler creates a new database there.# Any data older than retention policy threshold will be purged from InfluxDB.retentionPolicy:name:10dduration:10dtag:static:# Static tags to attach to all data stored in InfluxDB# - name: butler_instance# value: devreloadTaskFailure:enable:truetailScriptLogLines:20tag:static:# Static tags to attach to data stored in InfluxDB- name:butler_instancevalue:prod-1dynamic:useAppTags:true# Should app tags be stored in InfluxDB as tags?useTaskTags:true# Should task tags be stored in InfluxDB as tags?reloadTaskSuccess:enable:trueallReloadTasks:enable:falsebyCustomProperty:enable:truecustomPropertyName:"Butler_SuccessReloadTask_InfluxDB"enabledValue:"Yes"tag:static:# Static attributes/dimensions to attach to events sent to InfluxDb# - name: event-specific-tag 1# value: abc 123dynamic:useAppTags:true# Should app tags be sent to InfluxDb as tags?useTaskTags:true# Should task tags be sent to InfluxDb as tags?# Store script logs of failed reloads on disk.# The script logs will be stored in daily directories under the specified main directory below# NOTE: Use an absolute path when running Butler as a standalone executable!scriptLog:storeOnDisk:clientManaged:reloadTaskFailure:enable:falselogDirectory:/path/to/scriptlogs/qseowqsCloud:appReloadFailure:enable:falselogDirectory:/path/to/scriptlogs/qscloud# Qlik Sense (client-managed) related links used in notification messagesqlikSenseUrls:qmc:<URL to Qlik Sense QMC>hub:<URL to Qlik Sense Hub>appBaseUrl:<URL to Qlik Sense hub>/<virtual proxy, if any>/sense/app# Base URL for Qlik Sense apps, for example http://sense.mycompany.net/sense/app. App ID will be appended to this URL.# Links available as template variables in notification messagesgenericUrls:- id:ptarmiganlabs_comlinkText:Ptarmigan Labs home pagecomment:The home page of the company behind Butlerurl:https://ptarmiganlabs.com- id:butler_docslinkText:Butler documentationcomment:The documentation for Butlerurl:https://butler.ptarmiganlabs.com# Settings for monitoring Qlik Sense version info# Version info is retrieved from the hostname:9032/v1/systeminfo endpoint in Qlik SenseqlikSenseVersion:versionMonitor:enable:false# Should Qlik Sense version info be retrieved?frequency:every 24 hours# https://bunkat.github.io/later/parsers.html#texthost:<FQDN or IP of Qlik Sense central node>rejectUnauthorized:false# Set to false to ignore warnings/errors caused by Qlik Sense's self-signed certificates.destination:influxDb:# Store version data in InfluxDB.# If enabled, version info will be stored as measurements in InfluxDB.enable:falsetag:static:# Static attributes/tags to attach to the data sent to InfluxDB- name:foovalue:bar# Settings for monitoring Qlik Sense licensesqlikSenseLicense:serverLicenseMonitor:enable:falsefrequency:every 24 hours# https://bunkat.github.io/later/parsers.html#textalert:# Alert if the number of days left on the license is below the threshold# License expiry alerts on a global level are enabled here, then configured on# a per-destination basis elsewhere in this config file.thresholdDays:60destination:influxDb:# Store license data in InfluxDBenable:falsetag:static:# Static attributes/tags to attach to the data sent to InfluxDB- name:foovalue:barmqtt:enable:falsesendRecurring:# Send license data to the MQTT broker at the frequency specified aboveenable:truesendAlert:# Send an MQTT alert if the number of days left on the license is below the thresholdenable:truewebhook:enable:falsesendRecurring:# Send license data to webhook(s) at the frequency specified aboveenable:truesendAlert:# Send alert to webhook(s) if the number of days left on the license is below# the threshold or the license has already expiredenable:truelicenseMonitor:# Monitor Qlik Sense accesds license usageenable:falsefrequency:every 6 hours# https://bunkat.github.io/later/parsers.html#textdestination:influxDb:# Store license data in InfluxDBenable:falsetag:static:# Static attributes/tags to attach to the data sent to InfluxDB- name:foovalue:barlicenseRelease:# Release unused Qlik Sense access licensesenable:false# true/false. If true, Butler will release unused licenses according to settings belowdryRun:true# true/false. If true, Butler will not actually release any licenses, just log what it would have done.frequency:every 24 hours# https://bunkat.github.io/later/parsers.html#textneverRelease:# Various ways of defining which users should never have their licenses releaseduser:# Users who should never have their licenses released- userDir:"INTERNAL"userId:"sa_repository"- userDir:"INTERNAL"userId:"sa_api"- userDir:"USERDIR"userId:"qs_admin_account"tag:# Users with these tags will never have their licenses released- License do not release- some other tagcustomProperty:# Users with these custom properties will never have their licenses released- name:LicenseManagevalue:do-not-releaseuserDirectory:# List of user directories whose users should never have their licenses released- INTERNAL- ADMINinactive:Ignore# Ignore/Yes/No. The value is case insensitive# No = Don't release licenses for users marked as "Inactive=No" in the QMC# Yes = Don't release licenses for users marked as "Inactive=Yes" in the QMC# Ignore = Disregard this settingblocked:Ignore# Ignore/Yes/No, No = Don't release licenses for users marked as "Blocked=No" in the QMCremovedExternally:ignore# Ignore/Yes/No, No = Don't release licenses for users marked as "Removed externally=No" in the QMClicenseType:# License types to monitor and releaseanalyzer:enable:true# Monitor and release Analyzer licensesreleaseThresholdDays:30# Number of days a license can be unused before it is releasedprofessional:enable:true# Monitor and release Professional licensesreleaseThresholdDays:30# Number of days a license can be unused before it is releaseddestination:influxDb:# Store info about released licenses in InfluxDBenable:falsetag:static:# Static attributes/tags to attach to the data sent to InfluxDB- name:foovalue:bar# Settings for notifications and messages sent to MS TeamsteamsNotification:enable:falsereloadTaskFailure:enable:falsewebhookURL:<web hook URL from MS Teams>messageType:formatted# formatted / basic. Formatted means that template file below will be used to create the message.basicMsgTemplate: 'Qlik Sense reload failed:"{{taskName}}"' # Only needed if message type = basic
rateLimit: 300 # Min seconds between emails for a given taskID. Defaults to 5 minutes.
headScriptLogLines: 10
tailScriptLogLines: 10
templateFile: /path/to/teams/template/directory/failed-reload-qseow.handlebars
reloadTaskAborted:
enable: false
webhookURL: <web hook URL from MS Teams>
messageType: formatted # formatted / basic. Formatted means that template file below will be used to create the message.
basicMsgTemplate: 'Qlik Sense reload aborted:"{{taskName}}"' # Only needed if message type = basic
rateLimit: 300 # Min seconds between emails for a given taskID. Defaults to 5 minutes.
headScriptLogLines: 10
tailScriptLogLines: 10
templateFile: /path/to/teams/template/directory/aborted-reload-qseow.handlebars
serviceStopped:
webhookURL: <web hook URL from MS Teams>
messageType: formatted # formatted / basic. Formatted means that template file below will be used to create the message.
basicMsgTemplate: 'Windows service stopped:"{{serviceName}}"onhost "{{host}}"'# Only needed if message type = basicrateLimit:30# Min seconds between messages for a given Windows service. Defaults to 5 minutes.templateFile:/path/to/teams/template/directory/service-stopped.handlebarsserviceStarted:webhookURL:<web hook URL from MS Teams>messageType:formatted# formatted / basic. Formatted means that template file below will be used to create the message.basicMsgTemplate: 'Windows service started:"{{serviceName}}"onhost "{{host}}"'# Only needed if message type = basicrateLimit:30# Min seconds between messages for a given Windows service. Defaults to 5 minutes.templateFile:/path/to/teams/template/directory/service-started.handlebars# Settings for notifications and messages sent to SlackslackNotification:enable:falserestMessage:webhookURL:<web hook URL from Slack># Webhook to use when sending basic Slack messages via Butler's REST APIreloadTaskFailure:# Reload task failed in QSEoWenable:falsewebhookURL:<web hook URL from Slack>channel:sense-task-failure# Slack channel to which task failure notifications are sentmessageType:formatted# formatted / basic. Formatted means that template file below will be used to create the message.basicMsgTemplate: 'Qlik Sense reload failed:"{{taskName}}"' # Only needed if message type = basic
rateLimit: 300 # Min seconds between emails for a given taskID. Defaults to 5 minutes.
headScriptLogLines: 10
tailScriptLogLines: 10
templateFile: /path/to/slack/template/directory/failed-reload-qseow.handlebars
fromUser: Qlik Sense
iconEmoji: ":ghost:"
reloadTaskAborted: # Reload task aborted in QSEoW
enable: false
webhookURL: <web hook URL from Slack>
channel: sense-task-aborted # Slack channel to which task stopped notifications are sent
messageType: formatted # formatted / basic. Formatted means that template file below will be used to create the message.
basicMsgTemplate: 'Qlik Sense reload aborted:"{{taskName}}"' # Only needed if message type = basic
rateLimit: 300 # Min seconds between emails for a given taskID. Defaults to 5 minutes.
headScriptLogLines: 10
tailScriptLogLines: 10
templateFile: /path/to/slack/template/directory/aborted-reload-qseow.handlebars
fromUser: Qlik Sense
iconEmoji: ":ghost:"
serviceStopped:
webhookURL: <web hook URL from Slack>
channel: qliksense-service-alert # Slack channel to which Windows service stopped notifications are sent
messageType: formatted # formatted / basic. Formatted means that template file below will be used to create the message.
basicMsgTemplate: 'Windows service stopped:"{{serviceName}}"onhost "{{host}}"'# Only needed if message type = basicrateLimit:30# Min seconds between messages for a given Windows service. Defaults to 5 minutes.templateFile:/path/to/slack/template/directory/service-stopped.handlebarsfromUser:Qlik SenseiconEmoji:":ghost:"serviceStarted:webhookURL:<web hook URL from Slack>channel:qliksense-service-alert# Slack channel to which Windows service stopped notifications are sentmessageType:formatted# formatted / basic. Formatted means that template file below will be used to create the message.basicMsgTemplate: 'Windows service started:"{{serviceName}}"onhost "{{host}}"'# Only needed if message type = basicrateLimit:30# Min seconds between messages for a given Windows service. Defaults to 5 minutes.templateFile:/path/to/slack/template/directory/service-started.handlebarsfromUser:Qlik SenseiconEmoji:":ghost:"# Settings needed to send email notifications when for example reload tasks fail.# Reload failure notifications assume a log appender is configured in Sense AND that the UDP server in Butler is running.emailNotification:enable:falsereloadTaskSuccess:enable:false# Custom property used to control which task successes will cause alert emails to be sent# If this setting is true, alerts will not be sent for all tasks, but *only* for tasks with the CP set to the enabledValue.# If this setting is false, alerts will be sent for all failed reload tasks.alertEnableByCustomProperty:enable:falsecustomPropertyName:"Butler_SuccessAlertEnableEmail"enabledValue:"Yes"# Custom property used to say that alerts for a certain task should be sent to zero or more recipients# These alerts will be sent irrespective of the alertEnableByCustomProperty.enable setting.alertEnabledByEmailAddress:customPropertyName:"Butler_SuccessAlertSendToEmail"rateLimit:60# Min seconds between emails for a given taskID/recipient combo. Defaults to 5 minutes.headScriptLogLines:15tailScriptLogLines:25priority:high# high/normal/lowsubject: '✅ Qlik Sense reload success:"{{taskName}}"'
bodyFileDirectory: path/to/email_templates
htmlTemplateFile: success-reload-qseow
fromAddress: Qlik Sense (no-reply) <qliksense-noreply@ptarmiganlabs.com>
recipients:
- <Email address 1>
- <Email address 2>
reloadTaskAborted:
enable: false
appOwnerAlert:
enable: true # Should app owner get notification email (assuming email address is available in Sense user directory)
includeOwner:
includeAll:
true # true = Send notification to all app owners except those in exclude list
# false = Send notification to app owners in the include list
user:
- directory: <Sense user directory>
userId: <userId>
- directory: <Sense user directory>
userId: <userId>
excludeOwner:
user:
- directory: <Sense user directory>
userId: <userId>
- directory: <Sense user directory>
userId: <userId>
# Custom property used to control which aborted tasks will cause alert emails to be sent
# If this setting is true, alerts will not be sent for all tasks, but *only* for tasks with the CP set to the enabledValue.
# If this setting is false, alerts will be sent for all aborted reload tasks.
alertEnableByCustomProperty:
enable: true
customPropertyName: "Butler_AbortedAlertEnableEmail"
enabledValue: "Yes"
# Custom property used to say that alerts for a certain task should be sent to zero or more recipients
# These alerts will be sent irrespective of the alertEnableByCustomProperty.enable setting.
alertEnabledByEmailAddress:
customPropertyName: "Butler_AbortedAlertSendToEmail"
rateLimit: 600 # Min seconds between emails for a given taskID. Defaults to 5 minutes.
headScriptLogLines: 15 # Number of lines from start of script to include in email
tailScriptLogLines: 15 # Number of lines from end of script to include in email
priority: high # high/normal/low
subject: 'Qlik Sense reload aborted:"{{taskName}}"' # Email subject. Can use template fields
bodyFileDirectory: path/to/email_templates # Directory where email body template files are stored
htmlTemplateFile: aborted-reload # Name of email body template file to use
fromAddress: Qlik Sense (no-reply) <qliksense-noreply@mydomain.com>
recipients: # Array of email addresses to which the notification email will be sent
- <Email address 1>
- <Email address 2>
reloadTaskFailure:
enable: false
appOwnerAlert:
enable: true # Should app owner get notification email (assuming email address is available in Sense user directory)
includeOwner:
includeAll:
true # true = Send notification to all app owners except those in exclude list
# false = Send notification to app owners in the include list
user:
- directory: <Sense user directory>
userId: <userId>
- directory: <Sense user directory>
userId: <userId>
excludeOwner:
user:
- directory: <Sense user directory>
userId: <userId>
- directory: <Sense user directory>
userId: <userId>
# Custom property used to control which task failures will cause alert emails to be sent
# If this setting is true, alerts will not be sent for all tasks, but *only* for tasks with the CP set to the enabledValue.
# If this setting is false, alerts will be sent for all failed reload tasks.
alertEnableByCustomProperty:
enable: false
customPropertyName: "Butler_FailedAlertEnableEmail"
enabledValue: "Yes"
# Custom property used to say that alerts for a certain task should be sent to zero or more recipients
# These alerts will be sent irrespective of the alertEnableByCustomProperty.enable setting.
alertEnabledByEmailAddress:
customPropertyName: "Butler_FailedAlertSendToEmail"
rateLimit: 600 # Min seconds between emails for a given taskID. Defaults to 5 minutes.
headScriptLogLines: 15 # Number of lines from start of script to include in email
tailScriptLogLines: 15 # Number of lines from end of script to include in email
priority: high # high/normal/low
subject: 'Qlik Sense reload failed:"{{taskName}}"' # Email subject. Can use template fields
bodyFileDirectory: path/to/email_templates # Directory where email body template files are stored
htmlTemplateFile: failed-reload # Name of email body template file to use
fromAddress: Qlik Sense (no-reply) <qliksense-noreply@mydomain.com>
recipients: # Array of email addresses to which the notification email will be sent
- <Email address 1>
- <Email address 2>
serviceStopped:
rateLimit: 30 # Min seconds between emails for a given service. Defaults to 5 minutes.
priority: high # high/normal/low
subject: '❌ Windows service stopped on host {{host}}: "{{serviceDisplayName}}"'bodyFileDirectory:path/to/email_templates/email_templateshtmlTemplateFile:service-stoppedfromAddress:Qlik Sense (no-reply) <qliksense-noreply@mydomain.com>recipients:- <Email address 1>- <Email address 2>serviceStarted:rateLimit:30# Min seconds between emails for a given service. Defaults to 5 minutes.priority:high# high/normal/lowsubject:'✅ Windows service started on host {{host}}: "{{serviceDisplayName}}"'bodyFileDirectory:path/to/email_templates/email_templateshtmlTemplateFile:service-startedfromAddress:Qlik Sense (no-reply) <qliksense-noreply@mydomain.com>recipients:- <Email address 1>- <Email address 2>smtp:# Email server settings. See https://nodemailer.com/smtp/ for details on the meaning of these fields.host:<FQDN or IP or email server, e.g. smtp.gmail.com>port:<port on which SMTP server is listening>secure:true# true/falsetls:serverName:# If specified the serverName field will be used for TLS verification instead of the host field.ignoreTLS:falserequireTLS:truerejectUnauthorized:falseauth:enable:trueuser:<Username, email address etc>password:<your-secret-password># Incident management tools integration# Used to trigger incidents in these tools when task reloads fail or are aborted.incidentTool:signl4:enable:false# Enable/disable Signl4 integration as a wholeurl:https://connect.signl4.com/webhook/abcde12345reloadTaskFailure:enable:false# Enable/disable reload failed handling in Signl4rateLimit:15# Min seconds between emails for a given taskID. Defaults to 5 minutesserviceName:Qlik Sense# Signl4 "service name" to useseverity:1# Signl4 severity level for failed reloadsincludeApp:includeAll:falseappId:- 47d38f73-628f-44e1-a62c-841604b123ffreloadTaskAborted:enable:false# Enable/disable reload aborted handling in Signl4rateLimit:15# Min seconds between emails for a given taskID. Defaults to 5 minutesserviceName:Qlik Sense# Signl4 "service name" to useseverity:10# Signl4 severity level for aborted reloadsincludeApp:includeAll:falseappId:- 47d38f73-628f-44e1-a62c-841604b123ffnewRelic:enable:falsedestinationAccount:event:# Failed/aborted reload tasks are sent as events to these New Relic accounts# - First NR account# - Second NR accountlog:# Failed/aborted reload tasks are sent as log entries to these New Relic accounts# - First NR account# - Second NR account# New Relic uses different API URLs for different kinds of data (metrics, events, logs, ...)# There are different URLs depending on whther you have an EU or US region New Relic account.# The available URLs are listed here: https://docs.newrelic.com/docs/accounts/accounts-billing/account-setup/choose-your-data-center/url:# As of this writing the valid options are# https://insights-collector.eu01.nr-data.net# https://insights-collector.newrelic.comevent:https://insights-collector.eu01.nr-data.net# Valid options are (1) EU/rest of world and 2) US)# https://log-api.eu.newrelic.com/log/v1# https://log-api.newrelic.com/log/v1log:https://log-api.eu.newrelic.com/log/v1reloadTaskFailure:destination:event:enable:falsesendToAccount:# Which reload task failures are sent to New Relic as eventsbyCustomProperty:enable:false# Control using a task custom property which reload task failures are sent as eventscustomPropertyName:"Butler_FailedTask_Event_NewRelicAccount"always:enable:false# Controls which New Relic accounts ALL failed reload tasks are sent to (as events)account:# - First NR account# - Second NR accountattribute:static:# Static attributes/dimensions to attach to events sent to New Relic.- name:event-specific-attribute 1# Examplevalue:abc 123# Exampledynamic:useAppTags:true# Should app tags be sent to New Relic as attributes?useTaskTags:true# Should task tags be sent to New Relic as attributes?log:enable:falsetailScriptLogLines:20sendToAccount:# Which reload task failures are sent to New Relic as log entriesbyCustomProperty:enable:false# Control using a task custom property which reload task failures are sent as log entriescustomPropertyName:"Butler_FailedTask_Log_NewRelicAccount"always:enable:false# Controls which New Relic accounts ALL failed reload tasks are sent to (as logs)account:# - First NR account# - Second NR accountattribute:static:# Static attributes/dimensions to attach to events sent to New Relic.- name:log-specific-attribute 1# Examplevalue:def 123# Exampledynamic:useAppTags:true# Should app tags be sent to New Relic as attributes?useTaskTags:true# Should task tags be sent to New Relic as attributes?sharedSettings:rateLimit:15# Min seconds between events sent to New Relic for a given taskID. Defaults to 5 minutes.header:# Custom http headers- name:X-My-Header# Examplevalue:Header value 1# Exampleattribute:static:# Static attributes/dimensions to attach to events sent to New Relic.- name:service# Examplevalue:butler# Example- name:environment# Examplevalue:prod# ExamplereloadTaskAborted:destination:event:enable:falsesendToAccount:# Which reload task aborts are sent to New Relic as eventsbyCustomProperty:enable:false# Control using a task custom property which reload task aborts are sent as eventscustomPropertyName:"Butler_AbortedTask_Event_NewRelicAccount"always:enable:false# Controls which New Relic accounts ALL aborted reload tasks are sent to (as events)account:# - First NR account# - Second NR accountattribute:static:# Static attributes/dimensions to attach to events sent to New Relic.- name:event-specific-attribute 2# Examplevalue:abc 123# Exampledynamic:useAppTags:true# Should app tags be sent to New Relic as attributes?useTaskTags:true# Should task tags be sent to New Relic as attributes?log:enable:falsetailScriptLogLines:20sendToAccount:# Which reload task aborts are sent to New Relic as log entriesbyCustomProperty:enable:false# Control using a task custom property which reload task aborts are sent as log entriescustomPropertyName:"Butler_AbortedTask_Log_NewRelicAccount"always:enable:false# Controls which New Relic accounts ALL aborted reload tasks are sent to (as logs)account:# - First NR account# - Second NR accountattribute:static:# Static attributes/dimensions to attach to events sent to New Relic.- name:log-specific-attribute 2# Examplevalue:def 123# Exampledynamic:useAppTags:true# Should app tags be sent to New Relic as attributes?useTaskTags:true# Should task tags be sent to New Relic as attributes?sharedSettings:rateLimit:15# Min seconds between events sent to New Relic for a given taskID. Defaults to 5 minutes.header:# Custom http headers- name:X-My-Header# Examplevalue:Header value 2# Exampleattribute:static:# Static attributes/dimensions to attach to events sent to New Relic.- name:service# Examplevalue:butler# Example- name:environment# Examplevalue:prod# ExampleserviceMonitor:destination:event:enable:falsesendToAccount:# Windows service events are sent to these New Relic accounts# - First NR account# - Second NR accountattribute:static:# Static attributes/dimensions to attach to events sent to New Relic.- name:event-specific-attributevalue:abc 123dynamic:serviceHost:true# Should host where service is running be sent to New Relic as attribute?serviceName:true# Should service name be sent to New Relic as attribute?serviceDisplayName:true# Should service display name be sent to New Relic as attribute?serviceState:true# Should service state be sent to New Relic as attribute?log:enable:falsesendToAccount:# Windows service log entries are sent to these New Relic accounts# - First NR account# - Second NR accountattribute:static:# Static attributes/dimensions to attach to events sent to New Relic.- name:log-specific-attributevalue:def 456dynamic:serviceHost:true# Should host where service is running be sent to New Relic as attribute?serviceName:true# Should service name be sent to New Relic as attribute?serviceDisplayName:true# Should service display name be sent to New Relic as attribute?serviceState:true# Should service state be sent to New Relic as attribute?monitorServiceState:# Control whih service states are sent to New Relicrunning:enable:truestopped:enable:truesharedSettings:rateLimit:5# Min seconds between events/logs sent to New Relic for a given host+service. Defaults to 5 minutes.header:# Custom http headers- name:X-My-Header# Examplevalue:Header value 2# Exampleattribute:static:# Static attributes/dimensions to attach to events sent to New Relic.- name:service# Examplevalue:butler# Example- name:environment# Examplevalue:prod# Example# Settings for notifications and messages sent using outgoing webhookswebhookNotification:enable:falsereloadTaskFailure:rateLimit:300# Min seconds between outgoing webhook calls for a given taskID. Defaults to 5 minutes.webhooks:# - description: 'This outgoing webhook makes a POST and is used to...' # Informational only# webhookURL: http://host.my.domain:port/some/path # outgoing webhook that Butler will call# httpMethod: POST # GET/POST/PUT# cert:# enable: false # Set to true to use a custom CA certificate when calling the webhookURL# rejectUnauthorized: true # Set to false to ignore warnings/errors caused by self-signed certificates used on the webhooks server.# certCA: /path/to/ca-certificate.pem # Path to the CA certificate file# - description: 'This outgoing webhook makes a PUT and is used to...' # Informational only# webhookURL: https://host.my.domain:port/some/path # Outgoing webhook that Butler will call# httpMethod: PUT # GET/POST/PUT.# cert:# enable: true # Set to true to use a custom CA certificate when calling the webhookURL# rejectUnauthorized: false # Set to false to ignore warnings/errors caused by self-signed certificates used on the webhooks server.# certCA: /path/to/ca-certificate.pem # Path to the CA certificate file# - description: 'This outgoing webhook makes a GET and is used to ..' # Informational only# webhookURL: https://host.my.domain:port/some/path # Outgoing webhook that Butler will call# httpMethod: GET # GET/POST/PUT# cert:# enable: true # Set to true to use a custom CA certificate when calling the webhookURL# rejectUnauthorized: true # Set to false to ignore warnings/errors caused by self-signed certificates used on the webhooks server.# certCA: /path/to/ca-certificate.pem # Path to the CA certificate filereloadTaskAborted:rateLimit:300# Min seconds between outgoing webhook calls for a given taskID. Defaults to 5 minutes.webhooks:# - description: 'This outgoing webhook makes a GET and is used to ..' # Informational only# webhookURL: http://host.my.domain:port/some/path # Outgoing webhook that Butler will call# httpMethod: GET # GET/POST/PUT# cert:# enable: true # Set to true to use a custom CA certificate when calling the webhookURL# rejectUnauthorized: true # Set to false to ignore warnings/errors caused by self-signed certificates used on the webhooks server.# certCA: /path/to/ca-certificate.pem # Path to the CA certificate fileserviceMonitor:rateLimit:300# Min seconds between outgoing webhook calls, per Windows service that is monitored. Defaults to 5 minutes.webhooks:# - description: 'This outgoing webhook makes a POST and is used to...' # Informational only# webhookURL: http://host.my.domain:port/some/path # Outgoing webhook that Butler will call# httpMethod: POST # GET/POST/PUT. Note that the body and URL query parameters differs depending on which method is used# cert:# enable: true # Set to true to use a custom CA certificate when calling the webhookURL# rejectUnauthorized: true # Set to false to ignore warnings/errors caused by self-signed certificates used on the webhooks server.# certCA: /path/to/ca-certificate.pem # Path to the CA certificate fileqlikSenseServerLicenseMonitor:# Outgoing webhook that Butler will call with info on Qlik Sense server license statusrateLimit:300# Min seconds between outgoing webhook calls, per Windows service that is monitored. Defaults to 5 minutes.webhooks:# - description: 'This outgoing webhook makes a PUT and is used to ...'# webhookURL: http://host.my.domain:port/some/path# httpMethod: PUT # GET/POST/PUT. Note that the body and URL query parameters differs depending on which method is used# cert:# enable: false # Set to true to use a custom CA certificate when calling the webhookURL# rejectUnauthorized: true # Set to false to ignore warnings/errors caused by self-signed certificates used on the webhooks server.# certCA: fooqlikSenseServerLicenseExpiryAlert:# Outgoing webhook that Butler will call when Qlik Sense server license is about to expirerateLimit:300# Min seconds between outgoing webhook calls, per Windows service that is monitored. Defaults to 5 minutes.webhooks:# - description: 'This outgoing webhook makes a POST and is used to ...'# webhookURL: https://host.my.domain:port/some/path# httpMethod: POST # GET/POST/PUT. Note that the body and URL query parameters differs depending on which method is used# cert:# enable: true # Set to true to use a custom CA certificate when calling the webhookURL# rejectUnauthorized: true # Set to false to ignore warnings/errors caused by self-signed certificates used on the webhooks server.# certCA: /path/to/ca-certificate.pem # Path to the CA certificate file# Scheduler for Qlik Sense tasksscheduler:enable:false# Should Butler's reload task scheduler be started?configfile:config/schedule.yaml# Path to file containing task start schedules# Key-value storekeyValueStore:enable:false# Should Butler's key-value store be enabled?maxKeysPerNamespace:1000# Max keys that can be stored per namespace. Defaults to 1000 if not specified in this file.mqttConfig:enable:false# Should Qlik Sense events be forwarded as MQTT messages?brokerHost:<FQDN or IP of MQTT server>brokerPort:1883azureEventGrid:enable:false# If set to true, Butler will connect to an Azure Event Grid MQTT Broker, using brokerHost and brokerPort aboveclientId:<client ID>clientCertFile:<path to client certificate file>clientKeyFile:<path to client key file>taskFailureSendFull:truetaskAbortedSendFull:truesubscriptionRootTopic:qliksense/## Topic that Butler will subscribe totaskStartTopic:qliksense/start_task# Topic for incoming messages used to start Sense tasks. Should be subtopic to subscriptionRootTopictaskFailureTopic:qliksense/task_failuretaskFailureFullTopic:qliksense/task_failure_fulltaskFailureServerStatusTopic:qliksense/butler/task_failure_servertaskAbortedTopic:qliksense/task_abortedtaskAbortedFullTopic:qliksense/task_aborted_fullserviceRunningTopic:qliksense/service_runningserviceStoppedTopic:qliksense/service_stoppedserviceStatusTopic:qliksense/service_statusqlikSenseServerLicenseTopic:qliksense/qliksense_server_license# Topic to which Sense server license info is publishedqlikSenseServerLicenseExpireTopic:qliksense/qliksense_server_license_expire# Topic to which Sense server license expiration alerts are publishedqlikSenseCloud:# MQTT settings for Qlik Sense Cloud integrationevent:mqttForward:# QS Cloud events forwarded to MQTT topics, which Butler will subscribe toenable:falsebroker:# Settings for MQTT broker to which QS Cloud events are forwardedhost:mqttbroker.company.comport:<port>username:<username>password:<password>topic:subscriptionRoot:qscloud/## Topic that Butler will subscribe toappReload:qscloud/app/reloadudpServerConfig:enable:false# Should the UDP server responsible for receving task failure/aborted events be started?serverHost:<FQDN or IP (or localhost) of server where Butler is running>portTaskFailure:9998restServerConfig:enable:false# Should Butler's REST API be started? Must be true if *any* API endpoints are to be used.serverHost:<FQDN or IP (or localhost) of server where Butler is running># Use 0.0.0.0 to listen on all network interfaces (e.g. when running in Docker!).serverPort:8080# Port where Butler's REST is available. Any free port on the server where Butler is running can bse used.backgroundServerPort:8081# Port used internally by Butler's REST API. Any free port on the server where Butler is running can bse used.# List of directories between which file copying via the REST API can be done.# Butler will try to clean up messy paths like this one, which resolves to /Users/goran/butler-test-dir1# How? First you have /Users/goran/butler-test-dir1//abc which cleans up to /Users/goran/butler-test-dir1/abc,# then up one level (..).fileCopyApprovedDirectories:# - fromDirectory: /Users/goran/butler-test-dir1//abc//..# toDirectory: /Users/goran/butler-test-dir2# - fromDirectory: /Users/goran/butler-test-dir2# toDirectory: /Users/goran/butler-test-dir1# - fromDirectory: /from/some/directory2# toDirectory: /to/some/directory2# List of directories between which file moves via the REST API can be done.fileMoveApprovedDirectories:# - fromDirectory: /Users/goran/butler-test-dir1//abc//..# toDirectory: /Users/goran/butler-test-dir2# - fromDirectory: /Users/goran/butler-test-dir2# toDirectory: /Users/goran/butler-test-dir1# - fromDirectory: /from/some/directory2# toDirectory: /to/some/directory2# List of directories in which file deletes via the REST API can be done.fileDeleteApprovedDirectories:# - /Users/goran/butler-test-dir1# - /Users/goran/butler-test-dir1//abc//..# - /Users/goran/butler-test-dir2# If set to true, Butler will be started with a focus on creating an API documentation file# All configuration relating to outbound connections (to Sense, email servers, MQTT broker etc) will be disabled.# NOTE: This setting should always be false (or just deleted), unless you want to regenerate the API doc files.restServerApiDocGenerate:false# Enable/disable individual REST API endpoints. Set config item below to true to enable that endpoint.restServerEndpointsEnable:apiListEnbledEndpoints:falsebase62ToBase16:falsebase16ToBase62:falsebutlerping:falsecreateDir:falsecreateDirQVD:falsefileDelete:falsefileMove:falsefileCopy:falsekeyValueStore:falsemqttPublishMessage:falsenewRelic:postNewRelicMetric:falsepostNewRelicEvent:falsescheduler:createNewSchedule:falsegetSchedule:falsegetScheduleStatusAll:falseupdateSchedule:falsedeleteSchedule:falsestartSchedule:falsestopSchedule:falsesenseAppReload:falsesenseAppDump:falsesenseListApps:falsesenseStartTask:falseslackPostMessage:falserestServerEndpointsConfig:newRelic:postNewRelicMetric:# Setings used by post metric to New Relic API endpointdestinationAccount:# - First NR account# - Second NR account# As of this writing the valid options are# https://insights-collector.eu01.nr-data.net/metric/v1# https://insights-collector.newrelic.com/metric/v1url:https://insights-collector.eu01.nr-data.net/metric/v1header:# Custom http headers- name:X-My-Headervalue:Header valueattribute:static:# Static attributes/dimensions to attach to the metrics data sent to New Relic.- name:envvalue:prodpostNewRelicEvent:# Setings used by post event to New Relic API endpointdestinationAccount:# - First NR account# - Second NR account# Note that the URL path should *not* be included in the url setting below!# As of this writing the valid options are# https://insights-collector.eu01.nr-data.net# https://insights-collector.newrelic.comurl:https://insights-collector.eu01.nr-data.net/header:# Custom http headers- name:X-My-Headervalue:Header valueattribute:static:# Static attributes/dimensions to attach to the metrics data sent to New Relic.- name:envvalue:prod# Controls which tasks can be started via Butler's REST API.# Enabling this feature gives Qlik Sense sysadmins a way to control which tasks can be started by third party systems and applications.# If this feature is disabled all tasks can be started via the API (assuming the start task API itself is enabled).# Note that the taskId, tag and customProperty sections below are additive. I.e. a task only has to appear in one of those sections to be on the "allowed" list.startTaskFilter:enable:falseallowTask:taskId:# Zero or more approved/allowed task IDs# If Butler.startTaskFilter.enable is true, only task IDs listed below will be started by Butler# - e3b27f50-b1c0-4879-88fc-c7cdd9c1cf3e# - 7552d9fc-d1bb-4975-9a38-18357de531ea# - fb0f317d-da91-4b86-aafa-0174ae1e8c8ftag:# Zero or more tags used to indicate that a task is approved to be started by Butler.# Use the Qlik Sense QMC to set tags on tasks.# If Butler.startTaskFilter.enable is true, only tasks with the tags below will be started by Butler# - startTask1# - startTask2customProperty:# Zero or more custom properties name/value pairs used to indicate that a task is approved to be started by Butler.# Use the Qlik Sense QMC to set custom properties on tasks.# If Butler.startTaskFilter.enable is true, only tasks with the custom property values below will be started by Butler# - name: taskGroup# value: tasks1# - name: taskGroup# value: tasks2# Monitor Windows services.# This feature only works when Butler is running on Windows Server or desktop.# On other OSs service monitoring will be automatically disabled.serviceMonitor:enable:false# Main on/off switch for service monitoringfrequency:every 30 seconds# https://bunkat.github.io/later/parsers.html#textmonitor:# - host: <hostname or IP> # Host name of Windows computer where services are running# services: # List of services to monitor# - name: postgresql-x64-12 # Posgress/repository db# friendlyName: Repository DB# - name: QlikSenseEngineService# friendlyName: Engine# - name: QlikSensePrintingService# friendlyName: Printing# - name: QlikSenseProxyService# friendlyName: Proxy# - name: QlikSenseRepositoryService# friendlyName: Repository# - name: QlikSenseSchedulerService# friendlyName: Scheduler# - name: QlikSenseServiceDispatcher# friendlyName: Service DispatcheralertDestination:# Control to thich destinations service related alerts are sentinfluxDb:# Send service alerts to InfluxDBenable:truenewRelic:# Send service alerts to New Relicenable:trueemail:# Send service alerts as emailsenable:truemqtt:# Send service alerts as MQTT messagesenable:trueteams:# Send service alerts as MS Teams messagesenable:trueslack:# Send service alerts as Slack messagesenable:truewebhook:# Send service alerts as outbound webhooks/http callsenable:trueqlikSenseCloud:# Settings for Qlik Sense Cloud integrationenable:falseevent:mqtt:# Which QS Cloud tenant should Butler receive events from, in the form of MQTT messages?tenant:id:tenant.region.qlikcloud.comtenantUrl:https://tenant.region.qlikcloud.comauthType:jwt# Authentication type used to connect to the tenant. Valid options are "jwt"auth:jwt:token:<JWT token># JWT token used to authenticate Butler when connecting to the tenant# Qlik Sense Cloud related links used in notification messagesqlikSenseUrls:qmc:<URL to QMC in Qlik Sense Cloud>hub:<URL to Hub in Qlik Sense Cloud>comment:This is a comment describing the tenant and its settings# Informational onlyalert:# Settings for notifications and messages sent to MS TeamsteamsNotification:reloadAppFailure:enable:falsealertEnableByTag:enable:falsetag:Butler - Send Teams alert if app reload failsbasicContentOnly:falsewebhookURL:<URL to MS Teams webhook>messageType:formatted# formatted / basicbasicMsgTemplate: 'Qlik Sense Cloud app reload failed:"{{appName}}"' # Only needed if message type = basic
rateLimit: 15 # Min seconds between emails for a given appId. Defaults to 5 minutes.
headScriptLogLines: 15
tailScriptLogLines: 15
templateFile: /path/to/teams_templates/failed-reload-qscloud-workflow.handlebars
# Settings for notifications and messages sent to Slack
slackNotification:
reloadAppFailure:
enable: false
alertEnableByTag:
enable: false
tag: Butler - Send Slack alert if app reload fails
basicContentOnly: false
webhookURL: <URL to Slack webhook>
channel: sense-task-failure # Slack channel to which task failure notifications are sent
messageType: formatted # formatted / basic. Formatted means that template file below will be used to create the message.
basicMsgTemplate: 'Qlik Sense Cloud app reload failed:"{{appName}}"' # Only needed if message type = basic
rateLimit: 60 # Min seconds between emails for a given appId. Defaults to 5 minutes.
headScriptLogLines: 10
tailScriptLogLines: 20
templateFile: /path/to/slack_templates/failed-reload-qscloud.handlebars
fromUser: Qlik Sense
iconEmoji: ":ghost:"
# Settings needed to send email notifications when for example reload tasks fail.
# Reload failure notifications assume a log appender is configured in Sense AND that the UDP server in Butler is running.
emailNotification:
reloadAppFailure:
enable: false # Enable/disable app reload failed notifications via email
alertEnableByTag:
enable: false
tag: Butler - Send email if app reload fails
appOwnerAlert:
  enable: false # Should app owner get notification email (assuming email address is available in Sense)?
  includeOwner:
    includeAll:
      true # true = Send notification to all app owners except those in exclude list
      # false = Send notification to app owners in the include list
    user:# Array of app owner email addresses that should get notifications
      # - email: anna@somecompany.com
      # - email: joe@somecompany.com
  excludeOwner:
    user:
      # - email: daniel@somecompany.com
rateLimit: 60 # Min seconds between emails for a given appId/recipient combo. Defaults to 5 minutes.
headScriptLogLines: 15
tailScriptLogLines: 25
priority: high # high/normal/low
subject: '❌ Qlik Sense reload failed:"{{taskName}}"'
bodyFileDirectory: /path/to//email_templates
htmlTemplateFile: failed-reload-qscloud
fromAddress: Qlik Sense (no-reply) <qliksense-noreply@ptarmiganlabs.com>
recipients:
# - emma@somecompany.com
# - patrick@somecompany.com
# Certificates to use when connecting to Sense. Get these from the Certificate Export in QMC.
cert:
clientCert: <path/to/cert/client.pem>
clientCertKey: <path/to/cert/client_key.pem>
clientCertCA: <path/to/cert/root.pem>
# If running Butler in a Docker container, the cert paths MUST be the following
# clientCert: /nodeapp/config/certificate/client.pem
# clientCertKey: /nodeapp/config/certificate/client_key.pem
# clientCertCA: /nodeapp/config/certificate/root.pem
configEngine:
engineVersion: 12.612.0 # Qlik Associative Engine version to use with Enigma.js. Works with Feb 2020 and others
host: <FQDN or IP of Sense server where Sense Engine is running>
port: <Port to connect to, usually 4747>
useSSL: true
headers:
static: # http headers that are sent with every request to QRS. The "X-Qlik-User" is mandatory.
- name: X-Qlik-User # Header used to identify what user connection to QRS is made as
value: UserDirectory=Internal;UserId=sa_repository # What user connection to QRS is made as
rejectUnauthorized:
false # Set to false to ignore warnings/errors caused by Qlik Sense's self-signed certificates.# Set to true if the Qlik Sense root CA is available on the computer where Butler is running.configQRS:authentication:certificateshost:<FQDN or IP of Sense server where QRS is running>useSSL:trueport:<Port to connect to, usually 4242>headers:static:# http headers that are sent with every request to QRS. The "X-Qlik-User" is mandatory.- name:X-Qlik-User# Header used to identify what user connection to QRS is made asvalue:UserDirectory=Internal;UserId=sa_repository# What user connection to QRS is made asrejectUnauthorized:false# Set to false to ignore warnings/errors caused by Qlik Sense's self-signed certificates.# Set to true if the Qlik Sense root CA is available on the computer where Butler is running.configDirectories:qvdPath:<Path to folder under which QVDs are stored>
Comments
Note that you can enable/disable most features independently of each other. This means Butler can be configured to do exactly what you need, and nothing more.
The default location cert/key files are found in (assuming a standard install of Qlik Sense) C:\ProgramData\Qlik\Sense\Repository\Exported Certificates\<name specified during certificate export>
The files needed by Butler are client.pem, client_key.pem and root.pem.
5.3 - REST API documentation
OpenAPI/Swagger style documentation for the Butler API.
Remember
The “Try it out” feature of the API documentation below does not work when accessed from butler.ptarmiganlabs.com. This is only expected as this site does not know anything about where your Butler instance is running.
The same feature is however also available from Butler itself, see this page.
Butler is a microservice that provides add-on features to Qlik Sense Enterprise on Windows.
Butler offers both a REST API and things like failed reload notifications etc.
Copy file(s) between well defined, approved locations.
Copying of files is only posttible between pre-approved directories.
Defining approved source and destination directories is done in Butler's config file.
If the source directory contains subdirectories, these will be copied too.
Request Body schema: application/json
fromFile
string
Name of source file.
toFile
string
Name of destination file. Can be different from source file name, if needed.
overwrite
boolean
Controls whether destination file should be overwritten if it already exists. Note that the copy operation will silently fail if you set this to false and the destination exists. Defaults to false.
preserveTimestamp
boolean
When true, the timestamp of the source file(s) will be preserved on the destination file(s). When false, timestamp behaviour is OS-dependent. Defaults to false.
Responses
http://localhost:8081/v4/filecopy
Request samples
Payload
Content type
application/json
{
"fromFile": "subfolder/file1.qvd",
"toFile": "archive/file1_20200925.qvd",
"overwrite": false,
"preserveTimestamp": false
}
Response samples
201
400
403
500
Content type
application/json
{
"fromFile": "subfolder/file1.qvd",
"toFile": "archive/file1_20200925.qvd",
"overwrite": false,
"preserveTimestamp": false
}
Move file(s) between well defined, approved locations.
Moving of files is only posttible between pre-approved directories.
Defining approved source and destination directories is done in Butler's config file.
If the source directory contains subdirectories, these will be moved too.
Request Body schema: application/json
fromFile
string
Name of source file.
toFile
string
Name of destination file. Can be different from source file name, if needed.
overwrite
boolean
Controls whether destination file should be overwritten if it already exists. Defaults to false.
Responses
http://localhost:8081/v4/filemove
Request samples
Payload
Content type
application/json
{
"fromFile": "subfolder/file1.qvd",
"toFile": "archive/file1_20200925.qvd",
"overwrite": false
}
Response samples
201
400
403
500
Content type
application/json
{
"fromFile": "subfolder/file1.qvd",
"toFile": "archive/file1_20200925.qvd",
"overwrite": false
}
Delete file(s) in well defined, approved locations.
It is only possible to delete files in pre-approved directories, or subdirectories thereof.
Defining approved directories is done in Butler's config file.
Request Body schema: application/json
deleteFile
string
Name of file to be deleted. Use forward/backward slashes in paths as needed, depending on whether Butler runs on Windows/non-Windows platform.
Responses
http://localhost:8081/v4/filedelete
Request samples
Payload
Content type
application/json
{
"deleteFile": "data/qvdstore/sales/file1.qvd"
}
Response samples
204
400
403
500
Content type
application/json
{ }
Creates a directory in designated QVD directory.
Creates a directory in QVD directory (which is defined in Butler's config file).
Request Body schema: application/json
directory
string
Directory that should be created.
Responses
http://localhost:8081/v4/createdirqvd
Request samples
Payload
Content type
application/json
{
"directory": "subfolder/2020-10"
}
Response samples
201
400
500
Content type
application/json
{
"directory": "subfolder/2020-10"
}
Creates a directory anywhere in the file system.
If the directory already exists nothing will happen.
If permissions don't allow a directory to be created, or if the path is invalid, an error will be returned.
Request Body schema: application/json
directory
string
Path to directory that should be created. Can be a relative or absolute path.
Responses
http://localhost:8081/v4/createdir
Request samples
Payload
Content type
application/json
{
"directory": "/Users/joe/data/qvds/2020"
}
Response samples
201
400
500
Content type
application/json
{
"directory": "/Users/joe/data/qvds/2020"
}
List all currently defined namespaces.
Responses
http://localhost:8081/v4/keyvaluesnamespaces
Response samples
200
500
Content type
application/json
[
"Weekly sales app",
"Sales ETL step 1",
"Sales ETL step 2"
]
Get the value associated with a key, in a specific namespace.
path Parameters
namespace
required
string
Example: Sales ETL step 2
query Parameters
key
required
string
Example: key=Last extract timestamp
Responses
http://localhost:8081/v4/keyvalues/{namespace}
Response samples
200
400
500
Content type
application/json
{
"namespace": "Sales ETL step 2",
"key": "Last extract timestamp",
"value": "2020-09-29 17:14:56"
}
Create a new key-value pair in the specified namespace.
If the specified key already exists it will be overwritten.
If the posted data has a TTL, it will start counting when the post occur.
I.e. if a previouly posted key also had a TTL, it will be replace with the most recent TTL.
path Parameters
namespace
required
string
Example: Sales ETL step 2
Name of namespace.
Request Body schema: application/json
key
string
Key to use
value
string
Value to set
ttl
number
Time to live = how long (milliseconds) the key-value pair should exist before being automatically deleted
The message is a generic text string and can thus contain anything that can be represented in a string, including JSON, key-value pairs, plain text etc.
Responses
http://localhost:8081/v4/mqttpublishmessage
Request samples
Payload
Content type
application/json
{
"topic": "qliksense/new_data_notification/sales",
"message": "dt=20201028"
}
Response samples
201
400
500
Content type
application/json
{
"topic": "qliksense/new_data_notification/sales",
"message": "dt=20201028"
}
Post events to New Relic.
This endpoint posts events to the New Relic event API.
Request Body schema: application/json
required
eventType
required
string <= 254 characters
Event type. Can be a combination of alphanumeric characters, _ underscores, and : colons.
timestamp
number
The event's start time in Unix time. Uses UTC time zone. This field also support seconds, microseconds, and nanoseconds. However, the data will be converted to milliseconds for storage and query. Events reported with a timestamp older than 48 hours ago or newer than 24 hours from the time they are reported are dropped by New Relic. If left empty Butler will use the current time as timestamp.
Array of objects
Dimensions/attributs that will be associated with the event.
Responses
http://localhost:8081/v4/newrelic/event
Request samples
Payload
Content type
application/json
{
"eventType": "relead-failed",
"timestamp": 1642164296053,
"attributes": [
{
"name": "host.name",
"value": "dev.server.com"
}
]
}
Response samples
202
400
500
Content type
application/json
{
"newRelicResultCode": "202",
"newRelicResultText": "Data accepted."
}
Post metrics to New Relic.
This endpoint posts metrics to the New Relic metrics API.
Request Body schema: application/json
required
name
required
string <= 254 characters
Metric name.
type
required
string
Value:"gauge"
Metric type.
value
required
number
Value of the metric.
timestamp
number
The metric's start time in Unix time. Uses UTC time zone. This field also support seconds, microseconds, and nanoseconds. However, the data will be converted to milliseconds for storage and query. Metrics reported with a timestamp older than 48 hours ago or newer than 24 hours from the time they are reported are dropped by New Relic. If left empty Butler will use the current time as timestamp.
interval
number
The length of the time window (millisec). Required for count and summary metric types.
Array of objects
Dimensions that will be associated with the metric.
Responses
http://localhost:8081/v4/newrelic/metric
Request samples
Payload
Content type
application/json
{
"name": "memory.heap",
"type": "gauge",
"value": 2.3,
"timestamp": 1642164296053,
"interval": 0,
"attributes": [
{
"name": "host.name",
"value": "dev.server.com"
}
]
}
Response samples
202
400
500
Content type
application/json
{
"newRelicResultCode": "202",
"newRelicResultText": "Data accepted."
}
Get all information available for existing schedule(s).
If a schedule ID is specified using a query parameter (and there exists a schedule with that ID), information about that schedule will be returned.
If no schedule ID is specified, all schedules will be returned.
No schedule metadata beyond ID, cron setting and job state will be returned, but as this comes from the core scheduler it is the authorative truth about what jobs are running (and which ones are not).
Do a stand-alone reload of a Qlik Sense app, without using a task.
path Parameters
appId
required
string
Example: 210832b5-6174-4572-bd19-3e61eda675ef
ID of Qlik Sense app.
Request Body schema: application/json
reloadMode
integer
Reload mode that will be used. 0, 1 or 2. If not specified 0 will be used
partialReload
boolean
Should a full (=false) or partial (=true) reload be done? If not specified a full reload will be done.
startQSEoWTaskOnSuccess
Array of strings
Array of task IDs that should be started when the app has successfully reloaded.
startQSEoWTaskOnFailure
Array of strings
Array of task IDs that should be started if the app fails reloading.
Responses
http://localhost:8081/v4/app/{appId}/reload
Request samples
Payload
Content type
application/json
{
"reloadMode": 0,
"partialReload": true,
"startQSEoWTaskOnSuccess": [
"09b3c78f-04dd-45e3-a4bf-1b074d6572fa",
"eaf1da4f-fd44-4cea-b2de-7b67a6496ee3"
],
"startQSEoWTaskOnFailure": [
"09b3c78f-04dd-45e3-a4bf-1b074d6572fa",
"eaf1da4f-fd44-4cea-b2de-7b67a6496ee3"
]
}
Response samples
201
400
500
Content type
application/json
{
"appId": "210832b5-6174-4572-bd19-3e61eda675ef"
}
Dump a Sense app to JSON.
Does the same thing as /v4/app/:appId/dump
path Parameters
appId
required
string
Example: 210832b5-6174-4572-bd19-3e61eda675ef
ID of Qlik Sense app.
Responses
http://localhost:8081/v4/senseappdump/{appId}
Response samples
200
400
422
500
Content type
application/json
{
"properties": { },
"loadScript": "",
"sheets": [ ],
"stories": [ ],
"masterobjects": [ ],
"appprops": [ ],
"dataconnections": [ ],
"dimensions": [ ],
"bookmarks": [ ],
"embeddedmedia": [ ],
"snapshots": [ ],
"fields": [ ],
"variables": [ ],
"measures": [ ]
}
Dump a Sense app to JSON.
Does the same thing as /v4/senseappdump/:appId
path Parameters
appId
required
string
Example: 210832b5-6174-4572-bd19-3e61eda675ef
ID of Qlik Sense app.
Responses
http://localhost:8081/v4/app/{appId}/dump
Response samples
200
400
422
500
Content type
application/json
{
"properties": { },
"loadScript": "",
"sheets": [ ],
"stories": [ ],
"masterobjects": [ ],
"appprops": [ ],
"dataconnections": [ ],
"dimensions": [ ],
"bookmarks": [ ],
"embeddedmedia": [ ],
"snapshots": [ ],
"fields": [ ],
"variables": [ ],
"measures": [ ]
}
Get a list of all apps in Sense environment.
Does the same thing as /v4/apps/list
Responses
http://localhost:8081/v4/senselistapps
Response samples
200
500
Content type
application/json
[
{
"id": "5d7ae888-61cd-4539-97b2-6cf5baaa6f9d",
"name": "2021 sales targets"
}
]
Get a list of all apps in Sense environment.
Does the same thing as /v4/senselistapps
Responses
http://localhost:8081/v4/apps/list
Response samples
200
500
Content type
application/json
[
{
"id": "5d7ae888-61cd-4539-97b2-6cf5baaa6f9d",
"name": "2021 sales targets"
}
]
Start a Qlik Sense task.
An optional array of zero or more objects can be passed in the message body. It is used to pass additional info related to the reload task being started.
Currently supported values in this array are:
A key-value pair that will be stored in Butler's KV store. If Butler's key-value store is not enabled, any key-value information passed in this parameter will simply be ignored.
Setting ttl=0 disables the TTL feature, i.e. the KV pair will not expire.
A task identified by its taskId that should be started.
Tasks identified by tags set on tasks in the QMC.
Tasks identified by custom properties set in the QMC.
This parameter uses a generic JSON/object format (type + payload).
It's thus possible to add new integrations in future Butler versions.
path Parameters
taskId
required
string
Example: 210832b5-6174-4572-bd19-3e61eda675ef
ID of Qlik Sense task.
Butler will ignore the "magic" task ID of "-" (=dash, hyphen). This ID will not be reported as invalid.
query Parameters
allTaskIdsMustExist
boolean
Example: allTaskIdsMustExist=true
If set to true, all specified taskIds must exist. If one or more taskIds does not exist in the Sense server, no tasks will be started.
If set to false, all existing taskIds will be started. Missing/invalid taskIds will be ignored.
In either case, missing/invalid taskIds will be reported in the result set back to the client calling the API.
Note: Tasks started by specifying tags and/or custom properties are not affected by this.
Slack channel to post message into. Prefix channel name with #.
from_user
required
string
Name of sending user, as shown in the Slack message
msg
required
string
Text going into the Slack message
emoji
string
Emoji to shown next to Slack message
Responses
http://localhost:8081/v4/slackpostmessage
Request samples
Payload
Content type
application/json
{
"channel": "#reload-notification",
"from_user": "Butler the Bot",
"msg": "This is a message from Qlik Sense",
"emoji": "thumbsup"
}
Response samples
201
400
500
Content type
application/json
{
"channel": "#reload-notification",
"from_user": "Butler the Bot",
"msg": "This is a message from Qlik Sense",
"emoji": "thumbsup"
}
5.5 - Scheduler
Details about the Butler scheduler.
Scheduling overview
The scheduler is used to start Sense reloads at specific times, or at certain intervals.
The rationale for having a scheduler in Butler is mainly that Qlik Sense’s built-in scheduler doesn’t quite have the desired flexibility. The Sense scheduler on the other hand offer some features not included in the Butler scheduler, so they complement each other nicely.
Put differently: Butler’s scheduler is great for kicking off the first step if reload chains (or single app reloads), while the QMC scheduler is needed to link the individual parts of reload chains together.
Feature
Qlik Sense scheduler
Butler scheduler
Tasks should run same time each day.
Yes
Yes
Tasks should run only some days of the month/week (ex 1st day of the month or on Wednesdays and Fridays).
Yes
Yes
Tasks should run only between certain hours during the day (e.g. every 5 minutes during the first 30 minutes of each hour, between 08.00 and 18.00).
Yes, with lots of manual work
Yes
Tasks can be chained together, with one task starting when the previous has finished.
Yes
-
Task definitions can be stored in Git and managed by a DevOps workflow.
Yes, with lots of work.
Yes, out of the box
Schedules
The Butler scheduler handles zero or more schedules, where a schedule is simply a set of information about which Sense reload task should be started when.
While Butler is running it keeps the schedules in memory, but they are also stored on disk in the file specified in the Butler’s main config file. This means you can either manage the schedule file manually, or via the Butler APIs.
The following information is kept about each schedule. Note that some fields are optional and only set when managing schedules via API calls.
Field name
Descriptions
Example
name
Descriptive name for the schedule.
Every 2 hours
cronSchedule
Cron string. 5 or 6 positions allowed. If 5 positions used a 0 will be used for seconds. crontab.guru and similar sites are useful for creating the cron string.
0 _/2 _ * *
timezone
Timezone in which the schedule will execute. List of available time zones here.
Europe/London
qlikSenseTaskId
Qlik Sense task that will be started. The task ID can be found in the task view in the QMC.
0fe447a9-ba1f-44a9-ac23-68c3a1d88d8b
startupState
Controls whether this task should be started or left stopped when Butler starts up. If set to “start” or “started”, the schedule will be started upon creation. Otherwise it will remain in stopped state.
started
tags
Array of tags, can be used to categorize schedules. Optional.
[ finance ETL, abc 123 ]
id
Schedule ID. Free text string, can be set to anything as long as it is unique. Schedules created via the REST API will have a GUID as id.
2f7a6c38-46df-416d-83de-44bdea5cedaa
created
Timestamp the schedule was created. Optional when manually adding schedules to schedule file.
2020-09-29T17:14:35.154Z
lastKnownState
The schedule’s last known state. Optional when manually adding schedules to schedule file.
started
Sample schedule file
A schedule file could look like this:
butlerSchedule:- name:Every 30 seccronSchedule:"*/30 * * * * *"timezone:Europe/StockholmqlikSenseTaskId:0fe447a9-ba1f-44a9-ac23-68c3a1d88d8bstartupState:startedtags:- tag 2- abc 123 åäöid:c7ec214c-e9ca-40b2-acb4-54648f90dd73created:'2020-09-29T14:29:12.283Z'lastKnownState:started- name:Every 2 hourscronSchedule:"0 */2 * * *"timezone:Europe/LondonqlikSenseTaskId:0fe447a9-ba1f-44a9-ac23-68c3a1d88d8bstartupState:startedtags:- sales ETLid:2f7a6c38-46df-416d-83de-44bdea5cedaacreated:'2020-09-29T17:14:35.154Z'lastKnownState:started- name:00and 30 minutes past every hour from 06 to 18 on Mon-FricronSchedule:"0,30 6-18 * * 1-5"timezone:Europe/ParisqlikSenseTaskId:0fe447a9-ba1f-44a9-ac23-68c3a1d88d8bstartupState:startedtags:- finance ETL- weekdaysid:Manually-added-schedule-1
A few things to note:
Schedule 1
Uses 6 positions in the cron string. The leftmost position is seconds.
This schedule cannot be created in the QMC scheduler, as minutes is the smallest increment there.
On the other hand, it’s questionable if Sense jobs should run more often than once per minute…
Schedule 2
Uses 5 positions in the cron string. The leftmost position is minutes. The seconds position is implicitly set to 0, which means the schedule will fire at the top of each minute.
This schedule can be created in the QMC scheduler.
Schedule 3
This schedule cannot be created in the QMC scheduler.
Manual vs API created schedules
Schedules are stored in a YAML file on disk. This file is loaded each time Butler is started.
When a new schedule is created using the APIs, all schedule definitions and their current state is written to the schedule YAML file. Thus, if Butler is stopped or restarted, it will also restart all schedules in the same state they were in before the Butler stop/restart.
There are a couple of differences between manually created schedules (i.e. ones that are added directly to the YAML file) and schedules created via the APIs:
The created field in a schedule is optional. It is set when a schedule is created using the APIs. You can set it when manually editing the schedule file, if so desired - but it’s not required.
The lastKnownState field is overwritten each time the schedules are saved to disk. This means that you can change this field manually for a schedule in the schedule file on disk, but if you then change the schedule’s state (start or stop it), that will trigger a saving of the schedules to disk, and your previous (manual) change will be overwritten.
5.6 - Key-value store
Details about the Butler key-value store.
Key-value store overview
The API documentation is the best, most complete source of information about the key-value API endpoints.
Namespaces
Each key-value pair is associated with a “namespace”, which is simply a way to group KV pairs together in logical groups.
Examples:
An app might have it’s own namespace to make it clear what key-value pairs belong to the app.
A reload chain that need to pass parameters from app to app can have it’s own namespace.
The Butler.keyValueStore.maxKeysPerNamespace property in the main config file controls how many KV pairs can be created in each namespace. If no value is specified in the config file, a default value of 1000 KV pairs per namespace is used.
Time to live
When key-value pairs are created an optional time-to-live (ttl) parameter may also be passed in the call to Butler’s API.
If the ttl parameter is specified (=set to a non-zero value, unit is milliseconds) the created KV pair will only exist for that long.
If a KV pair with a running ttl clock is updated before the KV pair expires, the current ttl clock will be discarded and replaced with the ttl value from the new KV pair.
In other words: The ttl is relative to the last update of the KV pair in question.
5.7 - Alert template fields
List of template fields available in Butler alert messages.
Template fields
Butler uses the Handlebars library for templating work.
Handlebars offers a lot of useful features (nested template fields, evaluation context, template comments) and it’s recommended that you browse through at least the language features section of their getting started guide to get a feeling for what’s possible.
Different Butler monitoring features offer different template fields.
For example, the template fields available for reload alerts are different from the ones available for monitoring Windows services.
5.7.1 - Client managed Qlik Sense Enterprise on Windows
List of template fields available in alert messages for client-managed Qlik Sense Enterprise on Windows.
5.7.1.1 - Alert template fields for failed/aborted reload tasks
List of template fields available in Butler’s reload failed/aborted alert messages.
Template fields
Butler uses the Handlebars library for templating work.
Handlebars offers a lot of useful features (nested template fields, evaluation context, template comments) and it’s recommended that you browse through at least the language features section of their getting started guide to get a feeling for what’s possible.
Warning
Only some alert destinations support template files, namely
Email
Teams
Slack
Please see the Concepts and Getting started sections for more information about which alert types support templates.
If a template field is used for an alert type where that field is not supported, the field will simply be blank. No errors will occur, but it can still be tricky to debug if you’re not aware of this.
The following template fields are available in alert messages.
Note that some fields are sometimes (often, even) empty, for example the script log for stopped messages.
This is simply how Sense works - the template fields just forward the information retrieved from the Sense APIs.
Failed reload
Stopped reload
Successful reload
Field name
Description
✅
✅
✅
hostName
Server on which a reload or other event took place.
✅
✅
✅
user
Reload failures: User ID for use doing the reload. Typically sa_scheduler. Reload stopped: User ID of user stopping the reload.
✅
✅
✅
taskId
ID of reload task.
✅
✅
✅
taskName
Name of reload task.
✅
✅
✅
appId
ID of Sense app.
✅
✅
✅
appName
Name of app.
✅
✅
✅
appDescription
Description of app.
✅
✅
✅
appFileSize
Size of app file (on disk).
✅
✅
✅
appLastSuccessfulReload
Date of last successful reload.
✅
✅
✅
appLastModifiedDate
Date/time of last modification of app.
✅
✅
✅
appLastModifiedByUserName
User who last modified the app.
✅
✅
✅
appPublishTime
Date/time when app was published.
✅
✅
✅
appPublished
Is the app published? (true/false)
✅
✅
✅
appStreamName
Name of stream where app is published.
✅
✅
✅
appCustomProperties
Custom properties that are present on the app.
✅
✅
✅
appTags
Tags that are present on the app.
✅
✅
✅
appUrl
URL to the app.
✅
✅
✅
taskCustomProperties
Custom properties that are present on the reload task.
✅
✅
✅
taskTags
Tags that are present on the reload task.
✅
✅
✅
taskIsPartialReload
Does the reload task perform a partial reload? (true/false)
✅
✅
✅
taskMaxRetries
Maximum number of retries for the reload task.
✅
✅
✅
taskModifiedByUsername
User who last modified the reload task.
✅
✅
✅
taskModifiedDate
Date when the reload task was last modified.
✅
✅
✅
taskSessionTimeout
Session timeout for the reload task, i.e how long the reload task will run before it is canceled.
✅
✅
✅
taskNextExecution
Next scheduled execution of the reload task.
✅
✅
✅
appOwnerName
Name of app owner (if this is available in the metadata provided by the Sense server)
✅
✅
✅
appOwnerUserDirectory
App owner user’s user directory (if this is available in the metadata provided by the Sense server)
✅
✅
✅
appOwnerUserId
App owner user’s user id (if this is available in the metadata provided by the Sense server)
✅
✅
✅
appOwnerEmail
App owner email (if this is available in the metadata provided by the Sense server)
✅
✅
✅
logTimeStamp
Timestamp as recorded in the Sense logs
✅
✅
✅
logLevel
Log level of the Sense log file entry causing the alert
✅
✅
✅
logMessage
Log message from the Sense log files
✅
✅
✅
executingNodeName
Name of the server where the reload took place
✅
✅
✅
executionDuration.hours
executionDuration is a JSON object. Duration of reload (hours part)
✅
✅
✅
executionDuration.minutes
Duration of reload (minutes part)
✅
✅
✅
executionDuration.seconds
Duration of reload (seconds part)
✅
✅
✅
executionStartTime.startTimeUTC
JSON object. UTC timestamp for reload start
✅
✅
✅
executionStartTime.startTimeLocal1
Reload start timestamp, format 1
✅
✅
✅
executionStartTime.startTimeLocal2
Reload start timestamp, format 2
✅
✅
✅
executionStartTime.startTimeLocal3
Reload start timestamp, format 3
✅
✅
✅
executionStartTime.startTimeLocal4
Reload start timestamp, format 4
✅
✅
✅
executionStartTime.startTimeLocal5
Reload start timestamp, format 5
✅
✅
✅
executionStopTime.stopTimeUTC
JSON object. UTC timestamp for reload end
✅
✅
✅
executionStopTime.stopTimeLocal1
Reload end timestamp, format 1
✅
✅
✅
executionStopTime.stopTimeLocal2
Reload end timestamp, format 2
✅
✅
✅
executionStopTime.stopTimeLocal3
Reload end timestamp, format 3
✅
✅
✅
executionStopTime.stopTimeLocal4
Reload end timestamp, format 4
✅
✅
✅
executionStopTime.stopTimeLocal5
Reload end timestamp, format 5
✅
✅
✅
executionStatusNum
Final reload task status code
✅
✅
✅
executionStatusText
Final reload task status message
✅
✅
✅
executionDetails[].timestampUTC
executionDetails is an array of status updates for the reload task, similar to the one found in the QMC’s task view. UTC timestamp of the task status
✅
✅
✅
executionDetails[].timestampLocal1
Task status timestamp, format 1
✅
✅
✅
executionDetails[].timestampLocal2
Task status timestamp, format 2
✅
✅
✅
executionDetails[].timestampLocal3
Task status timestamp, format 3
✅
✅
✅
executionDetails[].timestampLocal4
Task status timestamp, format 4
✅
✅
✅
executionDetails[].timestampLocal5
Task status timestamp, format 5
✅
✅
✅
executionDetails[].detailsType
Task status timestamp, format 1
✅
✅
✅
executionDetails[].message
Task status message
✅
✅
✅
scriptLogSize
Size of the reload’s script log (characters)
✅
✅
✅
scriptLogSizeRows
Size of the reload’s script log (rows)
✅
✅
✅
scriptLogSizeCharacters
Size of the reload’s script log (characters)
✅
✅
✅
scriptLogHeadCount
Number of lines extracted from the start of the script log
✅
✅
✅
scriptLogTailCount
The first y lines from the reload’s script log
✅
✅
✅
scriptLogHead
The first x lines from the reload’s script log
✅
✅
✅
scriptLogTail
Number of lines extracted from the end of the script log
✅
✅
✅
qliksSenseQMC
Links to QMC, as defined in main config file
✅
✅
✅
qliksSenseHub
Links to Hub, as defined in main config file
✅
✅
✅
genericUrls
Links to other systems, as defined in main config file
5.7.1.2 - Alert template fields for Windows services events
List of template fields available in Butler’s Windows services alert messages.
Email, Slack and Teams
Butler uses the Handlebars library for templating work.
This gives a lot of flexibility in how alert messages are formatted for the destination types that support template fields.
Handlebars offers a lot of useful features (nested template fields, evaluation context, template comments) and it’s recommended that you browse through at least the language features section of their getting started guide to get a feeling for what’s possible.
Warning
Not all alert destinations (MQTT, outgoing webhooks etc) support template fields.
Please see the Getting started sections for more information on how to set up alerts for each destination.
If a template field is used for an alert type where that field is not supported, the field will simply be blank. No errors will occur.
The following alert destinations support template fields:
The following template fields are available in alert messages.
Note that some fields are usually (always?) empty, for example the script log for stopped messages.
This is simply how Sense works - the template fields just forward the information retrieved from the Sense APIs.
Email
Slack
Teams
Field name
Description
✅
✅
✅
{{host}}
The hostname of the server where the service is running
✅
✅
✅
{{serviceStatus}}
The status of the service, e.g. RUNNING or STOPPED
✅
✅
✅
{{servicePrevStatus}}
The previous status of the service, e.g. RUNNING or STOPPED
✅
✅
✅
{{serviceName}}
The name of the service as defined in Windows
✅
✅
✅
{{serviceDisplayName}}
The display name of the service as defined in Windows. Can sometimes be a bit more human readable than the serviceName.
✅
✅
✅
{{serviceFriendlyName}}
The display name of the service as defined in the Butler config file. Used to give the service a good name when both serviceName and serviceDisplayName are unsuitable for use in for example Grafana dashboards.
✅
✅
✅
{{serviceStartType}}
The startup mode of the service, e.g. Automatic or Manual
✅
✅
✅
{{serviceExePath}}
The path to the executable of the service
InfluxDB
Window service data will be stored in the InfluxDB database specified in the config file Butler.influxdb.dbName setting.
The latest status of each service will be stored in the butler_windows_services measurement every time Butler checks the status of the service, i.e. not only when the service changes status.
Fields/metrics
The following metrics will be stored in a measurement named win_service_state, for each Windows service:
Field name
Description
state_num
A numeric representation of the Windows service’s current state.
state_text
The Windows service’s current state (textual representation).
startup_mode_num
A numeric representation of the Windows service’s startup mode.
startup_mode_text
The Windows service’s startup mode (textual representation).
Mapping of state_num to state_text:
state_num
state_text
1
STOPPED
2
START_PENDING
3
STOP_PENDING
4
RUNNING
5
CONTINUE_PENDING
6
PAUSE_PENDING
7
PAUSED
Mapping of startup_mode_num to startup_mode_text:
startup_mode_num
startup_mode_text
0
Automatic
1
Automatic (delayed start)
2
Manual
3
Disabled
Tags
The following tags will be attached to all Windows service data stored in InfluxDB:
Tag name
Description
butler_instance
The value in Butler.influxDb.instanceTag. Can be used to differentiate several Butler instances running in parallel.
host
Host name where the Windows service is running. Comes from Butler.serviceMonitor.monitor.<host>.
service_name
The name of the Windows service, as defined in Windows.
service_display_name
The display name of the Windows service, as defined in Windows.
service_friendly_name
The friendly name of the Windows service, as defined in the Butler config file Butler.serviceMonitor.monitor.<host>.services.<friendlyName>.
New Relic
Butler will create New Relic events and/or log entries when a monitored Windows service changes state, for example from RUNNING to STOPPED.
Events
Events sent to New Relic will have these attributes attached:
Attribute name
Description
eventType
Always set to qs_serviceStateEvent
butler_serviceHost
The host name where the Windows service is running. Comes from Butler.serviceMonitor.monitor.<host>.
butler_serviceName
The name of the Windows service, as defined in Windows.
butler_serviceDisplayName
The display name of the Windows service, as defined in Windows.
butler_serviceStatus
The status of the Windows service, e.g. RUNNING or STOPPED.
…
Any static and dynamic attributes defined in Butler.incidentTool.newRelic.serviceMonitor.destination.event.attribute.
…
Any static attributes defined in Butler.incidentTool.newRelic.serviceMonitor.sharedSettings.attribute.static.
Log entries
Log entries sent to New Relic will have these attributes attached:
Attribute name
Description
logType
Always set to qs_serviceStateLog
butler_serviceHost
The host name where the Windows service is running. Comes from Butler.serviceMonitor.monitor.<host>.
butler_serviceName
The name of the Windows service, as defined in Windows.
butler_serviceDisplayName
The display name of the Windows service, as defined in Windows.
butler_serviceStatus
The status of the Windows service, e.g. RUNNING or STOPPED.
…
Any static and dynamic attributes defined in Butler.incidentTool.newRelic.serviceMonitor.destination.log.attribute.
…
Any static attributes defined in Butler.incidentTool.newRelic.serviceMonitor.sharedSettings.attribute.static.
The log message will be one of the following:
“Windows service on host is RUNNING.”
“Windows service on host is STOPPED.”
“Windows service on host is in state START_PENDING.”
“Windows service on host is in state STOP_PENDING.”
“Windows service on host is in state CONTINUE_PENDING.”
“Windows service on host is in state PAUSE_PENDING.”
“Windows service on host is in state PAUSED.”
MQTT
Similar to how InfluxDB works, Butler will send an MQTT message to the topic specified in Butler.mqttConfig.serviceStatusTopic every time it checks the status of a Windows service, i.e. not only when the service changes status.
Butler will ALSO send an MQTT message to the topics specified in Butler.mqttConfig.serviceRunningTopic and Butler.mqttConfig.serviceStoppedTopic when a Windows service is stopped or started.
Message payload for continuously sent messages is a JSON object with these properties:
Property name
Description
host
The host name where the Windows service is running. Comes from Butler.serviceMonitor.monitor.<host>.
serviceName
The name of the Windows service, as defined in Windows.
serviceFriendlyName
The friendly name of the Windows service, as defined in the Butler config file Butler.serviceMonitor.monitor.<host>.services.<friendlyName>.
serviceStatus
The status of the Windows service, e.g. RUNNING or STOPPED.
serviceDetails
The details of the Windows service, e.g. RUNNING or STOPPED.
Message payload for start/stop messages is a JSON object with these properties:
Property name
Description
host
The host name where the Windows service is running. Comes from Butler.serviceMonitor.monitor.<host>.
serviceName
The name of the Windows service, as defined in Windows.
serviceFriendlyName
The friendly name of the Windows service, as defined in the Butler config file Butler.serviceMonitor.monitor.<host>.services.<friendlyName>.
serviceStatus
The status of the Windows service, e.g. RUNNING or STOPPED.
serviceDetails
The details of the Windows service, e.g. RUNNING or STOPPED.
prevState
The previous state of the Windows service, e.g. RUNNING or STOPPED.
currState
The current state of the Windows service, e.g. RUNNING or STOPPED.
stateChanged
true if the Windows service changed state, false if not.
Outbound webhooks
Outbound webhooks (=http calls) are sent when a Windows service changes state, for example from RUNNING to STOPPED.
The payload for PUT and POST http calls is sent in the message body as a JSON object with these properties:
Property name
Description
event
Always set to Windows service monitor
host
The host name where the Windows service is running. Comes from Butler.serviceMonitor.monitor.<host>.
serviceStatus
The status of the Windows service, e.g. RUNNING or STOPPED.
serviceName
The name of the Windows service, as defined in Windows.
serviceDisplayName
The display name of the Windows service, as defined in Windows.
serviceStartType
The startup mode of the service, e.g. Automatic or Manual
prevState
The previous state of the Windows service, e.g. RUNNING or STOPPED.
currState
The current state of the Windows service, e.g. RUNNING or STOPPED.
stateChanged
true if the Windows service changed state, false if not.
The payload for GET http calls is sent as query parameters with the same properties as above, but with the property names being all lowercase letters.
A typical GET webhook URL would look like this:
https://mywebhookserver.com?event=Windows service monitor&host=MyHost&servicestatus=RUNNING&servicename=MyService&servicedisplayname=MyServiceDisplayName&servicestarttype=Automatic&prevstate=RUNNING&currstate=STOPPED&statechanged=true
5.7.2 - Qlik Sense Cloud
List of template fields available in alert messages for Qlik Sense Cloud.
5.7.2.1 - Alert template fields for failed app reloads
List of template fields available in Butler’s failed app reload alert messages.
Template fields
Butler uses the Handlebars library for templating work.
Handlebars offers a lot of useful features (nested template fields, evaluation context, template comments) and it’s recommended that you browse through at least the language features section of their getting started guide to get a feeling for what’s possible.
If a template field is used for an alert type where that field is not supported, the field will simply be blank. No errors will occur, but it can still be tricky to debug if you’re not aware of this.
The following template fields are available in alert messages.
Failed app reload
Field name
Description
✅
tenantId
ID of the tenant where the reload took place.
✅
tenantComment
Comment for the tenant, as entered in Qlik Cloud.
✅
tenantUrl
URL to the tenant.
✅
userId
ID of the user who triggered the reload.
✅
userName
Name of the user who triggered the reload.
✅
appId
ID of Sense app.
✅
appName
Name of app.
✅
appDescription
Description of app.
✅
appUrl
URL to the app.
✅
appHasSectionAccess
Does the app have section access? (true/false)
✅
appIsPublished
Is the app published? (true/false)
✅
appPublishTime
Date/time when app was published.
✅
appThumbnail
URL to the app thumbnail.
✅
appOwnerName
Name of app owner.
✅
appOwnerUserId
App owner user’s user id.
✅
appOwnerPicture
URL to the app owner’s profile picture.
✅
appOwnerEmail
App owner email.
✅
reloadTrigger
What triggered the reload? Manually, scheduled etc.
✅
source
Source of the reload. Usually com.qlik/engine
✅
eventType
Type of QS Cloud event. For example com.qlik.v1.app.reload.finished
✅
eventTypeVersion
Version of the event type.
✅
endedWithMemoryConstraint
Did the reload end due to a memory constraint? (true/false)
✅
isDirectQueryMode
Is the app in Direct Query mode? (true/false)
✅
isPartialReload
Was the reload a partial reload? (true/false)
✅
isSessionApp
Is the app a session app? (true/false)
✅
isSkipStore
Should storing (to disk) the reloaded app be skipped? (true/false)
✅
reloadId
ID of the reload.
✅
rowLimit
Row limit for the reload.
✅
statements[]
Array of statements from the engine.
✅
status
Status of the reload. For example error.
✅
usageDuration
Duration of the reload.
✅
peakMemoryBytes
Peak memory usage during the reload.
✅
sizeMemoryBytes
Memory usage during the reload.
✅
appFileSize
Size of app file (on disk).
✅
errorCode
Error code for the reload. For example "EngineReloadScriptError".
✅
errorMessage
Error message for the reload. For example "error in app script or datasource".
✅
logMessage
Log message from the Sense log files. Example: "ReloadID: 670e1df04cf4e529c035c902\r\nStarted loading data\r\n(A detailed script progress log can be downloaded when the reload is finished)\r\nCharacters << AUTOGENERATE(26) 26 Lines fetched\r\nASCII << AUTOGENERATE(255) 191 Lines fetched\r\nTransactions << AUTOGENERATE(1000) 2,027 Lines fetched\r\n\r\nData has not been loaded. Please correct the error and try loading again.\r\nThe following error occurred:\r\nUnknown statement: ThisFailsForSure...\r\n \r\nThe engine error code: EDC_ERROR:11002\r\nThe error occurred here:\r\nThisFailsForSure...\r\n \r\n"
✅
executionDuration.hours
executionDuration is a JSON object. Duration of reload (hours part)
✅
executionDuration.minutes
Duration of reload (minutes part)
✅
executionDuration.seconds
Duration of reload (seconds part)
✅
executionStartTime.startTimeUTC
JSON object. UTC timestamp for reload start
✅
executionStartTime.startTimeLocal1
Reload start timestamp, format 1
✅
executionStartTime.startTimeLocal2
Reload start timestamp, format 2
✅
executionStartTime.startTimeLocal3
Reload start timestamp, format 3
✅
executionStartTime.startTimeLocal4
Reload start timestamp, format 4
✅
executionStartTime.startTimeLocal5
Reload start timestamp, format 5
✅
executionStopTime.stopTimeUTC
JSON object. UTC timestamp for reload end
✅
executionStopTime.stopTimeLocal1
Reload end timestamp, format 1
✅
executionStopTime.stopTimeLocal2
Reload end timestamp, format 2
✅
executionStopTime.stopTimeLocal3
Reload end timestamp, format 3
✅
executionStopTime.stopTimeLocal4
Reload end timestamp, format 4
✅
executionStopTime.stopTimeLocal5
Reload end timestamp, format 5
✅
executionStatusText
Final reload task status message, for example FAILED.
✅
scriptLogSize
Size of the reload’s script log (characters)
✅
scriptLogSizeRows
Size of the reload’s script log (rows)
✅
scriptLogSizeCharacters
Size of the reload’s script log (characters)
✅
scriptLogHeadCount
Number of lines extracted from the start of the script log
✅
scriptLogTailCount
The first y lines from the reload’s script log
✅
scriptLogHead
The first x lines from the reload’s script log
✅
scriptLogTail
Number of lines extracted from the end of the script log
✅
qliksSenseQMC
Links to QMC, as defined in main config file
✅
qliksSenseHub
Links to Hub, as defined in main config file
✅
genericUrls
Links to other systems, as defined in main config file
5.8 - Information stored in InfluxDB
Butler stores a lot of information in InfluxDB. This page describes the different measurements and tags that Butler send to InfluxDB.
Failed reload tasks
Measurement: reload_task_failed
Tags
Tag name
Description
host
Server on which the reload took place.
user
Full user info (directory + ID) for user doing the reload. Typically sa_scheduler for tasks started via scheduler. For manually started (from QMC) tasks the actual user starting the task is used.
task_id
ID of reload task that failed.
task_name
Name of reload task that failed.
app_id
ID of Sense app whose reload failed.
app_name
Name of Sense app whose reload failed.
log_level
Log level of the Sense log file entry causing the alert
task_executingNodeName
Name of node where the reload task was executed.
task_executionStatusNum
Reload task’s execution result code (numeric).
task_executionStatusText
Reload task’s execution result (text).
appTag_<app tag name 1 from Qlik Sense>
App tag defined in the QMC for the Qlik Sense app.
appTag_<app tag name 2 from Qlik Sense>
App tag defined in the QMC for the Qlik Sense app.
taskTag_<reload task tag name 1 from Qlik Sense>
Task tag defined in the QMC for the Qlik Sense reload task.
taskTag_<reload task tag name 2 from Qlik Sense>
Task tag defined in the QMC for the Qlik Sense reload task.
static-tag-1
Static tag specified in the Butler configuration file.
static-tag-2
Static tag specified in the Butler configuration file.
Fields
Field name
Description
log_timestamp
Timestamp of the Sense log file entry that triggered the event.
execution_id
Execution ID of the reload task.
log_message
Raw message from the Sense log file entry that triggered the alert.
task_executionStartTime_json
Start time of the reload task. Stringified JSON with seconds, minutes, hours.
task_executionStopTime_json
Stop time of the reload task. Stringified JSON with seconds, minutes, hours.
task_executionDuration_json
Duration of the reload task. Stringified JSON with seconds, minutes, hours.
task_executionDuration_sec
Duration of the reload task in seconds.
task_executionDuration_min
Duration of the reload task in minutes.
task_executionDuration_h
Duration of the reload task in hours.
task_scriptLogSize
Size (number of characters) of the reload script log associated with the event.
task_scriptLogTailCount
Number of lines from the end of the reload script log that are included in the event.
reload_log
Last few lines of the reload script log associated with the event.
Successful reload tasks
Measurement: reload_task_success
Tags
Tag name
Description
host
Server on which the reload took place.
user
Full user info (directory + ID) for user doing the reload. Typically sa_scheduler for tasks started via scheduler. For manually started (from QMC) tasks the actual user starting the task is used.
task_id
ID of reload task.
task_name
Name of reload task.
app_id
ID of Sense app that was reloaded.
app_name
Name of Sense app that was reloaded.
log_level
Log level of the Sense log file entry causing the event
task_executingNodeName
Name of node where the reload task was executed.
task_executionStatusNum
Reload task’s execution result code (numeric).
task_executionStatusText
Reload task’s execution result (text).
appTag_<app tag name 1 from Qlik Sense>
App tag defined in the QMC for the Qlik Sense app.
appTag_<app tag name 2 from Qlik Sense>
App tag defined in the QMC for the Qlik Sense app.
taskTag_<reload task tag name 1 from Qlik Sense>
Task tag defined in the QMC for the Qlik Sense reload task.
taskTag_<reload task tag name 2 from Qlik Sense>
Task tag defined in the QMC for the Qlik Sense reload task.
static-tag-1
Static tag specified in the Butler configuration file.
static-tag-2
Static tag specified in the Butler configuration file.
Fields
Field name
Description
log_timestamp
Timestamp of the Sense log file entry that triggered the event.
execution_id
Execution ID of the reload task.
log_message
Raw message from the Sense log file entry that triggered the event.
task_executionStartTime_json
Start time of the reload task. Stringified JSON with seconds, minutes, hours.
task_executionStopTime_json
Stop time of the reload task. Stringified JSON with seconds, minutes, hours.
task_executionDuration_json
Duration of the reload task. Stringified JSON with seconds, minutes, hours.
task_executionDuration_sec
Duration of the reload task in seconds.
task_executionDuration_min
Duration of the reload task in minutes.
task_executionDuration_h
Duration of the reload task in hours.
Windows service info
Measurement: win_service_state
Tags
Tag name
Description
butler_instance
Name of the Butler instance, from config file.
host
Server on which the reload took place.
service_name
Name of the Windows service.
display_name
Display name of the Windows service.
friendly_name
Friendly name of the Windows service (as defined in the Butler config file).
Fields
Field name
Description
state_num
State of the Windows service (numeric).
state_text
State of the Windows service (text).
startup_mode_num
Startup mode of the Windows service (numeric).
startup_mode_text
Startup mode of the Windows service (text).
Qlik Sense server version info
Measurement: qlik_sense_version
Tags
Tag name
Description
butler_instance
Name of the Butler instance, from Butler.influxDb.instanceTag in config file.
In addition to above, all tags defined in Butler.qlikSenseVersion.versionMonitor.destination.influxDb.tag.static in the config file are added to each datapoint that is sent to InfluxDB.
Fields
Field name
Description
content_hash
Content hash, as returned from the Sense version API.
sense_id
Sense ID, as returned from the Sense version API. This is usually on the form qliksenseserver:<version>
product_name
Sense product name, for example Qlik Sense
deployment_type
Sense deployment type, for example QlikSenseServer
version
Sense version, for example 14.173.4
release_label
Sense release label, for example February 2024 Patch 1
deprecated_product_version
Sense old/deprecated product version, for example 4.0.x
copyright_year_range
Sense copyright year range, for example 1993-2024
Qlik Sense server license info
Measurement: qlik_sense_server_license
Tags
Tag name
Description
butler_instance
Name of the Butler instance, from Butler.influxDb.instanceTag in config file.
In addition to above, all tags defined in Butler.qlikSenseLicense.serverLicenseMonitor.destination.influxDb.tag.static in the config file are added to each datapoint that is sent to InfluxDB.
Fields
Field name
Description
license_expired
Whether the Sense license has expired. true/false.
expiry_date
Expiry date of the Sense server license, YYYY-MM-DD format.
days_until_expiry
Number of days until the Sense server license expires. If expiration date has passed this number will be negative.
Qlik Sense end user access license info
The access license information returned by the Qlik Sense API is not very well documented by Qlik.
As a result it is not always clear what the different fields mean.
This is highlighted for each affected field below.
Measurement: sense_license_info
Each datapoint has a tag called license_type that can have the following values:
professional
analyzer
analyzer_capacity
token_login
token_user
tokens_available
The tags are the same for all license types, but the fields differ as follows.
Tags
Tag name
Description
butler_instance
Name of the Butler instance, from Butler.influxDb.instanceTag in config file.
In addition to above, all tags defined in Butler.qlikSenseLicense.licenseMonitor.destination.influxDb.tag.static in the config file are added to each datapoint that is sent to InfluxDB.
License types “professional” and “analyzer”
Field name
Description
allocated
Number of allocated professional licenses.
available
Number of available professional licenses.
excess
Number of excess professional licenses. Unclear what this means.
quarantined
Number of quarantined professional licenses.
total
Total number of professional licenses included in the installed Qlik Sense license.
used
Number of professional licenses in use right now.
License type “analyzer_capacity”
Field name
Description
allocated_minutes
Total number of analyzer capacity minutes available in the installed Qlik Sense license.
unavailable_minutes
Number of analyzer capacity minutes that are currently unavailable. Unclear what this means.
used_minutes
Number of analyzer capacity minutes used so far this month.
License type “token_login”
Field name
Description
allocated_tokens
Unclear what this means.
token_cost
Unclear what this means.
unavailable_tokens
Unclear what this means.
used_tokens
Unclear what this means.
License type “token_user”
Field name
Description
allocated_tokens
Unclear what this means.
quarantined_tokens
Unclear what this means.
token_cost
Unclear what this means.
used_tokens
Unclear what this means.
License type “tokens_available”
This license type contains aggregated token information.
Field name
Description
available_tokens
Number of tokens available. Unclear what this means.
total_tokens
Total number of tokens included in the installed Qlik Sense license. Unclear what this means.
Butler uptime info
Measurement: butler_memory_usage
Tags
Tag name
Description
butler_instance
Name of the Butler instance, from config file.
version
Version of Butler.
Fields
Field name
Description
heap_used
Amount of heap memory used by Butler.
heap_total
Total amount of heap memory available to Butler.
external
Amount of external memory used by Butler.
process_memory
Amount of memory used by the Butler process.
5.9 - Helper subs that make it easy to use Butler APIs
Butler exposes a REST API that can be called from many different systems and tools, just not Qlik Sense itself.
When it comes to Sense, it’s very doable but not entirely easy to call REST APIs from an app’s load script. Butler comes with a set of subs/functions that wrap the API calls and make it a lot easier and cleaner to call Butler APIs from load scripts.
This page describes those subs.
Currently available helper subs
These sub() are available in the the file butler_subs.qvs in the GitHub repo.
They are also part of the demo app Butler 5.2 demo app, which is also available in the GitHub repo.
Sub name
Description
NiceTrace
Prints timestamped messages in the reload log.
ButlerInit
Initializes some data structures used by Butler. Right now there isn’t much done in this sub, but this may change in future versions.
GetEnabledButlerAPIEndpoints
Gets a list of which Butler API endpoints are enabled.
ReloadSenseApp
Does a full or partial app reload in the engine. No reload tasks are involved in the actual reload, but when the reload is done different reload tasks can be started depending on whether the reload was successful or not.
StartTask_KeyValue
Same as above, but a key-value pair can also be included via the extra parameters. This KV pair is saved in Butler’s KV store (assuming it’s enabled). Any Sense app (or other system) can then query the KV store for these parameters. It’s thus an easy but effective way of passing arbitrary parameters to Sense tasks (or rather to the associated app’s load scripts).
StartTask
Start a single or many reload tasks. Tasks can be selected using task IDs, tags and custom properties. Full freedom to use any number of task IDs, tags and custom properties to specify what tasks should be started. Any number of key-value pairs can be passed along as parameters.
CopyFile
Copy a file or directory in a file system that’s accessible to Butler and also approved in the config file.
MoveFile
Move a file or directory in a file system that’s accessible to Butler and also approved in the config file.
DeleteFile
Delete a file in a file system that’s accessible to Butler and also approved in the config file.
CreateDir
Create new directory anywhere Butler has access. Warning! If Butler is running with admin privileges there is no stopping a user from creating directories anywhere.
CreateDirQVD
Create a directory somewhere under the QVD folder specified in the config file’s Butler.configDirectories.qvdPath. This is less of a security concern than the previous call, of course.
AddKeyValue
Add a key-value pair to a namespace in the Key-Value (KV) store.
GetKeyValue
Get KV pair in a namespace.
DeleteKeyValue
Delete a KV pair in a namespace.
ExistsKeyValue
Tests if a KV pair exists in a namespace.
DeleteKeyValueNamespace
Delete a namespace and all KV pairs in it.
GetKeyValueNamespaces
Get all namespaces.
GetKeyValueNamespaces
Get all keys in a specific namespace.
PostToMQTT
Post a message to a MQTT topic.
PostToSlack
Post a basic message to Slack.
Helper subs on the todo list
There should be helper subs for these API endpoints too, they’re just not there yet…
Sub name
Description
AddSchedule
Add a new task reload schedule to Butler’s scheduler.
GetSchedule
Get information about an existing Butler task schedule.
UpdateSchedule
Modify an existing Butler task schedule.
DeleteSchedule
Delete a Butler task schedule.
StartSchedule
Enable a Butler task schedule.
StopSchedule
Disable/pause a Butler task schedule.
PostToTeams
Make it easy to post basic messages to MS Teams.
5.10 - Test cases
Automated test cases are used to ensure that (mainly) Butler’s REST API works as intended.
All test cases are documented in an Excel file stored in the tests directory in the main Butler repository.
6 - Security considerations
Security is important! Keep these things in mind when deploying Butler.
Security is a whole field in its own.
What’s considered secure in one company might be considered insecure in another.
It’s a good idea to review your tools and services every now and then, for example making sure they are updated to include the latest security patches etc.
When in doubt, be paranoid.
Security considerations
Security/Disclosure
If you discover a serious bug with Butler that may pose a security problem, please disclose it confidentially to security@ptarmiganlabs.com first, so that it can be assessed and hopefully fixed prior to being exploited. Please do not raise GitHub issues for security-related doubts or problems.
Make sure to configure the firewall on the server where Butler is running to only accept connections from the desired clients/IP addresses.
A reasonable first approach would be to configure the firewall to only allow calls from localhost. That way calls to Butler can only be made from the server where Butler itself is running.
If Butler is not running on the Sense server, the IPs of the Sense servers should also be whitelisted in the firewall, of course.
The MQTT connections are not secured by certificates or passwords.
For use within a controlled network that might be fine, but nonetheless something to keep in mind. Adding certificate based authentication (which MQTT supports) would solve this.
Butler uses various Node.js modules from npm. If concerned about security, you should review these dependencies and decide whether there are issues in them or not.
Same thing with Butler itself - while efforts have been made to make Butler secure, you need to decide for yourself whether the level of security is enough for your use case.
Butler is continuously checked for security vulnerabilities by using GitHub security audit, Snyk, npm audit and other tools.
Butler’s REST API
Butler uses http for its REST API. As Butler typically runs on the Sense server itself (or a server in close network proximity to the Sense server), the firewalls of that server can be configured to protect Butler from unauthorized access.
This way of using http for communication between internal systems is in many cases considered ok from a security perspective. You should however always consider what’s ok in your particular company/setup/configuration/network.
Adding https support could be done, Node.js supports this very nicely.
Butler talking to Qlik Sense
Butler uses https for all communication with Sense, using Sense’s certificates for authentication.
Signed binaries
The macOS executable binary is signed and notarized by Apple’s standard process.
A warning may still be shown first time the app is started. This is expected and normal.
The Windows executable binary is signed by “Open Source Developer, Göran Sander".
7 - Legal stuff
Information om licenses, personal integrity and more.
MIT License

Copyright (c) 2016-2024 Göran Sander

Permission is hereby granted, free of charge, to any person obtaining a copy
of this software and associated documentation files (the "Software"), to deal
in the Software without restriction, including without limitation the rights
to use, copy, modify, merge, publish, distribute, sublicense, and/or sell
copies of the Software, and to permit persons to whom the Software is
furnished to do so, subject to the following conditions:

The above copyright notice and this permission notice shall be included in all
copies or substantial portions of the Software.

THE SOFTWARE IS PROVIDED "AS IS", WITHOUT WARRANTY OF ANY KIND, EXPRESS OR
IMPLIED, INCLUDING BUT NOT LIMITED TO THE WARRANTIES OF MERCHANTABILITY,
FITNESS FOR A PARTICULAR PURPOSE AND NONINFRINGEMENT. IN NO EVENT SHALL THE
AUTHORS OR COPYRIGHT HOLDERS BE LIABLE FOR ANY CLAIM, DAMAGES OR OTHER
LIABILITY, WHETHER IN AN ACTION OF CONTRACT, TORT OR OTHERWISE, ARISING FROM,
OUT OF OR IN CONNECTION WITH THE SOFTWARE OR THE USE OR OTHER DEALINGS IN THE
SOFTWARE.
Data collection
This documentation site was built using Hugo and consists of static web pages hosted on GitHub Pages.
GitHub probably keep log files for GitHub Pages, your visit to this documentation site is thus likely to be recorded there. I do not have any access to those logs though.
Web analytics
We use Plausible Analytics to collect aggregated web analytics data.
Plausible Analytics is a privacy-friendly alternative to Google Analytics. No cookies are used and no personal data is collected.
Web analytics data is stored on Plausible’s servers in the EU.
Telemetry data
If you at some future date decide that you want your Butler telemetry data deleted from the database operated by Ptarmigan Labs, please follow this process:
Send your request by email to info -at- ptarmiganlabs -dot- com.
You must include the Butler instance ID shown during Butler startup. Without this ID Ptarmigan Labs cannot delete your telemetry data.
Ptarmigan Labs will confirm that your telemetry data has been deleted.